Showing posts with label DIY. Show all posts

Monday, January 6, 2025

Snap Caps & Dummy Rounds for Dry Fire & Malfunction Practice

Modern firearms are “dry fire safe” in that they don’t need a round or snap cap in the chamber to safely work the trigger mechanism through the full range of operation. However, snap caps are a useful tool for deliberately inducing a “failure to fire” event during live training to help perfect the “clear a malfunction” sequence into muscle memory. 

Snap caps are commercially available from a number of manufacturers, often in sets of five for handguns and sets of two for rifles and shotguns. However, it’s often cheaper to make your own dummy rounds using commercial ammunition components.

https://amzn.to/40f7fth

In my military service, a dummy round was an inert training aid that can be easily distinguished from live ammunition by having indentations on the sides of the brass, being a different color entirely, or a combination of both feel and appearance. These dummy rounds were used in training personnel to use weapons in a safe manner, often in classroom locations. Lessons on how to load, arm, and troubleshoot a failure to fire could all be done as slowly as needed before going to a range and doing it live. If you’re helping to introduce new people to the shooting sports, then dummy rounds are a great tool for teaching basic firearm manipulation, how to load, unload, and so forth.

Making Your Own
I like to make my dummy rounds with a drill press by drilling holes through the sides of the cartridge case for an easy visual indicator that they aren’t live ammunition. Since I’m a handloader, I can omit the steps of priming and charging a round before crimping in the bullet. This leaves me with a dummy round that has holes in the side for visual identification, but weighs very close to what a live round would weigh. I find this to be useful for properly weighting a handgun magazine, as 15 rounds of 115gr 9mm ammunition is about 3.5 ounces of additional mass if you’re practicing “draw from concealment” drills at home.

The author's handmade dummy rounds

Some of you may be wondering “Why not just take a live round and drill through it?” I’ve done this when no other option was available to me, and it works because brass doesn’t spark. I don’t recommend it, though, because there’s still a lot of steel-cased ammunition on the market and I don’t think the risk justifies the potential reward. 

Additionally, if you drill a live round and then pour the powder out the holes, you still have to deal with the primer. You can’t use your firearm to do that, either, because the chamber would be directly exposed to the hot primer gas and you might dislodge the bullet into the barrel.

For dummy shotgun rounds:
  1. Take a spent hull and fill it with BBs and epoxy just below the crimp line. Because the vast amount of mass in a shotgun shell is in the lead shot, you really have to add a filler material back in to get the right weight/feel.
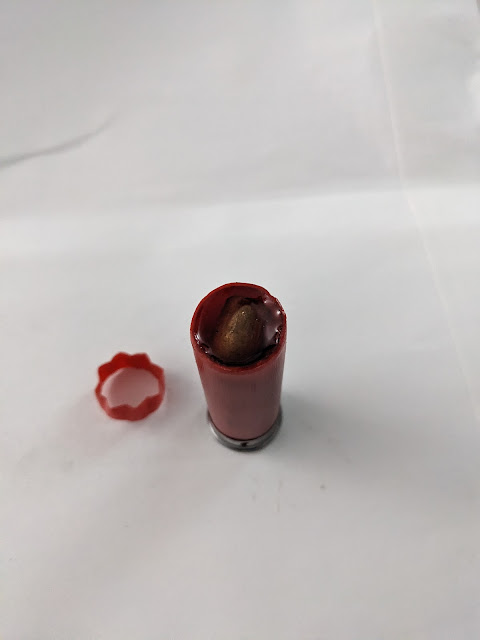

  2. Wait for the epoxy to harden, then cut the crimp away at the crimp line.


  3. Drill the visual indicators in the metal part of the hull and drill out the spent primer. 


This is a tad more expensive than pistol or rifle dummies, but still quite a bit cheaper than commercial snap caps or dummy rounds. 

Concerns
“Is there a risk of having a bullet from a homemade dummy round come loose into your firearm?” Yes, but I've not yet encountered that in reality. I’ve experienced an AK-style rifle (Saiga .308) slam uncrimped match ammo so hard into the chamber that it unseated the bullet spilling powder everywhere, so it’s entirely possible that this “inertial bullet puller effect” could happen with a dummy round. If you’re worried about that, then don’t use homemade dummy rounds mixed with live ammo for live training.  However, I haven’t experienced this with dummy pistol ammo, and the dummy shotgun ammo is epoxied in place.

Conclusion
Dummy rounds are useful for teaching new shooters the manual of arms with a firearm and for working misfire drills and dryfire practice for more skilled shooters. I cannot recommend strongly enough that every prepper incorporate dummy round-enhanced training drills at home, as they are incredibly valuable to skill building and skill retention and don't require range fees or expending live ammunition.

Dummy rounds are also cheap to purchase and easy to make if you have reloading tools, and I encourage you to buy or make them at your next opportunity. You don't need a whole lot of them, but you should have a few on hand for practice and education. 

Thursday, October 10, 2024

Preppers Armory: Zeroing Red Dots

In previous posts I talked about the process of mounting and zeroing scopes. When used on rifles, red dots can be treated pretty much the same way as other optics. However, on handguns, especially compact pistols, there are some additional challenges when sighting red dot sights, also called RMRs for Rear Mounted Red Dots.

Sight Picture
On rifles, most red dot sights are set up to either bottom third or co-witness with the iron sights, if any. These two terms mean that the iron sights either appear below the dot, generally in the bottom third of the viewable area while the dot remains in the center, or the dot lines up precisely with the existing sights. Handgun RMRs frequently co-witness with the pistol's iron sights, which can make sighting in the red dot easier if the iron sights have been properly adjusted.


Boresighting
If using a spud-type boresight, either collimator or laser style, the bore insert may be too long to seat properly in a handgun barrel, with the end of the spud impacting the breech face before it can solidly fit the muzzle. Magnetic or laser cartridge boresights should still work as designed.

Old school boresighting, where the target is viewed through the barrel and the sight is adjusted to coincide, obviously won't work with a semi-automatic pistol. Mirrored barrel inserts have been available now and again over the years for use with revolvers; good luck finding one, though.

That leaves the most fun option: actually shooting the gun and adjusting the point of aim and point of impact. When using this technique, the most important aspect is having the pistol properly braced. A Ransom Rest or something similar is ideal, but very pricey for both the base unit and the grip adaptors. I 3D printed a rest for sighting in my firearms.

A traditional commercial rifle rest, sandbags, or even a bunch of tightly rolled or folded cloth can all work nearly as well as a fixed rest, as long as the shooter maintains consistency, grip, position, and orientation of the firearm.

Zeroing Procedure
  1. With a handgun, the rest and firearm should be positioned so the shooter's forearms are also supported. With a long gun, this applies to the elbows.
  2. Set up a target at a known range. I prefer starting handguns at five yards and rifles at ten, just in case the sighting system is way off. Having the dot contrast with the target is important for proper visibility. 
  3. Once this is done, load five rounds into the magazine or cylinder, and make ready to shoot.
I prefer using five round groups. While three rounds are traditionally used for sighting, I've found that five reduces the uncertainty considerably. For example, if I have two shots close together and one flyer off to the side, I have to wonder if the ones in close proximity are coincidental or a clear representation of the firearm's potential accuracy, and I just pulled one shot. Meanwhile, with five round groups, this issue practically vanishes, as four shots close together with one flyer is much easier to judge.

Adjustment
As with other optics, most RMRs will have some system for adjusting the emitter. A fairly common one is recessed screws turned by a small hex wrench, which is frequently supplied with the optic.

Pay close attention to those adjustment points; they should be marked with an arrow and the letter U for up or L for left. Rarely will you see D for down or R for right marked on them. If there are no markings, check the manual or manufacturer's website.

Consistency is key, so fire five rounds while maintaining the same sight picture. Hopefully they are all in close proximity, even if they aren't at the point of aim. Tune the vertical and horizontal adjustments, and repeat.

Within a few cycles of this process, the shots should be landing where the dot appears on the target. If necessary, put up a new target at the intended zero distance, and repeat for final adjustments. At this point, the red dot should be properly sighted in, and barring a problem shouldn't require any further adjustments. 

Final Thoughts
The only other thing we'll need to do is make sure the battery is changed regularly. Some of the newer red dots have auto off and shake-awake features, with battery life measured in tens of thousands of hours. There are even units with small solar panels to keep the battery topped off when exposed to light.

Whether the optic has these features or not, find out how long the battery actually lasts, and make sure to schedule replacement within this window.

Shoot often, shoot safely, shoot accurately.

Friday, October 4, 2024

Luxe Bidet 120 Follow-Up

Not actually Erin.
Used with permission.
With all the rumors about toilet paper shortages in the wake of Hurricane Helene and the dockworkers' strike, it's time to revisit the product review post I made back in 2020. Go read that first, then come back for this follow-up. 

Disclaimer: In order to write a useful post about this subject, I need to talk about things which a lot of people find distasteful and/or embarrassing. Everybody poops and everybody needs to wipe, so let's just be adults about this.

The Luxe 120 that I bought back in December 2020 still works fine, although there are a few issues I have with cleaning it. First, cleaning the part of the toilet behind the bidet nozzle is inconvenient at best (I use a Clorox Toilet Wand and it can reach most areas with a bit of work) and difficult at worst, especially when it comes to removing dried-on particles. Fortunately, Luxe has addressed that issue with their latest model which flips up for easy cleaning ($44 on Amazon as of this writing). 

The Luxe Bidet 120 Plus


The second issue that I have is related to the first: despite the self-clean feature, the nozzle itself must be periodically cleaned to prevent bacterial biofilm, aka "pink mold", from growing on it and impeding the nozzle's protraction and retraction. In my case this is easily handled by opening the protective door, pulling the nozzle down and giving the entire area a good scrub with the toilet wand at the same time I'm cleaning the bowl. I expect that the new flip-up feature would make this cleaning much easier and perhaps needed less often. 

If I should ever need to purchase another bidet, I'm definitely getting the new flip-up model, but mine is still working great and shows no signs of stopping. My toilet paper usage has been drastically diminished, and overall I just feel cleaner. The only drawback to this bidet is that I miss it terribly whenever I go out of town. I make do with flushable baby wipes, but it's not the same, especially when my lower back arthritis is acting up and making it difficult to reach behind me. 


This new version also doesn't require a full removal of the toilet seat to install,
which is a welcome change and a big help.


My Recommendation: Still A+
As I mentioned in my previous product review: 

If you're a human being who poops, buy this. It's more comfortable than dry wiping, it's probably better for the long-term function of your septic system to flush less toilet paper, and the paper you do use will last longer. It's easy to install, it's great if you have health problems (including reduced flexibility that makes wiping difficult), and if you register it comes with a 2 year warranty. 

Buy one now, before the next (real or imagined) toilet paper shortage. 


Dear FTC: I bought this product with my own money. Go away. 

Tuesday, March 5, 2024

3D Printing Revisited

As I covered in a post in January 2022, I'm a fairly new member of the 3D printing community. When getting started, there are many decisions that need to be made, as well as a variety of trials and tribulations for a newbie to 3D printers and printing.

Buying a Printer
There are many of them on the market with various features and a wide range of price tags. Bambu, Creality, Prussa, and Voron are just a few of the companies offering benchtop 3D printers. Most people recommend starting with a Creality Ender 3; in my case, I chose the V2 model. The V3 has since been released, and by all accounts it's worth the increased price tag, as some of the upgrades I mention below are included as standard in the new model.

Printers can also often be found on sale, either online through websites like Woot, or in stores such as Microcenter. Assembly and setup generally aren't terribly difficult, so long as you can use basic hand tools and follow printed directions.

Upgrades
One of the first upgrades most 3D printers usually get is replacing the extruder/feeder parts with metal ones, as well as replacing the springs and adjustment knobs for the print bed.

Ender 3 Upgrade Kit


When the Trouble Begins
Bed leveling, also called tramming, is one of the larger bugaboos of the printer world. It takes time, patience, and close attention to fine detail. The purpose of this operation is to make sure the print nozzle -- the part where the melted plastic exits onto the print bed -- is neither too close nor too far away from that bed. Both of these extremes will cause problems, either with prints not adhering to be bed properly or adhering too well, the latter potentially causing damage to the bed when attempting to remove a print.

From what I've read, the optimal distance is approximately 0.1 millimeters between the nozzle and the bed, or about the thickness of a piece of paper. However, a metal feeler gauge of the appropriate size is more precise.


The frustration from attempting and repeatedly failing in this operation caused me to walk away from my printer for a few months until a friend sent me one of the best upgrades to reduce the aggravation involved with bed leveling. Called the CR Touch, it's a small mechanism attached to the side of the print head and a software package that enables the printer to check bed leveling automatically. The bed still needs to be leveled manually first, but once that's done the printer can more easily maintain proper offset.

CR Touch

This was a game changer for me, and I went from angrily attempting to relevel the bed repeatedly after each failed print to near-perfect prints most of the time.

Designs
Speaking of prints, we need design files in order to print something, and there are a number of online resources where these can be found. Thingiverse and Printables are two of the more well-known and popular ones, but there are many others, including sites hosting designs specific to the 3D printed firearms community.

For those with graphic design skill, there are also tools available for creating our own printer files, such as Tinkercad. I've uploaded a few I created to Thingiverse and Printables myself.

A needle file holder designed by the author


I've also downloaded, and either used as-is or modified, a variety of other designs. One I think would be of particular interest to preppers is a set of nesting dividers that fit in an Altoids tin. This was originally designed for watercolor paints, but I'm sure we could come up with a variety of other uses.

Altoids tin dividers


Slicing
Once a print is acquired, generally as an STL file, it needs to be run through what's called a slicer, a program that uses gcode to create the tool path and extrusion details the printer needs to actually print. I use UltimakerCura, but there are other slicers available as well.

Within these programs, we can rotate and scale our models, as well as adjust print specifications such as temperature, speed, quality, and a million other options. I'm only reasonably familiar with a couple dozen of these settings myself.

Ultimaker Cura screenshot


Filament
Once the sliced file has been output and transferred to the printer, we still need filament. The most common filament on the market right now is PLA, which stands for polylactic acid. The current version, PLA+, can be found in a bewildering array of colors and, if bought in bulk, for a reasonable price. I've been happy with the filament I've ordered online from IIIDMax.

After everything's been set in motion, all that's left is to cross our fingers and wait. If all goes well, in a few hours, we'll have a completed print. If not, we'll have a print bed full of what's appropriately called spaghetti.
 
A failed print


My very first successful print was one that came with the basic printer files, a Lucky Cat. Since then, I've downloaded and printed a variety of decorative and useful objects. But as a tradition, and possibly some superstition, I first print a lucky cat with each new filament color.

clowder of lucky cats


As my skill and confidence have increased, I've begun printing firearm parts. I started with relatively simple things such as grips, optic mounts, and fore-ends, then moved on to more complicated designs, such as linear compensators.

Two AR pistol grips


I've printed two linear comps, the first for a 5.56 AR, and the other for one in .300 Blackout. They came out beautifully, and I've run a couple magazines through the 5.56 one with no issues.

My next achievement will be printing a frame or receiver. Maybe this is how I finally get a Glock?


I'm sure I've left out a number of important 3D printing details, but as I said, I'm still a novice in this world and I know I still have much to learn. Some additional links are provided below.

May your bed always be level, and your spaghetti only be the kind cooked for dinner.

Links:

Wednesday, March 22, 2023

Misfires and Hangfires and Squibs, oh my!

While working on a segment for Assorted Calibers Podcast, I realized that it's likely not all of our listeners there, or our readers here, would be familiar with the three main ammunition failures and how to safely resolve them.

There are overlapping potential causes of these issues, so it's not a simple linear list. For example, ammunition contaminated with a liquid (water, oil, solvent, etc.) can result in any of the three malfunctions, so I'm not going to focus on root causes.

The basic definitions of these ammunition failures are:

  1. Misfire: the round doesn’t fire, resulting in a click but no bang. This could be due to (among other things) a bad primer, no primer, or a light firing pin strike.
  2. Hangfire: a perceptible delay between pulling the trigger and firing. This usually results from contaminated gunpowder or primers, which causes the powder to ignite slowly.
  3. Squib: the round is underpowered and the bullet gets stuck in the barrel. This could be due to a more advanced contamination issue as with a hangfire, or an improper load with little or no powder.

The squib is the most dangerous of the three ammunition malfunctions due to the possibility of firing a following round into a blocked barrel. However, it is fairly easy to detect a squib if the shooter is paying attention: due to the reduced pressure, recoil will be softer, muzzle blast will be quieter, and (if fired in low light) muzzle flash will be minimal if it's even visible at all.

The nose of a squib is just visible in this barrel

For all three situations, the immediate action is the same: Stop! After that, keep the muzzle pointed in a safe direction, finger off the trigger, and remove the magazine (if appropriate).
  • For a misfire, wait 30 seconds to make sure it's really not going to go off, then eject the round, being careful to keep fleshy bits like hands away from the ejection port. 
  • If a hangfire occurred, check to make sure the empty case ejected and the barrel is clear. In both cases, assuming everything looks fine, reload and continue shooting.
  • With a squib, the gun is out of service until the blockage is removed from the barrel.

There are several processes that can be used to remove the stuck bullet. What follows is mine:

  1. Remove the barrel from the gun.
  2. Secure the barrel, muzzle down, in a vice with soft jaws.
  3. A couple of drops of penetrating oil in the barrel can help.
  4. Place a brass rod just smaller than bore diameter in the barrel.
  5. Only an inch or two of the rod should protrude from the chamber.
  6. Using a rubber, rawhide, or dead blow mallet, tap the rod to get the bullet moving.
  7. Once the rod is nearly flush with the end of the barrel, replace it with a longer one.
  8. Repeat until the bullet is clear.
  9. Clean the barrel, then check it inside and out for any damage.
  10. If everything looks good, reassemble the firearm and test fire.

If the barrel can't easily be removed, such as with revolvers, secure the barrel muzzle up and follow the same steps. Be extra careful not to mar the barrel crown, as this will likely negatively affect accuracy.

Stay safe and keep your ammunition dry

Friday, March 3, 2023

Homemade Soap

Keeping clean is an essential part of maintaining both physical and mental health. I've taken enough bloodborne pathogen and hazmat classes that not being able to wash my hands regularly makes me actively uncomfortable. Any of our readers who have been on an extended camping trip (whether personal or under government contract) know the challenges involved in maintaining an acceptable level of personal hygiene.

There are a number of potential issues in keeping ourselves clean, such as access to a water source, ambient temperature, and privacy. While there's not much we can do about those issues, the one we can address is soap. While readily available in stores and online, making soap at home doesn't have to be complicated or expensive, and is another self-sufficiency skill to be considered.

WARNING!
Soap making uses lye, a caustic chemical that can cause severe burns. Use all appropriate personal protective equipment,  including but not limited to eye protection, long sleeves, and gloves.

Equipment
Just over a year ago I posted an article on candle making, and some of that same equipment can be repurposed for making soap, specifically a double boiler or crock pot to melt the ingredients safely and a mold to form the soap.

A friend of mine who makes soap uses Pringles cans as one-use molds, with the resulting tube of soap then cut into disks. Any of the variety of silicone baking molds available on the market can be used as well.

A variety of home-made soaps from the author's collection

Make sure that any equipment and utensils used in the soap-making process are never again used for food preparation! Some of the chemical residue isn't good to imbibe, and it will give your food a nasty taste. 

Secondhand stores and yard sales are a very economical source for the necessary equipment.

Ingredients
A basic soap can be made with just three ingredients:

  1. Oil or another fat (olive oil, coconut oil, etc.)
  2. Lye (sodium hydroxide for bar soap, potassium hydroxide for liquid soap)
  3. Water (preferably distilled) or other liquids, such as goat's milk

Optional ingredients include essential oils, colorants, and dried herbs or flowers. 

The type and quantity of oil will affect the amount of lye needed for a recipe. This is a link to a handy lye calculator.

WARNING!
Never use aluminum containers or utensils when working with lye, it can cause a dangerous chemical reaction.

Process
This is the traditional hot process method for making soap. There is also a cold process method that takes longer, but doesn't require constant heat.

  1. Set the mixing vessel to low heat.
  2. Add the oil and cover.
  3. In a separate container, slowly add the lye to the water
    (don't add water to lye, it can splatter).
  4. Gently stir the solution while adding the lye.
  5. Put aside and let the lye solution cool for 15 to 20 minutes.
  6. Check the temperature of the oil(s) using a candy thermometer.
  7. Once they reach 120 to 130F gently pour in the lye to avoid splashing.
  8. Stir slowly (a stick blender on low can also be used).
  9. Continue blending and stirring for 10 to 15 minutes, or until the soap has thickened and looks like pudding.
  10. Cover and cook on low heat for 50 minutes, stirring gently if bubbles form.
  11. Let cool until the mixture drops below 180° F.
  12. If desired, add essential oils and/or colorants and mix well.
  13. Pour the mixture into a mold.
  14. Gently tap the mold to eliminate air bubbles.
  15. If using an open mold, smooth the top with a spatula.
  16. Let sit for at least 24 hours at room temperature.
  17. After cutting, allow the soap to dry for another week.

Soap making, if done responsibly, can be safe and isn't very complicated. It's also good clean fun.

Links


Thursday, February 16, 2023

Home Shooting Range

For many years, one of my dreams was to have a shooting range on my property. When my wife and I moved to rural Tennessee in 2017, I was able to start working to realize that dream. The back third of our property slopes up from the basement door on the side of the house all the way to the property line, which is fairly heavy woods, making it an ideal location for a range.

Unfortunately, life got in the way and I didn't do much more than clear the area and mark the boundaries of the space. Then 2020 happened, and fairly early in that year my father died. I needed an emotional outlet, but I wanted it to be something constructive, so I grabbed a shovel and a wheelbarrow and started digging. Our soil is mainly clay, which can be easy to dig... unless it's too dry, in which case it's like rock... or it's too wet, in which case it's heavy and slippery.

By the time I was done a few months later, I'd excavated a six foot wide by eight foot deep bay in the slope outside the garage. At the rear, it's about five feet high, but the hillside slopes up another twelve feet or so. By very rough estimate, I moved over two tons of dirt.

cannot recommend taking on a project of this scale with hand tools! Rent a bobcat or hire someone who does excavation work; the savings in time and effort, not to mention physical pain, will be worth the financial expense.

I'm fairly happy with how mine turned out. At least so far. I plan to expand both its depth and width, as well as putting supports on the sides and the back to help with erosion control. Most likely I'll use old railroad ties for this purpose; unless large sections of armor plate are available, railroad ties are one of the more cost-effective options for home range backing.


When planning your range, there are several things to keep in mind. I'll be focusing on considerations for an outdoor range, as it's what I built, but many of these points (as well as others) will apply to an indoor range as well.
  • Legality. In locations where what's commonly called "sport shooting" is legal, people can shoot on their own property as long as they follow some basic guidelines such as not endangering their neighbors, not shooting too early in the morning, and not shooting too late at night -- in other words, by not being a jerk. Before I started my project, I talked to local law enforcement and checked the county regulations. As I live in an unincorporated area, that's as far as I needed to go. 
  • Property layout and shooting direction. It's essential that any shooting is constrained to a safe direction. My property is a relatively long and narrow plot, but if things were laid out differently, I might not have been able to orient my range optimally. I'm fortunate that my property slopes up in the right direction, otherwise I would have had to build a large enough berm to make sure fired rounds didn't escape the property. The minimum recommended height for a backstop is 10 to 12 feet, though higher is better.
  • Runoff and erosion. An outdoor range will be at the mercy of the elements. The last thing I wanted was for the shooting bay to become a duck pond after a heavy rain, so I made sure that the bottom sloped down as it approached the entrance. That didn't keep the back and sides from eroding from rain and runoff, though, which is why I'm planning to add supports as the project progresses. As I mentioned earlier, railroad ties are my first choice for this purpose.
  • Targets. Paper and cardboard targets are both safe and readily available. Steel targets are fun, but need to be set up and shot responsibly, whereas Tannerite can be extremely dangerous, even deadly, if used without proper care. Listen to my segment in Assorted Calibers Podcast #190 for more information. 
While there are additional considerations when designing and building a home shooting range, these are some of the more important ones in my opinion. For any of our readers who are considering a home shooting range, take your time and plan first.

Have fun, and safe shooting.

Links


Wednesday, February 8, 2023

Prepper's Toolbox: Adhesives

Throughout history, humans have needed to attach things to other things, sometimes permanently and sometimes temporarily. While fasteners such as nails, screws, and rivets are all fine choices, there are times when some form of glue is better suited for the task at hand. 

Every type of adhesive has its pros and cons; from simple wood glue to fiber-reinforced epoxy, they all have their proper use. Some adhesives act as a separate layer that applies a gripping strength to the items via any imperfections in the surface, while others actually soften the edges of the parts and meld them together, forming a type of chemical weld.

While all sorts of adhesives are currently available through the normal course of commerce, that may not always be the case. The ability to make some of the more basic glues and pastes can be of great benefit to preppers. 

One of the simplest is classic flour-based wallpaper paste, also useful in crafts like papier mache.


Traditional Flour Paste
  1. Combine 5 cups flour and 1 cup of sugar in a large pot.
  2. Place over low heat.
  3. Slowly add 1 gallon water, using a whisk to break down any lumps.
  4. Cook until nearly clear.
  5. Let cool to room temperature.


There are a variety of other adhesives that can be made at home. Particularly useful is a water-resistant glue made using pine resin as its main ingredient.


Pine Pitch Glue
  1. Collect pine resin (aka sap).
  2. Melt the resin. Try to not overheat it, as the compounds are destroyed the longer they're subjected to heat.
  3. Be careful! The resin can ignite if placed too close to open flame.
  4. Add 1 part powdered hardwood charcoal.  This helps temper the resin and reduces its stickiness.
  5. Add 1 part filler material.  This can be ground plant material (crushed to a fine powder) or animal droppings (dried and ground up).  Sawdust, bone dust, or animal hair can also be used.  The filler material helps strengthen the glue compound.
  6. To make the glue more flexible, add one part fat, tallow, or beeswax to the mixture.
  7. Mix thoroughly.
  8. After the glue hardens, it will resemble hardened glass (if beeswax or fat were added, it will be more elastic).


While some of the simpler adhesives, such as the flour-based glue I mentioned above, are weaker and less permanent, others can provide a much longer-term bond.

I hope I don't sound tacky, but stick around for more tips and tricks.


Wednesday, January 4, 2023

Prepper's Armory: Scope Zeroing

Now that the scope has been properly mounted to the firearm, it's time to adjust the optic so that Point of Aim (POA) matches Point of Impact (POI) for a specific distance. This is called zeroing the scope, and while this can be approximated on the work bench, the only way to truly zero a scope is from the shooting bench.

Minute of Angle
Scope knobs apply adjustments in ¼ or ½ minute of angle increments. A Minute of Angle (MOA) is defined as 1/60th of a degree, which equates to approximately 1 inch per 100 yards (actually 1.047″) and increases with distance. Therefore, 8 inches at 800 yards is still 1 Minute of Angle.

Tools
There are two main categories of bore sight tools available on the market today: analog and laser. The analog version is a collimator type system held in place either by a magnet or barrel spud. In either case, a grid is displayed in the field of view of the scope.

Spud and Magnetic Collimator Boresights


There are two types of laser boresight. The arbor version is similar to the analog collimator in that a spud is inserted at the muzzle end of the barrel using a caliber-specific bushing. After it's in place, the laser is activated and projected on a surface a set distance away.

The chamber type is shaped like an empty shell casing and inserted into the chamber. Once activated, it's treated in the same manner as the other laser type mentioned above.

Arbor and Chamber Laser Boresights


Technique
Zeroing a scope using either method is easier if the rifle is solidly secured, either through a vice, sandbags, or some other fixture.

When sighting in a rifle, the specific range chosen will affect the functional zero -- the two different distances where the bullet will hit at approximately the same point on the target, due to its parabolic rise and fall -- without having to adjust elevation or holdover excessively. (Holdover refers to raising the crosshair when aiming at a target further away than the range for which the scope is zeroed. This is one of the uses for Mil-Dots on a reticle.) The image below provides a visual for this concept.

Zero ranges for the 5.56mm cartridge from Gun Websites


Analog Boresight
Once installed and adjusted according to manufacturer instructions,  carefully rotate the windage and elevation knobs on the scope so the crosshairs line up with the center of the collimator target. Some analog boresights can be adjusted to estimate a specific range, but most are fixed.

Image courtesy of Savage Arms


Laser Boresight
Regardless of whether you are using arbor or chamber type, a laser boresight projects a dot onto a surface at a set distance. As with the above method, carefully rotate the windage and elevation knobs on the scope so that the crosshairs line up with the dot. This method can result in smaller groups when shot testing, as the sighting point is not right in front of the firearm.

Old-School Boresighting Technique
Last, but certainly not least, is the literal boresight method. While this technique isn't as precise as either of the two above, it requires no tools other than a method of securing the firearm.
  1. The bolt is removed to allow an unobstructed view through the barrel from the chamber end. (This may not be possible on all rifles.)
  2. The bore is centered on an aiming point at a set distance. 
  3. Without disturbing the rifle, the windage and elevation knobs on the scope are carefully rotated so the crosshairs line up with the center of the selected target.

Summary
While all these techniques can put shots on paper, as mentioned above the only way to truly zero a firearm is by actual shooting. However, beginning the sight-in process with bore sighting can save time and ammunition -- two things that are often in short supply.

Good luck, and safe shooting.

Friday, December 23, 2022

Prepper's Armory: Scope Mounting

As with iron sights, there's a proper way to mount, adjust, and sight in a scope. Actually, I should say proper ways, because there are a number of variables as well as preferences involved with the process.

Early scopes were externally adjusted, meaning the scope body was solid and the adjustment knobs were located on the scope mounts. Turning these knobs physically changed the angle of the scope tube. Later, the adjustment knobs were moved to the scope body itself, making adjustments simpler. Further developments made the adjustments more consistent and predictable.

Components
The first steps in mounting a scope to a firearm is acquiring a solid rail mount and the proper rings.

Rail mounts come in one- and two-piece configurations and Weaver or Picatinny rail patterns. These days, one-piece Picatinny are the most common; in fact, many firearms come with Picatinny rail either built into the design, or supplied as an optional attachment. Despite the difference in their appearance, they are functionally identical. 

Weaver (L) and Picatinny (R) rail sections


Scope rings come in diameters for the two most common scope tube sizes, 1" and 30mm. The height of the rings is also important: ideally, the scope is mounted as low as possible but with some clearance between the objective lens and the barrel. If removable lens caps are to be used, their diameter should be taken into consideration when selecting scope ring height.


Mounting Process
If necessary, mount the rail to the firearm. A single drop of blue Loctite can be used to prevent the screws from backing out if they don't come with thread locker already applied. 

Next, attach the ring bases to the rail. Position them so that when the scope is in place they are relatively centered between the adjustment knobs and where the scope tube swells out at either end.

Once the rail and ring bases have been properly mounted to the rifle, place the scope on the rings and determine the best position for optimal eye relief. Keep in mind this can be adjusted in small increments once everything is in place, but try to get it as close as possible. (Proper eye relief is when the shooter can place their head in a comfortable position on the stock and still see the entire field of view through the scope without any fuzzing around the edges.)

Once scope position is determined, install the top half of the rings and loosely screw them down. Don't tighten them all the way yet; scope orientation needs to be checked and confirmed. This can be done by eye, but a better option is to use a leveling tool. Secure the firearm in a soft jaw vice and try to get it as level as possible first, then attach the scope leveling tool and rotate the scope until the reticle is level.


When tightening the scope ring screws, be careful not to overtighten them. Most scope and scope ring manufactures recommend 25 inch-pounds as a maximum. While this can be done by feel, a safer and more precise option is using a torque wrench. This can either be a dedicated tool or an adapter for an existing bit driver.

The screws should also be tightened in a pattern to avoid applying too much pressure to one side and twisting the scope. Since most rings have four screws each, a figure eight pattern is recommended, tightening each screw partially in turn until they're all done. Make sure the reticle remains level throughout the process.

Sighting In
Once the scope is successfully mounted, it's ready to be sighted in, but that's a topic for another article.

Have fun, and safe shooting.

The Fine Print


This work is licensed under a Creative Commons Attribution- Noncommercial- No Derivative Works 3.0 License.

Creative Commons License


Erin Palette is a participant in the Amazon Services LLC Associates Program, an affiliate advertising program designed to provide a means for sites to earn advertising fees by advertising and linking to amazon.com.