Wednesday, February 22, 2023

Minimal Motorcycle Medical Kit, pt. 2

The dust has settled and the First 72 Hours have passed. Follow along as I build a long term plan via Prudent Prepping. 

Even though it is "California cold", raining, and I'm not riding very often, now is a good time to go through my various first aid kits to come up with  a decent amount of gear to carry on my motorcycle. 

In a previous post I showed what I started with, but since then I've added some extra items that I believe are useful.
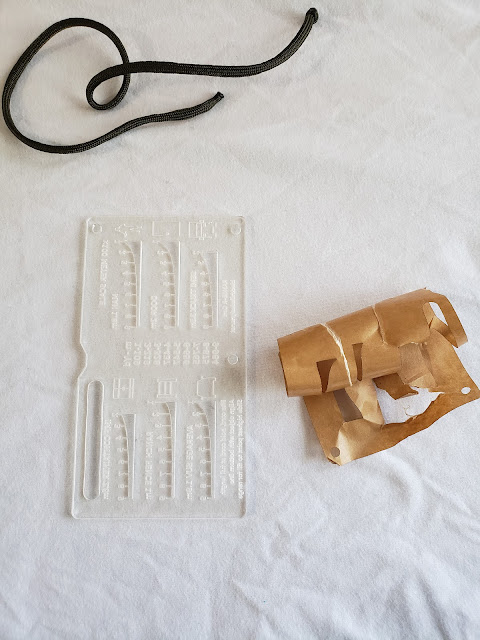
 
What's In the Bags?
Several things I really like, have used in the past, and a bit extra.

A collection of quality gear!

Left
Maxpedition zipper bag, containing the following: 

Middle
Adventure Medical Trauma Pack, containing the following:
  • 1 x Bandage, Conforming Gauze, 3"
  • 1 x Dressing, Gauze, Sterile, 2" x 2", Pkg./2
  • 1 x  Dressing, Gauze, Sterile, 4" x 4", Pkg./2
  • 1 x Gloves, Nitrile (Pair), Hand Wipe
  • 1 x QuikClot Gauze 3" x 2'
  • 1 x Trauma Pad, 5" x 9"
  • 1 x Duct Tape, 2" x 26"
  • 1 x Bandage, Triangular
  • 4 x Antiseptic Wipe
  • 1 x Trauma and Accident Management Instructions
Right
North American Rescue Mini First Aid Kit (NAR M-FAK), recently purchased directly from North American Rescue specifically to have a red, easily-seen kit, since there isn't red as an order option on Amazon. It contains the following:
  • 1 x CAT Gen 7 Tourniquet Orange
  • 1 x 4 in. Flat ETD, 1 x S-rolled Gauze (4.5 in. x 4.1 yd)
  • 1 x HyFin Vent Compact Chest Seal, Twin Pack
  • 1 x pair Bear Claw Nitrile Trauma Gloves, lg
https://www.narescue.com/m-fak-mini-first-aid-kit-red.html

Why Two Tourniquets?
I have talked with several different riders and racers who all suggested adding another tourniquet, as well as extra bandages and quick clotting agents, since crashing on a motorcycle usually involves hitting the pavement or ground at speed. This means road rash at the minimum, and potentially serious cuts and bleeding. From my own experiences with motorcycle crashes and damage seen on my friends, even this amount of blood-stopping material may not be enough. 

With this in mind I've asked several different EMT's and Paramedics if I should be concerned with the 'Use By' dates on some of my supplies. I was told that yes, there could be some deterioration of the clotting agents, especially if stored at high heat,  more than one or two years past the listed date.

Recap and Takeaway
* * *

Just a reminder: if you plan on buying anything through Amazon, please consider using our referral link. When you do, a portion of the sale comes back here to help keep this site running!

If you have comments, suggestions or corrections, please post them so we all can learn. And remember, Some Is Always Better Than None!

NOTE: All items tested were purchased by me. No products have been loaned in exchange for a favorable review. Any items sent to me for T&E will be listed as such. Suck it Feds.

Thursday, February 16, 2023

Home Shooting Range

For many years, one of my dreams was to have a shooting range on my property. When my wife and I moved to rural Tennessee in 2017, I was able to start working to realize that dream. The back third of our property slopes up from the basement door on the side of the house all the way to the property line, which is fairly heavy woods, making it an ideal location for a range.

Unfortunately, life got in the way and I didn't do much more than clear the area and mark the boundaries of the space. Then 2020 happened, and fairly early in that year my father died. I needed an emotional outlet, but I wanted it to be something constructive, so I grabbed a shovel and a wheelbarrow and started digging. Our soil is mainly clay, which can be easy to dig... unless it's too dry, in which case it's like rock... or it's too wet, in which case it's heavy and slippery.

By the time I was done a few months later, I'd excavated a six foot wide by eight foot deep bay in the slope outside the garage. At the rear, it's about five feet high, but the hillside slopes up another twelve feet or so. By very rough estimate, I moved over two tons of dirt.

cannot recommend taking on a project of this scale with hand tools! Rent a bobcat or hire someone who does excavation work; the savings in time and effort, not to mention physical pain, will be worth the financial expense.

I'm fairly happy with how mine turned out. At least so far. I plan to expand both its depth and width, as well as putting supports on the sides and the back to help with erosion control. Most likely I'll use old railroad ties for this purpose; unless large sections of armor plate are available, railroad ties are one of the more cost-effective options for home range backing.


When planning your range, there are several things to keep in mind. I'll be focusing on considerations for an outdoor range, as it's what I built, but many of these points (as well as others) will apply to an indoor range as well.
  • Legality. In locations where what's commonly called "sport shooting" is legal, people can shoot on their own property as long as they follow some basic guidelines such as not endangering their neighbors, not shooting too early in the morning, and not shooting too late at night -- in other words, by not being a jerk. Before I started my project, I talked to local law enforcement and checked the county regulations. As I live in an unincorporated area, that's as far as I needed to go. 
  • Property layout and shooting direction. It's essential that any shooting is constrained to a safe direction. My property is a relatively long and narrow plot, but if things were laid out differently, I might not have been able to orient my range optimally. I'm fortunate that my property slopes up in the right direction, otherwise I would have had to build a large enough berm to make sure fired rounds didn't escape the property. The minimum recommended height for a backstop is 10 to 12 feet, though higher is better.
  • Runoff and erosion. An outdoor range will be at the mercy of the elements. The last thing I wanted was for the shooting bay to become a duck pond after a heavy rain, so I made sure that the bottom sloped down as it approached the entrance. That didn't keep the back and sides from eroding from rain and runoff, though, which is why I'm planning to add supports as the project progresses. As I mentioned earlier, railroad ties are my first choice for this purpose.
  • Targets. Paper and cardboard targets are both safe and readily available. Steel targets are fun, but need to be set up and shot responsibly, whereas Tannerite can be extremely dangerous, even deadly, if used without proper care. Listen to my segment in Assorted Calibers Podcast #190 for more information. 
While there are additional considerations when designing and building a home shooting range, these are some of the more important ones in my opinion. For any of our readers who are considering a home shooting range, take your time and plan first.

Have fun, and safe shooting.

Links


Monday, February 13, 2023

Two Life Hacks

Not actually Erin.
& is used with permission.
I'm going to flying to Utah on Wednesday, so that means posts by other authors may be late because I'm not around to edit them before publishing. It also means this article is going to be quick because I need to pack. 

Yes, I'm the kind of worry-wart who stresses out about packing days before I need to leave. If I could manage it, I'd have a suitcase that I could keep 100% packed and ready so all I'd need to do is grab it and go. That probably explains some of my prepping tendencies and why I find the concept of bug-out bags so comforting. 

Because I can't keep a prepped suitcase, I have a packing list saved on Google Sheets which I print out every time I pack for a trip. I cross out everything I don't need (for example, I don't need cold weather clothes for a summer trip) and then I check off items as I pack them. When I'm done, everything should be marked, and I can throw the paper away. When I return, if there's something I wish I'd had with me then I add it to the sheet. 


My second life hack is a follow-up to David's RANGE-R Card. I found it difficult to read the etchings in the clear plastic, so I rubbed an orange crayon into the grooves and then wiped the surface clean. I picked orange because it's high-visibility against foliage and I don't get a lot of fall colors here in Florida, depending on your environment, you might want a different color. 

You can really see the difference it makes in this picture:


I apologize for the glare, but it's difficult to take pictures of glossy plastic with overhead lights. Still, it pretty clearly illustrates proof of concept. 

If you have any tips, tricks, or life hacks useful to preppers, please leave them in the comments below. 


Friday, February 10, 2023

The RANGE-R Card

The dust has settled and the First 72 Hours have passed. Follow along as I build a long term plan via Prudent Prepping.

I needed a way to easily teach an experienced shooter how to estimate how far away objects are, because going over the several different types of reticules, and how they are used, wasn't clear.

Luckily, I found the RANGE-R Card from Black Hills Designs.


From the RANGE-R Card website:
Similar in function to the world famous PSO BDC reticle used on Combloc weaponry the RANGE-R card gives off NO thermal, IR, or SWIR signature. With a bombproof design and small footprint, add a Black Hills Designs RANGE-R card to your gear today. At a svelte 5.375″ x 3″ and only 1.2oz , the Black Hills Designs RANGE-R Card is sure to fit anywhere in your kit. The RANGE-R Card gives you the ability to range easily out to 900m without the use of electronics or dependence on GPS. The RANGE-R Card can be used as a standalone ranging solution or can be combined with traditional ranging mechanisms (Laser Range Finding, GPS, Milling, etc) to improve the accuracy of a given range. The polycarbonate card is perfectly sized for a BDU pocket. binocular pack or GP pouch. At roughly 1 oz the card disappears effortless into your kit.
Instructions: 
  1. Bite the end of the included 18” draw string and extend in front of sightline until tight.
  2. Shift target within its specific targeting slot until it touches top and bottom of the curve.
  3. Now, you have your range.

https://www.blackhillsdesigns.net/product/range-r-card/
The card is graduated in meters, but has a direct conversion to yards in the center for quick translation.
Opening the Package
The RANGE-R Card is laser-etched (I think) and comes with the protective film still on the reverse side, likely for protection during shipping. The paper covering has some adhesive to keep it stuck to the plastic.

RANGE-R Card with protective film and paracord

In the above photo you can see a cleaned RANGE-R Card and one still covered with the protective paper. I had a slight problem with removing the paper on the first one; the paper was much more stiff or brittle, which made the removal somewhat harder.

Starting at a corner I picked up the paper with my fingernail and pulled. As the card is only about 3 x 5 inches, it took maybe two minutes to get all of the small pieces removed.


If any of you have ever done serious house painting and had difficulty removing masking tape without damaging the taped surface, even the blue or green painters tape advertised as 'clean removal' , there's a trick to having everything come out as clean and damage-free as possible: pull the tape on a 45° to 90° angle to the run of the tape while pulling as close to the surface as possible. If you try to pull straight up and away from the surface, you're almost guaranteed surface damage.

Paper removed

After removing the paper, I found smudges or glue residue on the surface. I wasn't too concerned until our Esteemed Editrix Erin mentioned having the same issue on her Card. Up to that point I wasn't too concerned, as I figured what I had might be a fluke.

Hmmm... smudges

Since the smears weren't terrible, I decided to try wiping the plastic with a wet paper towel, and had no results. The next step was Dawn dish soap, which I've used on all sorts of things that would be damaged if harsher cleaners or solvents were used. After washing the card with Dawn, a sponge and warm water, the smears were still there! Now it appeared there might be a real problem with the cards...

... until I really looked at the surface. Really, really looked closely...

... and washed the etched side, not just the smooth side that came covered with paper.

Yeah.

Clean and clear!

In the photo above, just above my index finger you can see what looks like two smudges. They are in fact a reflection from my hand that's holding my phone.

Using The RANGE-R Card
I pulled out the paper range cards I ordered from Amazon, the seriously cool Rite in the Rain ones. From previous measurements using Google Maps and their added distance measuring functions, I have a fairly good idea how far away several permanent points are, like buildings. The "Front Door" slot was the easiest to use, as I have measurements to the corner of several buildings and their driveways. Allowing for some error in Google and my mapping, I believe I'm within several yards of perfect.

https://amzn.to/3HRNzkW

Some of the other sizing options I haven't been able to use yet, as I need to find a building site to measure some cargo containers or fencing. I certainly can expect those distance measurements to be at least as good as the door estimates, but I'd like to get a second source.

Recap And Takeaway
  • I really like the simplicity and easy use of the card. I'm going to use it with the Purple Pack Lady, since I'm not the best teacher to explain how to estimate distances and then translate that to hash marks in a scope.
  • Ordered previously from Amazon: Rite in the Rain Range Cards, $13.80 with Prime shipping.
  • RANGE-R Card ordered from Black Hills Designs: $25 and free shipping.
* * *

Just a reminder: if you plan on buying anything through Amazon, please consider using our referral link. When you do, a portion of the sale comes back here to help keep this site running!

If you have comments, suggestions or corrections, please post them so we all can learn. And remember, Some Is Always Better Than None!

NOTE: All items tested were purchased by me. No products have been loaned in exchange for a favorable review. Any items sent to me for T&E will be listed as such. Suck it Feds.

Wednesday, February 8, 2023

Prepper's Toolbox: Adhesives

Throughout history, humans have needed to attach things to other things, sometimes permanently and sometimes temporarily. While fasteners such as nails, screws, and rivets are all fine choices, there are times when some form of glue is better suited for the task at hand. 

Every type of adhesive has its pros and cons; from simple wood glue to fiber-reinforced epoxy, they all have their proper use. Some adhesives act as a separate layer that applies a gripping strength to the items via any imperfections in the surface, while others actually soften the edges of the parts and meld them together, forming a type of chemical weld.

While all sorts of adhesives are currently available through the normal course of commerce, that may not always be the case. The ability to make some of the more basic glues and pastes can be of great benefit to preppers. 

One of the simplest is classic flour-based wallpaper paste, also useful in crafts like papier mache.


Traditional Flour Paste
  1. Combine 5 cups flour and 1 cup of sugar in a large pot.
  2. Place over low heat.
  3. Slowly add 1 gallon water, using a whisk to break down any lumps.
  4. Cook until nearly clear.
  5. Let cool to room temperature.


There are a variety of other adhesives that can be made at home. Particularly useful is a water-resistant glue made using pine resin as its main ingredient.


Pine Pitch Glue
  1. Collect pine resin (aka sap).
  2. Melt the resin. Try to not overheat it, as the compounds are destroyed the longer they're subjected to heat.
  3. Be careful! The resin can ignite if placed too close to open flame.
  4. Add 1 part powdered hardwood charcoal.  This helps temper the resin and reduces its stickiness.
  5. Add 1 part filler material.  This can be ground plant material (crushed to a fine powder) or animal droppings (dried and ground up).  Sawdust, bone dust, or animal hair can also be used.  The filler material helps strengthen the glue compound.
  6. To make the glue more flexible, add one part fat, tallow, or beeswax to the mixture.
  7. Mix thoroughly.
  8. After the glue hardens, it will resemble hardened glass (if beeswax or fat were added, it will be more elastic).


While some of the simpler adhesives, such as the flour-based glue I mentioned above, are weaker and less permanent, others can provide a much longer-term bond.

I hope I don't sound tacky, but stick around for more tips and tricks.


Monday, February 6, 2023

Comparing Compasses

Not actually Erin.
& is used with permission.

Over my years as a prepper (and before that, as a Scout) I've accumulated a number of compasses. Some have been good, while others were clearly cheap trash. However, many of them occupy the realm of "I'm not sure."

It's easy to tell if a compass is broken, because they very clearly don't point toward north, or spin slowly, or otherwise have obvious errors. But how do you know if a compass is just slightly wrong?

I don't know if there's an official way to do it, but here's how I do it. 
  1. In a place without metallic or magnetic interference, determine magnetic north. You can do this with a known good compass or with a compass app on your smartphone. 
  2. Indicate magnetic north with a pencil and ruler on a clean sheet of paper. If you are using an app, place the phone on the paper and the ruler alongside the phone. 
  3. Place the suspect compass(es) on the paper and draw a line with the ruler and pencil along the azimuth the compass says is north. 
  4. Label each line. 
  5. Use the ruler to determine if the lines are parallel or not. 
Here's an example of this in action. The UST Compass is my Known Good. 


As you can see from this picture, the white ring compass (which arrived in an Apocabox) is parallel to my Known Good UST, whereas the black ring compass (which I found in my father's room) is mostly accurate, but there's some deviation to the west. 

From looking at this picture, could you tell that the top compass isn't accurate?


The other compasses my father owned were even worse. The brass compass deviates further west than the black ring, and the cheap Coughlan's compasses with LED lights are so wrong as to be completely useless. Those last three were thrown into the trash before I thought to write this article, so I have no pictures of them except through Amazon links -- and don't buy them for navigational purposes, please!

So that's how I determine if a compass is good or not. How do you do it?

Sunday, February 5, 2023

Look For The Helpers

If any of our readers have ever been witness to an emergency of some sort, they’ve probably noticed different behaviors from people immediately following the event. I'm not talking about professionals, like EMS or fire fighters; I mean the bystanders, the people who are on the scene of an incident before the professionals arrive, the actual first responders.

These people can be roughly categorized in to four general types of behavior. Put simply, they are: Wait; Predate; Ignore; and Help.

  • Wait: These are the people who are willing to jump in to assist, but generally not without clear direction from an accepted authority figure. This group probably represents the majority of people.
  • Predate: The people who are looking to get what they can for themselves, even from another person's tragedy, such as a fatal car accident or hit and run incident. Thankfully, this is a fairly small group, though larger in some areas than others.
  • Ignore: If it doesn't affect them directly, they keep going about their lives as if nothing happened. This group size likely sits somewhere between the prior two.
  • Help: These are the people who will step up without hesitation to aid in whatever way they can, even putting themselves in danger at times. While the smallest group, they are the ones we should strive to be.

Here's an example of all four types: when I lived in New York City back in the 1980s, I witnessed a collision between two taxi cabs. Many people glanced over at the sound of impact, but kept walking; others stood and stared, waiting; a few ran out to direct traffic and check on the occupants; but the woman who was a passenger in one of the vehicles got out and hailed another taxi.

As Mr. Rogers relayed in a story from his childhood:
"When I was a boy and I would see scary things in the news, my mother would say to me, 'Look for the helpers. You will always find people who are helping.' To this day, especially in times of 'disaster,' I remember my mother’s words and I am always comforted by realizing that there are still so many helpers – so many caring people in this world."
Sadly, not everyone agrees with this belief, but they also seem to be in the minority, at least for now. Still, we need to be vigilant; while there are people who genuinely need help, there seem to be several times as many scammers and confidence tricksters who prey on those who care, and I'm not just talking about the emails from that Nigerian prince.

Buy a first aid kit, get some medical training, carry basic tools, exercise, and eat properly, because when the time comes, attitude isn't enough; we need to have the tools to accomplish the goal of helping.

Don’t just look for the helpers. Be a helper. It's in all of our best interests.

Thursday, February 2, 2023

Guest Post: MSR Dragonfly Review

by Stephen

Hello intrepid readers! My name is Stephen, and I am a recovering gearhead. My first camping trip was at age six when my family drove 12 hours to the Upper Peninsula and spent a week at various campgrounds there. Between family and Boy Scouts, my memories have only gotten more numerous and there are too many trips of all sorts to count.   

In a 72-hour bug-out scenario, you can survive on cold rations or starve, but what if that situation goes longer? What if you are bugging in without power? Hot food provides morale as well as sustenance.  

Four basic fuel types exist: wood, solid, liquid, and gas. 
  • Wood can be scavenged so you do not have to carry it, but takes longer to get lit, gives inconsistent heat, and requires more effort to collect fuel.  
  • Solid fuel tabs are easy to use, but lack temperature control since they are all-or-nothing. 
  • Liquid fuels work in a wider variety of temperatures and are scavengeable, but lack the quick plug-and-play of a butane or propane canister.  
  • Gas, for all its ease of use, suffers in performance when temperatures are below freezing and may even stop working when it's cold enough. 
So which one did I pick? 

Let me introduce you to the MSR Dragonfly, a multi-liquid fuel backpacking stove.

https://amzn.to/3jowwPg


My dad bought this stove in the 90s as part of his preps for Y2K, and in the early 2000s we dug it out to use on a 50 mile backpacking trip with my best friend and his dad. As an illustration of the usefulness of having a liquid fuel system: we forgot to fill the fuel bottle, but since this will burn anything from gasoline to jet fuel, we were not out of luck, and a gas station sufficed to get us topped off.  

As with any liquid fuel stove, pressurizing the fuel tank -- in this case steel bottles that, other than the red color and warnings all over them, could be mistaken for a water bottle -- takes some elbow grease. Also, as the fuel runs low, you'll have to pump more to get the same pressure. Since you don't want to carry or store the bottle pressurized, this means you will get a workout with each meal.  

The stove folds up fairly compactly, and will store in a pot as MSR advertises. Its three legs provide much more stability than a pocket-rocket style stove (which Erin reviewed back in April 2022) since the footprint is wider than your typical fuel canister.  

One other difference in usage is the pre-heating step where you let out a little fuel, then ignite it with the fuel turned off. This takes some getting used to; I remember the little fireballs we created at first, learning to control how much fuel was released. Once the flame dies, open up the fuel again, ignite, and proceed to cook.

Although it definitely had some adjustability, my dad’s version didn't simmer as the website claims. We burned some pancakes in our 70’s Boy Scout mess kits, though it was probably just as much of a cookware and/or batter technique issue as stove functionality. It served us well on that trip, and when I moved out on my own I purchased one. They've definitely changed the model over the 20 years since then, because my much more recent purchase looks drastically different.  

The MSR Dragonfly is not the lightest stove, weighing 1 lb 3 oz without the fuel bottle, but I want it for it size. As an apartment dweller for the time being, I am at risk of losing cooking capabilities with a loss of electricity, so having a backup is comforting. What's more, it will hold my two liter stove-top pressure cooker, which I bought for the exact purpose of cooking beans and rice in a more fuel-efficient manner. No, I won't carry that pot in a bug-out situation, but bugging in whenever possible is always preferable.

Fuel flexibility is also a huge consideration for my prepping lifestyle. I can burn five different liquid fuels (gasoline, diesel, jet fuel, kerosene, and white gas) with just the change of a nozzle, using only a screwdriver. Even at current prices, gasoline will provide way more burn time than a small cannister of isobutene at the same price: Amazon has butane canisters for $2.14 per oz, versus $0.04 per oz of gasoline (presuming $3.99/gallon). If you stock up diesel or kerosene you also get more than twice the energy efficiency per MSR specs, though kerosene does burn dirtier; I lack experience with diesel to comment.  

https://amzn.to/3wSxLsU


If money and weight are no issue, another way to increase performance is to get the heat exchanger which clamps onto the bottom of a pot. This prevents the heat escape around the edges of the pot that Erin saw in using the pocket rocket at full blast. My dad owned the heat exchanger, and it needed a little monkeying around, but we definitely noticed a difference in performance. 

In theory, the Dragonfly stove will need more maintenance than many stoves, such as the replacement of o-rings. MSR recommends this be done on a yearly basis regardless of use, but my dad’s stove sat at least a decade without use and worked perfectly fine.  

I know of backpackers who only use the MSR Pocket Rocket, and its price, weight, and ease of use are definitely appealing; it's for those reasons that I want to add it to my fiancée’s bag when I have the funds. In my opinion, though, the Dragonfly’s capabilities make it worth its extra weight and complexity. 

The Fine Print


This work is licensed under a Creative Commons Attribution- Noncommercial- No Derivative Works 3.0 License.

Creative Commons License


Erin Palette is a participant in the Amazon Services LLC Associates Program, an affiliate advertising program designed to provide a means for sites to earn advertising fees by advertising and linking to amazon.com.