

One of humanity's older
crafts, making candles at home can be a fun and useful skill to learn. It’s
also much simpler than most people realize.
Supplies and Equipment
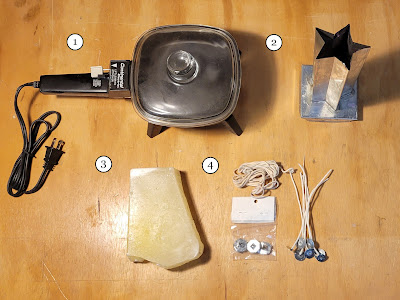
The elements necessary to make candles are not complicated or expensive, but they can be fairly specific in certain details. You will need:
- A method of melting wax safely
- A candle mold
- Wax
- Wicks and sustainer tabs
When melting wax, the two most common options are an electric melter or a double boiler. They each have their pros and cons; for example, an electric
melter is considered safer as there is no open flame, but obviously requires electricity, whereas a double boiler works with nearly any heat source, but is a greater safety risk if used over
an open flame as liquid wax is very flammable.

A simple aluminum double boiler
Candle molds can be simple
or fancy
and come in various sizes. Existing containers such as glasses, mugs, tins, and
even boxes can be used as-is without needing to remove the wax after casting.
You can even 3D print
your own candle molds.
Paraffin,
beeswax,
soy,
and other plant
and synthetic-based waxes are all available for candle making. The range of prices varies, and so do their properties; qualities such as burn rate, drip quantity, and melt
temperature should be considered. Damaged or broken candles are also
a good resource.
Wicks are available in both coils
that need to be cut to length and in pre-cut lengths and already threaded on keepers called sustainer tabs, which are also available separately. Another consideration when selecting wicks
is matching the wick material to the type of wax and the size of the wick to
the diameter of the candle.
Optionally, dyes, perfumes, and other decorative elements can
be added for aesthetic purposes.
Process
The steps to follow are also fairly straightforward, and are safe as long as reasonable care is taken.
Obligatory safety warning: melted wax can be very hot!
Avoid getting it on your skin or other important things.
- Place the wax in the melter and begin heating.
- While the wax is melting, prep the wick by attaching the sustainer tab and threading to the mold as appropriate based on manufacturer's instructions.
- Make certain the wick is properly centered in the candle mold.
- Carefully pour the melted wax into the mold.
- Let sit while the wax hardens.
- If appropriate, remove from the mold. (If the wax is being poured into something like a jar or tin that will be the permanent container for the candle this step can be skipped.)
- Enjoy your candle.

No comments:
Post a Comment