Friday, November 28, 2014

Black Friday Prepping Deals

Not actually Erin.
& is used with permission.
This is just a quick post as I take a break from decorating the house.

There are some good shopping deals to be had online that I'd like to share with you.


Klymit makes some good stuff. I have one of their camping mattresses (a Static V) in my bug-out bag; it gives me a great night's sleep and it compresses down to about the size of a 20 ounce Gatorade bottle. The mattress listed here is lighter; it weighs 12 ounces and has an integrated 4" pillow.  I have no experience with their sleeping bags, but if they're anything like their sleep pads, they are also quality.

50% off is a ridiculously good deal. If you need a sleeping pad, get this now


Lucky Gunner is having a Black Friday sale (am an an affiliate, so shopping through my link helps me out), They've reduced prices on a lot of things, and there's also a 25% off sale for all optics. Use the code BLACKFRIDAY at checkout. Every prepper likes ammunition!


I have no experience with BioLite -- their stuff is too expensive -- but I've admired their products from afar. If you can afford them, they're a great way to generate power for your electrical goods while you cook food. Use the code BFBIO14 at checkout for for 20% off all products. 


Our own Blue Collar Prepping co-blogger Evelyn Hively has a 25% off special with the use of the code BlueCollarPrep2014. It's good through December 18th, which is the last day she can ship anything and have it arrive in time for Christmas. 

Evelyn does really phenomenal work with yarn, and buying one of her crocheted shawls or purses will help her in a direct and immediate way. Please, browse her store!


And of course, Amazon is having its usual Black Friday sale. I am an Amazon Associate, so buying through my link helps me (and indirectly helps this blog).

Happy shopping, preppers!

Thursday, November 27, 2014

The First Thanksgiving: Prepping Lessons from the Pilgrims

The first Thanksgiving was a three-day celebration of a successful harvest after a rough year for the the settlers at Plymouth, in 1621. How well prepared were they for what they faced when they left England?

A Brief History Lesson
The settlers called themselves "Saints", not "Puritans"- a name reserved for those who chose to stay in England - nor "Pilgrims", a name that wasn't applied to the Separatists until later. The Saints were a small religious group that rejected the teachings of both the Roman Catholic Church and the Church of England. They tried moving to Holland, looking for a place to practice their religion in peace but ran into problems with the 17th Century version of labor unions not allowing them to work.(1) They applied for and received permission to emigrate to the British colonies in the New World and starting making preparations to move to a place with no state religion and very limited government.

They took off from Plymouth, England in two older cargo ships, the Mayflower and the Speedwell, but the Speedwell started leaking shortly after they left port. This required that they return to port and cram 102 of the 120 colonists into the Mayflower for the trip, finally setting out in September 1620.(2) There was speculation that the crew of the Speedwell caused the leaks as a way of getting out of the year-long contract.(3)

It took them two months to make the journey from England to America, but the return journey only took a month. A baby was born during the voyage, proving that life goes on. Anyone who has been on a ship in the Atlantic Ocean in the fall or winter will tell you stories about the storms that occur. The Mayflower lost a crewman after he was swept overboard by a wave in a storm and one passenger died during the trip.(4) 

Once they found America, they landed at an area in what is now Massachusetts. Their permission only extended to the area that is now Virginia, so they were just a bit off course. Maps of the time were crude and hand-drawn, there was no GPS system, and nautical navigation was done by compass and sextant - taking readings from the sun and stars which were then compared to an ephemeris to determine the latitude and longitude of their location. Time was measured by hourglass and ship's speed was measured by log-and-line.(5)

The weather prevented them from sailing down the coast and winter was setting in. A group of the men wrote and ratified the “Mayflower Compact", a declaration of the founding of Plymouth (named after the port they sailed from in England) establishing the colony.(6)

The colonists and crew spent the winter of 1620-21 living aboard the Mayflower (where another child was born in November), anchored just off-shore while working on building a village on the site of an abandoned native village. Of the 102 colonists and about 30 crew, 49 passengers and about half of the crew died during that first winter from a combination of scurvy, pneumonia, and tuberculosis. Proper medical supplies and a balanced diet, both of which were not well understood at the time, would have helped with survival.(7) They did the best they could with what they had, which is all anyone can ask for.
Aside: Living conditions aboard the Mayflower
From the information that I have been able to find, the Mayflower had about 1250 square feet of passenger space on the "gun deck", which is where the passengers would have lived. Shove 100+ bodies into something the size of an small suburban house with no good way to get out, no central heating, no bathroom, no insulation, limited fresh water, limited fresh food, and you'll get an idea of the living conditions. Floor space per passenger would have been about the size of a twin bed or a couch, with a five-foot high ceiling. Compared to that, your average root cellar/storm shelter is spacious.(8)
Once spring arrived, the colonists were able to move ashore and finish building their village. With the help of the indigenous peoples (Native Americans) they were able to get some crops planted and learned how to hunt some of the game in the area. There were disagreements with some of the natives due to the initial lack of respect that the settlers showed for burial grounds and stored food that they found during scouting missions.(9)

The Mayflower left the colony to return to England in April 1621, after waiting for the crew members that were still alive to recover from the hardships of the winter, making it back to London by mid-May. There is no evidence that the Mayflower ever sailed again; her owner died shortly after her arrival back in England and she was probably broken up for scrap shortly afterwards.(10)

Life for the settlers that first year was busy with building, planting, hunting, and learning about their new home. They established a viable village (something that was not guaranteed) that became the basis of the longest continually-occupied community in America.

Once the first harvest was in, the remaining settlers held a three-day celebration of their accomplishments. They had a bit to be proud of and I'm sure most of them were glad to know they didn't have to spend another winter aboard a ship.(11)

Footnotes
  1. Even if you have skills, you may run into situations where you may not be able to use them, so have a back-up plan. 
  2. This is a good example of the axiom “Two is one, and one is none” that you'll hear preppers repeat. 
  3. A prime example of the risks associated with contracting out any part of your preps. 
  4. Travel can be dangerous, so plan your bug-out carefully. 
  5. Get the best information that you can, and be prepared for some of it to be wrong or no longer relevant.
  6. Proof that paperwork will follow you everywhere, even when SHTF. 
  7. There is a reason that the holy trinity of prepping is referred to as "Beans, Bullets, and Band-aids."
  8. Be grateful for what you have, and realize that people have lived in much worse. 
  9. Be aware of the cultures around you, have some idea of how to negotiate, and be capable of admitting if/when you make a mistake. 
  10. Nothing lasts forever.
  11. Celebrations are important for morale, which is vital to the survival of any group after a crisis, so look for reasons to celebrate and remember the wins as well as the losses.

Summary
The colonists made preparations for a difficult journey to a location that they'd never visited and ran into serious problems along the way. Their plans started coming undone from the very start, with the loss of half of their transportation, yet they continued on. They arrived at a location about 500 miles from their original destination, but decided to stay there and start a colony. Even though almost half of the colonists died before the ship left, the survivors decided to stay the course and stayed. They found an abandoned village and built on the cleared land that was available, making use of the resources they found. Without the aid of the locals, the colonists would have fared much worse. Through pure stubbornness or religious faith, the colonists had the determination to persist through disease, deaths, and weather unlike anything they were used to. They prepared as best they could and then dealt with things as they came.

Wednesday, November 26, 2014

Prudent Prepping: Rain?

The dust has settled and the First 72 Hours have passed. Now we concentrate  on what to do in, and how to plan for, the long term via Prudent Prepping.


Rain?
What is this "rain" of which you speak?


If you ask the average Californian about rain, the answer is usually going to be "Not Enough!" (or possibly "Too Much!" from the uninformed), but it really has been rare here lately. Low rainfall totals and very mild winters can be a bad combination when the sky clouds up and the rain finally gets going.

For example, this past week I spent parts of two days getting a friend out of the hospital and his car out of a ditch. He wasn't hurt and his car was not badly damaged (he didn't cause the accident, either), but people here in California forget how to drive safely when the roads get wet or there is snow in the mountains.

Rain, California-style.
Unlike in the East or the Midwest, our roads do not get wet enough from rain to wash the oils and grease off. The first one or two rainy days floats everything up, and the accidents start blocking roads everywhere. We also have a law that when your wipers are on, you are required to turn on your headlights also.

This is all a long intro to:

Winter Prepping, California-Style 
(And no, it doesn't mean wearing socks with your sandals 
to keep your feet warm)

Lokidude covered much of this here, but I need to modify things to make them fit here at low altitudes.

Car Items
  • Window washer fluid. Even though it doesn't often freeze where I'm at, there are days where the dew point and temperature are low enough there is frost on the windshield. Your standard washer fluid may not wash off the frost, but rather add to it until the defroster gets hot enough to melt it from the inside. I use Rain-X Bug Remover all year long, with added low temperature fluid when I know it will be cold. As a bonus, the Rain-X makes the areas of your windshield that aren't cleaned by the wipers that much clearer by causing the water bead up and flow off faster. Check your washer nozzles for crust and blockages, also. 
  • Anti-fog treatment. There is nothing worse than getting into a cold car, exhaling and fogging up the windows. I use Rain-X Anti-Fog on all my windows after a thorough cleaning. 
  • Wiper Blades. Until it starts raining, most people don't think to check the condition of their wipers. Replace them twice a year, even if you don't use them. I change mine at Christmas and the 4th of July.
  • Headlights. If your plastic lenses are foggy, hazy or yellowed, look into treating them with a lens restorer. There are some very good restorers out there, alongside some average to poor brands. Any one of them will work to clean up your headlights; the more expensive brands will just last longer. 

Personal Items 
  • Rain Gear. I have added a compact poncho to my bag and removed the windbreaker that was there. I carry a Gore-Tex jacket with me during winter and put one extra pair of socks in the GHB. 
  • Food. One more can of tuna (4 total) and 6 black tea bags are added to the 6 instant coffee tubes already there, along with 12 more sugar packets. 
  • Extras and oddities. Two 1 qt. zip lock bags, two 1 gal. zip lock bags, 6 grocery store produce bags, two 13 gal. kitchen size trash bags, and one 32 gal trash bag. Changed out the 6 Clif bars for fresh ones. 

General Purchase
  • 30 count box of instant oatmeal, $8.46 from Sam's Club to be added to the other stored food. 

As always, if you have comments, suggestions or corrections, please post them so we all can learn. And remember, Some Is Always Better Than None!

Tuesday, November 25, 2014

Rope Tending and Basic Knots

A few weeks back, we briefly discussed paracord . Today, I'd like to talk a bit more about cordage in general, how to dress it, and a couple of basic knots.

Cordage
Cords are composed of braided or twisted strands of either natural or synthetic material. Both types of cordage have unique properties. Natural fibers tend to be a bit more elastic and stretchy, but are also susceptible to mildew and rot. Synthetic cords are far more rot resistant, but are vulnerable to heat and have very little "give."

When cords or ropes are cut, the ends immediately begin to fray. There are a variety of ways to arrest this fray, depending on the material of the cord:
  • Natural fibers must be bound or otherwise physically secured.  A few wraps of tape can accomplish this, as can a small amount of super glue. In a pinch, a simple overhand knot will stop fraying, but it makes the rope a bit harder to handle. Another clean, permanent fix is referred to as "whipping," which is the process of binding the end of a rope with thread or string, creating a strong, durable working end.


  • Synthetic cords give you an additional option: they can be melted, giving a secure end that is no larger than the cord itself. Simply hold the fibers in the flame of a lighter or candle until they melt, turning them so they melt evenly. Don't handle them until they've cooled, as they will be hot and sticky, and can cause painful burns.
What it should look like when you're done.


Basic Knots

Overhand Knot
The overhand knot is the basis for the majority of more complex knots.  It is simply a loop with a single pass through, which is then pulled snug.


Lark's Head
A Lark's Head knot forms a loop at any point in a rope.  It is a very useful knot for securing all manner of things.

Start by doubling your line into a loop.


Tie an overhand knot in it and pull it snug.


The loop that forms is solid and will not slip tighter, nor will it move along your rope.


Square Knot
A square knot is the gold standard for joining two ropes together. I was taught to tie one with the mantra "Right over left, left over right."

Cross the right hand line over the left.


Then loop the free end down and over.


 Repeat the same with the left side.


It should look like this:


Then pull tight.


Keep it all secure!

Lokidude

Monday, November 24, 2014

Guest Post: Horses and Hurricanes

by Jess Amule

Editor's Note: Jess has 15 years of experience in working with and caring for horses in Texas and Missouri, and he now owns a horse farm in southern Louisiana. 


A few months back, Erin asked for articles on bugging out with livestock. While I have not had to evacuate with horses, I do have a plan as I live in a Gulf state that is vulnerable to hurricanes. A lot of my information comes from a stable manager who has run barns and been in the NOLA horse scene since the 1950s. The rest is just knowledge I've picked up during my career.

Microchipping is important.
It costs about $50 per horse, and alongside a Coggins test it is required for horse ownership in many states. Stay or go, lost or stolen, this is a sure form of ID. When rescue teams for animals move into an area, this is the first thing they check for. Be sure your chip is registered and you have the serial numbers and other important paperwork (such as the Coggins paperwork) with you in your bug-out gear. Many places will not accept you without it.

(See also: Scan Your Stuff. -- Editor)

Know your terrain and what could happen. 
I am told a lot of horses were found drowned in their stalls after Katrina because "Oh, it's never flooded around the stables before."

Keep an eye on the weather reports, know your area, and know the terrain. Does your location flood? If it doesn't, is that only because a 20 foot high dirt wall was put there by the lowest bidder? The biggest question is always "Do I stay, or do I go?"

If you stay, the preps are the same as for people. 
  1. Make sure you have enough protected feed (55 gallon food-safe plastic barrels are best for this),  hay or forage, and most importantly, water. 
  2. Prepare to be without access to a hay supplier or feed store for a few weeks. 
  3. If you have a well. have a generator to run it. If you don't, get more of those barrels and fill them with water. In my experience, most horses need at least 5 gallons of water per day. Given that hurricanes are hot and nasty, it would be a good idea to double that. 
  4. Make sure your emergency vet bag is well stocked up (you have one of those, right?)
  5. Even if it doesn't flood where you are, if you have been through a hurricane you know to expect water. Keep hay covered, food sealed and everything stored on pallets. Make sure you have filled in those stalls and/or your barn or pasture area has some high ground. Your horse doesn't want to stay in water for days any more than you do.

If you leave, remember you will be leaving with everyone else. 
If you are like me, you do not own a top-end air-conditioned trailer. 10-12 hours in a trailer is about the limit for most horses in good conditions; stuck in traffic on a hot road, that time goes down. Having been through a hurricane, I know that it is hot, humid, and miserable beforehand, and hot, wet, humid and miserable afterwards.
  1. Try to find back roads you can use. 
  2. Always keep your trailer prepped and your hauler fueled up. If your safe point is far away it might be worth investing in an auxiliary fuel tank. 
  3. You may have to pack 2-3 weeks worth of supplies for you and for your horses; see above for what you'll need. 
  4. Know where you are going, and have more place than one place in case one is full or you need to choose one that is not in the path of the storm. 
  5. There are a lot of places inland that will host horses. Know where they are, know the rules, etc. These places are usually stockyards, fairgrounds, agricultural colleges and the like, and it is first come first serve.
  6. Bring protection for you and your animals because these can be rough places in an emergency. How you protect yourself is up to you, but personally I keep all my supplies locked up. You may want to consider padlocks and bits of chain in case you wish to lock your horse up.
  7. Have a backup. If your place is destroyed and you cannot return, it helps to have horse friends inland. Work out arrangements with them so you can stay if necessary. 

Tornadoes
Since hurricane-prone areas are prone to tornadoes, too: I have been told that if you see one coming, you should open the barn and all the gates. Let your horses run, as they have a better chance than you do of surviving by running to safety. (You DID microchip them, right?)

While I confess that this is hand-me-down information and not anything I have direct experience with, there is logic behind this:  unless you have a tornado-proof barn (and most people don't), it's better to let the horses run than to trap them inside where the building can collapse and kill all of them. 

Gun Blog Variety Podcast #14

Not actually Erin.
& is used with permission.
Last week I announced a contest for "Weirdest Item In Your BOB/GHB" and not a single person replied. This makes me very sad and now I wonder how many people, if any, actually listen to my segment.

Oh well. This week, I talk about cold weather survival if you're snowed in at home (Hello, Boulder NY!)

You can listen to the podcast here, and the show notes may be found here.

Saturday, November 22, 2014

My Portable Trauma Kit

Not actually Erin.
& is used with permission.
This is the final part of my medical kit saga. In part 1, I talked about what I had for treating wounds at home. In part 2, I showed you what was in my BOB first aid kit.  In today's article, I will show you my portable trauma kit, which is designed to be "grab and go" for bugging out but is still separate from the BOB itself.


The pack itself is a Red Rock "Rover" sling pack that started out as a get home bag but ended up being too small. On the side is a Mora 840 Clipper in carbon steel, put on the pack when it was a GHB and kept on because knives are always useful.

Outside

In the top pocket are latex gloves and masks (although not N95 respirators, as I can't get those to fold into the pocket.)


Also included are two "heavy duty" maxi-pads in a plastic container. Not only can they be used for their obvious purpose but they are useful improvised bandages. Blood is blood, after all...


The bottom pocket has a first aid kit, some bandages, and a bottle of unopened (and therefore still sterile) Bausch & Lomb Soothe XP eyedrops.


The five 10cm x 10cm bandages were scrounged from a German auto accident kit. They're old, but they're unopened, and bandages don't go bad.


The first aid kit is mostly bandages, though it also has gauze, alcohol wipes, and some antibiotic ointment.


Inside


I've tried to organize things with the most important stuff up top, but that hasn't always worked. Some things just have to end up on the bottom.


First layer: 


Here's the first handful of stuff:  an Adventure Medical Trama Pack with QuikClot (same as in the kit at home), some surgical tubing that's good for a variety of uses; a cordial-size bottle of Jim Beam (antiseptic and sterilizing agent), and... some bags of sugar?

Sure. They're useful if someone is hypoglycemic or suffering from diabetic shock. It's easy to administer in granulated form, and it costs me nothing to carry these.

Next handful of stuff, still on the top layer:
  • Israeli Bandage, 6 inch version
  • another tube of sterile eyewash; 
  • a mylar emergency sleeping bag (like a survival blanket, only it covers the entire body);
  • ADC Adsafe CPR pocket respirator. This is mainly in case I need to give CPR to someone who might be sick; this device has a one-way valve that is supposed to reduce cross-contamination. (Does it work? I dunno. But it gives me peace of mind, and for less than $10 I'm happy with the investment.)
  • Notably missing: another CAT Tourniquet. I have one at home, and one in my GHB, but I need another one here.  This highlights the importance of going through your gear on a regular basis and making sure you have everything you think you have. 
Second layer:


These are things which I hopefully won't need in a hurry. The possible exception is the Sawyer Bite & Sting kit, but it's BRIGHT YELLOW and immediately underneath very orange pocket respirator, so I have faith I can get to it quickly.
  • Surgical tape
  • Box of tampons (see maxi-pad, above)
  • LED Mini Maglite
  • Extra batteries for same, with ends covered by electrical tape
  • Box of safety pins
  • Ace bandage with velcro closure. 
Bottom layer:

Top and bottom are items in individual pockets. In the middle is the bottom layer of items; this is mostly gauze and wound compresses of various widths and thicknesses (also taken from the German car accident box).  Per Brad Henson's excellent suggestion, I took one of the triangular bandages out and put it in my BOB first aid kit. 


This is what's in the top pocket:  a SAM splint and something called a catheter strap. This was sent home with mom after one of her operations; I figure anything which will hold a tube securely in place is a useful thing to have.


A burn compress (again from the German kit) and older version of the Adventure Medical Dental Medic Kit


Concluding Thoughts

Do you see what I've forgotten?  Another bottle of hand sanitizer. I've since added it to the kit. 

Deliberately excluded are things like scalpels, sutures and the like, because I'm not trained in their use. Should I ever learn how, I will add them, but right now I think I'd do more harm than good with them. 

I'd like to point out that I've been building this kit since 2009, in bits and pieces. I can guarantee you that I have less disposable income than most of you (I don't have a steady job -- I work freelance), so if I can put this together, so can you.  

I hope this gives you inspiration for building your own kit. 

Thursday, November 20, 2014

Sawyer Point One Filter Test

This link was sent to us by a friend, so I thought I'd go through the information presented and give my opinion and a review.

The link leads to a PDF file that contains what appears to be 21 slides used in a PowerPoint presentation at Tufts University School of Engineering. In late 2011, “Pure Water for the World” (PWW) distributed 200 SawyerPoint One water filters to households in Honduras for use in cleaning water for drinking and cooking. Since this is a common brand of filter (I use the Sawyer Mini myself), I thought the information that they gathered from a field test might be useful.

According to the slides, the recipients were given training on the use and maintenance of the water filters, including how to back-wash them when flow or quality decreased. Initial laboratory tests confirmed that the Sawyer filters achieved 5-log (99.999%) removal of protozoa and 6-log (99.9999%) removal of bacteria when new. The filters were then used on a daily basis for two months and a few were tested. They were still averaging 99.6% bacteria removal. After almost two years (23 months to be exact), six filters -- 3% of the total shipped out -- were brought back to the lab for testing against a brand new filter. The results were not good.

Of the six filters brought back for testing:
  • One was completely plugged, allowing no flow.
  • Four failed testing for bacteria removal (54% removal).
  • One had ruptured internally, allowing water to pass through unfiltered.
  • All six showed no external damage.
  • Recipients showed proper back-washing procedures when asked.

About half of the slides go into the very boring details of the testing procedures that they used, all standard microbiology and drinking water tests for bacteria and “turbidity” (a fancy way to measure how cloudy or murky the water is) along with electron microscope imaging of the fiber from inside the filters.

There is then a section of slides that explains the mechanics of the Sawyer filters and the types of fouling that they can encounter. Not bad information to know when you're looking for a filter for your own use.

The “Summation” slides at the end point out the limits of the test and suggest further areas of study. I agree with all of the limitations that they listed, but had a few others to add. The limitations they listed were:
  1. Few filters were brought back for testing
  2. Source water quality was largely unknown
  3. Reported use and maintenance could not be verified.

To which I would add the following limitations:
  1. Quantity of source water was not addressed in the study. With a household of 4 people, using a minimum of two gallons of water a day each, you're dealing with about 3,000 gallons a year.
  2. The laboratory tests were sufficient, but the presentation of the results was poor. A good example is the electron microscope imaging of the new filter fiber and the used filter fiber: they chose three images of each, and all six were at different resolutions. This is like comparing a 1:25,000 scale map of California to a 1:1,000,000 map of Kentucky.
  3. No reason was given for the 3% sample rate. Why were only 6 out of 200 filters brought back for testing? Were the other 194 totally inoperative and discarded by the recipients, or did someone just pick the worst ones they could find?
  4. A 3% sample is not normally considered a statistically valid sample (unless you're running a political poll). The results are interesting, but largely meaningless.
  5. Why did they choose a portable filter for use by a household for two years? Despite the marketing claims, small portable filters are made for individual use for a limited time.
All in all, what they have given us is the results of tests on a small number of filters from a large batch that they dropped off in a third-world country with limited training and no observation. From the data presented, I have no idea of how this test is relevant to much of anything other than how not to conduct a field study. My professors would have given this report a "C" at best, but I went to a small college a long time ago.

Even under the conditions they selected, the Sawyer held up quite well for the first two months (still averaging 99.6 % bacteria removal). I don't expect to be using a portable filter for my daily water needs for anything beyond that, so I am still comfortable with my choice of filters. Proper maintenance and pretreatment of your source water is vital to getting the most out of any filtration system, and they are something that you need to take into consideration when selecting a filter.

Wednesday, November 19, 2014

Getting Started in Solar Cooking

Guest post by Paul T. Martin
Paul writes at The Suburban Dad Survivalist.

Are you looking for an easy and inexpensive way to prepare foods in a grid-down environment? Depending on where you live, solar cooking may provide you with great options beyond meal preparation.

As the name implies, solar cooking utilizes energy from the sun to prepare foods. As with any solar energy application, there are limitations to how well this works. The biggest downside to utilizing solar cooking as part of your preparedness plan is that it requires adequate exposure to the sun. Depending on where you live in the United States, solar energy options can have varying degrees of utility.

That’s not to say that people of the preparedness community should shun solar cooking if they live at high latitudes, where limited wintertime sun exposure and extensive cloud cover make solar energy applications impractical. The upside to living in high latitude areas is that in the summertime, residents have tremendous access to solar energy. For these residents, the tool may be limited to seasonal use, but given the benefits and inexpensive cost, it can broaden the options preppers have for cooking and heating water.


Why solar cooking?

Using the sun’s energy to prepare your meals has a number of advantages. First and foremost, the fuel source is free and renewable. There’s no need to store energy for your solar cooking devices. As long as you have good access to the sun, you will have the ability to prepare a wide variety of meals that you would normally prepare and modern kitchen with full utilities.

Solar cooking comes with another advantage over traditional cooking methods, in that it does not require the chef to be exposed to tremendous amounts of heat. Unlike cooking on an open fire or on a grill, solar cooking generates very little additional heat, limiting the energy transfer just to those cooking utensils being utilized in the preparation of the meal.

Many in the preparedness community are rightfully concerned about operational security and maintaining “smell discipline” during grid down operations. These people worry that the smell of smoke or charcoal may give away their activities or location. With solar cooking, there is no byproduct: no smoke and no charred remains of burnt wood. Depending on the type of solar cooking device are using, it is possible for the smell of cooked food to waft outside of your yard or property; however, that risk can be managed in large part by placing your cooking device in such a place where people are unlikely to be downwind from it.

In addition to preparing food, solar cooking devices have other applications as well. They can be used to pasteurize water (although they cannot remove non-pathogenic materials such as dirt and chemicals). Recent medical research shows that solar ovens can be used to safely sterilize medical instruments, making them ideal for use in third world applications as well as in grid down conditions. In addition, solar cookers can be used to start fires. Often when I am demonstrating my solar cooker at field day events and to neighbors, I will take a 2x4 or log and set it on the spot where you would normally place a pot. Assuming that you have the mirror angle correctly and in full sun conditions, it takes but a matter of seconds before the log or 2x4 will burst into flames.

Some people say that solar cooked foods taste better; many of the same people go on to say that it is impossible to burn food in a solar oven. While I cannot attest to taste differences between foods cooked using solar energy versus conventional means, I can certainly dispel the myth that it is impossible to burn foods using solar cooking techniques: you absolutely can burn food in a solar oven or on a solar cooker.

When many people think of solar cooking, they think of science or scout projects they made using an old box with the interior covered in aluminum foil. While it is certainly possible to make solar cooking devices, the two that I use are commercially made. Unless you are a tinkerer or are very handy at building things, I suspect most people’s success with solar cooking will depend largely upon their decision to purchase commercially made (and thus better engineered) solar cooking devices.


What kind of solar cooking devices are there?

Most solar cooking devices can be placed in one of two categories – solar ovens and solar cookers.


Solar ovens are just like the name implies: these box-like devices replace the conventional ovens you have in your home. Most of these devices consist of a box with a glass door on the front of it. Reflective panels surround the glass door, effectively reflecting the sun’s rays into the box through the glass door. The interior of the box is painted black to help absorb and retain heat. These devices are used just as you would use the oven in your kitchen.


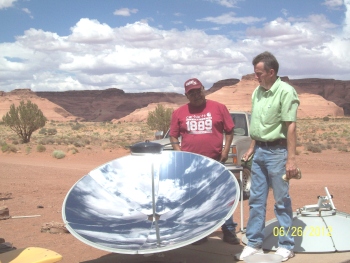
Solar cookers look a bit more exotic. These devices usually consist of a large reflective dish, called a parabola, which aims the sun’s light at an area roughly 40 to 50 square inches. Pots and pans sit on top of this area of intense energy, which is capable of boiling water, frying bacon and even setting logs on fire. The solar cooker replaces the conventional stovetop in your kitchen.

These devices vary in price, depending on manufacturing quality. You will likely pay somewhere in the neighborhood of $200 - $300 for commercially made solar cooking device.


How well do these devices work in cloudy or cold conditions?

Clouds definitely present a problem for solar cooking devices. Overcast skies generally do not bode well for solar cooking, while partly cloudy skies – when the sun is blocked intermittently – can still yield positive conditions for solar cooking. Cold weather, interestingly, has little to no bearing on the effectiveness of solar cooking. In fact, I generally find that temperatures in my solar oven are generally higher in the winter than in the summer, due to the lack of humidity in the wintertime.


What are some tips on getting started and solar cooking?

First and foremost, you’ll have to decide what sort of cooking device to build or purchase. If I were starting out, I would want a solar oven. It has more utility than a solar cooker and is easier to store. Keep in mind that when you have a solar cooker with a five foot parabola, you will need a place to store a five foot parabola. Mine hangs upside down on the ceiling of my tool shed.

Your choice of cooking containers will be as important as your choice of cooking device. For solar ovens, pots and pans that have thin walls and are dark in color work best. The thin walls allow for easier transfer of heat to the food, and the dark color aids in heat retention. You will quickly learn – as I did – that you do not want to use your solar oven pots and pans with your solar cooker. The solar cooker's energy concentration is simply too great for thin-walled cooking utensils.

For my solar cooker, I generally use either a cast-iron skillet or clear Pyrex. When you’re using a solar cooker, find the most indestructible utensils in your kitchen. I damaged a number of my wife’s various conventional oven trays and my solar oven utensils by using them with my solar cooker. Don’t make that mistake!

Solar cooking does require a bit more planning than conventional cooking. Not only must you allow the solar oven time to heat up (which can take longer than conventional ovens), but due to the fact the sun is always moving, you will constantly be making adjustments to both your oven and solar cooker throughout the day. My advice is to budget ample time to get your solar cooking device set up and oriented to the sun. Allow additional time to move the cooking device every so often to track the sun’s movement across the sky.

“Making hay while the sun shines” isn't just a folksy saying for farmers; it’s very applicable to solar chefs as well. If you see that there’s an increased chance of clouds or rain in the forecast, you may want to do as much solar cooking as you can while the sun is expected to be out.

The learning curve for solar cooking is not steep, but it does exist. The best way to learn how to solar cook is to simply practice. Whenever I obtain a new solar cooking device, the first test I always do is to see how long it will take to heat a gallon of water to its maximum temperature. Knowing this piece of data will teach you a lot about how to operate the cooking device as well as its capabilities and limitations.

There is no substitute for actually using your solar cooking devices now, when the stakes are low. Practice heating up your lunch leftovers in the solar oven. Practice brewing tea with your solar cooker. Then you can branch into making soups, baking loaves of bread, cooking a pot roast, and even frying bacon.

Solar cooking will not be the only cooking method you will want to have in your preparedness inventory, but it does provide you with a tremendous amount of flexibility without the need of collecting or storing fuel. Give it a try!

Tuesday, November 18, 2014

Cold Weather Considerations

It got bitterly cold here this weekend, and looks to stay that way for the foreseeable future. With cold weather comes certain considerations that need to be taken into account. If you're from a place that doesn't get hard winters, or are traveling through a place that does, or just need a refresher, then this is for you.

I've shown off the contents of my Car Survival Kit, but cold weather brings some additions.

Blankets: When the weather turns, I add a couple extra wool blankets to my truck. Some folks prefer sleeping bags, because they keep you warmer. I lean towards blankets, for a bit more versatility and utility. Wool blankets from a thrift store are cheap and work great.

Clothes: I keep a spare set of clothes in the truck in the winter, including a coat and socks. Being cold and wet is miserable at best, and can make for a quick trip to hypothermia.

Boots: A good pair of waterproof boots can help stave off the cold and wet I mentioned. Personally all my boots are waterproof, but for someone like my wife, a pair of boots or overshoes are a necessary seasonal shift. Be sure to check them and make sure they're still waterproof each year.

Lights: Cold weather wreaks havoc on batteries. Make sure they still work.

Chains or Cables: If you have snow chains or cables, check them to make sure they're still in good shape, and that you know how to use them.

Tires: Cold weather can cause tires to lose pressure, so check them regularly and air them up as needed. Check your tread as well, or have your favorite tire shop do it for you.

Don't stay *too* frosty out there.

Lokidude

Monday, November 17, 2014

Pilot Bread? More Like Dog Biscuits!

 "After the Storm" Rhi's avatar
A while back on our Facebook page, we had a discussion concerning foods suitable for storage in the trunk of your vehicle or a Get-Home Bag to tide you through until you can get home or to your Bug-Out Bag and better supplies.

Several types of foods were mentioned, including a brief discussion of hardtack, way bread, and journey breads, as well as various types of crackers. Bread of all sorts, and what we think of as crackers, have been used for millennia as a quick, long-storing, easily transportable source of energy.

During the discussion, one of the commenters mentioned this commercially available stuff called Alaskan Pilot Bread.

Now, the guy who mentioned this was also kind enough to post a link to the recipe (found here) and I, baking fiend that I am, agreed to give it a try and see how they turned out.

Now personally, I'd never heard of Alaskan Pilot Bread.  My DHT (Dear Hubby Type),  having been in the Navy during his misspent youth, had not only heard of them but had also actually eaten them.  He was fairly excited at the prospect of me trying out a recipe that touted itself as being a version of Alaskan Pilot Bread and was looking forward to trying out the results.

We were both in for a rather unpleasant surprise when the results finally came out of the oven: They were salty. They were bitter. They left an unpleasant aftertaste in the back of the mouth. They never got crispy and had a color that was reminiscent of paste, which hasn't been appetizing since Kindergarten.

Quite frankly, they were worse than some of my earliest attempts to bake bread during my childhood. The only member of the household that found them palatable was the dog, and she's not known for being terribly picky when it comes to things she's willing to consume.

Now after attempting the recipe and having it turn out so poorly, I decided to do a bit of tinkering with it to see if I could come up with something that wasn't quite so hideously unpalatable.   Fortunately, the results of experimentation were much more satisfying.

I tried a couple of different variants on the recipe before settling on a final form, which follows below. They're more of a cracker than the pilot bread was, but that can be fixed by simply not rolling it out quite so thin as I did.

I don't normally bake with things that are so far removed from "natural" as to be unrecognizable from their original form. However, Crisco has an unusually long shelf life (several years) that keeps it from going bad, so I keep some in my pantry for emergency use when I can't get more natural alternatives. Since we're discussing SHTF scenarios, the pantry to keep for them, and things that don't spoil easily, Crisco does have its uses.


Rhi's Way Bread Crackers
(Sorry for the lack of comparison photos - I was too busy enjoying baking to remember to grab the camera!)

2 cups all purpose flour
2 teaspoons Baking Powder
8 tablespoons Butter Flavor Crisco
1/2 cup warm water
1/4 teaspoon salt
    1. Mix salt, baking powder, and flour in large bowl.  
    2. Using a pastry cutter or pair of forks, mix in shortening until it resembles a bowl full of crumbs.  
    3. Add 1/2 cup of warm to almost hot water and mix together well.  Do not worry about over mixing, as you are not looking for "flaky" in the end result - so it doesn't matter if your shortening begins to melt into the dough rather than staying as crumbs.
    4. Dough will be somewhat sticky.  Sprinkle surface of rolling area, and rolling pin, generously with flour.  
    5. Roll out dough until it is approximately 1/16 inch thick uniformly, sprinkling top with extra flour as needed to keep it from sticking to the rolling pin.  
    6. Cut into rounds using small cookie cutter, water glass, or mason jar which you have lightly floured the rim of.
    7. Transfer rounds onto baking sheet which has either been floured or lined with Baking Parchment Paper.  
    8. Prick face of rounds several times with a fork.  
    9. Bake in oven at 400 for 30 minutes, or until beginning to brown.  
    10. If saltine style is desired, lightly brush tops with melted butter and sprinkle with coarse grain salt while still warm.

    Recipe should yield about 36 to 42 crackers, depending on size of cutter used.

    Sunday, November 16, 2014

    Gun Blog Variety Podcast #13

    Not actually Erin.
    Picture by KJ Photography
    & is used with permission.
    In this week's GBVC episode I list some of the stranger items I have in my Bug Out and Get Home Bags... and then I issue a challenge:  If you can come up with an item as strange, if not stranger, than what I have in my bag, and are able to prove that it's a useful item to have, then I will give the person who suggests the oddest item a prepping prize from my own pocket!

    Leave a comment, either here or at the show notes page, to be entered into the contest!

    You can listen to the podcast here, and the show notes may be found here.

    Friday, November 14, 2014

    My BOB First Aid Kit

    Not actually Erin.
    & is used with permission.
    Following up on a post made several weeks ago where I talked about my in-home medical kit, this will be a photo exploration of the first-aid kid I have in my bug-out bag.


    The base unit is the First Aid Only All-Purpose 299-piece kit, which I bought at my local Walmart years ago for about $20 but can be purchased from Amazon for about $19.50 and free shipping.

    Here's what it comes with:

    (75) 3/4"x3" Adhesive plastic bandages
    (20) 3/4"x3" Fabric bandages
    (30) 1"x3" Adhesive plastic bandages
    (10) 1"x3" Fabric bandages
    (4)   Knuckle fabric bandages
    (4)   Fingertip fabric bandages
    (2)   2"x4" Elbow & knee plastic bandages
    (50) 3/8"x1-1/2" Junior plastic bandages
    (1)   1-1/2"x1-1/2" Patch plastic bandage
    (3)   Butterfly wound closures
    (6)   2"x2" Gauze dressing pads
    (4)   3"x3" Gauze dressing pads
    (2)   4"x4" Gauze dressing pads
    (1)   5"x9" Trauma pad
    (1)   2" Conforming gauze roll bandage
    (6)   Aspirin tablets
    (6)   Ibuprofen tablets
    (6)   Extra-strength non-aspirin tablets
    (14) Alcohol cleansing pads
    (15) BZK antiseptic towelettes
    (6)   Antibiotic ointment packs
    (2)   First aid cream packs
    (3)   Insect sting relief pads
    (2)   1/2"x5 yd. First aid tape roll
    (1)   4"x5" Instant cold compress
    (1)   Burn relief pack, 3.5 gm.
    (1)   Sterile eye pad
    (1)   Emergency blanket
    (3)   2"x2" Moleskin squares
    (1)   Thermometer, one time use
    (10) 3" Cotton tipped applicators
    (2)   6"x11/16" Finger splint
    (2)   Exam quality vinyl gloves
    (1)   4-1/2" Scissors, nickel plated
    (1)   4" Tweezers, plastic
    (1)   First aid guide

    In my opinion, that's a pretty complete kit for a very good price. But I'm not done with it -- my incessant desire to tinker has led me to add things to it!  The idea here is to have a kit that will handle any discomfort or boo-boos that occur on a typical hike or camping trip.  More serious injuries are addressed with the Trauma Kit, which I will detail in a later post.
    • Medical shears
    • X-acto knife with extra blades
    • nail clippers/file
    • 10 safety pins
      (run the pin from one of them through the loop of the other 9 to keep them organized)
    • better set of tweezers
    • small bottle hand sanitizer
    • sealed plastic bottle of sterile 0.9% sodium chloride
      (mom brought some home after eye surgery and gave this one to me)
    • tube of Neosporin + Pain Relief ointment
    • tube of Bacitracin Zinc
    • tube of Blistex
    • tube of Cortizone 10plus
    • tube of Lotrimin antifungal
    • Blister Medic  (has both dressings and moleskin)
    • bottle of Gold Bond Body Powder, travel size
      (keeps feet dry AND prevents chafing)
    • small spray bottle of insect repellent with Maxi Deet
    • StingEze poison ivy relief spray
    • bottle of Afrin no-drip sinus spray
    • Breathe-Right strips
    • sheet of Benadryl ultratabs
    • sheet of Zantac 75
    • travel-size toothbrush, toothpaste, & dental floss
    • Kanka SoftBrush Gel
    • Walgreens oral anesthetic paste with 20% Benzocaine
    • Halls cough drops
    • Smelling salt ampule
     As you can imagine, the bag is bigger now, but the zippers still zip and everything still fits inside. 

    Did I forget anything?  Let me know!

    The Fine Print


    This work is licensed under a Creative Commons Attribution- Noncommercial- No Derivative Works 3.0 License.

    Creative Commons License


    Erin Palette is a participant in the Amazon Services LLC Associates Program, an affiliate advertising program designed to provide a means for sites to earn advertising fees by advertising and linking to amazon.com.