Monday, January 31, 2022

We Have An AR At Home, Part 2: Tools

When assembling an AR pattern rifle, a variety of tools are used. The firearm parts involved in the build will affect what tools are needed to some extent; depending on the style of AR being built, there may only be one or two specialized tools needed to complete the rifle. Many people will already have a number of the tools I’m about to describe. But if not, these tools are so generally useful for a variety of projects, it’s a good idea to have them in the toolbox anyway.

Bits and Driver
Nearly everyone has screwdrivers in their home tool box. Unfortunately, most hardware store screwdrivers are not a good choice for working on guns, especially flat bits. The majority of less expensive flat bits are ground with a wedge shape, which will often cause the blade to ride up out of the screw slot when pressure is applied, often damaging the screw and possibly the firearm.

In contrast, proper gunsmithing bits are hollow ground, meaning the sides are ground in a curve ending with the flats parallel to each other near the tip. This prevents the bit from riding out of the slot and damaging things. Othias of C&Rsenal talks about this issue in his recent video.

The two types of flat bit screwdrivers: Wedge (left) and Hollow Ground (right)

Depending on the parts being used, flat, hex, and/or Torx bits may also be needed. I’m a fan of replaceable bit drivers in general, and the Brownells Magna Tip Bits in particular. Bits can be purchased in sets or individually and there are a variety of handles as well. If one of the shorter handles is purchased, the Magna Tip 4” Extension bit is very useful.

Punches and Hammers
When dealing with coiled spring steel pins known as roll pins, it’s very important not to damage the ends during installation or removal. This is where specialized Roll Pin Punches really shine.

A selection of Roll Pins

Of course, punches aren’t much use without a way to drive them. A hammer with removable and replaceable heads, one side brass and the other nylon, is an excellent general purpose tool.

Vices and Holders
Pretty much any bench vice with a maximum distance between jaws of four inches will cover most conceivable needs, as long as it’s securely fastened to a solid bench. A vice this size has enough clearance to hold an Upper Receiver Action Block. This accessory reduces the chance of damage when installing a barrel.

Upper Receiver Vice Block set

Another useful vice fixture is a Lower Receiver Vice Block which will keep the lower receiver from shifting when putting in the fire control parts. Magnetic Soft Jaws are useful for holding pretty much anything else while reducing the risk of damage.

Specialized Tools
A bog-standard ¼” by 2” Clevis Pin, while not required, makes installing the front pivot pin on an AR a much less stressful affair. Everyone who works on these rifles should have one in their kit.

Standard Clevis Pin

Depending on the style of rifle being built, the other specialized tool that might be needed is an AR Armorer’s Wrench. It helps with stock, barrel, and muzzle device installation and removal.

AR Armorers Wrench

Now that we’ve covered the necessary tools, my next post will detail the parts required to assemble a functional and safe AR style rifle.

Have fun, and safe shooting!

Saturday, January 29, 2022

Bottled Firestarter

Not actually Erin.
& is used with permission.
One of my biggest failings as a prepper is that I am absolutely terrible at getting a fire to catch without cheating. No matter how I build my fire bundle, I lack the skill and/or knowledge to coax a spark into an ember and that ember into a flame. Heck, I have difficulty getting a fire to start with a lighter

While this is something I intend to work at improving, I must acknowledge and make allowances for this shortcoming, because the worst time to have to improve one's skills is during an emergency. 

As my friend Lokidude says, If you aren't cheating then you aren't trying hard enough to win. This project, therefore, is my attempt at cheating at fire starting in a compact package suitable for a Bug Out or Get Home bag. 


No, it's not Purell hand sanitizer, but I am repurposing an empty 2 oz squeeze bottle. Does Purell even come in orange color? If so, I haven't seen it. 

No, this is actually Sterno from an aging 2.6 oz can. I don't know how old it was, but it had never been opened and I scraped it all into this bottle, so 0.6 oz must have somehow evaporated or condensed down. 

My plan is to use this like lighter fluid, but with a twist. You see, most fire starters burn hot and quickly, and therefore have a tendency to burn out before my fuel fully catches. Sterno, on the other hand, burns low and slow because it's made to keep food warm instead of cook it. The longer it burns, the more likely I am to get the fuel to ignite. 

The plastic squeeze bottle is small, durable, enables me to see how much I have left, and the small aperture allows for precise application of the gel. Plus, I repurposed something rather than throw it away, which is always good. 

I plan to experiment with this to find out how much I need to squeeze per fire. Hopefully I will have useful information for you in a few months!


Wednesday, January 26, 2022

Surprise Finds

The dust has settled and the First 72 Hours have passed. Follow along as I build a long term plan via Prudent Prepping.  

While searching for an item through the Home Depot portal, I misspelled the word and found Augason Farms food pails! The assortment is good, but unfortunately Home Depot (like pretty much everywhere and everyone) is currently out of stock. I even did some checking and there is no restocking date. The only item in inventory seems to be a 100 count box of 125 mL Emergency Water pouches, and they aren't even an Augason brand.

From the Augason Farms website, here are the water barrel specs:
Water is the first product to sell out at grocery stores in the days leading up to and during an emergency. Be sure your family has plenty of water in an emergency with an easily-accessible supply of safe, potable water for drinking, cleaning, cooking, and sanitation. Don’t forget to pick up water treatment drops to ensure your water is free of bacteria, viruses, and cysts. Augason Farms 55-gallon Water Barrel is BPA-free and produced from food grade Polyethylene.

Barrel Specifications
  • 55-gallon food grade water barrel
  • BPA-free
  • Stackable
  • 22.95" diam. x 35.13"h· 18.2 lb.
It appears that this is also unfortunately out of stock, but you may be able to source all the parts to build something similar elsewhere.

Recap and Takeaway
  • The Home Depot is probably the very last place I would look for emergency food, but here it is! When the pails were available, the prices were very competitive.
  • I can see a water barrel being on the Home Depot site, since it joins water troughs and tanks as livestock-related items.
* * *

Just a reminder: if you plan on buying anything through Amazon, please consider using our referral link. When you do, a portion of the sale comes back here to help keep this site running!

If you have comments, suggestions or corrections, please post them so we all can learn. And remember, Some Is Always Better Than None!

NOTE: All items tested were purchased by me. No products have been loaned in exchange for a favorable review. Any items sent to me for T&E will be listed as such. Suck it Feds.

Tuesday, January 25, 2022

We Have An AR At Home, Part 1: 80% Lowers

This post is the first in a series on assembling an AR-15 at home and on a budget.

Obligatory Disclaimer: Please check all relevant Federal, State, and Local laws before embarking on this voyage. At the Federal level, it is perfectly legal for non-prohibited persons to manufacture firearms for personal use.

Putting an AR together from parts is something anyone with basic mechanical aptitude, the ability to follow simple instructions, and few specialized tools can do in an afternoon.

When getting started, a preliminary question should be “Should I buy a completed lower, or should I get an 80% lower and finish it myself?”

For those who are not familiar with them, 80% lowers (one source, another source) are complete firearm receivers except for the fire control pocket, which is left solid. This is the area where the hammer, trigger, and associated pins and springs fit.

There are pros and cons for both options, of course. Here are some of the main considerations

Completed Lowers:

  • Usually slightly more expensive
  • Must be shipped to or purchased from an FFL
  • Require filling out a 4473
  • Ready to go without any modification

80% lowers:

  • Generally less expensive
  • Can be shipped to a private residence
  • Do not involve any Federal paperwork
  • Require fairly precise machining

Completing an 80% lower can be accomplished with basic tools such as a hand drill or cold chisels and files. But a much better and more professional result will be achieved with a drill press or, preferably, a milling machine. While this process can be done freehand, the risk of error, and therefore ruining the lower, is quite high, and this is where the cost savings for the 80% lower can evaporate quickly. A jig (one source, another source) to help guide the cuts is highly recommended; however, the price of a quality jig will often exceed the cost of a single 80% lower. Everyone needs to decide for themselves where the tradeoff of effort vs convenience falls on their personal cost/benefit scale.

What follows is the experience of a fellow gun owner who has been through the process of converting an 80% lower to a complete lower. Remember: skills, tooling, and experience will vary.

*****************************

Hello, Different Gunnie here, to talk about my experiences doing 80% AR lowers and other incomplete firearm parts! But first, some information: 

  • Using power tools can be dangerous. Follow all safety instructions for the equipment you are operating!
  • You need PPE (Personal Protective Equipment) designed to protect you from the hazards at hand. Safety glasses, particle masks and hearing protection should be available for the times you need them.
  • YouTube can be your friend. My default source are manufacturers videos of the tools I'm using.
  • YouTube can also be your enemy. When in doubt, DON'T. Instead, ask a friend with power tool experience for help. 
Now for some other information: I Am Not A Lawyer and didn't stay in a Holiday Inn Express. Neither am I a firearm manufacturer, as defined by the U.S. Government.

It is not against the law to make a firearm FOR YOUR PERSONAL USE, but there are certain very explicit exceptions. Please see this link for more information. The important section from that site is copied here:

The Gun Control Act of 1968 (GCA) mandated, among other things, that persons "engaged in the business" of dealing in firearms must be licensed by the federal government. (18 U.S.C. § 921(a)(21)(C).) This development made it illegal for an unlicensed person to make a firearm for sale or distribution. (18 U.S.C. § 923.) In addition, the law requires that firearms dealers must perform background checks on prospective purchasers and maintain records of all gun sales. (18 U.S.C § 922(t).)

However, nothing in the GCA prohibits individuals from making guns for their own personal use. A non-licensed person may make a firearm, provided it is not for sale and the maker is not otherwise prohibited from possessing firearms (such as a convicted felon). (18 U.S.C., Chapter 44; § 922 (d).) Federal law imposes none of the purchase restrictions on non-licensed possessors that it does on those who need licenses, and as a result, homemade guns need not be registered and the owner need not undergo a background check.
All of this may be different and/or change, depending on your state of residence or a change in Federal regulations. In general, though if you are not prohibited from possessing a firearm, you can build one FOR YOURSELF. According to the Federal government, the AR-15 lower is what is meant by 'firearm', as that is the only part with a serial number. All other parts are a collection of steel and plastic.

Questions on this, please see the "I Am Not A Lawyer" section above and contact a real, certified expert at the site shown.

On To The Fun Stuff!

Tools
 
Jig
I have used two different jigs and the one I have now is from 5D Tactical and it is, in my opinion, very easy to use. This particular jig will allow you to machine a lower for any caliber you choose from 9mm, through 5.56 and similar length, to the assorted .308/7.62x51 length rounds. Both of these jigs I used required a router to make the process relatively quick and easy. I highly recommend watching the video on the liked 5D page for how all this works.

Router
I happen to already own a router, so I didn't need to go shopping. The choices are as varied as there are power tool companies, so as long as you are choosing a reputable manufacturer, I don't care what you choose as long as you can adapt the router bit/milling bit to your tool. There are complete instructions on the 5D pages.

Other Needed Items
You will need a vise to hold things, mounted on a workbench or attached to a 2x6 board that can be clamped in a safe place to operate it. To control the aluminum particles produced and expelled at ~25,000 rpm, a vacuum is nice but not required. A hand drill can be used to make the holes through the sides if you are careful, but I used a friend's drill press.

The Actual Process
Again, I recommend watching this video and also this one, found on the 5D jig page for a good understanding of how this all works. My first try using the 5D jig took me about four hours to complete everything. Even with practice I'm not comfortable rushing the steps, and I seem to be at a bit under 3 hours to finish everything.

What Is The Cost? 
That depends on whether you are buying everything from scratch or if you have access to some of the tools to start. If you were to buy everything, starting with a router, jig, cordless drill, vise, portable stand, vacuum, drill bits and screwdrivers, the cost could start at $700 and easily be $1,000, depending on what you like. As I had everything but the 80% lowers, jig and milling head, the cost wasn't terrible.

Lowers are available from many different places, and after a quick search can be found for as little as $60 to as much as $250 and above.

What Do You Get?
If you can follow directions, you can get something like this:

Before and After
 
Bonus Content!
There are other firearms available to make at home, such as various pistols. I am doing a Not-A-Sig 320 from a kit bought from JSD Supply. You can buy the jig and 
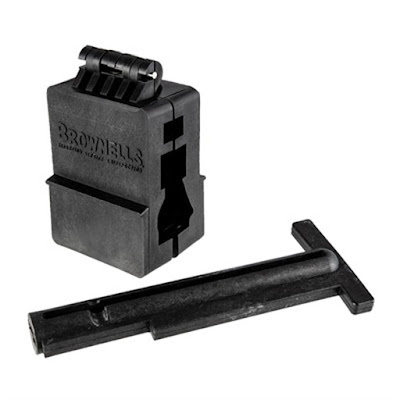
the part that makes it a 'firearm' from them. Here is a picture of what the parts look like. 
 
Top to Bottom: Jig box, unfinished control unit,
completed  control unit, outer jig,
inner jig


This company also has very good support and the instructional video has easy to follow instructions. For this project I recommend a drill press, since several of the required drill bits are a very small diameter and the holes need to be precisely located.

Also available are several different frame and slide options, since the 'firearm' parts can be easily removed and placed into a different frames with the removal of a couple of pins.

I have this combination which was purchased last year (out of stock now) and I just haven't quite finished it yet, There needs to be some trimming of several parts and polishing and smoothing of some spots where I didn't necessarily drill as smoothly as I could have. That's why you see an unfinished unit in the picture shown above, just in case I need to redo it.

Full Size Not-a-Sig 320

 While JSD Supply has a good assortment to choose from, I also recommend going to the home page of  5D Tactical and looking over their 80% products too!
 
I hope my experiences answered more questions than were raised! Best of luck to you!

********************************

In future posts I (David) will discuss parts, tools, and the assembly process of a complete AR-15 lower. 

Good luck and safe shooting.

Friday, January 21, 2022

Cold Air Precautions

Living as I do in the frozen wastelands of the northern US, I've seen a lot of bitterly cold winters. We're not Arctic cold, but we experience seasonal temperature swings that require some preparation and forethought. If you're just visiting, you'll probably spend most of your time inside a comfortable building, but getting stuck outside can be dangerous.

Winter travel preparations have been covered here before; check the archives by using the search box in the upper left corner. This post, however, is about a small thing that can make a big difference in your comfort and health. The best part is that you probably already have the equipment, or you can get it for free.

Humans have built-in systems to help preheat and moisturize cold, dry air in our nasal passages, but they can get overwhelmed in extreme weather. The beard and mustache you see in my picture are helpful insulation for my face and neck, but only provide minor help with breathing cold air. 

Those of us who live in areas with cold winters get acclimated over a few weeks of dealing with it, but if you're dropped into it without that time to adjust it can be painful. The human body is mostly water (roughly 70%) so when the really cold air settles in and the humidity follows the temperature to the bottom of the bulb, we lose heat and moisture, aka water, just by breathing. If it's cold enough that you can see your breath, you're losing water.

Winter air hitting your lungs can dry out the lining and cause poor oxygen transfer, often causing panting, coughing, or wheezing. Cold air will also cause your airways to tighten or “constrict”, reducing airflow. Lungs don't like cold air; it's not what they were made to handle. Strenuous activity in winter air will tax your airways and can lead to bronchitis, or make you really miserable if you have asthma or COPD.

The simplest thing you can do to take the edge off of the cold air entering your body is to wear a scarf or mask over your mouth and nose. I have family that have COPD and limited lung function as a result of lung cancer, so I have seen what has worked for them and what hasn't.

  • The cloth masks that everyone has hanging from their rear-view mirror or stuffed in the glovebox for when they have to wear one to gain entrance to a store will trap some of the heat and moisture of your exhaled breath and transfer it to the next inhalation. 
    • The flat paper surgical masks aren't as effective as a close-fitting cloth or N95 dust mask, but are better than nothing.
  • Thin, woven scarfs are better at keeping your face and neck warm but will freeze over faster. 
  • A thick, knitted scarf will work longer than any mask because it has more surface area for frost to build up on.  
  • The old-fashioned ski masks and balaclava are time-tested and efficient, but make you look like a bank robber. 
 I work outside in all weather and have a few wool scarves that I keep handy this time of year. The old Army-issue wool scarves are harder to find now, but they are medium-thick and loosely woven so they are a good middle ground option that works for many situations (even if they are ugly as sin, according to my wife). If you have a crafty friend, or even knit yourself, wool is the best option since it will insulate even when wet.

We've had a fairly mild winter so far this year, but it's not over yet and there's always next year to think of. I may be transferring to a different job which will mean more outside work and travel in the crappiest weather, so my winter preps are getting extra attention.


Staying hydrated in the winter is another subject that we've covered, so I won't repeat the details. The simplest hydration check is to observe your urine color: the clearer it is, the better. Drink water until you have to pee and keep drinking even if you're not thirsty.


Thursday, January 20, 2022

Product Review: Spirit Burner Stove

Not actually Erin.
& is used with permission.

Because three people on Facebook expressed an interest in the results, I have reviewed what is called a Trangia Stove (because it was the first of its kind and now, like Xerox or Kleenex, it has become a generic term for its type) but is more properly called a spirit burner or alcohol stove. Like the name says, this is a small (2" high, 3" diameter), lightweight (5 ounces) brass stove which will burn any alcohol-based fuel, such as:
  • Denatured alcohol (aka methylated spirits)
  • Rubbing alcohol (aka surgical spirits)
  • Solvent alcohol (aka paint stripper)
Per the Trangia website, any fuel that is at least 70 % alcohol will work, with ethanol being the most efficient (but generating soot) whereas methanol burns cleaner but produces toxic fumes. Oil-based fuels should not be used; the reasons for this are unclear. 

WARNING! Never use gasoline or other petroleum based fuels in a spirit burning stove! 
This will produce thick smoke and toxic fumes, and will contaminate any food you are cooking or water you are heating. It may also result in serious injury!

For this test I used 4 ounces (2/3 of the stove's capacity) of Klean-Strip Denatured Alcohol and I placed the stove inside my Firebox Nano for stability and to provide a cooking surface. 

It's worth noting that spirit burners are very susceptible to wind, so it is advisable to have some form of wind screen for them; I decided that there was no functional difference between performing these tests on my porch with a windscreen and indoors, so these tests were done within the comfort of my kitchen under a stove vent. 

4 ounces of fuel inside the burner inside the Nano.

Again, the tests are: 
  1. How easy is it to light and keep fed, using natural materials. 
  2. How quickly it will bring 16 ounces of water to boil in a steel mug. 
  3. How quickly it will bring 24 ounces of water to boil in an uncovered aluminum pot.
  4. How quickly it will cook a single egg on an aluminum skillet. 
First Impressions
The Trangia spirit burner is, dare I say it, cute. It's small and lightweight, made of brass, and has a screw-on lid with a gasket and a simmer ring/flame snuffer that fits over the top. I would not recommend storing fuel inside the burner, as the stove has an un-soldered seam where the bottom meets the top and fuel will leak from there if stored in a pack. The gasketed lid is mainly a convenience so that residual drops will not leak into your pack and to prevent evaporation and spillage between cooking sessions. 

There was no need to keep the stove fed, as it burned steadily throughout without needing a refill. See the conclusion for how much of the 4 ounces of fuel were left after all tests were completed. 

Test 1: Fire Starting
Just for fun, I tried to light the alcohol using a sparker; it didn't work, but perhaps I was worried about getting too close. I then used an open flame, and the fuel lit immediately. 

Something which is interesting about spirit burners is that they take some time to "bloom". It's easier to explain with pictures than with words. This is immediately after ignition:


It's easier to see with the lights out:

Unbloomed


It can take between a few seconds to a minute to bloom, depending upon such things as fuel purity, whether or not the wick is dry, and so forth. 

Wick? Oh yes. The Trangia is a double-walled design, and there's a cotton wick in between those walls which carries fuel up to burn holes. When they ignite, usually with a "whoomp" sound, the flame has bloomed. 

Bloom!

Much like the Nano, this is a cooking stove with a focused flame, so don't expect it to warm you up unless you drink the water it's boiled. Speaking of which...

Test 2: Cup Boil
Nothing unusual to report here; the burner boiled 16 ounces of cold tap water in 8:30, with nearly all of the flames along the bottom and very little going up the sides. The Nano, in comparison, only took 6:30 but sooted up the entire exterior of my cup. 


I extinguished the flames before the next test. This is how much fuel was left:


Test 3: Pot Boil
This test surprised me: whereas the Nano took 11 minutes to boil 24 ounces of water, the Trangia did it in 10. While I can speculate as to how this happened -- perhaps I didn't feed the Nano properly, or perhaps the Trangia was 'primed' from having already boiled the cup -- I don't truly know the answer. 

Other than that, I have nothing to report. I again extinguished the flames before the final test. 


Test 4: Egg Cooking
The Trangia cooked an egg in 2:00, exactly the same amount of time that the Nano took. Again, I am mystified. 

This is the fuel left after cooking:


After the burner had cooled, I poured the fuel into the same measuring glass that I used to measure out exactly 4 ounces of alcohol. This is what remained:


As you can see, a combined burn time of 20 minutes 30 seconds used just a bit over 2 ounces of fuel. Interestingly enough, a stereotypical hip flask, which is designed to keep alcohol from leaking despite repeated jostling, holds 8 ounces. At an estimated burn rate of 10 minutes per ounce, a flask of fuel would give you 80 minutes of burn time -- a very solid return for your investment of money and weight.

As a point of interest, the fuel was clear when I first poured it. Knowing this, you probably don't want to pour old fuel back into your flask. Now that you know the burn time, you can be precise with how much you pour. 

My Rating: A+
This is a solidly-performing piece of kit that is efficient, lightweight, and very reasonably priced. Its biggest drawback is that you have to carry fuel for it, but a spirit burner more than makes up for it by being incredibly easy to light and having an even burn rate. I pack it in my GHB alongside my Firebox Nano, and my plan is to use the Nano when conditions are good and use the spirit burner when conditions are poor (it's raining, I cannot find fuel, or I need something hot to drink immediately). 

In addition to having a fuel flask, I recommend having a small measuring cup. Not only will this allow you to precisely measure and pour the fuel you need, but it will also make refilling your fuel flask easier. This 2 oz mini-cup is made of Tritan, the same as most sport water bottles, and costs only $6. 

https://amzn.to/3tLSsGS

The original Trangia stove can be purchased for $18.50, or you can spend a little less and get knockoff version which comes with a cooking stand and a simmer-ring that has a fold-out handle.  

https://amzn.to/33XpOaR

Tuesday, January 18, 2022

Candle Making

The ability to generate light, either with a flashlight or by making fire, is a topic frequently discussed on this blog. However, the overlooked candle is another source of light and heat. From a simple birthday candle to a three wick, eight inch diameter, two foot tall column, they all have their uses. 

One of humanity's older crafts, making candles at home can be a fun and useful skill to learn. It’s also much simpler than most people realize.


Supplies and Equipment
The elements necessary to make candles are not complicated or expensive, but they can be fairly specific in certain details. You will need:
  1. A method of melting wax safely
  2. A candle mold
  3. Wax
  4. Wicks and sustainer tabs

When melting wax, the two most common options are an electric melter or a double boiler. They each have their pros and cons; for example, an electric melter is considered safer as there is no open flame, but obviously requires electricity, whereas a double boiler works with nearly any heat source, but is a greater safety risk if used over an open flame as liquid wax is very flammable.

A simple aluminum double boiler

Candle molds can be simple or fancy and come in various sizes. Existing containers such as glasses, mugs, tins, and even boxes can be used as-is without needing to remove the wax after casting. You can even 3D print your own candle molds.

Paraffin, beeswax, soy, and other plant and synthetic-based waxes are all available for candle making. The range of prices varies, and so do their properties; qualities such as burn rate, drip quantity, and melt temperature should be considered. Damaged or broken candles are also a good resource.

Wicks are available in both coils that need to be cut to length and in pre-cut lengths and already threaded on keepers called sustainer tabs, which are also available separately. Another consideration when selecting wicks is matching the wick material to the type of wax and the size of the wick to the diameter of the candle.

Optionally, dyes, perfumes, and other decorative elements can be added for aesthetic purposes.

Process
The steps to follow are also fairly straightforward, and are safe as long as reasonable care is taken.

Obligatory safety warning: melted wax can be very hot! 
Avoid getting it on your skin or other important things.

  1. Place the wax in the melter and begin heating.
  2. While the wax is melting, prep the wick by attaching the sustainer tab and threading to the mold as appropriate based on manufacturer's instructions.
  3. Make certain the wick is properly centered in the candle mold.
  4. Carefully pour the melted wax into the mold.
  5. Let sit while the wax hardens.
  6. If appropriate, remove from the mold. (If the wax is being poured into something like a jar or tin that will be the permanent container for the candle this step can be skipped.)
  7. Enjoy your candle. 
With a small investment in equipment and supplies along with a few hours of time, we can make attractive and functional candles that can brighten our lives in more ways than one.

Friday, January 14, 2022

Product Review: Firebox Nano

Not actually Erin.
& is used with permission.

I have mentioned the Firebox Nano when I blogged about my most recent Get Home Bag configuration, but I haven't given it a proper Product Review until now. I will be using the same three tests I used in my review of the original Folding Firebox 9.5(!) years ago, with the same utensils, so that the results are comparable between models. 

The tests are: 
  1. How easy is it to light and keep fed, using natural materials. 
  2. How quickly it will bring 16 ounces of water to boil in a steel mug. 
  3. How quickly it will bring 24 ounces of water to boil in an uncovered aluminum pot.
  4. How quickly it will cook a single egg on an aluminum skillet. 
Why is the pot uncovered? Because that's how I originally did the tests, and I don't want to change the test metrics; if I did, the results would not be comparable. 

All tests were performed on my back porch where wind would not be a factor. I used natural fuels, but since this was not a referendum on my fire-making skills, I used a lighter to start them.


First Impressions
The 3" wide Nano is, by design, much smaller and commensurately lighter than its 5" wide big brother. Whereas the original Firebox weighs 2 pounds, the Nano is only 6 ounces. 

Other dimensions:
  • Width: Nano 3.0", Original 5"
  • Height: Nano 4.75", Original 7.5"
  • Thickness when folded: Nano 0.25", Original 0.375"
Because the Nano will inevitably draw comparisons to the original, I will repost the results of my initial tests so you can determine which model is right for you. 

Test 1: Fire Starting
Original: The Firebox has a nice big opening 5" square. I had plenty of room to set up my fire, but it took me a few tries to get it to light. It wasn't as efficient as the Solo Stove, but once the fire got going it quickly took on a life of its own and started putting out a massive amount of heat. Unlike the Solo Stove, the Firebox most assuredly can be used to warm you up like a campfire, because its large steel walls radiate that heat out like, well, a radiator.
Nano: I had an easier time starting a fire within the Nano. I wouldn't say this is because of any expertise on my part; rather, because of two horizontal feed slots near the base of the stove (now present in the 2.0 version of the 5" Firebox as well). These allow me to feed the stove from the bottom with very long sticks. Given the much smaller size of the Nano, these slots are a necessity for keeping your fire fed when you place anything on top for cooking. 


Unlike the larger version, the Nano does not put out enough heat to serve as a portable campfire. I expected this, and do not fault it in the least. 

Test 2: Cup Boil
Original: The Firebox boiled 16 oz of water in three and a half minutes. Also, this thing is rock solid. I had no fear of knocking over the stove or the cup that was on it -- probably because I was afraid I would brush up against it and get third degree burns. I am not kidding when I say the Firebox is a portable campfire rather than a stove.
Nano: It should be no surprise that, given a smaller burn chamber and smaller cooking surface, the Nano took longer to boil the same amount of water. Even though it took 6.5 minutes -- nearly twice as long as the original -- I felt that this was an acceptable amount of time to wait. 

While the Nano is by no means wobbly, it is much less stable than the original, especially when the legs (which double as cooking supports) are folded inward for small items. I strongly recommend the purchase of the X-Case accessory, which not only serves as a carrying case and ash pan, but also helps secure the legs in place and increases the stove's stability. 


Caution! When serving as an ash pan the X-Case can become very hot! In fact, it scorched the plastic flooring on my porch, and some even melted to the bottom of the X-Case. If you are cooking on a surface that is potentially heat-sensitive, put down an insulator first. (My Nano kit came with a piece of Carbon Felt which would have been ideal in this situation, and I will use it as a ground cloth from now on.)

Test 3: Pot Boil
Original: 24 ounces of water took six and a half minutes to come to a roaring boil.

 Nano: Again, cook times increased with decreased size, and again, it was just under double the original time: 11 minutes. 

The biggest problem I experienced was keeping the Nano fed. The fire needs more attention than the original, specifically by feeding sticks into the bottom fuel slots to make sure as much fuel as possible is burning. If you walk away from this stove for more than a few minutes the fire will go out; fortunately, the coals are still quite hot and it easy enough to get things going again by feeding it more fuel and oxygen. 

Test 4: Egg Cooking
Original: Fuhgeddaboutit. Cooked that egg in a flat minute. This was the only stove that completely supported the frying pan without even a hint of wobble. I could probably roast a Cornish game hen over this monster.
Nano: Two minutes to cook the egg, although (as expected) I had some issues with the handle of the pan wanting to pull the pan itself off the stove. I suppose this could have been mitigated by turning the Nano's legs to face out instead of in, but by this point the ash pan was pretty full of ash. Between that and the hot metal I decided not to risk it, and I achieved adequate results by placing the handle directly in line with one of the support legs.

My Rating: A+
While the 3" Nano cannot outperform the 5" original in heat output, it more than makes up for that in weight savings and portability. Even so, its performance is still better than that of the Solo Stove (whose measurements were an 8 minute cup boil, 12 minute pot boil, and a three-minute egg).

Ultimately, which stove you choose comes down to what you need it to do. Either will cook well; you just need to decide if heat output or portability is more important. As for me, I have one of each, with the original kept in my camping & bug out gear, and the Nano in my Get Home Bag. 

If you do decided to buy the Nano, I strongly recommend you get the combo kit. For $45 you receive the Nano stove, X-Case, and Carbon Felt wind screen/hot pad, and choose as an add-on the fuel plate for $6.50 to allow you burn fuel tablets and gells.


Thursday, January 13, 2022

Mental Flexibility

One of the main differences that I've seen between preppers and “normal” people is their level of mental flexibility. I don't mean the range of ideas that people consider; I mean the very concept that other ideas are possible.

“Normal” people are often stuck in a rut of some sort. They have a routine that varies only slightly from day to day, and if it varies beyond their comfort zone they react poorly. Panic, aggression, denial, and stasis (shutting down, not moving or acting at all) are common “normal” responses to any situation that violates their view of existence. The trope of a “Karen” flipping out over minor things that has become popular in recent years is a good example of how an inflexible mind reacts to change. Other examples include:

  • The route/road to work is closed due to weather, an accident, construction, etc. A “normie” will get frustrated, angry, or confused. This starts the day on a sour note that will color how they react to everything for hours.
  • One of the rugrats fell and scraped their knee. Panic ensues and the really clueless will call 911. The child learns that this is a “normal” reaction and will likely react the same way when they get older.
  • A button pops off of a shirt, a zipper breaks, or a pair of pants gets a hole in it. It's “normal” to toss it in the trash and buy a new one, while lamenting the poor quality (that they chose).
  • Violation of the “4 stupids” rules (being in a stupid place, with stupid people, at a stupid time of night, doing stupid things) causes bad things to happen. Normies will find someone to blame (denial) for the consequences of those bad things. Note that if you remove at least one of the “stupids”, things tend to work out. I've got plenty of good stories of doing things with 2-3 of them, but rarely has any activity with all 4 turned out well.
  • Job requirements change and you're expected to do something new/different. I've seen a lot of this lately due to economic and social changes and anger, denial, and stasis are very common reactions. My work varies with the seasons and I've seen people quit a job because they were told they couldn't sit around and drink coffee all day if there were no customers. The concept of doing anything beyond what they considered their job was so abhorrent that they quit rather than learn something new. “I haven't done that for the 15 years I've been here, why should I start now?” is a direct quote from a co-worker.


Preppers, on the other hand, tend to be a bit more flexible in their thinking. If something goes awry, they try to find ways to keep moving towards their goals. Surviving may be the main goal that we strive for, while being aware that life is temporary, but even shorter-term goals can be achieved despite hiccups of the universe if you keep looking for ways to make them happen. Examples:

  • Road blockages are just a good reason to explore new routes to work, or aren't a problem because you already have alternate routes planned. You might be a few minutes late, but the day isn't ruined.
  • Scraped knees, minor cuts and burns, and other minor medical issues are treated at home from the first aid kit or medicine cabinet. Children learn to take care of themselves and others rather than relying on “professionals” for everything.
  • Minor wardrobe malfunctions are a part of life and a needle and thread are not some kind of arcane magic. Repairing clothing saves money for use on other things. Buying good quality clothing is an investment because it lasts longer.
  • Situational awareness will prevent violating the 4 stupids rule because you'll be able to predict what can happen if you do. Thinking ahead is always a good thing and planning for the unexpected is even better.
  • Jobs are temporary in today's world. The days of having a career with one company that lasts 40 years are long gone, so we have to be willing to learn new skills and apply what we know in new ways. A varied set of skills will also leave you more options when you're looking for a better job. I have a Commercial Driver's License (CDL) with the additional testing to carry hazardous materials. I need this for some of the fertilizers and pesticides I work with, but our fuel department lost four drivers in less than a month so I'm filling in and delivering propane to customers' houses for a few weeks. After two days, the fuel manager offered me a permanent position with a roughly 20% raise in pay. I'm thinking about it, but it's a much more physically demanding job and I'm not a young man any more.


The old saying that “Proper prior planning prevents piss-poor performance” is the heart of prepping. Having what you need, whether it's supplies, knowledge, or tribe, makes responding to life's inevitable challenges a lot easier. We're here to help you with all three.

Wednesday, January 12, 2022

The Under 20 lbs Get Home Bag

The dust has settled and the First 72 Hours have passed. Follow along as I build a long term plan via Prudent Prepping.

I've written this post to answer a specific question and to be an example for a friend who asked questions about a bag after my snow post (Hi Jeannie!), so I'll be using The Purple Pack Lady's bag as the starting point. It is a good size at 28L, not expensive, and if ordered correctly will not appear tactical at all. Please see the linked post for more information, but here are the high points on the Mardingtop 28L Molle daypack
 
From the Amazon ad:
  • 【Durable Material】This military 28-liter backpack is made of 600D polyester, and the buckles and zippers are made of YKK.The tactical backpack is durable and has many functions. The back area and shoulder straps use breathable and comfortable ventilation pads.
  • https://amzn.to/3to9pXC
    【Hydration Compartment】This military backpack with hydration compartment space and can hold a 2 Liter hydration bladder (hydration bladder is not included), the tube is fed through the top of the bag near grab handle.
  • 【Consummate Design】This tactical rucksack has molle system,molle webbing throughout for attaching additional tactical pouches or gear. The molle backpack also has bottom compression straps,it can hang your sleeping bag,tripod or tent.There is also a patch area on the top of the camping backpack, which can be used to paste your favorite badges.
  • 【Waist belt Design】The waist belt of this tactical backpack is stitched in, but you can slide them into the middle space behind the back padding support.If you need to use the belt, you can slide it out and use it. It's a pretty snuggle fit and won't slide back out on its own. 
I've written several posts covering the setup of a bag for the Purple Pack Lady, and all of them could be used as an introduction to prepping for someone who never thought about it before, or had to actually start planning due to circumstances like weather or natural disasters in the areas where we live.

Cooking & Fire
https://amzn.to/33qjXui
A Solo Stove is in this bag now in place of an Esbit that I first put in because I had one handy. While I've no problem with Esbit, a Solo doesn't need special fuel. Plus, as mentioned in this post from last year, the Solo i
s liked by the current owner, and gear that will be used and that is familiar to the user is better than highly rated, unfamiliar and difficult to use items.


https://amzn.to/3FultZS
Also going in the bag is a much smaller pot and cup combo, the MSR Alpine Stowaway Pot. From the Amazon ad:
  • Versatile: Great for storing gear or supplies when you're not cooking
  • Secure: Hinged, easy-lift handle flips over the fitted lid to lock it in place.
  • Weight: 9.5 oz./270 g (475ml); 13 oz./365 g (775ml); 15.5 oz./440 g (1100ml); 19.5 oz./550 g (1600ml)
I bought the 775ml version, since the pot is light enough and also large enough to useful, but not take up very much room.

https://amzn.to/3Ka3VW8
I have other Sea To Summit gear, but their X Cups are a hard to beat addition, since they collapse down to nothing. From the Amazon ad:
  • Pocket-sized, super lightweight collapsible cup packs that flat for storage or transport
  • Food grade silicone is heat resistant, dishwasher safe and ideal for camping, backpacking, or travel
  • Rigid Nylon rim holds its shape and provides a comfortable grip for handling hot liquids
  • Calibrated internal ridges serve as a measuring cup
  • X-Cup capacity one cup (250ml), weight 1.6oz, diameter 3.75-inches
Since the cup collapses to almost nothing, it fits into the MSR pot very easily and with room to spare. At ~3/8" tall when collapsed, there's room for other things in the pot like matches or even flat packets of  oatmeal of cocoa mix.

Still in the bag is a Sawyer Mini Water filter mentioned going into the Purple Pack here,  but on second thought I think having several smaller items carried in a larger, also useful container makes sense, like what was the challenge given us by our Esteemed Editrix early last year. My response on how to answer the Water Bottle/Bag Challenge was shown in this post, and I'm duplicating it in the Purple Pack. I don't want to repeat everything in that post so a fast recap is what I will do:
  • The bag has a shoulder strap that will allow separate carry.
  • Besides a water bottle, there is more than enough room to carry a small amount of supplies, sufficient to supply one person in an emergency.
  • Add-on points allow easy modification of what can be carried.
What's Left
This is the complicated part. In my opinion, the additional items from this point get into Personal Choice territory. Other than possibly one or two liters of water, any new gear needs to be tailored to the owner. Gear such as:
  • Clothing. Do you add rain gear, a change of clothes or just a pair of socks?
  • Food. Do you add a couple cans of chili, or several packs of freeze-dried meals? Depending on where you are and how far you may need to cover, it makes a difference to me.
  • Shelter. If you're in a car and not going to be stuck for long (see  my Snow Post), don't worry. If you need to walk out, should you have a tarp or some other way to protect yourself from the elements if stuck over night?
  • Tools. Do you need specific tools for what you are doing or the area you're in? At a minimum, there should be a multi-tool of some sort in the bag, which is shown in the Bottle Bag post. Purple Pack Lady has a small folding knife on her key lanyard, along with a very nice Benchmade fixed blade in the bag.
  • First Aid. The Purple Pack will have, at the minimum, the same assortment of First Aid gear as in my bag, which is what is shown in the Bottle Bag post. Both vehicles already have larger First Aid kits that will be put into the bags if that time comes.
I weighed everything so far and as it sits right now, the Purple Pack is ~4lbs. With 2L of water it's still under 10lbs, so a sub-20 lb Get Home Bag seems more than doable to me, with the extra items (and weight) tailored to the individuals wants and needs.

Have fun!

Recap And Takeaway
  • I can't say this enough: search for Get Home Bag or GHB on the blog page and read everyone's posts. Since we all have different needs. there are as many different bags as there are BCP bloggers.
  • Have a bag of some kind, with the things you know you may need in an emergency. You never know when you will need it.
  • One MSR 775l pot purchased from Amazon: $21.95 with Prime
  • One Sea To Summit Silicone X Cup purchased from Amazon,: $17 with Prime
* * *

Just a reminder: if you plan on buying anything through Amazon, please consider using our referral link. When you do, a portion of the sale comes back here to help keep this site running!

If you have comments, suggestions or corrections, please post them so we all can learn. And remember, Some Is Always Better Than None!

NOTE: All items tested were purchased by me. No products have been loaned in exchange for a favorable review. Any items sent to me for T&E will be listed as such. Suck it Feds.
 

The Fine Print


This work is licensed under a Creative Commons Attribution- Noncommercial- No Derivative Works 3.0 License.

Creative Commons License


Erin Palette is a participant in the Amazon Services LLC Associates Program, an affiliate advertising program designed to provide a means for sites to earn advertising fees by advertising and linking to amazon.com.