Tuesday, October 31, 2017

Power Tools

Hand tools are awesome for general tasks. Some tasks, however, require more strength than elbow grease can provide, and that's when power tools get called upon.

While there is a nearly infinite range of power tools available, they all fall in a couple of categories, based on how they're powered.

Air Tools 
(Pneumatic) 
Driven by compressed air, these tools are mechanically simple and durable. However, they require a separate compressor to supply the air, which can be a very pricey investment.

Corded Tools
Corded electric power tools are usually the most cost-effecient option in power tools. As long as they have 120 volt power from a wall outlet, they'll run all day at full speed. Unfortunately, they require outlets at the point where work is being done, or extension cords run into the area.

Cordless Tools
Battery operated cordless tools are the most convenient option in power tools. New battery technology gives them almost as much power as corded tools, without the need to drag cords along as you work. They're the tool of choice for almost every task in the professional trades. Unfortunately, they're also the most expensive option, due to those mighty batteries.

Cordless tool selection presents more issues than air or corded tools. There is only a single option for power for each type, so you only have to pick the tool that meets your task needs. However, each brand of cordless tool uses its own battery design, and different voltages and battery chemistries also limit compatibility. If you plan ahead, all your tools can share one set of batteries; if not, you end up like me, with three different batteries to keep track of.

Battery Voltage
12 volt tools are light and handy, but offer fewer tool options. 18 volts opens up your tool selection to almost the same as corded tools. Batteries larger than 18 volts are almost exclusively used for specialized tasks, and aren't worth the extra cost for homeowners and shadetree folks. Unless you have a specific reason, stick to 18 volt tools, simply for the options it provides.

Battery Chemistry
Lithium Ion is the only thing to look at here. There are still some nickel-metal-hydride batteries floating around, but they're not worth buying. Lithium Ion holds a charge better, recharges faster, and supplies full power throughout its run time. It has become the industry standard, and doesn't look to change any time soon.

Recommendations
With those considerations in mind, the Ryobi ONE+ line is my favorite recommendation for homeowner use. The batteries work across the line of products, and it has one of the widest varieties of tools that I've ever seen. It is the brand I personally use for work around the house. (My work tool set is overkill for folks who aren't using them professionally.)

The first three power tools that I would specifically recommend are an impact driver, a drill, and a reciprocating saw (available separately, but far more economical as a kit). The saw isn't perfect for every cutting task, but it's good at any cutting task. The drill and driver may seem redundant, but I assure you that they are not: while a drill can drive screws if it must, it is actually an inferior tool for the task. It drives far slower than the impact gun, and has a far greater tendency to slip and strip screw heads. Use the impact driver for running screws, and the drill for drilling holes.

After those three, you can expand your tool collection as your needs dictate, just like with hand tools.


Lokidude

Monday, October 30, 2017

Scrounging a Bicycle

There are a great many uses for a scrounged bicycle in the world of prepping. In its original form, you can use it for transportation, entertainment, and exercise; you can break it down and part it out for raw materials for projects or sell the pieces as trade goods; and with some work, you can even use it as a power generator.

The problem is that a lot of people don't know how to obtain a scrounged bike. Fortunately for them, I have many years of experience with this; I make a hobby out of acquiring donor bikes and combining spare components into working units, which I then either sell for a small profit or give away to people who could not otherwise afford one.

Location
I've found that the single best place to acquire free bicycles is in college towns. This is due to a turnover of high population that wants low cost transportation and a tendency to leave those bikes behind when they graduate, since the cost of bringing them back home wouldn't be worth the cost. 

My personal favorite source is college town apartment complexes. It amazes me how many of them have bikes literally piled up in a corner, and have to pay someone to haul them off, because people leave them behind. Once, a couple of phone calls and offering to print up a flyer that they can tape to the bikes asking if the owner is still around yielded more usable bikes than could fit into a one ton truck and a hauled trailer, and none of them needed repairs beyond a patched tire.

Thrift stores often receive too many donations to actually use all of them, and in my experience will actually throw away a certain percentage of things that come in. If you spend a few weekends volunteering for a few hours, they are usually happy to let you have first pick of the rejects as they come in (and sometimes even some of the good stuff). There is often nothing wrong with these other than cosmetic issues such as scratches or light rust.

Bicycle co-ops are also a great place to source inexpensive (or even free) bicycles, if you have one in your city or nearby. If you need one for transportation, they are usually fixed to the point that they work well enough for travel. If you need one for a project (making one into a generator, for example) they will often have components sitting around that they will give you for free, and since many of them are very into DIY, they might even help you assemble the project if you ask nicely.

Finally comes dumpster diving. There is nothing wrong with this, but I leave it as the last resort, because bikes found there tend to have more issues than bikes from other sources. That said, I have seen brand new racing bikes come out of dumpsters behind a mall, with nothing wrong with them but a flat tire.

Safety
Try to have a second person with you, especially when dumpster diving. People get hurt, from simple scratches to broken bones.

Wear gloves if you are not sure what the bike has on it, or if it in an overgrown area. I have been stung by wasps because I had disturbed their home. It was unpleasant, and I do not recommend it.

Wear a helmet. When you are riding a bike, a helmet can make a difference between a long hospitalization and/or death, and a funny story that you tell your friends. If you are in an accident, replace the helmet if it got bumped. Your life is worth looking like a dork, so long as you are a living dork.

Permission
I strongly recommend getting permission from property owners before going dumpster diving on their property. If you choose not to do this, be aware that there may be legal consequences afterwards.

A quick phone call ("Hello [apartment complex], do you have any bicycles that you need removed?") can save a lot of time and energy when it comes to finding donor bikes.

I find that people are remarkably open to someone offering to remove what they see as trash in order to recycle it, and will sometimes offer to help or even pay you to remove the bicycle from their property.

I have also found that apartment complexes with high turnover tend to be more than happy to have someone haul the bikes off, since a lot of them get left by previous tenants.

Getting It Home
Some lucky few of you will be close enough to the source of the bike, and find one in good enough condition, that you will be able to ride it home. Others will either have a pickup truck, or have a friend who does. Failing that, however, there are several options.

Consider public transportation, as you will often be fairly near to a bus stop, especially in a college town. People may give you an odd look, but it is a lot easier to haul a bike around on a bus for a few miles and then drag it home than to haul a bike with flat tires for ten miles. Public transit will also get you a remarkable distance, so if you do some research and make some phone calls before hand, you may be able to pick up multiple bikes for nothing more than the cost of a bus ticket.

Depending on the number of bikes that you are obtaining, you may want to rent a truck. A U-Haul or similar can be rented for about twenty dollars a day plus mileage and fuel.

If you remove the wheels using a crescent wrench, a great many cars can actually fit a bike in the trunk. My accord can fit my commuter bike with the wheels still on it, because the seat folds down.

If you are stuck with dragging it home, make sure to bring plenty of some sort of penetrating lube, and a water bottle. I have done this, and it was not fun.

Basic Tools
  • Adjustable wrench, crescent style for removing parts like wheels (or putting them back on)
  • Small pump for tire inflation
  • Emergency tire inflator. Sometimes the easiest way to deal with a flat is with something like this. It inflates and seals the tire, but will eventually eat through the tube.
  • Hacksaw. If you have to cut through a lock that was left on the bike (sometimes because the person who owns it lost the key), this can be very useful.
  • Rag to clean off goop, especially when it gets on your hands.
  • Cleaner. LOC, Simple green, or even heavily diluted dish soap in a spray bottle. Just to clean off the worst of whatever may be on the bike.
  • Lube. A decent aerosol lube can be a major help for everything from stuck bolts to rusty chains. 
  • Helmet. When you ride it, wear a helmet. Don’t get killed.
  •  to keep your hands from getting poked by a random piece of wire or bit of rusted steel. Also good for bikes that have been in especially nasty conditions. These don't have to be expensive, just something leather palmed and cheap.
  • Tire patch kit.
  • Bike Chain/Bike lockHaving your bike stolen really sucks, so make sure to lock it up.
  • A cheap backpack to hold all this stuff. 

A Few Useful Tips
Whenever I have to commute on a nice-looking bike, I cover it in bumper stickers and/or cheap spray paint. I call this "urban camouflage" and it makes the bike look unique, and not as nice, so it is much less likely to be targeted by thieves. I understand that this may not be for everyone.

If you want to keep it nice, paint a custom scheme (even if it is just a stripe or two) on the bike using a nice enamel. It makes it much easier to track if it gets stolen. 

Keep a picture of the bike on your phone and in your email.

Don’t ride a bike with flat tires. It is not just harder to pedal, it will also destroy the rims, making it impossible for them to hold air anymore.

Having a paper trail can help to avoid police problems. Even if all you have is a record of text messages or emails showing that you have permission to remove the bikes, it can save a lot of hassle. My preferred method is a piece of paper with a signature saying something like “Scott Bascom has agreed to help me remove these bikes from my property” or something similar. Getting stopped by the police while you are doing what looks like stealing bikes is fairly stressful, and showing that you are just removing trash tends to get a good response.

Sunday, October 29, 2017

GunBlog VarietyCast Radio #167 - Dog Bites and Murder Insurance

Weer'd is still pulling Stunt Cohost duty (no word on what kind of dress he's wearing this week).
  • MURDER INSURANCE!!! That’s what some anti-gun people are calling paid self-defense plans. Our own Beth Alcazar, who works for a company which offers such plans, talks about her encounter with the media on this issue.
  • Police chase a teen driver after a drive-by shooting,and his mom hits every trope in the interview. Sean tells us more.
  • Barron, Miguel, and Tiffany are on assignment.
  • Erin is back... sort of. She's not up to hosting just yet, but she did record a lengthy segment about her incident and her recovery so far.
  • Michael Bloomberg is pushing hard against the SHARE act and Concealed Carry Reciprocity using “Celebrities” and virtually no production values! You know that Weer'd couldn't pass that up.
  • And out Plug of the Week is The Grassfed Gourmet Cookbook.

Thank you for downloading, listening, and subscribing. You are subscribed, right? We are available on iTunes, Stitcher Radio, and Google Play Music!

Listen to the podcast here.
Read the show notes here.

Thanks to LuckyGunner and Remington for their sponsorship, and a special thanks to Firearms Policy Coalition for their support.

Friday, October 27, 2017

Hyskore Compact Revolver Light Review

Sometimes life gets in the way, so this week I'm phoning it in by posting an old (but new-to-you) video for revolver folks.

Next week I'll double down with two new videos.

Be good, be safe, and if you can't be safe, be good and dangerous!


Thursday, October 26, 2017

The AAR

While common in military circles and some corporate environments, the After Action Report (or Review) -- AAR for short -- is not a part of most people's lives. When it comes to prepping for disasters large and small, the AAR might be a tool worth adding. 

The AAR is a formal method of reviewing a mission after it has been completed and looking for ways to improve the actions taken. The best ones I've seen  involved an outsider who could both referee the meeting and provide an unbiased view of the actions. While finding a neutral party to play outsider may not be as hard as you think, the biggest problem a prepper will have is the matter of trust: you have to trust the observer with information that you would probably not share with a stranger (to preserve Operational Security [OPSEC]) and you also need to trust that they are going to be unbiased in their opinions.

I've seen AAR meeting turn into “blame-storming” sessions, and it's no fun finding out that it's your turn to be the scapegoat. Unless there was permanent damage done to another person or something vital was destroyed, you need to be able to get past the personal and focus on the action/reaction effects. A referee can help keep the personal attacks to a minimum if they weren't involved in the actual events.

At the very least, you need to be honest with yourself and be able to look at how you reacted to a situation without bias. If you can't find anyone you trust to help you review your actions, you need to be able to critique yourself without either glossing over your failings or wallowing in despair of ever doing anything right. You probably did some things right and other things wrong; that's just part of being human. Being able to recognize the wrong things and trying to change them is part of being a prepper.

As a prepper, you're not likely to have formal missions, but you may run into situations where you use your training and supplies and want to improve any future uses of them. A few examples might clarify the ways an AAR process can help.
  1. You decide to test some new camping gear by taking it out for a weekend trip.
  2. You witness to an accident and provide first aid to the victims.
  3. The power goes out for several hours after sundown, but comes back on before bedtime.
These are all a few of my personal “missions” that I sat down after and reviewed. Some of the results of those reviews were;
  1. Always have a backup plan. If you're testing a new tent and sleeping bag and they both fail in the first few hours of use, you need to have something to use for the rest of the weekend. A rain fly that isn't waterproof and a sleeping bag with a busted zipper can make for a miserable night's sleep. Emergency food that isn't edible means you miss a few meals if you didn't pack anything else.
  2. Check your first aid supplies at least every month. My gauze and Coban wrap were fine, but my neoprene gloves had melted together from being stored in a hot car for too long. Working on a bleeding victim with only one gloved hand is a challenge! Fortunately, EMT's showed up as I was still doing my patient assessment. 
  3. Flashlights were working and had good batteries, but not everyone in the house knew where they were. This led to some heated “discussion” from the family member with anxiety and claustrophobia issues. Communications about emergency supply locations are improving. The radio and laptop computer were not enough to placate the anxiety demons, so more research is underway.
I don't want to speak for the other authors here, but I am personally willing and able to assist anyone who needs an “outsider” to help them review their AARs. As a Chaplain, I have a duty to keep most things confidential (the law gets confusing when crimes are involved) and I take duty and honor very seriously. I still have about 20 years before I can discuss a lot of the classified crap I did in the Army, so I'm used to keeping secrets.

Wednesday, October 25, 2017

Prudent Prepping: Portable Power

The dust has settled and the First 72 Hours have passed. Follow along as I build a long term plan via Prudent Prepping.

My job starts so very early in the morning that the sun doesn't come up until after my first coffee break, even in the summer. I give myself an hour to reach all the stores I cover, even if the actual mileage should not compute out to an hour's drive time, to compensate for traffic.

There are only two ways to get to the Oakland-San Francisco metro area from where I live, so figuring in time to take the alternate route is necessary. That means I often arrive at stores up to 30 minutes before I can get in to start my work. 

In nice weather, I'll have the windows down to enjoy some fresh air, listen to music, connect to the free WiFi or read an eBook. Because of the smoke last week, the windows were up and I was reading a dead tree and listening to music. When it was time for work, I grabbed my tools, lunch box, extra bottles of water, and hopped out of my car.

I also neglected to turn off the dome light.

What To Do When The Lights Stay Off (and the car won't start, either)
Luckily, I call on Home Improvement stores which have so many wonderful things to buy that they are stacked to the ceiling just waiting for someone to purchase any number of cool products. 

I needed to get a jump start and couldn't find anyone with cables in the group of people who were leaving when I was. The cables offered in this store were too small a gauge for my needs, so I looked for Option #2. Other BCP authors have written posts about portable power, but hard starts in winter are never an issue here in the mild climate of California, as on average it drops below freezing less than 7 days a year. Leaving lights on is a different matter.

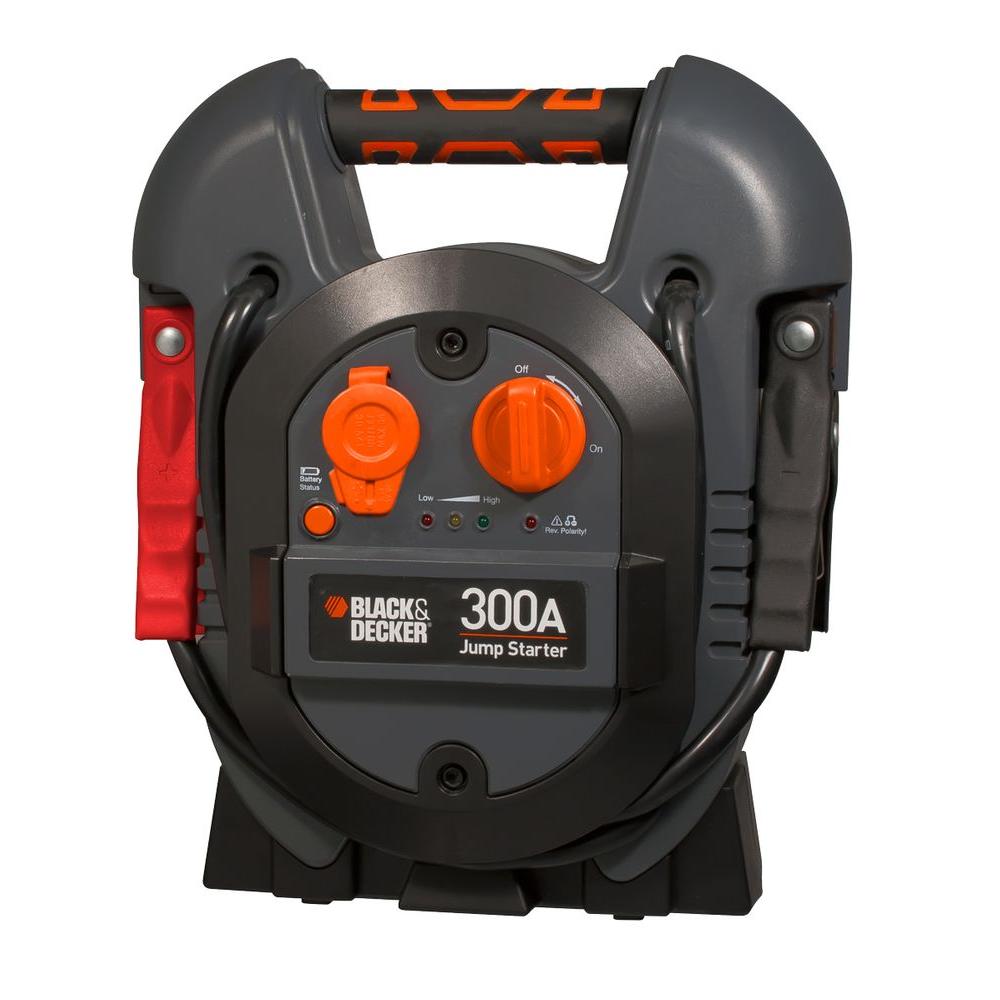
What I decided to buy to get myself home was the Black & Decker 300 Amp Portable Jump Starter. This charger leaves the factory partially charged, so it worked right out of the box. I have a 4 cylinder engine, and after a 30 second wait my car started right up.

BLACK+DECKER 300 Amp Portable Jump Starter
Model #J312B
The instructions say "4 or 6 cylinder engines",  but I'm curious if letting the unit sit for a few minutes might charge the battery enough to let it spin up and start a V8 motor. I don't have one of those handy, so it will require testing at a later date.

At 12" high, 10.5" wide, and 5.75" deep, this sits quite well into one of the smaller pockets of my previously-reviewed trunk organizer..

As things stand, I find that I'm doing what I really don't like to do, which is starting to fill up every nook and cranny with stuff, even if that stuff is useful and/or handy. I tend to be a hoarder, and getting a list of supplies to the KISS (Keep It Simple, Stupid) stage is difficult for me.

I will however soon be adding a set of long, large gauge jumper cables to my car kit, for those times when I can be the giver, and not the receiver, of a jump start. I know this sounds like "Belt and Suspenders" redundancy,  but I think both can be justified if I squint Clint Eastwood-style. 

The Recap
  • Getting a jump start is a rare, but not unexpected, thing. 
  • I believe jump starts are like Christmas: better to give than to receive. 
The Takeaway

Just a reminder: if you plan on buying anything through Amazon, please consider using our referral link. When you do, a portion of the sale comes back here to help keep this site running!

If you have comments, suggestions or corrections, please post them so we all can learn. And remember, Some Is Always Better Than None!

NOTE: All items tested were purchased by me. No products have been loaned in exchange for a favorable review. Any items sent to me for T&E will be listed as such. Suck it Feds.

Tuesday, October 24, 2017

Tooling Up

Buying tools can be an intimidating task, and can very quickly become a money pit. As a professional tool-user, I get asked a fair bit about basic tools for homeowners.

The aim of this series is to provide a bit of direction to your initial purchases. After those purchases, you can acquire tools as you find a need for them, just like professionals do.

This week, we'll look at the hand tools you'll want to pick up first. These tools cover the basic needs for repair and maintenance work around the home. In the coming weeks, we'll cover some power tools and a few specialized tools you may want around.

Hammers
There are countless hammer styles and weights on the market. For general use, I recommend a 16 oz claw hammer. Heavier hammers look like they'll do more work, but they're far more tiring to use and harder to swing accurately. 

Be sure to get a hammer with a smooth face! They work better with smaller nails and are far more forgiving to finished surfaces when you miss a swing.

Screwdrivers
Multi-head screwdrivers are a very popular option, and for good reason: I can replace between 6 and 11 individual drivers with one tool, saving money, space on my belt, and time spent looking for the right tool. For designated screwdriver tasks, they're top-shelf. 

The one area where they are lacking is prying strength. I know that screwdrivers aren't usually meant to be pry bars, but they do a great job of it. With that in mind, pick up a multi-bit driver that suits your needs, and a couple large, cheap flat-blade screwdrivers to use for "improper" tasks.

Wrenches
The wide variety of bolts and nuts that need to be turned in this world require an equally wide variety of wrenches to turn them, and this need can be met with sets of individual wrenches or with a few adjustable wrenches. 
  • Individual wrenches grab fasteners better and are stronger, but require more space and are more expensive when you buy all of the ones you need. 
  • Adjustable wrenches (sometimes called Crescent, which is a brand name) can turn a range of fastener sizes, but aren't as precise. 
For a do-most-everything single wrench, an 8" or 10" adjustable is hard to beat. Pick up individual wrench sets later, as money and tasks dictate.

Pliers
There are a few pairs of pliers that belong in every tool box. Primary among those are needle nose pliers, water pump pliers, and a set of diagonal cutting pliers. 
  • Needle nose pliers are good generalist pliers, holding material or reaching things down in a hole. I use mine several times every day. 
  • Water pump pliers, colloquially called Channel Locks (another brand name) are usually employed in plumbing tasks, as the name indicates. Their angled jaws are designed to grab pipe and fittings, and they also provide a strong mechanical advantage when gripping round items. 
  • Diagonal or side cutting pliers are ideal for cutting tough materials, and also work great for gripping and pulling small metal items like staples and nails.

Kits
There are a million and one kits on the market that claim to be basic tools. Sadly, most of them are very light duty, or with glaring holes in the included items. The alternative are large sets that are quite complete, but far more expensive than a starting kit. This kit is a great deal, and probably bridges the gap better than any other that I've seen.


Lokidude

Monday, October 23, 2017

Woven Glory

Two years ago, I started an extended series on Fiber Arts, but never finished it due to health problems. Now that I'm no longer over my head, I intend to finish that series. I've managed to cover the types of fiber, processing it, spinning, and dying it, and today I talk about weaving it into usable form.

Weaving is an art form that is almost as old as civilization itself, and has been practiced since the very beginnings of agriculture (and possibly before that). Every known society throughout history has had some form of woven textile goods that were produced from a variety of source fibers.

As societies grew and gained technological advances (either through study and innovation, or via trade with their near neighbors) the looms they used to produce cloth became more complex, allowing for a much wider range of patterning in the finished product.

In its most basic form, a loom is simply something to hold long threads in place and under tension (called the warp) while other, usually much shorter, threads are passed over and under them in succession (called the weft.)

These days, looms come in a huge variety of sizes and shapes, from lap-held looms that can produce both simple and elaborate trims or strips of fabric, all the way up to looms that require their own rooms for making extensive rolls of fabric, large rugs and carpets, or hanging wall tapestries*. When talking about home or artisan use, there are three different types of  basic looms, which is what I'll describe today, along with a fourth which is mainly a historical curiosity.

None of these looms require power to operate, and all can be made by hand with proper woodworking tools and knowledge, meaning that they are a good investment for a prepper interested in making woven fabric.

*Yes, tapestries are still a thing, though they aren't specifically used for keeping out drafts these days. They're very labor intensive, ornate, and time consuming to produce, sometimes taking upwards of two years to manufacture and costing thousands of dollars. Weaving specialists work hand in hand with draft artists and painters and can turn practically any piece of flat visual art into a one-of-a-kind tapestry to hang for viewing!

Style One: The Inkle Loom
Rhi's inkle
Inkle looms are small, portable, typically lap-held looms that weave very narrow strips of cloth. The width one can handle is determined by the length of the bars that make up most of its form, and is seldom over 3 1/2 inches in total width. The warp threads are wound individually, with every other thread passing through a loop of string which is tied off separately and is referred to as a heddle. The heddle is what allows a weaver to move alternating sets of threads into place (up/down or back/forwards, depending on the type of loom) before a pass is made with the weft (crossing) thread.

Inkle looms are fantastic for beginning weavers. They're inexpensive, easy to learn, and very forgiving of potential mistakes. With the addition of cards (also called tablets), some seriously intricate pattern work can be performed on an inkle loom, giving it a huge amount of versatility for its size and price.

I've seen inkles run between $45 and $150, depending on the quality of the woodworking done during manufacture. My inkle cost about $80, and is made of scrap hardwood from other projects. It will weave 2 1/2 inch wide pieces of fabric, which I primarily use for things like belts, trim on costuming, straps for purses, strips of it sewn together side by side and then into a shoulder bag or pouch, etc. It also doubles as a warping stand for my floor loom, where I use it to measure the lengths of thread to be warped onto the Big Boy (see below).

These are great for kids, beginning weavers, those who don't intend to invest a lot of time and money, and those who are wanting to see whether its a hobby they actually enjoy before making the larger time and money investment required with a tabletop or floor loom. They're also well loved by experienced weavers who make complex ribbons of trim via tablet (or card) weaving on an inkle.

Style 2: The Box or Tabletop Loom
Tabletop loom by
Tumbleweed Woodworks
Offering lightweight portability that still allows for significantly larger pieces of cloth than an inkle, the box or table loom is a good choice for those who don't want the expense (both monetary and floorspace) of a traditional floor loom. 

These guys are little work horses, reliable and easy to learn how to use. Though they're less forgiving of mistakes than an inkle, they're also a lot more versatile in the types of patterns available to the weaver. 

Most of the box or tabletop looms that you'll find are rigid heddle looms. Instead of a piece of string tied around every other thread like the inkle loom, a rigid heddle loom has rows of very thin metal bars with eyelets in them to pass the thread through. In the photo above, you can see the three sets of rigid heddles in the raised areas featured in the center of the "box" frame.

Each thread gets its own heddle instead of only half the threads getting held in position this way. The more heddles a loom (tabletop or floor) has available, the more complex and ornate the pattern can become. Since each thread gets its own means of moving up and down, the shed (current weaving area) is determined by which heddles are up.

These looms are good for slightly more advanced beginners, intermediate weavers, advanced weavers who want something small and portable to relax with while out of the studio, and those who want to dabble and are willing to spend more than what an inkle generally costs. Plan on spending between $250 and $600 if you decide to purchase a good tabletop loom.

Style 3: The Floor Loom
Modern LeClerc Floor Loom
This is the "Big Boy" category of looms; the largest available outside of the strictly commercial cloth production market. Floor looms come in a variety of sizes, measured by the width of the cloth they can produce. They are very large, often larger than a good sized desk and requiring a chair or bench to sit at while working the loom itself.

As you can see from the photo above, this particular style of loom requires a great deal of space to set up and use properly. They are also a significant investment financially, often costing anywhere from $1,500 to $8,000 depending on brand, weaving width, number of heddles (which partly determines how complex a pattern you can produce) and number of sheds available.

I own a 48" weaving width standing jack loom with six heddles and four sheds. It currently resides at Knight's Rest in storage, because I haven't had the space to set it up. Floor looms are not for dabblers, nor are they a good choice for those on a serious budget; I only managed to acquire one because an acquaintance in my RenFaire group had too man, and needed the space, so she gave one away. I was the lucky winner of the "First to say something gets it" lottery.

Style 4: The Warp Weighted Loom
https://en.wikipedia.org/wiki/Warp-weighted_loom#/media/File:WarpWeightedLoomCTMLodzPoland.jpg

Seldom used by any except the most dedicated historical re-enactors, a warp weighted loom doesn't look much like what people think of when they hear the term "loom." These are usually very tall (in excess of six feet) with a weaving area that ranges from three to eight feet wide. Tension is maintained on the warp threads by the expediency of tying bundles of warp thread to clay weights, which can then be adjusted to allow more thread as the weaving progresses. 

These are easy to build, but can take years of practice to become expert in its use. Due to their size, and how they are warped, some seriously fancy pattern work can be achieved by someone who knows what they're doing on one of these. Sadly, I am not one of those people!

A Final Word
Weaving is both a skill and an art form, much like many of the other obscure skills I've been known to discuss. True proficiency requires a time investment, and definitely has a learning curve involved. I'm far from being an expert in weaving, though I am a devoted hobbyist. Thankfully, I have friends who are truly experts in the field, and I highly recommend the advice of those well versed while learning.

Sunday, October 22, 2017

GunBlog VarietyCast Radio #166 - The Tiffany Challenge

Erin is at a plastic surgeon for suture removal, so Weer'd is once again our Stunt Erin. He may or may not be wearing a dress. (This is radio, use your imagination.)
  • Beth, Miguel, and Barron are still on assignment. 
  • A gas station shootout! Have the claims that concealed carry leads to blood in the streets finally been vindicated?... well, no. 
  • In the Main Topic, Tiffany talks about her experiences on the Resolutions Committee at GRPC. Will you take the Tiffany Challenge? 
  • Anti-gun billionaire and nasty little fascist Michael Bloomberg wants a Gun DNA Database, which means that his mouthpiece "The Trace" wants it as well. Weer'd explains how it's a waste of time and money. 
Thank you for downloading, listening, and subscribing. You are subscribed, right? We are available on iTunes, Stitcher Radio, and Google Play Music!

Listen to the podcast here
Read the show notes here.

Thanks to LuckyGunner and Remington for their sponsorship, and a special thanks to Firearms Policy Coalition for their support.

Friday, October 20, 2017

Bugging In: Fuels and Storage


If you're going to heat your house in the winter, you'll need fuel. And if you have fuel, you'll need to store it.

Here are the different ways I store my different fuels.


Thursday, October 19, 2017

eBook Review: “Water Storage for Survival”

I've been interested in what other prepper sources are publishing, so I decided to check a few of them out. I'm working long hours at the moment, but I do have time to read a bit here and there. The Kindle app on my phone tends to deplete the battery faster than any other app I have, but it's convenient to have a couple dozen books on hand.

I did a simple search for “prepper” and browsed through the results. Since we've written several articles about water, I picked one titled Water Storage for Survival by Ronald Williams. What I found was a mixed bag of common-sense information that is readily available on the internet on a dozen different sites. The chapters were broken down like this (with my commentary):

1) Why You Need to Store Water
He covers the basics of how your body uses water and the importance of avoiding dehydration. I did find it odd that he states, “...traveling back and forth between your home and a natural source of water is simply not practical.” Without a specific scenario, I fail to see how he can make such a blanket statement since people have been traveling to central wells for centuries and it seems to still be working. 

2) How Much Water Do You Need?
The basic “one gallon per person per day” formula. His example of a family of four, for a month, equaling 120 gallons (which he states is “simply not practical” to store) is a normal starting point. Erin covered a simple, cheap way to store 100 gallons of water here, so it's not that difficult to store water. One gallon jugs of drinking water come six to a case, so 20 cases would last a family of four a month and would fit along a wall quite easily. Stack them four wide and five high or fit them under a set of stairs, they don't take up that much room.

He also covers how to store water in this section instead of giving it a section of its own. Good, common-sense storage information.

3) Making a Rain Catchment System
This is how to modify your gutter system to catch rain water. Some of the steps aren't very clear, and he specifies food grade materials for some things but not all. We had a guest post that covered the process in detail with pictures back in 2014.

4) How to Purify Water
Boiling: He gets some things right and some wrong. Boiling water for 15 minutes is not needed, and simply boiling it will not necessarily render it safe to drink since it will concentrate any chemicals that aren't destroyed by the heat.

Bleach: A standard which I have covered in detail in several articles. His instructions are basic but workable.

Distilling: “Guaranteed to eliminate even the most deadly and resistant of chemicals, heavy metals, and microorganisms” according to Mr. Williams. Not always true; just ask anyone who has tried to distill alcohol.

As an afterthought, Williams covers filtration and purification tablets in a somewhat dismissive fashion. There is no mention of reverse osmosis, unless that's what he meant by “pump action water filters”.

5) Collecting Water From the Wilderness
These are simple methods of finding water, like going to the lowest point of the terrain to find the wettest area. Collecting dew on rags tied to your ankles may sound good, but unless you're living in a rain forest you're not going to gather much water.

6) Collecting Water From an Urban Environment
These are mostly sources of trapped water, something I covered in detail in my water purification series.

7) Myths About Storing Water
I'm not a fan of myths, so I'd never heard of most of these. 

Conclusion: Do Not Buy This eBook
Having read through the entire book, I must mention how much work our editrix does behind the scenes. This author needs to find someone to at least proof-read his work before he publishes it, just to point out the spelling and grammar errors. I read a lot and I expect a certain minimum level of competence from someone who want to trade me words for money.

All in all, this is pretty high on my list of the worst waste of $2.99 that I can think of. Since it was a digital book, I guess the best I can do is coin a new term for an e-book that's not worth buying: digital toilet paper.

Wednesday, October 18, 2017

Prudent Prepping: Protection For When Things Get Hot

The dust has settled and the First 72 Hours have passed. Follow along as I build a long term plan via Prudent Prepping.  

Fire: Week Two
Depending on the direction of the winds blowing from the Napa and Sonoma County fires, the air quality in the San Francisco area has been anywhere from hazy to unbearable. It has caused every Home Improvement store (both chain and independent) in a 30 mile radius to run out of filter masks.

Why did they all sell out you ask? Here is the reason:

There is a mountain behind the smoke


This a view of Mt. Diablo from Highway 24, approaching Walnut Creek CA. Air quality is about what an average smoky day looks like and believe me, it's been worse.


Same view, different day


This picture is taken half a mile further back, and if you compare the two pictures, there is a gum drop tree in the top picture over the middle white car, which is the same gum drop tree over the white building on the left in this picture. The air quality shown here is a bad winter day, almost to the point the Air Quality Management district would call for a 'Spare The Air Day' and prohibit using your fireplace.

Seriously, you can be fined for having a fire here in CA.


3M Particulate Respirator 8511 N95
All filter masks in the stores I call on have either been sold out or loaded onto a transfer truck and sent to the fire zone stores. Unfortunately, this also includes  masks that are not effective against smoke.

The minimum rating for smoke and particulate filtering is an N95 rated mask, and 3M is one of the most recognized rated brands. There are several different N95 styles, and several more highly-rated masks and actual replaceable cartridge respirators, but those are not necessary for the conditions around me.
3M #8511

This mask has two bands (as opposed to only one band on the not-recommended masks) and a bendable/moldable metal over-the-nose piece to fit it to your face.

Information from the 3M website:
  • NIOSH approved for at least 95 percent filtration efficiency against certain non-oil based particles
  • 3M Cool Flow Exhalation Valve reduces heat build-up inside the respirator
  • Adjustable M-noseclip reduces potential for eyewear fogging
  • Braided headbands two-strap design with dual point attachment helps provide a secure seal
  • 3M Cool Flow Exhalation Valve reduces heat build-up inside the respirator
  • Spacious and durable
  • Designed to increase comfort and wearability
  • Advanced Electret Media is designed for ease of breathing

With the fires approaching 50% containment and the possibility of a very small amount of rain in the fire zone over the weekend, demand for masks has slowed somewhat. This has allowed me to buy a box at my stop today, and I will be buying another box soon and dividing them up into my Buckets of Holding. This will give me some shareable breathing protection to go along with the supplies in them.

The Recap
  • Keep your plans flexible, and be prepared to toss them out or modify parts as needed.
The Takeaway
  • One box of 3M 8511 Filter Masks: $16.98 if purchased from Amazon with Prime; mine were from Home Depot and I paid $20.97 for them. 

Just a reminder: if you plan on buying anything through Amazon, please consider using our referral link. When you do, a portion of the sale comes back here to help keep this site running!

If you have comments, suggestions or corrections, please post them so we all can learn. And remember, Some Is Always Better Than None!

NOTE: All items tested were purchased by me. No products have been loaned in exchange for a favorable review. Any items sent to me for T&E will be listed as such. Suck it Feds.

Tuesday, October 17, 2017

Prepper Vehicles From the Ground Up

We've gone over ultimate bug out rigs, and some things you can do to make your current rig more prepper-friendly, but buying a new (or new-to-you) car presents some unique opportunities and considerations for a prepper.

The time came a couple weeks ago to replace my wife's trusty little SUV. It was becoming a bit of a money and time sink, and we were outgrowing it. Being preppers is part of our nature, so that just naturally flows into how we shop for big-ticket items like cars.

Let's look at some of the considerations that apply to preppers looking for a daily driver, and I'll tell you why we picked what we did.

Cargo and Towing
Prepping involves a fair bit of gear and supplies, even at a minimalist level, so the ability to easily haul those supplies is a huge consideration. Those little subcompact cars are affordable and efficient, but they can't haul much more than a gallon of milk, and the ability to tow light loads is a bonus for our lifestyle and for some prepping tasks.

Cost
We've talked about financial prepping before, and the cost of big-ticket items can put a serious dent in your budget. As much as it's nice to have something shiny and fancy and new, it can put you into a major hole in a hurry.

Drivetrain
I live in a place where deep, wet snow is a regular thing, and we live a lifestyle that frequently leaves the pavement, so 4 Wheel Drive is a necessity for us. (All-Wheel Drive works, but not nearly as well.) In warm, urban and suburban areas 2 Wheel Drive vehicles work just fine, while being simpler, more efficient, and far less expensive.

Efficiency
We spend a fair bit of time on the road, and stretching each gallon of gas is important to us. Better fuel economy is also handy if you do have to evacuate an area, allowing you to travel further from the chaos before you have to stop to refuel.

The "White Bread" Factor 
I'm a car guy. I have a childlike fascination with rides that are loud and flashy. However, there is a lot to be said for hiding in the noise: while something like a Pinzgauer can go anywhere and haul anything, it will catch eyeballs wherever it goes, while a popular model of minivan or midsize SUV will disappear on any city block.


When we laid out our requirements they pointed pretty heavily at a midsize SUV, and my wife picked out a Nissan Pathfinder Hybrid. Fuel efficiency is excellent, it has plenty of cargo room, and it can tow a decent amount. It cost more than I've ever spent on a vehicle before, but if past history is any indicator, we'll be driving it for a decade and we'll get our money out of it. It is also about as white bread as it gets, at least on the outside.

Embrace your prepper nature when you shop for the big stuff. It will help you seamlessly advance your life and your preps.

Lokidude

Monday, October 16, 2017

Preparing for Plumbing Disasters


The last few weeks have been fairly busy for me. Among other things, and as a reminder that not all disasters are major, my basement flooded.

This was no small small thing, involving over three inches of water in my basement and a fair amount of property damage, but thankfully it wasn't as bad as it could have been.

1) Scout the Territory
You don’t have to be a master plumber to find the water cutoff. It's typically located in the basement or lower floor, and it may be in a crawl space, but it controls the water inflow to the house or apartment. Locate this first, so that if all else fails, you can turn the water off from there to prevent flooding and damage.

Next, find out if you have access to the city water shutoff. In most apartments you will not, and only sometimes in houses, but if you do have access it works as an emergency backup cutoff if your cutoff valve is stuck.

I keep this one handy.
These cutoffs are usually valves like you find on a spigot for a hose, either a small wheel or brass bar. They turn just like a screw -- right to close the valve, left to open it up -- but in some cases, you may need to use a special tool to shut off the water flow.

Then look at every faucet and toilet in the house. There should be a small valve that will let you cut off the water to that specific outlet. (Depending on the building codes in your area, you may only have a hot water cut off.)

One you have located these items, take pictures of them with your phone, and email them to yourself, with a note on location. This will guarantee that you can find them again later and make it easier for others. If you can, also take a note of the brand and model of your plumbing fixtures. This will let you get spare parts easily.

2) Prepare Your Tools
Suggested tools for your Emergency Plumbing Kit:
(I don't recommend using the silicone tape or Fiberfix for the long term, but they can save a lot of grief until you can get a plumber over.)
  • Paper with location of the water shut off and any notes you feel that you may need
  • Pencil
  • Tool bag or box (to hold all this)
  • For advanced users: can of PB Blaster (for stuck valves)

3) Familiarize Yourself with What is Likely to Go Wrong
In my experience, the most likely problems to arise are:
  • Leaky faucet. Usually fixable by tightening something. 
  • Burst or leaky pipe.  You may not be able to fix this yourself, but it you should be able to band-aid it until a plumber gets there, which will prevent a lot of damage. 
  • Running toilet.  This is an entire sub-set of issues. Knowing how to shut off the water until you can get it fixed can save some nasty flooding.
  • Water heater issues. Once again, you may not be up to fixing this yourself, but knowing the basics can save some hassle.

I don’t have the space to go into how to fix all of these problems, but if you prepare yourself even this much, it can give you a way to prevent damage as well as time to look up how to fix many of these problems yourself, saving a mint in plumbing bills.

Sunday, October 15, 2017

GunBlog VarietyCast #165 - The Mega Anti-Gun Nuttery Show

Erin's hurt and everyone else is on vacation or assignment, so Sean and Weer'd talk about the Las Vegas shooting and how Hillary Clinton and Diane Feinstein rushed to the nearest camera to call for more gun control.

Thank you for downloading, listening, and subscribing. You are subscribed, right? We are available on iTunes, Stitcher Radio, and Google Play Music!

Listen to the podcast here.

Read the show notes here.


Thanks to LuckyGunner and Remington for their sponsorship, and a special thanks to Firearms Policy Coalition for their support.

Friday, October 13, 2017

Bugging In and Staying Warm

If you're bugging in up north, your first consideration is staying warm in the winter. In this video, I demonstrate my various options for efficient and low-cost home heating.

Thursday, October 12, 2017

Bargain Hunting aka If You Don't Ask, the Answer is Always “No”

I had to stop by the local hardware store the other day, and I noticed that they had left-over garden seeds on sale for 10 cents a pack. You've seen those cardboard displays full of seed packets" This one was still about half full of vegetable seeds, and there was another one with flower seeds that had a bit less.

As I was checking out, I asked the cashier if they'd take an offer on the whole batch -- all of their left-over vegetable seeds for one price. She took down my phone number and name so she could pass it on to the owner. Two days later I got a call: they'd accept my offer so long as I took the flower seeds, too.

Here's what I picked up, with a dollar bill for scale . The larger bag is vegetable seeds and the smaller one is flower seeds. I'll have to sort out any herbs that may have gotten mixed in, and there are a few flowers that are useful for more than just ornamentation.


Some of you may be wondering why I'm buying garden seeds after the growing season is over (our first frost warning was announced tonight). Besides the huge drop in price, the “interesting” mix of vegetables, and the quantity edging towards trade goods, the best reason is that there's nothing wrong with the seeds. Planting seeds a year after their “crop year” date will drop the germination rate (percentage of seeds that will actually produce a plant) from 80-100% down to 60-70% at worst. This just means I'll just have to over-plant the seeds to make up for the losses, which is easier to do when the prices are low. Waiting two or three years drops the rate even lower (it varies by seed type), but there's a chance some of them will grow.

With slightly lower germination rates, these seeds would also be a good candidate for “guerilla gardening”, which is the act of planting a random selection of food plants on property that isn't yours. Think river banks along a bug-out route, or maybe a southern exposure on state/federal land. You may not get to harvest it, but it's there if you need it, and if nothing else, it'll provide food for the critters and may even make them easier to hunt.

I've opened the sack of vegetable seeds and here's a rough inventory:
  • Lettuce, leaf and head: 26
  • Cabbage: 5
  • Broccoli: 10
  • Cauliflower: 3
  • Spinach: 14
  • Beans: 16
  • Peas: 7
  • Bell peppers: 37
  • Jalapeno peppers: 5
  • Tomatoes: 37
  • Cucumbers: 20
  • Eggplant: 7
  • Squash (3 kinds): 27
  • Watermelon: 3
  • Pumpkin: 7
  • Carrots: 17
  • Radishes: 15
  • Onions: 13
  • Turnips: 14
  • Beets: 5
  • Sweet Basil: 21
That's a total of 309 packets, pre-priced at $0.99 each. That's $305.91 (plus tax) at retail price. Since the seed count varies by plant type, I'm not even going to guess at how many seeds are there; “a whole bunch” is about as close as I care right now. 

If you look at the variety, you'll notice that most of the seeds are for vegetables that are easy to store. Lots of root crops (onions, turnips, etc.), squash, and plenty of easily dried or canned options. The lettuce and a few of the others are for immediate use, but I got a good mix of pre-food. There are some things in there that I don't care to eat, but if times get tough I'm sure I'll be able to choke them down.

The owner of this local store wanted to free up some floor space and get ready for the winter displays, so he was happy to get rid of the two big cardboard racks of seeds. I haven't opened the flower seeds bag yet, but I think I got a fair deal for my $30.00 -- that's less than 10 cents per packet for just the vegetable seeds. He took less than his “clearance” price (probably close to half) just to get rid of them all at once.

If you don't ask, the answer is always “No”, so don't be afraid to talk to the folks behind the counter. They may not be authorized to accept your offer, but they should be able to pass you on to someone who is.

Wednesday, October 11, 2017

Prudent Prepping: No One Is Safe

The dust has settled and the First 72 Hours have passed. Follow along as I build a long term plan via Prudent Prepping. 

I've made fun of my friends and others who live in tornado alley or hurricane-threatened areas, saying "Yeah, here in California, we can't sit on our porch and see an earthquake coming! We can't run for the basement or pack the car and leave the state!"

Since Sunday night, I've been reminded of exactly how much things can come back to bite oneself, repeatedly.

The Latest California Disaster: Fire
Coffey Park before the fire.
http://www.businessinsider.com/santa-rosa-fire-coffey-park-neighborhood-2017-10

Everyone knows about California's habit of having large portions of our forests burn, but a fire hasn't destroyed portions of a major city since 1992; now in Napa and Sonoma Counties there have been several severely damaged. What's more, several people may have died due to not having a cell phone to receive Emergency Alert messages after telephone land lines were destroyed by fire.

Based on the news tonight, all of the fires are virtually out of control and will continue to burn portions of Santa Rosa proper and the surrounding hills, wineries and smaller towns.

Coffey Park, late Monday.
http://www.businessinsider.com/santa-rosa-fire-coffey-park-neighborhood-2017-10

What Next?
Since every area of the world has the potential of being hit by some sort of emergency, the only option is to be prepared, always. Even though my weekly commute has been reduced by half, I've added extra water and food to my car, because I may have to be away from home longer than planned or help others who might be trapped away from home.

Everyone has posted tips on Bugging Out packs like Erin has done recently. The Discerning Shootist has a series talking about Bugging In, which he started right here. In fact, since all of us have written at least one post on Getting Out Of Dodge, there are too many to list here! This means the topic can be searched in the blog quite easily.

If you've been paying attention to the news and your regular gear is already set, then you may have time to grab originals of your important papers, some heirlooms and whatever else you think you can't live without, since you may only have what you are taking with you if your house burns. If you do get evacuation orders, follow them! Don't be a hero and try to beat Mother Nature.

The Recap
  • Plan ahead. Don't get caught short like a man I heard interviewed on the radio this afternoon. He got out with only his slippers, pajamas and bathrobe!
  • Don't be smug and think major disasters can't hit you, no matter where you may live.

The Takeaway
  • Nothing was added to my preps this week, other than copies of some new personal papers. 

Just a reminder: if you plan on buying anything through Amazon, please consider using our referral link. When you do, a portion of the sale comes back here to help keep this site running!

If you have comments, suggestions or corrections, please post them so we all can learn. And remember, Some Is Always Better Than None!

NOTE: All items tested were purchased by me. No products have been loaned in exchange for a favorable review. Any items sent to me for T&E will be listed as such. Suck it Feds.

Tuesday, October 10, 2017

Alternative Flotation Devices

Back when Hurricane Harvey was flooding Texas, I promised Erin an article on "alternative flotation devices," or in my native redneck vernacular, "Stuff what floats." While traditional boats are the best option for getting out of a flooded area, plenty of other common items float well enough to provide aid.

Note that I said "getting out of a flooded area." Do not go back into flood zones without proper equipment and training! Do not cross flood waters if any safe alternative exists! Water is powerful and deceptive, and will sweep you away before you can react to it.

If you've decided that you need to get out, but lack a proper boat, take a look around; you're bound to find something that will keep your head above water. Here are a few ideas to get you started.

Air Mattresses
If it's inflatable and designed to support the human body, it'll work. Floating pool loungers are designed for water, but in a pinch even a camping air bed will do. The larger the mattress, the more stable it is in the water and the more people it will support.

Coolers
The common cooler made by Igloo, Coleman, and a dozen other companies is cheap, universally common, and will float like a cork. (Some might require duct tape to keep the lid closed. You do have duct tape handy, don't you?) Look for the ones with a plastic shell and foam fill. As a side benefit, they're fairly water tight, and therefore can keep important items dry and safe.

Wood Furniture
If you've got a large wooden table or solid (not hollow core) door, turn it flat against the water and it will float nicely with the added benefit of being fairly stable. Taller furniture like dressers and armories will also float, but will be far less stable. Tables and doors can also carry some cargo, but don't expect it to stay dry.

Jeans
Yes, I mean Levi Strauss-style denim leg covers. Pants legs in good repair will hold enough air to keep a person afloat while they escape a flood. It's a trick I learned as a young Boy Scout, and we were crazy enough to test it fairly extensively. This video is a great demonstration of the process.


Plenty of things in this world float. If you have to get yourself out of a bad spot, look around and see what will bouy you up.

Lokidude

The Fine Print


This work is licensed under a Creative Commons Attribution- Noncommercial- No Derivative Works 3.0 License.

Creative Commons License


Erin Palette is a participant in the Amazon Services LLC Associates Program, an affiliate advertising program designed to provide a means for sites to earn advertising fees by advertising and linking to amazon.com.