Showing posts with label Knowledge Weighs Nothing. Show all posts

Saturday, February 19, 2022

Magical Thinking

I've switched jobs again. It seems like every year the company finds another problem that they think I can deal with; the most recent change is due to staff shortages caused by an aging workforce and the various societal issues we're all dealing with. We're not alone; there are “help wanted” signs everywhere, and finding people willing to work is getting harder. My new job is mostly delivering propane to customers, and it has made me aware of just how bad the “magical thinking” has gotten in our world.

Magical thinking is when people choose to be ignorant of how things work, just so long as they work. One former co-worker described it as “You don't have to know how the TV works as long as it turns on when you press the switch”. Unfortunately, our jobs required us to repair the “TV” that he was referring to, so he had a lot to learn.

There is a running joke about “First-world problems”, and I'm sure you've seen a few memes or cartoons that mention the concept: problems that most of the world doesn't have to deal with because they're too busy trying to stay alive and put food on the table. Those of us in the “first-world” have life easy and have the luxury of complaining when non-essential services fail or we are inconvenienced by the lack of what most of the world would consider a luxury. Magical thinking is a big part of those “first-world problems”.

I've run into customers that can't read an analog gauge on their propane tank. We're talking a 1.5 inch diameter dial with an arrow that points from 5-95%, not rocket science. This is in Iowa, where temperatures drop below zero every winter and most rural houses use propane as a source of heat, either as a primary source or as backup heat. Magical thinking tells them that the propane just appears in the tank and the heater just runs when they turn it on, so they don't think about it beyond that.

Magical thinking is:

  • Not caring what happens when you flush the toilet. It just “goes away”... until it doesn't. Then it becomes an emergency for someone else to fix.
  • Not knowing, or caring, where your food/fuel/water comes from.
  • Thinking that you will always be able to buy a replacement for something that wears out of breaks.
  • Thinking that everything works now, so it will always work.
  • Trusting others to make decisions that will have a major impact on your life.

I've fought against magical thinking for most of my life. I'm a curious person; I like to learn new things, and I like to teach others things that are new to them. I've been staff at a couple of military schools, a Cub Scout leader for a decade, a safety and compliance trainer at three companies, and done a bunch of impromptu teaching as the opportunities arise. Knowing how and why things work is part of my being a prepper, because it gives me the insight to see potential problems and look for ways to work around them.

 Unexpected problems are easier to deal with if you can find a way to make things work... but that requires knowing how they're supposed to work in the first place.


Friday, August 6, 2021

American Sign Language

One of the common topics of discussion by preppers is communications. We want to be able to find out what's going on around us, so we can figure out how to react. Long-range comms are nice, and we've had a few articles about radio and such over the years, but a one-on-one exchange of information can be more important and time-sensitive. There are a few problems, though:

  • Some of us are dealing with mask mandates due to the reactions of various governments and corporate “leaders” to COVID-19. Masks of any sort muffle the voice and make communications harder. For those who are hard of hearing or deaf that rely on reading lips to help understand what is being said, masks hide half of the face and make it impossible to see a person's mouth.
  • I wear an N95 mask at work when dealing with certain chemicals and levels of dust that are unsafe to breathe, so I know how they hinder clear speech. Add in the various machines that make enough noise to require hearing protection, and speech becomes a poor method of communicating. Since most of us older workers didn't have hearing protection available decades ago, many of us have some hearing loss and that makes it even harder.
  • English has many dialects and some people have a hard time making sense of those who speak a different dialect. I'm a Midwesterner, and while we have a fairly flat dialect without the changes in pitch common in several others, I've run into a lot of local people who have a hard time understanding Southern, British, or Creole/Cajun speakers.

There is a handy (pun intended) method of getting around these obstacles to clear communication: Sign Language.

American Sign Language (ASL) is a manual language that uses hand gestures and to a lesser degree facial expressions to communicate. Developed about 200 years ago as a way to teach the deaf and mute, ASL is a fully-formed language of its own with idioms, grammar, dialects, and unique contractions. ASL grew from native signs adopted by deaf people and a system developed in France to teach deaf and mute children. Up until the late 1600s, it was assumed that the lack of hearing meant a person was unteachable, and they were consigned to asylums or raised as imbeciles. By the 1800s, schools for the deaf started popping up around the US.

I grew up within view of a state school for the deaf that teaches children from 18 months to 18 years of age, so I learned a bit of ASL as a child. One of my school-mates had deaf parents, so he had to translate for me and I picked up the basic alphabet from him (along with all of the Helen Keller jokes). I've been teaching some of the guys at work (sorry, no women at the moment) some basic signs for when we're in places that don't allow for speech. Trying to yell over the noise and through the ear plugs gets tiring; it's just easier to sign the simple things.

It has recently become popular to teach infants some of the basic signs to give them a way to communicate with their parents before their verbal skills develop. My nephews could sign the basics like food, water, yes/no, and various toys long before they could speak. Kids are smarter than most of us think.

For preppers, there may be times where having a different method of talking to each other will be useful: not waking the off-shift crew, subtle hints during negotiations, and having a relatively uncommon language to hold private conversations in all come to mind.

There are lots of resources available for learning ASL, so start with the basics and keep learning. Here's the basic alphabet.


https://en.wikipedia.org/wiki/American_manual_alphabet

Amazon and your local bookstore have dozens of manuals and teaching aids, YouTube has hundreds of short instructional videos for common words and phrases, and Gallaudet University -- the first deaf college in the US, founded by the son of the man who got ASL rolling -- offers a free online course for learning ASL.

I've lost a lot of my foreign language skills due to lack of practice. All skills deteriorate without practice, so find someone to talk to once in a while to keep things fresh. You might even learn a few new “words” now and then.

Thursday, April 23, 2020

Vermiculture and Fishing

Vermiculture is the growing of worms for a specific purpose. Growing worms may sound like an odd endeavor, but there are several reasons why a prepper might want to do a little research on it.

I mentioned vermiculture in my post about composting toilets (CT), so you may recognize the word if you're a regular reader. Turning waste into something useful is what worms do, so this is a good use for them. Once you have an established colony of happy little waste eaters, you can “harvest” a portion to sell to others setting up a similar CT. The best online resource I've found so far (free and a good amount of information) is here.

Composting other forms of waste like food scraps, grass trimmings, and leaves is a lot quicker when worms are added to the mix. Proper aeration and moisture will keep the wrigglers happy and they'll eat their own body weight every day, providing “castings”, or worm feces, that is and excellent fertilizer for food crops. We don't seem to have a writer with a lot of experience in composting, so if you have such experience please contact me (comment below or drop a note on our Facebook page). I'd like to get more information out to our readers, but I'm not going to “pull a rabbit out of my hat” and try to explain something I've never done.

Fishing bait is another good use for worms. The fact that this is the time of year (spring) when the weekly rains will bring the night crawlers and earthworms out of the soil for us to pick up and use for bait is is actually what sparked the idea for this article, There are methods for coaxing or driving worms out of the soil which I may write more about later, but the main problem I have seen is storing them for more than a day or two. Worms live in cool, moist dirt, and if you want to keep them alive for any length of time you're going to have to provide something similar. Buckets full of soil are heavy and hard to dig through, so a couple of companies have developed “bedding” material for worms.

MagicBuss Bed-ding (that's the way they spell it) is the brand that my family has used for decades. Amazon's pricing is high, so check local stores or any other online sporting goods stores. It's made of recycled paper with some nutrients added and is designed to keep worms alive but not reproduce. Sold in several sizes of bags, you mix a quart of water with each pound of dry bedding, and then add worms. It makes a light, fluffy, dark gray mixture that worms can move through easily.

My father usually keeps 40-50 dozen night crawlers (they're the local favorite) in a couple of five-gallon buckets stored in a cheap refrigerator in the garage. He'll pick up worms in April and have live bait through November with very few problems. Leftovers at the end of the season are returned to the soil before the first hard freeze so they can spend the winter in their natural habitat. The refrigerator is set fairly warm, about 40-45 °F and the cool, dark, conditions are good for the worms. Grabbing a handful to take fishing for the day is simple, and having them in storage means more “spur of the moment” fishing.

Baitboxes for worms are normally insulated to keep them cool, and most have lids on two sides. The worms will tend to congregate on the bottom of the box, so instead of digging through the box you just flip it over and open what was the bottom lid. This is much easier than lugging around a five-gallon bucket, and the worms survive longer in an insulated box when the temperature starts to climb.

If you're growing worms instead of merely storing those you have found, you're going to have a surplus eventually. Selling bait may not pay the mortgage, but it is a time-honored method of providing extra income in areas near popular fishing spots. Overhead and operating supplies are minimal; a good root cellar will store them as well as a refrigerator, and if you're composting anyway the feed is free.
Kids can learn valuable lessons running a small bait business, from advertising to inventory control and security on a small scale, while making a bit of pocket change in good times and extra income for the family during hard times. Prices around here are a dollar or two per dozen, and the city folks would rather pay that than store their own.

Growing worms may not be for everyone, but it may be something that you can read up on and keep in the back of your mind. Having options is part of being prepared for life's ups and downs, this is just another option for some of us.

Friday, April 3, 2020

Social Distancing Week 3: Online Socialization & Learning

Not actually Erin.
& is used with permission.
Hello preppers! I'd ask how you are all holding up, but I've seen your Facebook posts. Those of us who are introverts are likely doing well, but our extroverted friends are likely not okay with all this.

But fear not! There are ways that extroverts can get their "people fix" without breaking quarantine. Additionally, if you're tired of reading books or watching Netflix, there are online courses you can take which will not only keep you entertained but also teach you useful prepping skills.

Online Socialization
Because I'm a nerd I play a weekly game of Dungeons & Dragons. Because I'm an introvert, I know more fellow D&D nerds online than I do in real life, so for the past 8 years I've been playing with friends across the country. Now some of you are using Zoom for telework and school, but I have no experience with that; I use Discord, which is a free chat service which works in both a browser tab and as a downloadable app. With Discord, a speaker and a microphone you can have group calls; you can also type in chat as if it were an old-school IRC channel or chatroom, drop in links to webpages, post pictures, etc. You can even have video chats, although the last time I tried that it was still awkward and limited. Still, I feel that Discord is best combination of voice and text conversation I've ever seen, and if it works for hosting a game of D&D then it'll work for chatting with your friends.

If you're playing an online game like D&D, then there are still some hurdles to be overcome: dice rolls, character sheets, and mapping with tokens. While it's tru that Discord has various dice-themed programs (called bots) which you can invite to your channel, I've found that I get my best results with another online service called Roll20. This is completely free to join and use, although there are subscription tiers which unlock additional features (I use the $5/mo service and have found no need for anything greater) and you can purchase things like maps and token in their Marketplace.  Using Discord for voice and text and Roll20 for maps, dice, tokens and character sheets meets all my needs as a D&D Dungeon Master.

If you aren't interested in role-playing games, there are still ways to have fun with friends:
  • Board Game Arena, like the name suggests, allows you to play board games online. 
  • Similarly, Playing Cards allows you to play, you guessed it, card games like poker, Go Fish, etc with your friends. If you're a fan of Cards Against Humanity, then check out Remote Insensitivity, which is an online version of CAH using a Creative Commons license. 
  • If you're more skilled with a computer and have a Steam account, check out Tabletop Simulator, which is a 3D physics engine that allows you to do whatever you want. If you hate playing online chess because you can't flip the board in anger, then this is the game for you!

Online Learning
If you want to make your time in isolation more productive then I recommend Outdoor Core, and online learning hub where professionals teach you skills in the following topics:
  • Archery & Bow Making
  • Blacksmithing, Knives, & Metalwork
  • Disaster Preparedness
  • Leatherworking
  • Navigation & Orienteering
  • Outdoor Business
  • Plants/Trees Uses & Identification
  • Ropework & Knots
  • Slingshots & Slingshot Shooting
  • Throwing Sports
  • Wild Crafting
  • Wilderness Survival
You can find course listing here. Not only are these classes very affordable, once you've bought a course it's yours forever and you can go back and re-watch it any time.

What's more, Outdoor Core is offering a 14-Day Quarantine Outdoor Skills Summit which has 14 separate 30-minute courses on such topics as
  1. Urban Net Weaving: How to Make a Bottle Sling [Instructor, Joel Graves]
  2. How to Back a Wooden Bow [Instructor, Dave Mead]
  3. Eating Wild: How to Make Tough Cuts of Game (Venison) Tender [Instructor, Stacy Lyn Harris]
  4. Stone Tools: How to Make a Slate Arrowhead [Instructor, Creek Stewart]
  5. Animal Track Casting & Track Identification [Instructor, Craig Caudill]
  6. Urban Cordage: How to make a drop spindle and spin cord from plastic bags [Instructor, Hank Gevedon]
  7. Black Nail Knots Ashley Book of Knots (ABOK) #785 Knife Lanyard [Instructor, Mandy Clinnch]
  8. How to Make a Leather Altoids' Tin Belt Pouch [Instructor, Kevin Luebke]
  9. Knife Etiquette & Knife Handling Skills [Instructor, Maximilian Neukäufler]
  10. 3 Tips to Draw from Observation [Instructor, Brandy Klindworth]
  11. Nails to Knives: How to make a knife from a nail [Instructor, Nathan Summers]
  12. How to Make a Wooden Burn Bowl + Rock Boiling [Instructor, Hutch Hutchings]
  13. Foolproof First Bow Drill Fire Kit - How to Make a Bow Drill Kit at Home from Junk and a Shot Glass [Instructor, David Polczynski]
  14. Painting with Pencils [Instructor, Andra Jensen]
  15. FREE BONUS COURSE! Rescue: 2-Pole Flip Winch [Instructor, Creek Stewart]
All for a discounted price of $43.
Note: Neither I nor Blue Collar Prepping are at all affiliated with Outdoor Core and we have received no compensation for this. I am just a big fan of Creek Stewart and anything he teaches. 

Hang in there, everyone. We can get through this!

Tuesday, January 7, 2020

String (Saw) Theory

There's a limitless number of cutting tools in the world; many are common and well known, while others are far less known even if they're the best tool for the job.

Cable saws have been a thing for as long as I have memories. Some have been decent, and many have been complete garbage. In the 1980s and 90s they were part of the Rambo cool-guy survivalist hardware despite being terrible. More expensive models from major tool manufacturers hold up and perform well. Despite the quality of the products offered, the principle is sound and friction saws have a place, though it's more limited than most sellers would have you believe. While they can cut through something like a tree branch, it's a slow process, but where they really shine is cutting soft materials with bad access... and you don't even need a commercial cable saw to do it.

A couple of weeks ago at work, we had a PVC conduit in the ground that we needed to cut. It had wire in it that we couldn't damage, and the conduit was in a place where we couldn't get a normal saw around it to finish the cut. Fortunately, I had a roll of string in my tool bag. String easily ran where a saw blade couldn't, and it's also sensitive enough that I could feel the wires before I damaged them.

The process for making this cut is fairly straightforward.
  1. I used a saw blade to start a groove in the parts of the pipe I could reach. This kept the string cutting right where I wanted it to. This groove isn't necessary, but it makes the process cleaner and more accurate. With or without the groove, the rest of the process remains the same. 
  2. Run your string around the material to be cut in a single pass. You want to concentrate all the friction in a single line. 
  3. Put one hand on either end of the string and pull back and forth with long, smooth strokes. Slow and smooth is the best technique, as fast jerking strokes will wear out and break your string before you complete the cut.
  4. As you cut through the material, work the string so that the cutting portion moves along the desired cut line. This will give you an even cut, which is especially important if you're trying not to damage the interior or contents.
A good cable saw has a place in your tools, but a length of string can do much of the same work for free. Make long, smooth strokes, and you'll cut right to the heart of your task.

Lokidude

Thursday, March 7, 2019

CD3WD

I was wandering through a prepper-themed social media site the other day, and I saw someone asking for a source of e-books to store on a laptop in the event of TEOTWAWKI (“The End Of The World As We Know It”). 

Years ago, I followed a project designed to accumulate information for use in third-world countries — mainly basic agricultural, science, and construction information — so I started digging. It was called CD3WD, short for “Compact Disk of 3rd World Data,” and the project ended up with slightly more than could be fit onto a single CD.

I did mention that this was several years ago, right? CDs were a viable way to store information and could be read by any computer available at the time, but they have since been rendered obsolete by USB drives which hold far more data. A data CD could hold about 700 MB (0.7 GB for the kids who never had to deal with anything less than a GB), and the common CD-R has a shelf-life of a few decades depending on the type of dye used in its manufacturing. They were cheap and easy to make, so they were popular for a while. Modern computers may not even come with a CD/DVD drive installed any more; my wife’s new laptop didn’t.

The CD3WD project collapsed years ago and their servers were shut down, so its collection of data has been unavailable in the interim... until I managed to find a mirror site that is still up. I was digging around for general knowledge that should be saved for a rainy day, and lo and behold, there was my old friend listed, along with 27 other sources of free information. Some on the list were familiar (such as Google library and Project Gutenberg), but there are several that are going to require more investigation. It's time to dig out a couple of thumb drives and external hard drives, folks, because there’s a mountain of free information available.

The source I found is called the Autarky Library. It’s a European site, but it and most of its resources are in English. It does, however, require signing up and creating an account to download the information. Autarky would likely be written Autarchy in English, and it is the political concept of self-reliance bordering on anarchy. I know we don’t do politics here, so I won’t go into the pros and cons of the site or its philosophy, but the collection of information was just too big and too useful not to pass it on to the rest of you. If it could be useful in building or rebuilding a society, you’ll find some information about it in one of the sources listed.

Formats vary by source, with PDF being the most used, but the common e-book formats of MOBI (Kindle) and EPUB (Nook/other)] are options for a few. The types of information found in this library are amazing — everything from recipe books to machine tool operation, books written in the 1700s and books written in the 1960s, scholarly texts and Peace Corp manuals.

I just wish I had found this mountain of information a few months ago; it would have given me something productive to do over the winter. With spring approaching, my research time will be curtailed, but the time I’ll have available for getting out and actually testing and doing things will increase. It’s been a long winter, and I’m ready for spring.

Friday, August 17, 2018

Stop the Bleed

We recently had several posts concerning a challenge issued among all the writers to produce an IFAK (Individual First Aid Kit) on a strict budget of $30. One thing that was rather common among all those articles is that they are tailored to the skill, training, and comfort levels of the individual writers. This was expected, since we all try very hard to write what we know.

We had some equipment that was fairly common among all of us, and things like bandages and gauze were, in fact, pretty universal. My personal kit is very trauma oriented - not just the standard scrapes and bruises that most contend with, but treating serious wounds, burns, broken bones, and life threatening situations.  Don't get me wrong, I'm not medical personnel, though I have taken courses over the years on doing First Responder duties, helping with triage, giving CPR, and basic first aid.  I'm no expert, but I'm not completely in the dark either.

I recently had an opportunity to take a free course in how to control bleeding from a traumatic injury until emergency services can get there to tend to the injured person. 80-90 % of traumatic injury deaths happen because a person bleeds out before they can get to the hospital to be treated by medical professionals. This course, called "Stop the Bleed", was developed by the American College of Surgeons in conjunction with The Committee on Trauma.  Information on the classes can be found at BleedingControl.org. Their site can give you information on the purpose of the courses, the basic content, and where the courses can be taken.

The course is aimed at non-medical personnel and teaches them to be able to quickly respond to a situation while waiting for medical help to arrive. However, I was amused to find that I was the only non-medically trained person in the course when I took it! I'm not joking, I was the only person in class who wasn't a nurse, EMT, LEO, or medical student. Oddly enough, I was also the person in the class who carries the most comprehensive first aid kit, and the only one who carries that kit every where they go.

Don't think that traumatic injury can only happen in SHTF situations, though.  Life threatening bleeding injuries can happen under any number of circumstances, ranging from auto accidents to kitchen knife slips to natural disasters like a tornado throwing debris around. And of course, for those who prefer to be prepared for the potential ugliness of life, there are always things like lunatics bent on mass murder in a public setting, school shootings, gang violence, home invasion, and robbery at work to think about as potentials for traumatic injury.

Knowing how to stop, or at least seriously slow down, the bleeding from an ugly wound could mean the literal difference between life and death for you or a family member or friend.  Knowing how and when and where to use that tourniquet you bought, or whether its better to pack gauze into a wound or use the QuikClot you purchased, might make all the difference to someone. 

Take the time. Learn to use the equipment you have, and under which circumstances to use that equipment. Take a course designed to give you that knowledge (even if you aren't a medical professional) and you'll feel much more confident that you can handle any situation you happen to find yourself coming up against.

Friday, June 8, 2018

Sharing Knowledge is Free

This week I had planned to give you a report on how well our mosquito yard spray worked. However, like many things in northern Michigan, the weather was not cooperating and we had low temperatures reach into the 40s every night this past week. Therefore we had no mosquitoes, but we did have some very nice campfire nights.

So instead of a mosquito spray report, I'll tell you about how I taught my 14-year-old daughter  to change the front brakes on my reasonably-priced everyday prepper vehicle.

There's no more inexpensive way to prep for any future catastrophe than by teaching your children and following generations how to do things. It doesn’t cost anything except a little bit of time and patience, and the pride in your kids and the knowledge that you won't go it alone (which is very important in a single-parent household) is an immeasurable payoff.


And it doesn’t have to be just your kids. I’ve had several neighbors inquire about raising their own chickens, and I’ve been able to give them some advice on what to look out for from my own experiences.


This is The Discerning Shootist for Blue Collar Prepping. Be good, be safe, and if you can’t be safe, be good and dangerous. 

Monday, October 23, 2017

Woven Glory

Two years ago, I started an extended series on Fiber Arts, but never finished it due to health problems. Now that I'm no longer over my head, I intend to finish that series. I've managed to cover the types of fiber, processing it, spinning, and dying it, and today I talk about weaving it into usable form.

Weaving is an art form that is almost as old as civilization itself, and has been practiced since the very beginnings of agriculture (and possibly before that). Every known society throughout history has had some form of woven textile goods that were produced from a variety of source fibers.

As societies grew and gained technological advances (either through study and innovation, or via trade with their near neighbors) the looms they used to produce cloth became more complex, allowing for a much wider range of patterning in the finished product.

In its most basic form, a loom is simply something to hold long threads in place and under tension (called the warp) while other, usually much shorter, threads are passed over and under them in succession (called the weft.)

These days, looms come in a huge variety of sizes and shapes, from lap-held looms that can produce both simple and elaborate trims or strips of fabric, all the way up to looms that require their own rooms for making extensive rolls of fabric, large rugs and carpets, or hanging wall tapestries*. When talking about home or artisan use, there are three different types of  basic looms, which is what I'll describe today, along with a fourth which is mainly a historical curiosity.

None of these looms require power to operate, and all can be made by hand with proper woodworking tools and knowledge, meaning that they are a good investment for a prepper interested in making woven fabric.

*Yes, tapestries are still a thing, though they aren't specifically used for keeping out drafts these days. They're very labor intensive, ornate, and time consuming to produce, sometimes taking upwards of two years to manufacture and costing thousands of dollars. Weaving specialists work hand in hand with draft artists and painters and can turn practically any piece of flat visual art into a one-of-a-kind tapestry to hang for viewing!

Style One: The Inkle Loom
Rhi's inkle
Inkle looms are small, portable, typically lap-held looms that weave very narrow strips of cloth. The width one can handle is determined by the length of the bars that make up most of its form, and is seldom over 3 1/2 inches in total width. The warp threads are wound individually, with every other thread passing through a loop of string which is tied off separately and is referred to as a heddle. The heddle is what allows a weaver to move alternating sets of threads into place (up/down or back/forwards, depending on the type of loom) before a pass is made with the weft (crossing) thread.

Inkle looms are fantastic for beginning weavers. They're inexpensive, easy to learn, and very forgiving of potential mistakes. With the addition of cards (also called tablets), some seriously intricate pattern work can be performed on an inkle loom, giving it a huge amount of versatility for its size and price.

I've seen inkles run between $45 and $150, depending on the quality of the woodworking done during manufacture. My inkle cost about $80, and is made of scrap hardwood from other projects. It will weave 2 1/2 inch wide pieces of fabric, which I primarily use for things like belts, trim on costuming, straps for purses, strips of it sewn together side by side and then into a shoulder bag or pouch, etc. It also doubles as a warping stand for my floor loom, where I use it to measure the lengths of thread to be warped onto the Big Boy (see below).

These are great for kids, beginning weavers, those who don't intend to invest a lot of time and money, and those who are wanting to see whether its a hobby they actually enjoy before making the larger time and money investment required with a tabletop or floor loom. They're also well loved by experienced weavers who make complex ribbons of trim via tablet (or card) weaving on an inkle.

Style 2: The Box or Tabletop Loom
Tabletop loom by
Tumbleweed Woodworks
Offering lightweight portability that still allows for significantly larger pieces of cloth than an inkle, the box or table loom is a good choice for those who don't want the expense (both monetary and floorspace) of a traditional floor loom. 

These guys are little work horses, reliable and easy to learn how to use. Though they're less forgiving of mistakes than an inkle, they're also a lot more versatile in the types of patterns available to the weaver. 

Most of the box or tabletop looms that you'll find are rigid heddle looms. Instead of a piece of string tied around every other thread like the inkle loom, a rigid heddle loom has rows of very thin metal bars with eyelets in them to pass the thread through. In the photo above, you can see the three sets of rigid heddles in the raised areas featured in the center of the "box" frame.

Each thread gets its own heddle instead of only half the threads getting held in position this way. The more heddles a loom (tabletop or floor) has available, the more complex and ornate the pattern can become. Since each thread gets its own means of moving up and down, the shed (current weaving area) is determined by which heddles are up.

These looms are good for slightly more advanced beginners, intermediate weavers, advanced weavers who want something small and portable to relax with while out of the studio, and those who want to dabble and are willing to spend more than what an inkle generally costs. Plan on spending between $250 and $600 if you decide to purchase a good tabletop loom.

Style 3: The Floor Loom
Modern LeClerc Floor Loom
This is the "Big Boy" category of looms; the largest available outside of the strictly commercial cloth production market. Floor looms come in a variety of sizes, measured by the width of the cloth they can produce. They are very large, often larger than a good sized desk and requiring a chair or bench to sit at while working the loom itself.

As you can see from the photo above, this particular style of loom requires a great deal of space to set up and use properly. They are also a significant investment financially, often costing anywhere from $1,500 to $8,000 depending on brand, weaving width, number of heddles (which partly determines how complex a pattern you can produce) and number of sheds available.

I own a 48" weaving width standing jack loom with six heddles and four sheds. It currently resides at Knight's Rest in storage, because I haven't had the space to set it up. Floor looms are not for dabblers, nor are they a good choice for those on a serious budget; I only managed to acquire one because an acquaintance in my RenFaire group had too man, and needed the space, so she gave one away. I was the lucky winner of the "First to say something gets it" lottery.

Style 4: The Warp Weighted Loom
https://en.wikipedia.org/wiki/Warp-weighted_loom#/media/File:WarpWeightedLoomCTMLodzPoland.jpg

Seldom used by any except the most dedicated historical re-enactors, a warp weighted loom doesn't look much like what people think of when they hear the term "loom." These are usually very tall (in excess of six feet) with a weaving area that ranges from three to eight feet wide. Tension is maintained on the warp threads by the expediency of tying bundles of warp thread to clay weights, which can then be adjusted to allow more thread as the weaving progresses. 

These are easy to build, but can take years of practice to become expert in its use. Due to their size, and how they are warped, some seriously fancy pattern work can be achieved by someone who knows what they're doing on one of these. Sadly, I am not one of those people!

A Final Word
Weaving is both a skill and an art form, much like many of the other obscure skills I've been known to discuss. True proficiency requires a time investment, and definitely has a learning curve involved. I'm far from being an expert in weaving, though I am a devoted hobbyist. Thankfully, I have friends who are truly experts in the field, and I highly recommend the advice of those well versed while learning.


Sunday, April 2, 2017

Gun Blog Variety Podcast #137 - You Keep Using That Word

The media being inaccurate? Or having an agenda? Inconceivable!
  • You think shooting a gun is a hair-raising experience? Beth suggests you try trimming a baby's nails. If you can do that, maybe shooting isn't so scary after all!
  • What kind of person shoots his girlfriend to death outside of her home? Sean takes a closer look.
  • Barron is on assignment this week, but in his place we welcome back Miguel in the inaugural episode of his new segment The Flea Market of Ideas. Miguel talks about less-lethal options for dealing with Antifa mobs.
  • In the Main Topic, Sean and Erin commiserate about the total misuse of the phrase "Stand Your Ground" in the media.
  • As promised last week, Tiffany tells us all about her trip to Germany to speak before the World Forum on Shooting Activities.
  • Last week Erin told you what emergency trauma equipment you'd need to keep people alive until the professional rescuers got there. Well what are you going to do if rescue isn't coming? Listen and find out.
  • We give them our tax dollars, but what does NPR do with them? Weer'd shows us that they don't try really hard to be objective.
  • And our plug of the week is Patrick O'Brian's Aubrey-Maturin series, the books that inspired the Russell Crowe movie, "Master and Commander: Far Side of the World."
Thank you for downloading, listening, and subscribing. You are subscribed, right? We are available on iTunes, Stitcher Radio, and Google Play Music!

Listen to the podcast here.
Read the show notes here.

Thanks to LuckyGunner and Remington for their sponsorship, and a special thanks to Firearms Policy Coalition for their support.

Blue Collar Prepping Transcript:
Medical Reference Books
With this weekend being April Fools’ Day, I was going to do a segment on how a folded and strategically placed piece of toilet paper can be a critically important prep when meeting people -- such as for a job interview or on a first date -- but I couldn’t find a way to address the subject in the classy manner you’ve come to expect from GunBlog VarietyCast segments. But if there’s enough interest, I could be persuaded to write it up for my blog. It really IS a very useful prep, despite the questionable taste of the subject matter.

Anyhoo, moving on…

Last week, I talked about what you should have at home to treat a traumatic injury while waiting for the ambulance to show up. But what about if you’re in a disaster situation and emergency services can’t show up? That’s an entirely different set of preps. 

Now a lot of people are probably thinking that I’m going to recommend scalpels and suturing kits and skin staplers and those surplus “military” 20-piece surgical kits you find for suspiciously low prices in places like the Bud K catalog. 

Yeah…. No. The reason those kits are so cheap is because they’re made with non-surgical steel. This is a bad, BAD thing, because this kind of cheap stainless steel has tiny grooves and trenches in that can trap traces of tissues or fluid, leading to infection if you use them on another patient. They’ve also been known to cause microscopic holes in surgical gloves, leading to infection of the person using them. 

So these are bad, bad, bad, things. Do not use them, do not get them, use ONLY surgical grade steel that you KNOW is surgical grade. 

As for the other things I mentioned -- they’re great, IF you know how to use them. I’m not going to make product recommendations on that subject because I  don’t know how to properly use them, so I don’t know what’s good and what isn’t. I’ll see if I can get an EMT to write a blog article about it. 
But here’s what I can recommend: BOOKS. Lots and lots of books, filled with knowledge on what to look for and what to do. 

The first book every prepper needs is the Merck Manual of Medical Information. It comes in two versions, the Home Edition - which uses everyday language non-doctors can understand - and the professional version, which is more up to date but has lots of dense medical terms. The professional version is also much more expensive. 

This manual is very useful for diagnosing what is wrong with someone based on their symptoms. And it tells you what causes the ailment and how to treat it. Its main drawback is that the treatment advice assumes you have access to modern medicine and equipment, and in a long-term disaster you won’t have access to those. 

For that reason, I recommend the “Where There Is No Doctor” series of books. These explain how to treat common maladies and injuries using plain language, lots of illustrations, and the assumption that you don’t have access to first-world medical care but instead must make do with first aid supplies and home remedies. In addition to the first book, subtitled “A Village Health Care Handbook”, there are others that deal with different topics, such “Where there is no dentist” for dental problems; “When There Is No Doctor: Preventive and Emergency Healthcare” for preventive medicine, and “Where Women Have No Doctor” an entire book on healthcare for women’s reproductive health. 

Many of these “Where there is no fill in the blank” books are also available in Kindle edition, making them incredibly portable. Buy them, download them to your smart phone or Kindle -- remember, I talked about making a survival e-reader part of your bug-out gear - and keep them handy when you need them. 

Gear can be improvised, but knowledge is priceless, so carry as much of it as you can!

Tuesday, September 20, 2016

Cuts and Closures

Cuts and scrapes are a part of life, as any mother of boys can tell you (just ask my mom; she treated plenty of  them, between my brother and me). However, there are multiple types of cuts, and they all need to be treated a bit differently.

This isn't a comprehensive breakdown by any means, as that can occupy entire chapters of medical textbooks. Instead, it's more of a crash course, if you'll pardon the unintentional pun. So, without further ado, lets close some cuts.

(Author's note: The pictures for this article are hidden behind links, for the benefit of those with softer stomachs. They are quite graphic. Be advised.)

Abrasions
Abrasions are one of the most common types of cuts, and are caused by rough materials rubbing the skin away. Colloquially called "road rash," abrasions can be caused by tools, falls, recreational accidents, or any other incident where moving skin hits a stationary surface (or vice versa).

These wounds look ugly, but usually don't bleed much and are fairly shallow. They do need particular attention when being cleaned, however, as debris often ends up in the wound.

Some abrasions can be quite severe, though. If large areas of skin are removed, or the wound bleeds heavily, professional medical attention is required. In addition, due to the amount of skin removed, abrasions need to be kept clean to prevent infections and speed healing.

Bandaging abrasions is usually quite simple, requiring only adhesive bandages or gauze pads. 
  1. Rinse the wound with clean water
  2. Dry it gently
  3. Apply the needed bandage. 
Lacerations
A laceration is what most people think of when they think of a cutting injury, and occur when a sharp object breaks the skin. They may bleed very little, or they may bleed heavily, depending on the depth of the wound and the location. Lacerations that bleed heavily, or won't stop bleeding with direct pressure, should be seen by a doctor. In addition, a wound deep enough or wide enough that you can see into it needs professional attention, typically sutures. Some folks are bold enough to do that at home, but I lack formal training in the subject, and so would rather leave that job to the professionals.

Bandaging a minor laceration is so basic that most folks do it without thinking.
  1. Flush the wound with clean water
  2. Dry it
  3. Apply an adhesive bandage, or something larger if needed. 
  4. Antiseptic ointment can also be used, if desired.
Temporary bandaging can also be used while transporting to, or waiting for, professional medical treatment. Wounds too large to bandage at home often benefit from a compression bandage until better treatment can be applied.

Punctures
Puncture wounds are deep, narrow, and generally difficult for a layman to treat. If possible, do not remove whatever caused the puncture, as it often helps "plug the hole" and removing it can make things dramatically worse.
  1. Bandage any areas that are bleeding
  2. Immobilize or otherwise support the object to keep it from moving
  3. Summon professional help.

Illustration: Laceration vs Puncture

Avulsions
Avulsions are ugly, nasty wounds. The definition of an avulsion is when something is "torn away" from its natural place. These injuries are often caused in a manner similar to abrasions, but they are far more severe. In short, if things are only partially attached, it's an avulsion. 

Much like a puncture, there isn't anything that can be done in the field beyond keeping the patient still and calm, controlling bleeding, and calling the professionals.

Blood makes folks understandably upset. With a bit of forethought and awareness, you can help calm that storm and lead the way to the E.R. and, hopefully, a shorter recuperation period.

Lokidude

Friday, September 2, 2016

Unexploded Ordnance


I have a moderate curiosity about explosives. I understand the chemistry behind most of them, have worked with a few different types, and I give them the respect they deserve. Like fire and electricity, explosives have a purpose and are safe when used properly. Unlike fire or electricity, explosives have a much longer shelf-life.

Military UXO
I spent the last year of my active duty Army time at the joint-services EOD (Explosive Ordnance Disposal) school, putting special weapons training devices back together after the students had torn them apart. I got to see a lot of bombs, mines, shells, grenades, etc. (henceforth ordnance) that were displayed in combination classroom-museums, and I was impressed by how ingenious humans are when it comes to finding ways to kill each other.

Several of the displays were of ordnance that had been found long after the battles were over. They were still deadly, even though they were decades old and covered in rust. When a piece of ordnance doesn't go “boom” when it should, it can hang around for decades just waiting for the right (or wrong) activity to set it off. Welcome to the world of the UXO (UneXploded Ordnance).

Most preppers make plans for extreme weather, zombies, accidents, and other natural or man-made disaster, but a random piece of UXO can ruin your day just as badly. The scary part is that UXO can be found just about anywhere; you'd expect to find old bombs and such around battlefields and war zones (Germany logs at least one UXO every week), but wartime plane crashes and various live-fire exercises over the years have scattered UXO all over the continental US. Tides and ocean currents bring them to our beaches, fishing vessels drag them up from the bottom of the sea quite often, and the many “souvenirs” brought back by military servicemen over the last two centuries means that UXO can be literally anywhere.

One of the odd links in my bookmarks file that has been there for about 20 years is UXOinfo.com. Sponsored by a private ordnance removal company, the webpage is a place for collecting and storing news about UXO around the world. I find it aggravating that they often don't provide links to their sources, forcing me to do my own research to get more information, but it is an eye-opening site. People run across old (and new) ordnance just about everywhere. Construction workers and hikers seem to find them quite often, but UXO have shown up at Goodwill stores and garage sales. Look through their picture galleries for some interesting (and scary) photos.

Civilian UXO
But besides military ordnance, it used to be legal (and simple) to purchase blasting caps and explosives for agricultural and personal use. Beavers damming up the stream again? A couple sticks of 60% dynamite will take care of the dam. Need to clear out a silted-in drainage ditch? A string of single sticks laid down the center will move the dirt quick. Boulder in the middle of a field too big to move and you're tired of farming around it? Blast it into manageable pieces.

As a result of this old, pre-terrorism era practice, boxes of blasting caps and dynamite are still sitting around in barns and sheds all over the country. I have seen, first-hand, a partial box of DuPont dynamite in a shed during an estate auction. The old man who owned it had passed away and nobody knew how old it was. Since this happened many years ago, the locals just called the Sheriff, who came and made sure it was disposed of safely. Today, the BATFE, FBI, and DHS would want to investigate everyone within 5 miles of the site for links to terrorism.

Dynamite is quirky: since it is made by absorbing liquid nitroglycerin into clay or some other absorbent material, it has to be rotated every month or two it is in storage because the liquid likes to settle to the bottom of the sticks and may seep or leak out (called “sweating”). Handling nitroglycerin with bare hands will have the same effect as a heart patient popping a “Nitro” tablet under his tongue- increased heart rate, lowered blood pressure, and a throbbing headache.

IED UXO
Last but not least are the intentionally placed explosives, Improvised Explosive Devices (IEDs). that have become one of the favorite weapons of terrorists around the world. Usually constructed from artillery shells or home-made explosives, they are often disguised as common debris or objects to avoid detection. Booby traps are another form of placed UXO; if you notice wires coming out of that teddy bear by the side of the road, it would probably be best to give it a wide berth.

The Three Rs
What do you do if you run across a piece of UXO? Follow these three Rs (stolen from a .mil website):

1) Recognize
Have a basic understanding of what explosives look like and realize when you might be looking at one; if you see a cylinder with the ends closed and fins (or the remains of fins) on the tail, it's probably a bomb.

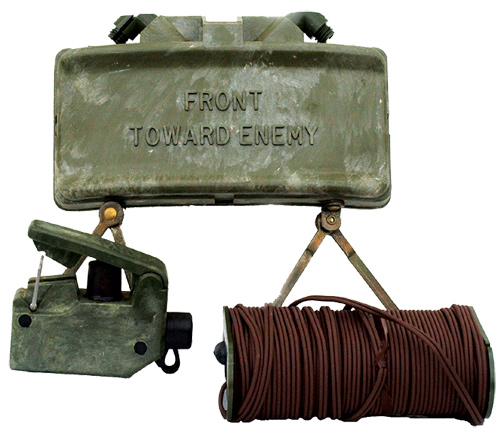
The moron who found a M18A1 Claymore mine while clearing a field in Florida and took it to a veteran buddy is a good example of what not to do.

https://upload.wikimedia.org/wikipedia/commons/c/c1/US_M18a1_claymore_mine.jpg
Most of us have seen at least one war movie where the “front towards enemy” molded into the plastic is visible. He was lucky that it didn't have the blasting caps installed.

2) Retreat
Don't touch it, move it or poke it, just get away from it! You may want to hang a piece of cloth in a nearby tree or mark the location so the EOD team can find it easier, but don't mess with the UXO itself. 500 yards is usually considered a safe distance, unless you run into a large pile; a mile or two is best if you find something like they did in Germany in 2014.

3) Report
Call 911 as soon as possible and let the experts handle it. Small items may be carried away in a “bomb bucket”, but larger pieces will likely be blown up in place., which can be fun to watch... from a safe distance.


I realize that this is probably more nightmare fuel for some folks. There are enough bad things going on in the world that I hate to add to the list of reasons to worry, but this belongs on that list. Without specialized training and tools, there just isn't much you can do about UXO except get away from it.

Tuesday, March 22, 2016

Tracking, part 2: Scat

Does a bear crap in the woods? Well yes, actually, and so do a whole lot of other animals. As a hunter, I use droppings to find game; as a hiker, scat can tell you if the animal crossing your path is a bear or a bunny.

Scat
Scat is any digestive leavings from an animal. In most cases, that's feces. It also includes "pellets" coughed up by certain birds of prey; these pellets contain all the parts of a meal that the bird couldn't digest.

Before you get too involved in investigating scat, be aware that animal waste can contain bacteria, parasites, or viruses. Some of these diseases, such as hantavirus, can even be transmitted by merely breathing air contaminated by waste. Latex gloves are called for in any feces handling, and a surgical-style mask is not out of line in confined areas such as caves and outbuildings.

The form that scat takes depends on the diet of the animal. Animals that eat a lot of plant matter (rabbits, deer, etc.) tend to have droppings that are small and spherical or oblong, and range from the size of small raisins to roughly half an inch in diameter. Animals that consume lots of protein have longer, corded droppings; if you have a dog or a cat, then you have a perfect example of carnivore waste.

Deer pellets (from icwdm.org)
Bear scat. Note the size. (icwdm.org)

Birds and lizards have very similar leavings, and those are different from any other animals. They have a tendency to be smooth and ropy, and are frequently entirely white, or have a white portion on one end. As with tracks, larger droppings or larger piles of droppings indicate a larger animal.

In many species, bird stools are loose to the point of being runny. Think about how pigeon droppings look on your windshield in the morning, and you get an idea of the consistency of some of these leavings.

An owl pellet. (tvja.org)
Next week, we'll look at the other signs animals leave behind and what they can tell us.

Lokidude

Tuesday, March 15, 2016

Tracking, part 1: Animal Tracks

We're teaching my Boy Scouts about animal tracks and signs this week, and I realized I've never talked about that here. Since there's so much to talk about how to track and the critical elements of it, I've broken it into multiple parts.

This week, we're going to talk about what tracking is, and what kind of tracks to look for and what they mean.

What It Is
Tracking is a very underrated skill among folks who don't hunt. The obvious use of tracking is following game that you'd like to turn into tasty meat; the less-obvious, but probably more useful employment of this skill, is being able to determine what animals are in the area that may want to turn you into tasty meat. Whether you use your skills as a predator or to avoid becoming prey, the same basic elements apply.

At its core, tracking is the art and discipline of identifying and interpreting signs left behind by animals as they go about their regular routines.The most commonly thought of sign is a footprint, but other common signs such as scat or disturbed or damaged environmental bits. All of these parts combine to tell the story of what went where, and when.

What to Look For
Animal signs fit into three main categories: tracks or prints; scat; and disturbed environment. Signs are unique to various types of animals, and when taken as a whole, they will tell a great deal about the fauna around you.

The particular signs, and animals you find, will depend on the area you're in, and a  good guidebook will give a comprehensive breakdown of the types of signs a particular animal leaves. My favorite guides are James Halfpenny's Scats and Tracks series. Scats and Tracks of the Desert Southwest happens to be the one that applies to my home are and favorite vacation spots, but there are guides for the whole country.

While a guide will give you great detail about the animals in your area, there are some universal constants in tracking that apply to the entire country.

Tracks
In general, a deeper track comes from a heavier animal.

A new track will have sharp, clean edges and more defined details. As a track ages, edges crumble and details wash out. After just a couple days, the detail can be almost entirely gone.

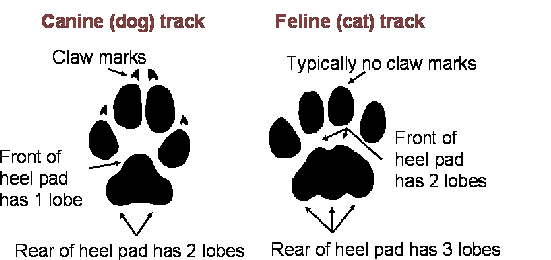
Different animal genera and species will make distinctly different tracks. For example, cat and dog tracks are very similar, but the differences between them are easily seen.

Picture from Michigan DNR.

Deer and other wild herbivores have a split hoof. As with predators, a larger, deeper track means a larger animal. Herbivores are generally harmless, but if they feel threatened, they can be even more dangerous than a predatory animal: for instance, a fully grown moose weighs upwards of 1200 pounds, with massive antlers and sharp hooves. Such an animal rampaging through camp would be like having a car drive through it.

Image from wildawareutah.org

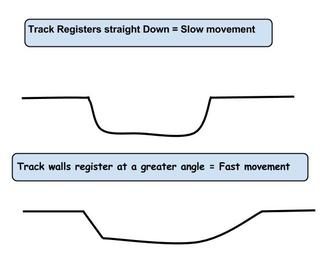
Tracks can also tell how fast an animal was moving. A slower-moving animal leaves tracks that have even, vertical sides; faster movement leaves a track with sloping edges as the foot rolls out of the track.  Faster movement also means that tracks are spaced further apart. 
http://wildfound.weebly.com/tracking/basics-of-tracking-part-2-reading-prints
For more information about animal tracks, including lots of examples and photographs, check out The Basics of Tracking part 2: Reading Prints on WildFound.

Next week, we'll shoot the poop as we talk about scat.

Lokidude

Thursday, February 18, 2016

Chemistry for Preppers: Molecules

First, I need to give a word of warning: Chemistry follows rules, but there are almost always exceptions to those rules. I will try to point out exceptions as they occur to me, but my memory is not perfect and I may miss some. If I make a mistake, please let me know so I can correct it; my ego is not so large that I am unwilling to admit that I can make mistakes.

I studied Chemistry for three years in college, but that was almost 30 years ago; my interest and desire to learn have kept me dabbling in chemistry for many years, and the various jobs I've had over those many years have taught me more than college did.

I am also struggling with subscript and superscript in the blog format, without resorting to writing the whole mess in HTML. If I ever figure out how to properly represent molecular formulas, I will. Until then you'll have to put up with the mess along with me.

Recap
Last week I covered atoms, which are the smallest pieces that elements can be divided into and still retain their physical and chemical properties. Start adding or subtracting protons and you're creating a different element; add or subtract neutrons and you're creating isotopes; electrons bounce around between atoms creating ions. All three will act differently, physically and chemically, than the atom you started with. Atoms are the base of chemistry, but molecules are what we work with.

Electron Shells
When atoms get together and share electrons, they create molecules. I mentioned electron shells briefly last week, and how there are a series of shells around the atomic nucleus with each shell capable of holding a set number of electrons. The shells tend to (almost always, but there are exceptions) fill completely before electrons start orbiting in the next higher shell. Thus, the outer shell is the one with the “available” electrons or “available” spaces for electrons, since it is the one that is not full (except for the Noble Gasses, with their full outer shells which don't combine with anything under normal circumstances). These outer electrons are called valence electrons, and are the ones shared in the “bonds” that tie atoms together into molecules. As you go down the Periodic Table, the outer electron shells hold more electrons and it becomes possible for atoms to have several natural valence states, or be polyvalent (more on that when I get to naming and nomenclature).

Ions
If electrons from one atom are stripped from the outer shell and take up orbit around another atom it is called an ionic bond, because both sides have had their electron/proton balance upset and have become electrically charged. Electrons carry a negative charge, so the atom that gains an electron will become more negatively charged and is known as an anion, while the donor atom will become more positively charged and is known as a cation. My simple way of remembering which is which is, “I like cats, so cats are positive and therefore cations are positively charged”. Those of you who don't like cats will have to use the “an-” part of anion and remember that it means “minus” or “negative”. Anhydrous = without (minus) water, anarchy = without rule, anaerobic = without air, etc.

Bonding
Since opposites attract, the positive and negative ions will stick together like magnets. 

Ionic bonds are fairly weak and easily broken; dissolving an ionic molecule in a solvent will create a solution of ions. Table salt is a good example of an ionic molecule: NaCl is the chemical formula for table salt, sodium chloride, and if you add NaCl to water, the molecule splits into Na (+) and Cl(-) ions. The Cl atoms have stripped an electron from the Na atoms, ionizing both of them.

If electrons are shared equally in pairs between the components of a molecule, it is called a covalent bond. Covalent bonds are strong and stable. Water is a good example of a covalent bond: H2O is the formula for water, two hydrogen atoms bound to a single oxygen atom, and these bonds require an external source of energy to break. Quite a few of the elements exist in a molecular form due to covalent bonds -- Oxygen atoms tend to buddy up and you'll find them as O2 in nature, and Sulfur (or sulphur) tends to gang up in groups of 8 such that the common yellow powder form of sulfur is known as S8.

There is a third type of bond, known as a hydrogen bond, that is peculiar to the unique state of hydrogen only having one electron to share but needing two to fill its first and only electron shell. This one is more applicable to the interactions between molecules than those between the atoms that make up molecules. Hydrogen bonds are very weak.

Depiction
If there are more than one bond in a molecule, the bonds will also have an angle between the bonds. If you look up H2O, you'll generally find a molecule that looks like a Mickey Mouse head, with the oxygen atom as Mickey's face and the hydrogen atoms being his ears. This shape is set by the angle of the O-H bonds (104.5 degrees) to each other, which is why you'll often see complex molecules pictured as bizarre tinker-toy constructions. Bond angles are determined by the number of valence electrons available and how many are actually being shared.

If you're looking through a chemistry text and see a molecule represented like H-O-H then you're seeing a simple Lewis Structure. Each of the bars (there may be more than one) between the atoms represents two electrons that are being shared in a bond. Unshared or “lone pair” electrons may be shown as dots around the atomic symbols. This system shows the electrons being shared, but not the bond angle. This is an older system that is being replaced with 3D graphical representations in order to relay more details about a molecule's structure.


Next week I will be introducing the various categories of chemicals, with reduction/oxidation chemistry, stoichiometry, and reaction potentials in the near future. My CRC Handbook of Chemistry and Physics must be packed away, so I bought an older version on eBay for less than $10, shipped. I'm going to need that for some of my references, and it's handy to have around for the conversion factors in the back (about 40 pages of fine print, how to convert any common unit of measure into any other) and some of the history of chemistry.

Thursday, February 11, 2016

Chemistry for Preppers: Elements

I've thought about starting a series of articles covering “Chemistry for Preppers” for a long time, and this is the first of a potentially long series. The depth of information will be determined by the feedback I receive from the readers and my fellow authors. If you didn't take or don't remember high school chemistry, a lot of this will be new information, but anyone with college-level chemistry will find it fairly basic. I am going to gloss over a lot of quibbles and minute details unless I am asked to be more precise; this is basic chemistry, after all, not Organic or Physical Chemistry. The first few articles will be basic chemistry with applied chemistry to follow.

If you're interested in having an excellent reference book on your shelf, I strongly suggest the CRC (Chemical Rubber Company) Handbook of Chemistry and Physics. They're up to the 96th edition and they are expensive, but the information in them changes so slowly and in such small amounts that any edition you can find will suffice, so look in used book stores or second-hand shops around colleges for a cheap copy. You can find a lot of the history of each element in the Handbook, along with more data than most of us will ever need.

A Little History
The study of what things are made of started with the ancient alchemists, who were searching for ways to transmute (change) cheap, common materials into expensive, rare materials. In their search, they found that there were many different kinds of “elemental” materials that couldn't be broken down into anything simpler. These became the basic elements, and were organized into a table (see below) by how they acted and reacted, which led to the deduction that there were holes in the table and therefore undiscovered elements. Chemists searched for these “missing” elements for centuries, often competing with each other to be the first to isolate a rare or stubborn element.

Periodic Table
Everyone has seen the Periodic table of the Elements, but how many of you know how to read the information that's in it? A good table will give name, symbol, number, atomic weight, and sometimes other information.

There are 92 naturally-occurring elements and 26 man-made elements. The man-made elements tend to be very radioactive and decay rapidly, normally small fractions of a second. The natural elements have names and symbols that are relics of the alchemists and the various languages spoken by the people who first isolated them. The man-made elements are often named after prominent physicists and physics labs. Some of the newer elements don't have official names and are referred to by their atomic number (in Latin) followed by the common -ium suffix.


The vertical columns are called Groups, and the horizontal rows are called Periods. 
  • Groups share physical characteristics, with activity generally higher at the top and declining as you go down through the Group. 
    • Hydrogen is in a Group by itself, having no neutrons in the most common isotope.
    • Alkali Metals react with water, stripping the oxygen away from the hydrogen and generating heat. 
    • Alkaline Earths are soft metals that also react with water. 
    • Metals, Transition Metals, and Semimetals are mostly solids that conduct electricity. 
      • Transition refers to electron behavior, and not the quality of metal. 
      • Semimetals are sometimes conductors and sometimes insulators, hence the "semi". 
    • Nonmetals are normally found tied to other elements, such as Oxygen to Nitrogen or Hydrogen. 
    • Halogens are very reactive, but Noble Gasses are completely inert and won't react with anything. 
    • Lanthanides are known as the “rare earths” because they are not very common in the Earth's crust. 
    • Actinides consist of naturally radioactive elements that decay through the release of atomic radiation (alpha, beta, gamma) to isotopes of lower elements.
  • Periods are set by the configuration of the electrons in the various shells around the atomic nucleus. The innermost shell will only hold two electrons, The second and third can hold 8 electrons each, the fourth and fifth each hold 18, the sixth and seventh each hold 32.
Positive, Negative, Neutral
All matter is made of three basic atomic particles (sub-atomic particles are above my pay-grade).
  • Protons are positively charged particles in the nucleus of the atom. The number of protons is the atomic number of the element. Since positive charges attract negative charges, there are generally an equal number of protons and electrons.
  • Neutrons are neutral (non-charged) particles in the nucleus that weigh as much as protons. The number of neutrons added to the number of protons equals the atomic weight or atomic mass of an element. The number of neutrons can vary without changing the element, and these variations are known as isotopes of the element. The atomic mass of an element is usually given as an average of all naturally-occurring isotopes for an element, and is rarely a whole number.
  • Electrons are negatively-charged particles that orbit the nucleus of the atom in distinct shells. Electrons have negligible weight and don't influence the atomic weight of an element. Electrons often move from atom to atom, and any time there is a difference in the number of protons and electrons, the atom is deemed an ion.

That covers elements. Next week I'll start putting a few of them together and we'll cover molecules and atomic bonds. If I can find decent graphics I will use them; otherwise, you may be forced to suffer through my attempts to use MS Paint or something similar.

The Fine Print


This work is licensed under a Creative Commons Attribution- Noncommercial- No Derivative Works 3.0 License.

Creative Commons License


Erin Palette is a participant in the Amazon Services LLC Associates Program, an affiliate advertising program designed to provide a means for sites to earn advertising fees by advertising and linking to amazon.com.