Showing posts with label Old School Skills. Show all posts

Friday, March 3, 2023

Homemade Soap

Keeping clean is an essential part of maintaining both physical and mental health. I've taken enough bloodborne pathogen and hazmat classes that not being able to wash my hands regularly makes me actively uncomfortable. Any of our readers who have been on an extended camping trip (whether personal or under government contract) know the challenges involved in maintaining an acceptable level of personal hygiene.

There are a number of potential issues in keeping ourselves clean, such as access to a water source, ambient temperature, and privacy. While there's not much we can do about those issues, the one we can address is soap. While readily available in stores and online, making soap at home doesn't have to be complicated or expensive, and is another self-sufficiency skill to be considered.

WARNING!
Soap making uses lye, a caustic chemical that can cause severe burns. Use all appropriate personal protective equipment,  including but not limited to eye protection, long sleeves, and gloves.

Equipment
Just over a year ago I posted an article on candle making, and some of that same equipment can be repurposed for making soap, specifically a double boiler or crock pot to melt the ingredients safely and a mold to form the soap.

A friend of mine who makes soap uses Pringles cans as one-use molds, with the resulting tube of soap then cut into disks. Any of the variety of silicone baking molds available on the market can be used as well.

A variety of home-made soaps from the author's collection

Make sure that any equipment and utensils used in the soap-making process are never again used for food preparation! Some of the chemical residue isn't good to imbibe, and it will give your food a nasty taste. 

Secondhand stores and yard sales are a very economical source for the necessary equipment.

Ingredients
A basic soap can be made with just three ingredients:

  1. Oil or another fat (olive oil, coconut oil, etc.)
  2. Lye (sodium hydroxide for bar soap, potassium hydroxide for liquid soap)
  3. Water (preferably distilled) or other liquids, such as goat's milk

Optional ingredients include essential oils, colorants, and dried herbs or flowers. 

The type and quantity of oil will affect the amount of lye needed for a recipe. This is a link to a handy lye calculator.

WARNING!
Never use aluminum containers or utensils when working with lye, it can cause a dangerous chemical reaction.

Process
This is the traditional hot process method for making soap. There is also a cold process method that takes longer, but doesn't require constant heat.

  1. Set the mixing vessel to low heat.
  2. Add the oil and cover.
  3. In a separate container, slowly add the lye to the water
    (don't add water to lye, it can splatter).
  4. Gently stir the solution while adding the lye.
  5. Put aside and let the lye solution cool for 15 to 20 minutes.
  6. Check the temperature of the oil(s) using a candy thermometer.
  7. Once they reach 120 to 130F gently pour in the lye to avoid splashing.
  8. Stir slowly (a stick blender on low can also be used).
  9. Continue blending and stirring for 10 to 15 minutes, or until the soap has thickened and looks like pudding.
  10. Cover and cook on low heat for 50 minutes, stirring gently if bubbles form.
  11. Let cool until the mixture drops below 180° F.
  12. If desired, add essential oils and/or colorants and mix well.
  13. Pour the mixture into a mold.
  14. Gently tap the mold to eliminate air bubbles.
  15. If using an open mold, smooth the top with a spatula.
  16. Let sit for at least 24 hours at room temperature.
  17. After cutting, allow the soap to dry for another week.

Soap making, if done responsibly, can be safe and isn't very complicated. It's also good clean fun.

Links


Tuesday, January 18, 2022

Candle Making

The ability to generate light, either with a flashlight or by making fire, is a topic frequently discussed on this blog. However, the overlooked candle is another source of light and heat. From a simple birthday candle to a three wick, eight inch diameter, two foot tall column, they all have their uses. 

One of humanity's older crafts, making candles at home can be a fun and useful skill to learn. It’s also much simpler than most people realize.


Supplies and Equipment
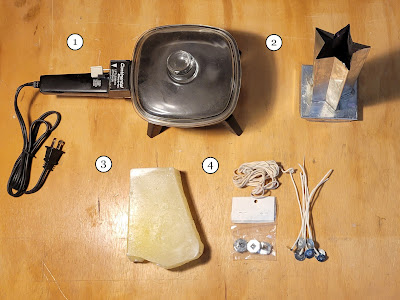
The elements necessary to make candles are not complicated or expensive, but they can be fairly specific in certain details. You will need:
  1. A method of melting wax safely
  2. A candle mold
  3. Wax
  4. Wicks and sustainer tabs

When melting wax, the two most common options are an electric melter or a double boiler. They each have their pros and cons; for example, an electric melter is considered safer as there is no open flame, but obviously requires electricity, whereas a double boiler works with nearly any heat source, but is a greater safety risk if used over an open flame as liquid wax is very flammable.

A simple aluminum double boiler

Candle molds can be simple or fancy and come in various sizes. Existing containers such as glasses, mugs, tins, and even boxes can be used as-is without needing to remove the wax after casting. You can even 3D print your own candle molds.

Paraffin, beeswax, soy, and other plant and synthetic-based waxes are all available for candle making. The range of prices varies, and so do their properties; qualities such as burn rate, drip quantity, and melt temperature should be considered. Damaged or broken candles are also a good resource.

Wicks are available in both coils that need to be cut to length and in pre-cut lengths and already threaded on keepers called sustainer tabs, which are also available separately. Another consideration when selecting wicks is matching the wick material to the type of wax and the size of the wick to the diameter of the candle.

Optionally, dyes, perfumes, and other decorative elements can be added for aesthetic purposes.

Process
The steps to follow are also fairly straightforward, and are safe as long as reasonable care is taken.

Obligatory safety warning: melted wax can be very hot! 
Avoid getting it on your skin or other important things.

  1. Place the wax in the melter and begin heating.
  2. While the wax is melting, prep the wick by attaching the sustainer tab and threading to the mold as appropriate based on manufacturer's instructions.
  3. Make certain the wick is properly centered in the candle mold.
  4. Carefully pour the melted wax into the mold.
  5. Let sit while the wax hardens.
  6. If appropriate, remove from the mold. (If the wax is being poured into something like a jar or tin that will be the permanent container for the candle this step can be skipped.)
  7. Enjoy your candle. 
With a small investment in equipment and supplies along with a few hours of time, we can make attractive and functional candles that can brighten our lives in more ways than one.

Thursday, February 11, 2021

Hide Glue

While digging through the cupboards and drawers at my new work location, I ran across a container of something I haven't seen in years: hide glue. Once upon a time, this type of glue was the preferred method of joining pieces of wood due to its strength and clear finish. Modern chemistry has given us more convenient alternatives, but hide glue is still an option for times when the stores are closed or too far away and you have something that needs to be mended. Several decades ago I learned how to make this basic glue on a scouting trip, and if a bunch of pre-teen boys can make it, I'd bet that a majority of you could, too.

Hide glue is, as the name implies, a glue or adhesive made from animal hides. It was one of the first adhesives that humans developed and has been in use for at least 6000 years. It dries clear, is strong enough for furniture joints, and is cheap to make. The downsides are that is is not waterproof and it does have a noticeable odor when wetted for use. 

The ingredients are simply animal hide and water. The tools needed aren't any more complicated: a source of heat, a container that can handle that heat, a stirring stick, a piece of cheesecloth (or old T-shirt) and a knife. We used coals from a campfire and an empty stew can along with a suitable stick off of the ground and our ever-present pocket knives. The T-shirt didn't work as well as cheesecloth, but it did work.

Preparation

  1. Clean the animal hide as best you can. Remove all hair, fat and tissue that you can; you want just the skin. Tanned leather will also work, so recycling an old pair of boots or shoes that are made of leather is another potential source. Found some roadkill that isn't fit to eat? Skin it and use the hide.
  2. Cut the hide or leather into small pieces. Somewhere between the size of a dime and a quarter is small enough. Smaller pieces give more surface area and speed up the process, but if you get them too small they are harder to remove after processing.
  3. Toss the pieces of hide or leather into the container and cover with water. Let it soak overnight to absorb as much water as possible.

Processing

  1. Add more water if needed to keep the pieces covered.
  2. Place the container on your source of heat and bring it to a simmer. You don't want to boil the leather, just get the water hot enough to leech the collagen out of the leather. This will be a rather smelly operation, so working outside is a good choice.
  3. Heat the mixture until the pieces start to turn translucent. That's the sign that you've got most of the collagen out.
  4. Remove from the heat and pick out the chunks of once-leather and discard them.

Finishing

  1. Filter the hot liquid into a second container to remove as many impurities as you can. Cheesecloth will get the big chunks while still letting the thick, viscous liquid flow through.
  2. Place the second container on the source of heat and simmer until most of the water is gone.
  3. Test the resulting liquid by touching some to a fingertip and seeing if it is tacky or sticky. Once you have a sticky gel, you've made glue that is ready to use.
  4. To store your glue, evaporate off as much water as possible by pouring it into a shallow pan or container and letting it dry. We used a solar food dryer to speed things up a bit, something that another group had been building while we played with the glue.
  5. Once the glue has dried and is brittle, chop or break it up into fine pieces and place in an air-tight container in the normal cool, dry place that we all know is best for storing most everything. The shelf-life is indefinite once it has thoroughly dried.

To Use As Glue

  1. Pour some of your glue crumbles or powder into a small container and add a bit of water. Add more water for thin, runny glue that will seep into porous surfaces, or add less for a thicker glue that will fill in gaps or holes.
  2. If you need to speed up the dissolving process, stir and apply gentle heat until it is liquid again.
  3. Apply like any other glue that you've used. Brushes work well with paper and flat surfaces, and pouring into holes works well for woodworking.

I'll cover a few other types of home-made glues in the next few weeks, since glue has been around for a long time and is used more commonly than most people think.

Friday, April 3, 2020

Social Distancing Week 3: Online Socialization & Learning

Not actually Erin.
& is used with permission.
Hello preppers! I'd ask how you are all holding up, but I've seen your Facebook posts. Those of us who are introverts are likely doing well, but our extroverted friends are likely not okay with all this.

But fear not! There are ways that extroverts can get their "people fix" without breaking quarantine. Additionally, if you're tired of reading books or watching Netflix, there are online courses you can take which will not only keep you entertained but also teach you useful prepping skills.

Online Socialization
Because I'm a nerd I play a weekly game of Dungeons & Dragons. Because I'm an introvert, I know more fellow D&D nerds online than I do in real life, so for the past 8 years I've been playing with friends across the country. Now some of you are using Zoom for telework and school, but I have no experience with that; I use Discord, which is a free chat service which works in both a browser tab and as a downloadable app. With Discord, a speaker and a microphone you can have group calls; you can also type in chat as if it were an old-school IRC channel or chatroom, drop in links to webpages, post pictures, etc. You can even have video chats, although the last time I tried that it was still awkward and limited. Still, I feel that Discord is best combination of voice and text conversation I've ever seen, and if it works for hosting a game of D&D then it'll work for chatting with your friends.

If you're playing an online game like D&D, then there are still some hurdles to be overcome: dice rolls, character sheets, and mapping with tokens. While it's tru that Discord has various dice-themed programs (called bots) which you can invite to your channel, I've found that I get my best results with another online service called Roll20. This is completely free to join and use, although there are subscription tiers which unlock additional features (I use the $5/mo service and have found no need for anything greater) and you can purchase things like maps and token in their Marketplace.  Using Discord for voice and text and Roll20 for maps, dice, tokens and character sheets meets all my needs as a D&D Dungeon Master.

If you aren't interested in role-playing games, there are still ways to have fun with friends:
  • Board Game Arena, like the name suggests, allows you to play board games online. 
  • Similarly, Playing Cards allows you to play, you guessed it, card games like poker, Go Fish, etc with your friends. If you're a fan of Cards Against Humanity, then check out Remote Insensitivity, which is an online version of CAH using a Creative Commons license. 
  • If you're more skilled with a computer and have a Steam account, check out Tabletop Simulator, which is a 3D physics engine that allows you to do whatever you want. If you hate playing online chess because you can't flip the board in anger, then this is the game for you!

Online Learning
If you want to make your time in isolation more productive then I recommend Outdoor Core, and online learning hub where professionals teach you skills in the following topics:
  • Archery & Bow Making
  • Blacksmithing, Knives, & Metalwork
  • Disaster Preparedness
  • Leatherworking
  • Navigation & Orienteering
  • Outdoor Business
  • Plants/Trees Uses & Identification
  • Ropework & Knots
  • Slingshots & Slingshot Shooting
  • Throwing Sports
  • Wild Crafting
  • Wilderness Survival
You can find course listing here. Not only are these classes very affordable, once you've bought a course it's yours forever and you can go back and re-watch it any time.

What's more, Outdoor Core is offering a 14-Day Quarantine Outdoor Skills Summit which has 14 separate 30-minute courses on such topics as
  1. Urban Net Weaving: How to Make a Bottle Sling [Instructor, Joel Graves]
  2. How to Back a Wooden Bow [Instructor, Dave Mead]
  3. Eating Wild: How to Make Tough Cuts of Game (Venison) Tender [Instructor, Stacy Lyn Harris]
  4. Stone Tools: How to Make a Slate Arrowhead [Instructor, Creek Stewart]
  5. Animal Track Casting & Track Identification [Instructor, Craig Caudill]
  6. Urban Cordage: How to make a drop spindle and spin cord from plastic bags [Instructor, Hank Gevedon]
  7. Black Nail Knots Ashley Book of Knots (ABOK) #785 Knife Lanyard [Instructor, Mandy Clinnch]
  8. How to Make a Leather Altoids' Tin Belt Pouch [Instructor, Kevin Luebke]
  9. Knife Etiquette & Knife Handling Skills [Instructor, Maximilian Neukäufler]
  10. 3 Tips to Draw from Observation [Instructor, Brandy Klindworth]
  11. Nails to Knives: How to make a knife from a nail [Instructor, Nathan Summers]
  12. How to Make a Wooden Burn Bowl + Rock Boiling [Instructor, Hutch Hutchings]
  13. Foolproof First Bow Drill Fire Kit - How to Make a Bow Drill Kit at Home from Junk and a Shot Glass [Instructor, David Polczynski]
  14. Painting with Pencils [Instructor, Andra Jensen]
  15. FREE BONUS COURSE! Rescue: 2-Pole Flip Winch [Instructor, Creek Stewart]
All for a discounted price of $43.
Note: Neither I nor Blue Collar Prepping are at all affiliated with Outdoor Core and we have received no compensation for this. I am just a big fan of Creek Stewart and anything he teaches. 

Hang in there, everyone. We can get through this!

Friday, November 30, 2018

Portyanki

Not actually Erin.
& is used with permission.
Despite what it sounds like, a portyanki isn't a monster from Dungeons & Dragons. It's actually the Russian name for "foot wrappings", and they were commonly used by the armies of many nations through the 20th century in lieu of socks.* In fact, the Russian army wore portyanki up until 2013!

A portyanka (that's the singular term) is simply a piece of cloth -- ideally rectangular and roughly 3 feet long by 1.3 feet wide, but square and triangular cloths will also work -- that is wrapped around a foot like a bandage and tied into place. It acts like a sock to cushion and insulate the foot, wicking away sweat and protecting against blisters.

https://en.wikipedia.org/wiki/Footwraps#/media/File:FootClothFromFinnishDefenceForces.JPG

Benefits
At this point, you're probably wondering why I suggest you learn to tie cloths around your feet when you have perfectly good socks. While socks are clearly the superior technology, there are several good reasons for knowing how to wrap your feet:

Portyanki are Easy to Make 
You might find yourself barefoot during a disaster, or your socks might become damaged or lost in a long-term SHTF scenario. Socks can be difficult to replace or repair in that situation, but portyanki can be scrounged from fabric like sheets, pillowcases, t-shirts, and the like, and they will fit any size foot. 

Portyanki can be Re-wrapped 
Socks with holes in them aren't very good, but since portyanki are wrapped, a hole isn't that big of a deal; just turn the cloth over and re-wrap it to cover the hole. 

Wet socks aren't pleasant, either. If you're wearing long enough portyanki (this is why I said the rectangular ones are better), you can take them off and re-wrap them so that the part which was wrapped around your shin (and are hopefully dry) can go around your foot, and the wet portion is now on the outside and higher on your leg where it can dry. 

Portyanki are Easy to Clean
Speaking of drying, because they are single pieces of cloth which lie flat, portyanki dry quickly in the air. Since the cloth is thinner than most socks, they are also easier to clean -- in fact, the standard Russian manner of cleaning portyanki was to boil them!

Portyanki are Disposable
Easy come, easy go. You didn't put a lot of effort into making them, so when they're worn and threadbare, you can throw them away without regret.

Drawbacks
Despite all these advantages, there are areas in which portyanki fall short.

Portyanki are Slow to Put On
Socks are easily and quickly pulled on, but portyanki must be tied in a specific manner. It is possible to put them on quickly -- Russian soldiers were held to a standard of getting dressed in 45 seconds -- but that requires practice.

Portyanki Must be Tied Properly
Improperly tied portyanki will result in painful blisters! Make sure that all folds and wrinkles are smoothed out as part of the tying process.

Summer vs Winter
Summer portyanki can be made out of cotton (and if you're scrounging them, that's probably the material you'll use). Winter portanki were traditionally made out of flannel, although wool would be best.

Tying Your Socks
So how do you properly tie your portyanki? I'll provide you with a step-by-step procedure, but the easiest way to teach you is for you to see the process yourself. I've provided several videos of the process from different angles, in case a certain step isn't clear. If you only watch one of them, watch the first one.


  1. Place your foot on the portyanki such that most of the material is on the same side as your big toe. (We will call this the inside.)
  2. Leave approximately one foot-width of material on the same side as your little toe. (We will call this the outside.)
  3. Some people like to have their feet parallel to the sides; others place theirs at an angle, with their heel near the corner. Experiment to find which style works best for you. 
  4. Take the outside edge corner and wrap it over your toes, tucking it under the ball of your foot. Smooth out any wrinkles. 
  5. Take the inside edge and wrap it over your entire foot and ankle, smoothing out any wrinkles. Make sure that the cloth stays taut around your heel and ankle.
  6. Continue the wrapping motion and go under your foot, stepping down again once the material is smoothly wrapped. 
  7. Grasp both corners of the inside wrap and cross it, so that the front corner is in the back and the back corner is in the front. 
  8. Wrap this portion around the upper ankle and shin. You will have one corner pointing up your leg and another behind your leg. 
  9. Take the corner behind your leg and wrap it around to the front, tucking the loose end into the wrap you've made. 
  10. Tuck the final corner down into the wrap. 
Congratulations, you've tied your first portyanka! Now you get to do it again for your other foot!

https://outdoors.stackexchange.com/questions/8125/how-to-put-on-footwraps-correctly


*  Prior to the 20th century, socks were considered luxury items that were only given to officers.

Tuesday, June 26, 2018

Product Review: Washing Wand

Around January, my husband and I found out that we could finally buy our first home next year. I immediately went into "Where can we save money so that we can pay off everything possible between now and then?" mode.

One of those areas was laundry. We were spending upwards of $40 a month going to a laundromat. $40 plus the amount of time taken away from my husband's job because we only have one vehicle plus the extra miles on the vehicle equals me deciding I was going to do laundry the old-fashioned way (by hand) but with a modern twist.

The Washing Wand
Enter this doodad. It was an initial investment of $8 (I got it on sale) and the amount added to the water bill by doing laundry in the tub at home was $12. That's half of what we were spending per month at the laundromat, which means the Washing Wand has already paid for itself in the first month of use.

I know it looks like a toilet plunger, but it's better:
  • I don't have to worry about someone forgetting there's one for the toilet and one specifically for laundry only. 
  • It's designed to agitate water, not un-plug a toilet, so it agitates better than a plunger. 

Tips and Tricks
  1. Let your laundry soak in the soapy water for five to ten minutes. 
  2. Dump that water and replenish it with fresh, then agitate it for 40 motions (think 'churning butter') or two minutes, whichever is longer.
  3. You may have to rinse twice, depending on how dirty the stuff was.

Q&A

Can it handle sheets and blankets? 
It can, if you have a large tub to let them soak in. You might have to work harder to get them clean, though. 

Has it proven to get the clothes clean?
Yes.

Would I trust it with the crocheted stuff I do for Jade Rose?
I haven't tried that yet, and am a little apprehensive about it.  Do you blame me?

My Rating: 7.5 out of 10

Pros:
  • There's no "ick factor" of using a toilet plunger
  • It gets things clean
  • It breaks down easily for storage/transportation
  • It's inexpensive
Cons:
  • It's exhausting to use if you're out of shape.
  • It's a bit hard on your hands if you're not used to gripping something for long periods of time.
  • The cup could use a couple more holes added to it to aid in the agitation of the water.
I recommend this product.

Thursday, May 17, 2018

The House Out Back

If TSHTF in a major way and destroys the infrastructure that we depend on for water and sewage services, you're going to need to find a way to deal with the inevitable result of people eating: they urinate and defecate. I'll try to keep this family-friendly, but face it, everybody pees and poops and it has to go somewhere. If you have a Bug Out Location (BOL) that is remote or plan on spending lots of time at a location that lacks a sewer line or septic tank, you'll need a plan for dealing with those necessary bodily functions. I'll cover a few different options in the next couple of articles, but today I want to talk about outhouses.

While I may be old and have spent most of my life in rural areas, I did grow up with indoor plumbing. The rare occasions where a normal toilet wasn't available were during camping trips to some rather remote locations, a couple of field deployments in the Army, and a two-week period when we moved to a new house that wasn't finished before we moved in (the school year was starting and my parents wanted us to get into the new schools at the start). As an adult, I spent six years working 12 hour shifts at a location without a flush toilet; we used a porta-potty (the blue plastic boxes that are common at construction sites) until management spent the money to run a sewer line down to our office. In other words, I have some experience with outhouses of various types.

Planning and preparation are why we read and write blogs like this one, so let's take a look at some of the steps you'll need to cover.

Legal
If you're going to build an outhouse before a crisis, you'll need to check your local laws. Zoning ordinances will prevent you from using a functional outhouse inside most city limits, but a “decorative” outhouse can be quickly converted into a real one simply by dragging it over a hole dug in the ground. Use it as a “garden shed” to store your shovels and rakes until you need to activate it.

Environmental
Do you know where the water table sits in your location? If you dig a hole and water seeps in, you're not going to want to place a standard outhouse there. Contaminating the groundwater is one of the things you're trying to prevent, so look for a better spot or use a sealed system (more on that when I get to types).

Know your soil types and plan accordingly. Well-drained soil will help keep an open-bottom hole from filling up as quickly; sand won't retain enough moisture for decomposition to occur; and clay won't let any liquid leech out. If you don't understand soil types, get a professional opinion from a local septic tank installer.

Location
You want to keep the outhouse close enough that you can get to it quickly, but not so close that you have to smell it inside the house. Since it's likely that you'll be eating unfamiliar food, plan on placing your outhouse within sprinting distance. 50 to 100 feet from the back door was normal a century ago, so that's a good rule of thumb. Take the other members of your family or tribe into consideration as well; children and elders are more prone to urgent need of a toilet.

I've mentioned water tables already, but you also want to locate your outhouse downhill from any water source that you may use. Keep it at least 200 feet from any well or spring. This will prevent contaminants from percolating through the soil and ending up in your drinking water.

Design
I'm not going to go into exterior design details. You can get as basic or creative as your time and budget allow as long as the basic functions aren't neglected.

Size
The common outhouse was about 4' x 4', with the “bench” taking up the back half of the floor space. Look around the internet and you'll find designs for just about any shape and size you can imagine, but the simple 4' x 4' size is easy to build with common lumber. Plywood comes in 4' x 8' sheets, so you can build the walls, floor, and roof with 3 sheets and a couple of armloads of 2 x 4s.

Ventilation
The area under the seat and above the hole in the ground needs to be ventilated. Gasses produced by the decomposition of bodily wastes are unhealthy to breathe and basically unpleasant to every culture on Earth. Running a piece of 4” or bigger PVC pipe from a hole cut in the bench up through the roof is common, but I've also seen designs that use thin (less than 1” thick) wood to create a channel up one or both of the back corners. Cover the top of the vent pipe with netting or window screen to keep insects out.

Cover/Roof
Unless you're setting up on a tropical island, having a roof to keep weather off of you is not an option. The type of roof is going to vary according to your available materials and style, with traditional outhouses having a simple single-pitch (one piece, without a peak in the center) roof that angles down to the rear of the structure.

Door
Privacy is nice, but the main reason for a door on an outhouse is to keep animals and insects out. A nice, dry shelter with a supply of nesting material (paper) is quite attractive to a lot of furry critters that you don't want to share your bathroom with. Equally disturbing is trying to use a bathroom that has become the location for a wasp nest.

I recommend putting a latch on the inside of the door if you have more than one person using the outhouse to ensure privacy. If you're handy enough and have the materials, a “dutch” door or “half door” that is split horizontally will allow you to close the bottom half for privacy and open the top half for ventilation while in use.

Interior
How you set up the interior is going to be purely personal preference. Other than a metal or plastic container to store your toilet paper (it keeps moisture, bugs, and mice out), you can go as basic or elegant as you want. 

A shelf for reading material is a good choice, as is somewhere to place a lamp or lantern if that's what you're going to use to find the outhouse in the dark.

When outhouses were common, people kept a container of wood ashes (from the fireplace) or slaked lime (ask at any hardware store or lumber yard) in them. A scoop of ash or lime was added to the pit after each use to keep odors down.

Keep the floor clear to prevent tripping and slipping, use the wall space for decorations and amenities.

Seat
You're going to need a place to park your butt while you take care of business, so make it comfortable. Standard toilets are about 15” from the floor to the top of the seat, but those of us with long legs prefer something closer to 20”. A regular toilet seat is a nice addition, but anything that will close the hole will work.

For winter use, cut a toilet seat shape out of styrofoam insulation and hang it in the house by the door so you can grab it on the way out. The extra insulation will make a huge difference, trust me. I've had to expose too much bare flesh to too much cold plastic over the years and hovering over a hole is more than my old legs can stand now.

Paper
Modern toilet paper is nice, but any paper will work to help clean your bottom and keep the wastes off of your hands (you'll still need to wash them, though). The old Sears and Roebucks catalog hanging from a nail provided reading material as well as a supply of paper for many years in many places. Newspaper will work after you've crumpled it up a few times to make it softer, and almost all newspapers use soy-based ink now so it's safer to use on delicate areas. Home-made paper from recycled magazines and newspapers would probably be softer and more pleasant to use than the “slick” paper found in advertising inserts, but more research is needed in that area.


Types of Outhouses 
(and how they work)

Open Pit or “Long Drop” Outhouse
This is your basic shack over a hole in the ground.

I've seen several examples that use a 55 gallon drum with both ends removed as a “liner” to keep the soil from collapsing into the hole. The height of a drum also ensures that the bottom of the hole is below the frost line in all but the most extreme environments. Metal drums will last for a several years and will eventually rust away, and plastic drums will stay in the ground for decades or centuries. Since the hole will eventually fill up and the house will be moved, I prefer metal drums. Plastic also tends to “float” out of the ground over the years if you live in an area where it freezes. The annual frost heave lifts the light plastic a few inches each spring, meaning you may end up seeing it pop up in the future.

Open pits work by holding the waste and letting naturally occurring bacteria decompose it. Having the bottom of the hole below the frost line ensures that you'll always have a live colony of bacteria available to work on the waste. This decomposition reduces the mass of the waste and destroys most pathogenic (harmful) organisms in the waste. The active bacteria tend to be anaerobic (they work in the absence of air) or facultative (they work with or without air), so you won't get good decomposition until you have enough waste to create an anaerobic pile. Anaerobes tend to create acids, so the old-time habit of throwing a handful of lime or wood ashes into the hole after each use will neutralize some of that acid and keep the odors down. I could bore you to tears with explanations of acid-formers and methanogens and the pH balance needed for each, but I won't.

Sealed or Watertight Systems
Where the soil conditions or local laws won't allow an open-bottom pit, you're going to have to use a hole with a liner that will trap all of the droppings. The biggest problem with this type is that they have to be pumped out or otherwise emptied when they start to fill up (the contents are then transported to a treatment plant for disposal) or they may be sealed (until services are restored) and the outhouse relocated to a new lined hole.

Vault toilets are a type of sealed system that you'll find in a lot of parks and campgrounds. The wastes are accumulated in a large underground tank that is pumped out by a contractor as needed, eliminating the need for an expensive septic system that will only get used for part of the year.

Bucket Toilet
While not common in the USA, “night soil” workers have been used in many countries through the ages to deal with a type of sealed system. Well into the mid-20th Century, outhouses built with a removable bucket were tended to in Australian towns, where they were known as “dunny cans”. The outhouses were built next to the fence on the alley behind the house and the buckets were removed and replaced through a hatch on the alley side.


Proper waste disposal is important at any time, but it becomes a priority when the normal infrastructure is unavailable or not working. Check the news for stories about E. coli outbreaks and the spread of “old” diseases like cholera and dysentery, they're happening more often than they used to due to improper sanitary practices and lack of education. With everything else you'll be dealing with after a crisis, you don't want to add disabling diseases that are preventable.

Thursday, April 26, 2018

Fire Carriers

One of the most common subjects in any prepper discussion is fire and how to start one. We've covered various methods of building and starting fires over the years, so I thought it might be time to take a step sideways and talk about carrying your fire with you.

A long time ago, in a place not too far away, I was a Boy Scout. 40-50 years ago, a lot of the lore and training of the Boy Scouts was based on American Indian traditions and practices because our leaders were trying to teach us wilderness skills and the local Indian tribes had worked out ways to deal with the same weather, animals, and terrain that we would be encountering. I live in the area the various Sioux tribes wandered, so we learned some of the tricks that they used.

Fire Horns
A nomadic people, the Sioux would “bug out” whenever they needed to: following the buffalo herds, migrating with the seasons, looking for fresh water, and territorial disputes were some of the reasons for moving. They would strike camp, pack up the belongings they wanted/needed, and travel to their destination.

One of the first things done at a new location was to light the community fire. Having a community fire offered everyone a quick and reliable way to start their own personal fires for heating and cooking. The communal (or council) fire was also a meeting place for the leaders of the tribe, and many cultures share the tradition of discussion around a camp fire as a method of bonding as a community and working out problems.

Since friction fires and flint and steel are time consuming ways to start a fire, and they didn't have access to matches, lighters, magnifying lenses, or any of the modern ways to start a fire, they used a “fire horn” to carry a burning ember from the last fire at the previous camp to the new location. A fire horn was a buffalo horn packed with soft punky wood that would smolder rather than burn, and covered with a loose-fitting cap to allow some air flow. A hot ember placed in the fire horn could be carried for up to a week and still be hot enough to start a fire. This was much quicker than starting from scratch!

Photo credit: http://franzbrown.com/plains-indian/lewisandclark-teacher/artifact_pages/23_buffalo_horn_fire_carrier.htm

Making and Using a Fire Carrier
Since there are very few buffalo horns to be found and a lot of young Scouts, we used soup or bean cans to make our fire-horns.
  1. When opening the can, leave a bit less than a quarter of the lid attached to the rim. This provides a cover that can be opened or closed as needed to provide air to the embers, and it also won't get lost.
  2. Use a screwdriver or awl to punch holes around the top edge for the carrying strap, and punch a few holes around the bottom of the can to let air in.
  3. We used leather lacing for a carry strap, but any form of cordage will work. 550 cord seems to be the “tactical” solution for everything, and it will work just fine.
  4. Make your carrying strap long enough that the fire-horn is free to swing from your belt or shoulder as you walk. This makes sure that fresh air get into the can and sustains the glowing embers, and having a longer strap also keeps a potentially hot metal can away from your body. It should be long enough to swing it around your head when you're trying to revive the ember.
  5. Fill the can about ¾ full of soft punky wood. Look for a tree that has been down long enough that it has started to rot; you want small chunks of almost rotted wood about the size of your thumb that should be easy to crush with your hand but not turn to dust when you pick them up. The best choices will be from the trunk or large branches; rotted heartwood works better than thin branches due to its denser structure.
  6. Use a stick to pull a hot ember out of your existing campfire. You're looking for one that will fit into the can without touching the sides. Break it up until you get the right size.
  7. Use your stick to scrape the ember into the can, or use two sticks like chopsticks to pick it up and place it into the center of the punky wood.
  8. Close the lid and once you've made sure the old fire is completely out (listen to Smokey Bear, folks),  you're ready to travel.

Starting a Fire from a Carrier
We experimented (played) with our fire horns a lot. Frequent checking of the hot ember to make sure it was still burning was common, and if it showed signs of dying it could be revived by swinging the can around by the strap. This forced air through the holes and partially open lid, which helped keep the embers going. I think the longest we ever used one was three days, but that was due to the length of the campout.
  1. Once you get to your new camp, find fuel for your fire and a good source of tinder. Bird's nests work great as tinder, but a large double handful of dry grass is just as good.
  2. Set up your fire like you normally would, leaving a hole on one side of the bottom for the tinder.
  3. Open the lid of your can (use a stick or knife if it's hot) and carefully dump the hot ember into your pile of tinder.
  4. Pick up the pile and gently blow through the pile to get air to the ember. Once the tinder starts to burn, quickly place it into the prepared stack of fuel and work on getting a real fire going.
  5. Once you have your new fire going, clean out the fire horn. There may be small, smoldering embers in the bottom that will keep burning for days, so unless you're planning on moving again soon, dump it out to prevent accidents.

Not everything has to be new and improved! Our ancestors lived through a lot of things we don't normally see, and they figured out ways to get by. Most of the disasters we prepare for are disruptions of our modern lives, setting us back to a time before electricity and clean water were common, but people lived that way for centuries and I think we can learn some of their tricks in case we ever have to play by their rules. 

Thursday, February 15, 2018

Old Things

No, I'm not writing about David or myself, even if we do qualify.

Over the years (this blog had its fourth birthday in January), I've written a lot about old tech and I've gotten some feedback that questions the wisdom of choosing, say, liquid fueled lighting over the latest and greatest LED lantern. Since I own and use both, it's not really an either/or choice for me; it's more like an example of my desire to have more than one option in most things. Besides, old tech that still works tends to be more robust and easier to maintain than new, high-tech replacements.

Look around at the things most preppers collect:
  • Fire starting equipment hasn't changed much in the last century, and the flint and steel set carried by trappers 400 years ago is still usable today. The materials to make a new set are still widely available, and while the skills to use it may take a while to learn, it's a skill that humans have had since before we started to write. Matches have improved from the “Lucifers” and “Congreves” of the 1800's, but the modern safety match works the same way. Sadly, the strike-anywhere matches have been declared hazardous material due to the chemicals used and are getting harder to find in stores because of the extra paperwork and cost of shipping them.
  • If you compare a modern bolt-action rifle to one produced before WW1, you won't find many major differences; most bolt-actions are based on the Mauser designs that date back to the late 1800's. The most common sporting rifle in America today is the AR-15, which was first sold in 1963. The AK-47 rifles were introduced in 1947 and were heavily influenced by German rifles made towards the end of WW2. Only in the last few decades have John Moses Browning's century-old pistol designs been challenged with any new technology -- but they still work. The oldest firearm in my collection is a revolver made in 1914, and it isn't much different than the one I have that was made in 2014.
  • Ammunition is another old technology that hasn't been replaced with anything better, although there have been a few attempts. The ubiquitous 22LR cartridge is based on the .22 Short, which was first sold in 1857. The venerable .30-06 became a standard military cartridge in 1906. Shotgun cartridges haven't changed much in the 140 years they've been around.
  • Knife design is an interesting field of study, but it also boils down to “There's nothing new under the sun”. Most of the patterns and shapes of knives were established when we were still using brass and bronze for our tools because we hadn't figured out iron and steel yet. If you squint your eyes a bit, some of the modern knife profiles look a lot like the stone knives used thousands of years ago.
  • Food prep hasn't changed since we started making fire. We may have better pots and pans, but the cooking varies more by region than by century. We store some of our food by drying it, same as every hunter/gatherer group has for millennia; it's just that we have better control over how dry it is now. Canning food is a technology developed for Napoleon's army, because he needed a way to store and transport food that didn't employ butchers and herdsmen.
  • Textiles have changed, but not for the better. With the exception of Gore-Tex and a few other synthetics like rip-stop nylon, it's hard to beat cotton and wool for everyday wear. Easy to clean and patch, the natural fibers are safer around fires and will outlast acrylics and polyester. Natural fibers are also easier to manufacture on a small scale, making them a renewable item. If you ever get a chance to examine old clothing in a museum, you'll find that they tended to be made of cloth that was a lot thicker than what we use now. When you're limited to only a handful of clothes, you want the ones you have to last a long time, so it makes sense to pick ones that are sturdy.
  • Those kerosene lanterns and lamps that I mentioned earlier? Simple oil- or fat-burning lamps have been around for thousands of years. My oldest hurricane lantern is roughly 80 years old, and it still works and I can still get parts for it. If you have a source of fiber and an Inkle loom, you can make lamp wicks. Plant and animal oils will work if you can't find petroleum oils, and their production is simple.

All of the above do not mean that the old ways are always best. We have made great progress in some fields:
  • Water purification has improved immensely in the last 30 years. Drinking out of whatever puddle or stream you could find was the only option we had for many centuries, but we also had to deal with the pollutants and bacteria present. Even the cheapest water filter on the market today is a huge improvement over drinking unfiltered water.
  • Medicine and the medical arts have made our lives longer and more comfortable than ever before. Diseases that used to kill or disable are now better understood and treatable, and vaccines have largely removed words like polio and tetanus from daily use. Equipment and supplies that weren't available to doctors and hospitals a hundred years ago can be purchased in your local WalMart. Training has also improved and is more wide-spread, which leads to more people knowing how to treat more injuries and improves the patient's chances of recovery.
  • Information is now more readily available than any other time in history. The days of books being rare commodities are gone (never to return, I hope), and even without the internet the average person has more resource available than they can use in their lifetime.

I like to learn and teach about old technology, because it is nice to have a back-up if TSHTF. Knowing how to use and maintain a time-proven system (we recently resurrected a 1974 Ford grain truck at work) that can at least partially replace something lost in a disaster gives me an advantage over someone who thinks that food comes from the grocery store and electricity is a form of magic. I'll be sitting by my wood stove or camp fire, reading a book by kerosene light, while they shiver in the dark trying to figure out why the wi-fi doesn't work any more. 

Monday, October 23, 2017

Woven Glory

Two years ago, I started an extended series on Fiber Arts, but never finished it due to health problems. Now that I'm no longer over my head, I intend to finish that series. I've managed to cover the types of fiber, processing it, spinning, and dying it, and today I talk about weaving it into usable form.

Weaving is an art form that is almost as old as civilization itself, and has been practiced since the very beginnings of agriculture (and possibly before that). Every known society throughout history has had some form of woven textile goods that were produced from a variety of source fibers.

As societies grew and gained technological advances (either through study and innovation, or via trade with their near neighbors) the looms they used to produce cloth became more complex, allowing for a much wider range of patterning in the finished product.

In its most basic form, a loom is simply something to hold long threads in place and under tension (called the warp) while other, usually much shorter, threads are passed over and under them in succession (called the weft.)

These days, looms come in a huge variety of sizes and shapes, from lap-held looms that can produce both simple and elaborate trims or strips of fabric, all the way up to looms that require their own rooms for making extensive rolls of fabric, large rugs and carpets, or hanging wall tapestries*. When talking about home or artisan use, there are three different types of  basic looms, which is what I'll describe today, along with a fourth which is mainly a historical curiosity.

None of these looms require power to operate, and all can be made by hand with proper woodworking tools and knowledge, meaning that they are a good investment for a prepper interested in making woven fabric.

*Yes, tapestries are still a thing, though they aren't specifically used for keeping out drafts these days. They're very labor intensive, ornate, and time consuming to produce, sometimes taking upwards of two years to manufacture and costing thousands of dollars. Weaving specialists work hand in hand with draft artists and painters and can turn practically any piece of flat visual art into a one-of-a-kind tapestry to hang for viewing!

Style One: The Inkle Loom
Rhi's inkle
Inkle looms are small, portable, typically lap-held looms that weave very narrow strips of cloth. The width one can handle is determined by the length of the bars that make up most of its form, and is seldom over 3 1/2 inches in total width. The warp threads are wound individually, with every other thread passing through a loop of string which is tied off separately and is referred to as a heddle. The heddle is what allows a weaver to move alternating sets of threads into place (up/down or back/forwards, depending on the type of loom) before a pass is made with the weft (crossing) thread.

Inkle looms are fantastic for beginning weavers. They're inexpensive, easy to learn, and very forgiving of potential mistakes. With the addition of cards (also called tablets), some seriously intricate pattern work can be performed on an inkle loom, giving it a huge amount of versatility for its size and price.

I've seen inkles run between $45 and $150, depending on the quality of the woodworking done during manufacture. My inkle cost about $80, and is made of scrap hardwood from other projects. It will weave 2 1/2 inch wide pieces of fabric, which I primarily use for things like belts, trim on costuming, straps for purses, strips of it sewn together side by side and then into a shoulder bag or pouch, etc. It also doubles as a warping stand for my floor loom, where I use it to measure the lengths of thread to be warped onto the Big Boy (see below).

These are great for kids, beginning weavers, those who don't intend to invest a lot of time and money, and those who are wanting to see whether its a hobby they actually enjoy before making the larger time and money investment required with a tabletop or floor loom. They're also well loved by experienced weavers who make complex ribbons of trim via tablet (or card) weaving on an inkle.

Style 2: The Box or Tabletop Loom
Tabletop loom by
Tumbleweed Woodworks
Offering lightweight portability that still allows for significantly larger pieces of cloth than an inkle, the box or table loom is a good choice for those who don't want the expense (both monetary and floorspace) of a traditional floor loom. 

These guys are little work horses, reliable and easy to learn how to use. Though they're less forgiving of mistakes than an inkle, they're also a lot more versatile in the types of patterns available to the weaver. 

Most of the box or tabletop looms that you'll find are rigid heddle looms. Instead of a piece of string tied around every other thread like the inkle loom, a rigid heddle loom has rows of very thin metal bars with eyelets in them to pass the thread through. In the photo above, you can see the three sets of rigid heddles in the raised areas featured in the center of the "box" frame.

Each thread gets its own heddle instead of only half the threads getting held in position this way. The more heddles a loom (tabletop or floor) has available, the more complex and ornate the pattern can become. Since each thread gets its own means of moving up and down, the shed (current weaving area) is determined by which heddles are up.

These looms are good for slightly more advanced beginners, intermediate weavers, advanced weavers who want something small and portable to relax with while out of the studio, and those who want to dabble and are willing to spend more than what an inkle generally costs. Plan on spending between $250 and $600 if you decide to purchase a good tabletop loom.

Style 3: The Floor Loom
Modern LeClerc Floor Loom
This is the "Big Boy" category of looms; the largest available outside of the strictly commercial cloth production market. Floor looms come in a variety of sizes, measured by the width of the cloth they can produce. They are very large, often larger than a good sized desk and requiring a chair or bench to sit at while working the loom itself.

As you can see from the photo above, this particular style of loom requires a great deal of space to set up and use properly. They are also a significant investment financially, often costing anywhere from $1,500 to $8,000 depending on brand, weaving width, number of heddles (which partly determines how complex a pattern you can produce) and number of sheds available.

I own a 48" weaving width standing jack loom with six heddles and four sheds. It currently resides at Knight's Rest in storage, because I haven't had the space to set it up. Floor looms are not for dabblers, nor are they a good choice for those on a serious budget; I only managed to acquire one because an acquaintance in my RenFaire group had too man, and needed the space, so she gave one away. I was the lucky winner of the "First to say something gets it" lottery.

Style 4: The Warp Weighted Loom
https://en.wikipedia.org/wiki/Warp-weighted_loom#/media/File:WarpWeightedLoomCTMLodzPoland.jpg

Seldom used by any except the most dedicated historical re-enactors, a warp weighted loom doesn't look much like what people think of when they hear the term "loom." These are usually very tall (in excess of six feet) with a weaving area that ranges from three to eight feet wide. Tension is maintained on the warp threads by the expediency of tying bundles of warp thread to clay weights, which can then be adjusted to allow more thread as the weaving progresses. 

These are easy to build, but can take years of practice to become expert in its use. Due to their size, and how they are warped, some seriously fancy pattern work can be achieved by someone who knows what they're doing on one of these. Sadly, I am not one of those people!

A Final Word
Weaving is both a skill and an art form, much like many of the other obscure skills I've been known to discuss. True proficiency requires a time investment, and definitely has a learning curve involved. I'm far from being an expert in weaving, though I am a devoted hobbyist. Thankfully, I have friends who are truly experts in the field, and I highly recommend the advice of those well versed while learning.

Thursday, March 30, 2017

Prepper Vehicle Choice?

Since our editrix Erin decided to make this a theme week, and the theme is “What is your choice in vehicles for preppers?”, I get a break from having to come up with a topic.

I tend to agree with David and Lokidude on their selection of a pickup truck as a good vehicle for preppers, because they're versatile and common. I've owned a pickup for all but a few years out of the last 35, so I'm a bit biased toward them (I'm comfortable working on Ford products from experience; GM and Chrysler make good ones as well). My current daily driver is a 1999 Ford F-250 2WD with a standard cab and full-size bed. My work truck is a 2008 Ford F-250 Super Duty, 4WD with a farm hitch, so 20,000+ lb trailers and dirt roads are normal parts of my days.

I also own an M35A2 2.5 ton retired Army truck.

Photo is mine, of my truck

Pros:
  • Multi-fuel: diesel engine that will burn almost anything combustible.
  • 10-wheel drive: if the bumper clear the hill, it will go up it.
  • Bullet-proof drivetrain: the Rockwell axles have been a favorite of custom off-road shops for decades.
  • Twice the bed of a pickup: 8' x 12' on mine but the 5 ton version came with a 8' x 16' bed.
  • Three times the load capacity of a pickup: the 2.5 ton rating is for off-road; on-road they'll carry 5 tons.
  • No electronics (EMP hardened): the turn signals/brake lights and windshield wipers are about the only things electric on mine.
  • 50 gallon fuel tank.
  • Made out of real metal instead of recycled pop cans.

Cons:
  • A royal pain to find parts for, as they stopped being made about 20 years ago.
  • Normal tools are not large enough to work on a lot of parts.
  • The tires are mounted on split-rim wheels, which can be dangerous to work on.
  • It gets 4 MPG on a good day.
  • The top speed is around 50 MPH.
  • It has no heater or air conditioner.
  • The steering column is a piece of steel pipe pointed at your chest.
  • The suspension is stiff as a brick unless you have a serious load in the back.
  • You need a ladder to get into the back if you're over 50 years old.
  • It runs on a 24V system, so lights and accessories are not easy to find.
  • The batteries (it has two 12V batteries in series to make 24V) cost over $200.00 each. Diesels take a lot of battery power to turn over when starting.
  • It stands out enough that I can drive it in parades.

It's a good vehicle for bugging out... but there's more to prepping than just bugging out.

My choice of vehicle for general prepping is influenced by what I am prepping for. My main concerns are natural disasters or weather related, with the serious threats that would require a vehicle being some long-term disruption of society. An EMP attack, Coronal Mass Ejection (CME) event, or some other cause of wide-spread loss of electricity would cripple the nation and lead to societal collapse. Wars we have dealt with; same for epidemics and crop failures. But losing the electrical grid would kick us back about 150 years in technology, so my prepper vehicle choice would look more like this.

Image is in the public domain. http://tinyurl.com/lcesley

I realize that not everyone has the resources to own horses; they take land and a moderate amount of care (the money is about equal to owning an automobile when you compare the two), and they're not as convenient as a car.

Pros:
  • The power source is capable of self-replicating. Let's see your Cat diesel create another diesel engine!
  • The system is modular. If you don't need the cargo capacity of the wagon, you can leave it behind and just ride the horse. Need to drag a log off of the road? Hitch two horses together and they'll move it.
  • Roads are optional. A horse can get you places that not even a dirt bike can get into.
  • There is nothing on the wagon that can't be fixed or replaced with hand tools and simple skills. Wood and steel are easy to find and shape. Lots of old-timers used whatever animal grease they could find to lubricate their wagon wheels -- no special semi-synthetic oils needed.
  • A horse and wagon is a lot quieter than a pickup truck, especially a turbocharged diesel. The noise is also harder to pick up against a natural background of animal noises.
  • No need to buy a diagnostic code reader to figure out which 02 sensor/crank position sensor/throttle position sensor/etc. went bad.
  • Women seem to be drawn to horses, especially young ones. My grand-daughters would love to have a pony or three.
  • Horses can be taught; a pickup truck can't. It will vary by the breed and individual, but horses are fairly intelligent animals.
  • Fuel requires no chemistry to produce. Grass, hay for winter, and some grain (along with plenty of water) will take care of most of their needs. Salt and mineral supplements are simple to find and store.
  • If TSHTF for real and everything is worst case, can you eat your Dodge?

Cons:
  • The narrow wheels don't like soft ground, they cut in. This means going off-road may be mandatory if the road is muddy.
  • Top speed is around 5-10 MPH, so long trips will mean sleeping along the way. Normal traveling speed will be lower, so you'll have to plan your trips more carefully.
  • Suspension is minimal (or missing),  which means rough roads will beat you up physically. The low speed will offset this to some extent.
  • Paved roads require good shoes on the horses. Farriers make good money because they practice a dying art.
  • Vet bills will be scary at first, but are in line with taking a newer car/truck to a dealer to get fixed. That $500 annual visit for vaccinations compares to having a new starter or alternator installed on a car. If you don't want to pay that much for either, learn to do it yourself and save a lot of money.
  • Horses are herd animals and are happier when they have other horses around. Keeping more than one horse gets expensive, but if your wagon is designed for two to begin with, it's something you'll have to deal with.

For long-term prepping, I'd take a couple of horses and a wagon. It would haul as much as a pickup (although not as fast) and be easier to maintain. There are plenty of uses for a horse besides transportation that a car or truck wouldn't be suited for, and working around another living thing feels different than working on metal and plastic.

The Fine Print


This work is licensed under a Creative Commons Attribution- Noncommercial- No Derivative Works 3.0 License.

Creative Commons License


Erin Palette is a participant in the Amazon Services LLC Associates Program, an affiliate advertising program designed to provide a means for sites to earn advertising fees by advertising and linking to amazon.com.