Thursday, November 30, 2017

Guerilla Gardening

A few weeks ago I wrote about buying a pile of garden seeds. I also mentioned guerilla gardening (GG for short) as one possible use for such a large amount of cheap seeds, and I thought I should expand upon that concept a bit.

As preppers, on of our main goals is to have enough food available to withstand a crisis. Food is usually third on the list of needs, right behind shelter and water. The emergency rations I've reviewed are one method of setting aside food, and one that is better suited to provide for short-term emergencies or long-term storage. Over the years, several of us have written articles about growing and storing food as a way to feed ourselves in the event that grocery stores are no longer an option. There are even a few posts about scavenging or foraging for food in the archives. However, GG is a method of improving your odds at foraging by hiding food-producing plants in areas that aren't under your direct control.

Let's say your BOL is miles away from your normal residence and you don't have a caretaker watching over it. If you plant a normal garden at your BOL, you're going to need to make (at least) weekly trips out to it in order to keep the weeds and insects under control. If one of your goals is to keep the location discrete, each of those trips is going to whittle away at its anonymity.

Or what if you don't have a BOL and have decided to “bug in” or shelter in place, but don't have enough land for a garden? City dwellers may also have Home Owners' Association (HOA) restrictions or insane city codes that would prevent the use of lawn space for growing food.

Or maybe you have a good BOL, but you'd like to have an extra layer of supplies close at hand. If it is rural, there's a good chance that it is close to land owned by some level of government (county, state, or federal park or reserve, state or national forest, road or water right-of-way) that may be a good spot for some GG.

What Exactly is Guerilla Gardening?
Wikipedia sums it up as “the act of gardening on land that the gardeners do not have the legal rights to cultivate”. While the idea has recently been picked up by “activists”, it's not a new one. People have been growing marijuana on state/federal land for decades, and even when I was in high school the local “growers” knew that the banks of rivers and streams (almost always government-owned as a right of way) had the most fertile soil and plenty of water. Two centuries ago, there was Johnny Appleseed planting apple tree nurseries as he traveled, spreading a valuable resource (cider apples) along what was then the frontier. As a prepper, the idea of GG is closer to “stocking the pond” for future possible use than setting up a garden that needs to be tended on someone else's land. Any produce that you don't get a chance to harvest will be appreciated by the local wildlife, which may improve your chances of hunting that wildlife later.

Here are a few GG ideas to ponder:
  • Planting climbing vines or plants that require support along fences. A woven-wire or chain-link fence would provide plenty of support for climbing gourds or pole beans.
  • Another blogger has explored the idea of grafting fruit-bearing limbs onto weed trees in the empty spaces formed by a highway clover-leaf. He's even offered scions to graft and time if anyone in his area is interested. This is a bit more advanced, but grafting isn't impossible to learn and it is a form of permaculture that requires very little attention after the first year or so.
  • Perennial or “walking” onions are hardy plants that go dormant in the winter and sprout again in the spring. They “walk” by producing seed heads at the top of their stalk that gets heavy enough to make it bend until the seeds touch the ground, planting another generation a few feet away from the original plant.
  • Rural road ditches around here used to be full of wild plums and elderberries, but aggressive clearing operations have provided slightly safer roads at the cost of freely available fruit. Clusters of plum or small nut trees placed far enough back from the road would have a good chance of surviving to produce fruit.
  • There are people who GG with wildlife. Pheasant and quail used to be common around here (until the DNR brought back the bobcats and mountain lions) and a few folks are raising and releasing them to try to get colonies reestablished. Commercial hatcheries offer chicks of a few different species every spring, so it may be something to consider.

Things to consider if you're contemplating taking up GG.
  • Since the land isn't yours, you have no “legal” right to the produce. Don't call the sheriff if you find someone else picking the fruit, as the result won't be worth the hassle.
  • Since most GG takes place on public (government-owned) land, anyone can harvest the produce. If you don't get there on time, don't expect it to be waiting for you.
  • Pick plants that will blend in with the background. Planting tomatoes with bright red fruits next to a well-traveled road isn't going to work out too well. Look for species with colors and leaves that are close to that of the weeds in the area, so they aren't obvious to everyone passing by.
  • Choose perennials over annuals whenever you can; the require less maintenance and they tend to spread out on their own.
  • An apple tree in the middle of a wooded area is going to be a lot easier to tend than a small plot of peppers or peas in the same place. It will also have a better chance of being ignored by others, since it's just another tree.
  • Root crops like garlic, carrots, beets, turnips, etc. are easy to hide since they don't have visible fruits. They also tend to be hardy and fairly low maintenance, so once they're planted you don't have to pay them much attention.
  • The modern “activists” that are talking about GG have never read about the “tragedy of the commons” and know very little history. If people know something is free, they will try to use as much of it as they possibly can to better their own life without any regard for the lives of others. Greed is an intrinsic human trait: just look at any toddler that has to share her toys.
  • Stocking a lake or pond with fish caught somewhere else is a tough one. Governments frown on “bucket biologists” who introduce non-native fish into “their” waters, and the fines can be astronomical. Around here the state will stock a private lake for you as long as you open it to the public... which defeats the purpose of stocking the lake.

I'm going to use some of the seeds I got in my big bag of vegetable seeds to see what will grow in the hills around the family farm. The soil is pretty poor, but I know of a few spots where squash and cucumbers should do well. If nothing else, I'll be feeding the deer and maybe a few of them will stick around for hunting season.

Wednesday, November 29, 2017

Prudent Prepping: More Unfinished Business

The dust has settled and the First 72 Hours have passed. Follow along as I build a long term plan via Prudent Prepping.

I forgot to go over my general maintenance and all the steps I take to set up my car for California winters.

Car Preps
The washer fluid used in my car is Rain-X, because the way it keeps water beading up on the windshield is really amazing. Combined with good wiper blades (also from Rain-X), the glass is kept as clean as anyone could want. Rain-X also makes a spray-on treatment for the rest of the glass on your vehicle, which also makes water bead up and run off quickly, almost to the point of not needing a squeegee (but not quite... I still need to clean off the back glass most mornings). One place that I forget to treat after washing the car is both side mirrors. The number of days I've rolled both front windows down and used a leftover fast-food napkin on the mirrors is greater than I care to recall.

The last place to use a Rain-X is on your interior glass, including the rear view mirror. No, not the outside products, but their anti-fog glass treatment. The weather has been cooling off in the evenings and after parking the car with the windows up after work, every morning for the past week the inside glass has been a little foggy. Without that treatment, I would need to run the air conditioner to clear the glass quickly.

There are stories of people not needing to run their wipers after treating their windows with Rain-X products, and I can state that those stories are mostly true in my experience. I rarely use the 'Constant' setting control for my wipers and leave the 'Intermittent' on the longest possible position, even at night.

General Prepping
Due to several Cyber Monday sales, I blew up my prepping budget for the rest of the year. The one item that I have a confirmed sale for is the Solo Stove Lite and Pot deal. I was gently reminded how awesome and fantastically wonderful this deal by was our Esteemed Edtrix.

Multiple times.

Until I broke down and bought one, along with the optional windscreen.

Not that I was unduly influenced. Nope, I'm my own man and can make my own decisions... really!

As was pointed out in a previous review of the Solo Stove, it works very well with the Power Pot system. I have a Power Pot in my second set of camping gear, so that is where the Solo is going!

The Takeaway
  • Rain, snow, slush and dirt can build up on the outside -- and inside -- of your windows. Keeping them clean only takes a minute or two. 
  • Good ideas are Good Ideas and missing out on a sale for something I can use A Bad Thing.
    The Recap
    * Ordering a set of wiper blades and the cleaner would be a good way to get everything needed to start you on the way to clean glass.


    Just a reminder: if you plan on buying anything through Amazon, please consider using our referral link. When you do, a portion of the sale comes back here to help keep this site running! 

    If you have comments, suggestions or corrections, please post them so we all can learn. And remember, Some Is Always Better Than None!

    NOTE: All items tested were purchased by me. No products have been loaned in exchange for a favorable review. Any items sent to me for T&E will be listed as such. Suck it Feds.

    Tuesday, November 28, 2017

    A Rosy Inclination

    Maps show you where you are, where you want to be, and what lies between. All of that is vital information to have, but it's utterly useless if you don't know which direction gets you there. The tool that fills that hole is the compass.

    At its heart, a compass is a magnetized metal indicator that is suspended in such a way that it moves freely and aligns itself with the earth's magnetic poles. Any compass you depend on should be liquid-filled, because this dampens the movement of the needle and makes it far more stable.

    There are a few styles of compass out there, ranging from tiny button-sized units to pieces with more bits and geegaws hanging off them than you can imagine. Out of all the compasses out there, I can only recommend two styles: the "map" or "flat" style and the "lensatic" style. The button types will show you north with varying degrees of accuracy, but they won't do anything more than that, and that honestly makes them almost useless.

    Map Compasses
    http://amzn.to/2jtPild
    These are made of a clear material with a flat base. They lie flat on a map and are great for orienting the map to north and determining the direction of travel. They're also incredibly budget friendly. Unfortunately, they lack any aid to sighting landmarks, making them the more difficult variety for pointing you in that direction.


    Lensatic Compasses
    http://amzn.to/2k8JYrk
    These lack the flat base of a map compass, but have a wonderful built-in sighting system. They also almost always incorporate a protective case.

    Lensatic compasses require a fair bit more practice and work to orient a map, but once you're moving, they making sighting landmarks an absolute breeze. They have a two-piece sight setup similar to gun sights: simply align the sights with a landmark on your desired bearing and you have an easy travel reference. This feature has made a lensatic my compass of choice for the past 15 years or more.


    Combination Compasses
    When I was searching out my links for this post, I wondered why someone hadn't build a compass with the features of both a map and a lensatic compass?

    http://amzn.to/2k6d7DE
    Apparently UST has. It opens flat to orient your map, and has measurements on the edges to scale distances. Once you're oriented and have a bearing, you fold it 90 degrees and open the sighting arm, and you can sight a landmark just like a lensatic. It's unique and useful enough that I'll be retiring my own compass and switching over.


    Next week, we'll put all the tools together.

    Lokidude

    Monday, November 27, 2017

    Product Review: AeroGarden Ultra


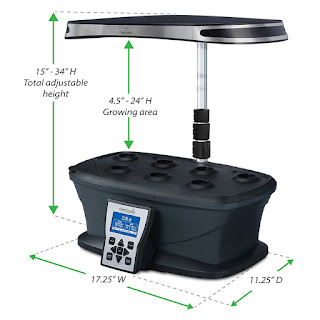
    When SHTF and supply lines break down, getting fresh plant matter in your diet can be hard. The AeroGarden is something that I would recommend that a prepper consider to fill that role. I am reviewing the “Ultra” model, but all of them work on the same principles.

    What is an AeroGarden?
    AeroGardens are small automated aeroponic (growing plants without soil or other media) gardens where everything from the lighting to the watering is automated. You add the water, seed pods, and fertilizer; tell the garden what you are growing;  add water and fertilizer when the display tells you to (usually once every two weeks); and then harvest.

    The Good
    • Aeroponics are incredibly space efficient. My 7-pod Ultra has a small footprint  -- less than 1.5'w x 1'd x 3' h -- yet I get enough from it that I have trouble keeping up with eating all it makes. (The light at the top extends upwards in order to give the best lighting to the plants.) 
    • I have never needed to weed my AeroGarden. Maybe you like weeding, but I will pass. I also never have to bend over to harvest, since mine is on a counter.
    • It is actually more water-efficient than a standard dirt garden, since almost none is lost to evaporation.
    • I can grow just about anything I consume. Lettuce and tomatoes are what I am growing currently, with a single basil for pesto. They even sell a Grow Anything kit that makes this fairly easy.
    http://amzn.to/2Br90WO
    • I can sprout plants for my dirt garden and transplant then when I am ready. A nice big root structure helps to get a nice head start. There is even an accessory tray that you can purchase just for that.
    • If you like salads like I do, it is (eventually) a cost savings over purchasing them from the store. This can lead to a cost savings, especially in the off season.
    • You can re-use basically anything plastic that comes with this kit. Just make sure to scrub and sanitize to prevent pathogen spread.
    • When I had issues and had to call customer service, they were excellent.

    The Bad
    • At $150 for the model I purchased, they are not super cheap. Mine has paid itself off in savings over purchasing fresh vegetables over the winter, but it first took a full season of use.
    • In addition, you really cannot grow root vegetables. Garlic, potatoes and onions are not an option for my AeroGarden, and I have to grow them in my dirt garden.
    • You have to remember to use the proprietary seed pods, which is rather obnoxious if you lose or break one. I re-use the pods, and have never had one break, but I would expect that it is possible.
    • It is a pain in the butt to clean all the little spaces after each harvest. Budget a couple of hours to do it, and make sure to have a Scotch-Brite pad handy. Thankfully, this cleaning is about a once a year task.
    • When my initial garden shipped, they had left out a couple of the little plastic domes that cover the seed pods while they sprout. Thankfully, they sent out new ones with no fuss when I called. 
    • It requires a special liquid fertilizer. You can purchase the name brand of it (made by Miracle-Gro) or any number of off-brands that work just fine.
    http://amzn.to/2hXI8oW

    The Ugly
    This unit requires electricity. Even though the newer ones use an LED light, and have a "power interrupt" feature so that they can tell if the power went off, these units do require power.

    Thankfully they are VERY low draw, and a couple years ago when I had several neighborhood power outages I purchased a cheap ($25) UPS for it. The AeroGarden ran for up to 14 hours during an outage without once losing power.

    In Conclusion
    If you can generate or store some power, and have about two days' worth of minimum wages to invest and about two square feet of counter space, I would consider this an excellent addition to your prepping arsenal.

    I would recommend this even if you have a "black thumb." It is easy to use and take care of, and the seed pods bought from the company have a guarantee to sprout.


    Good luck, and remember to practice.

    Sunday, November 26, 2017

    GunBlog VarietyCast Radio #171 - Talking Turkey


    We recorded this on Thanksgiving, between Erin's lunch and Sean's dinner. We apologize if listening makes you hungry.
    • Beth is on assignment.
    • A burglar is shot and captured. But what did he do just before that? And who were they, really? Sean takes a look.
    • Risk vs. Reward is as important a consideration in the Tech world as in real life. Barron is back to talk about doing a proper risk assessment.
    • Miguel is still on assignment.
    • In this week's Main Topic, Sean and Erin the tackles the "Giffords! Courage to Fight Gun Violence!" new position paper "Legal and Lethal: 9 Products That Could be the Next Bump Stock." <Dramatic Music>
    • Tiffany recently appeared on the Polite Society Podcast with fellow Rangemaster-certified instructor Aqil Qadir. She was so intrigued by his story that she asked if he would sit for an interview.
    • Erin spent the week shooting a gun in her back yard. Don't worry, it was an air gun. She's going to tell you about it and the heavy duty bullet trap she needed to make sure everything was safe.
    • Anti-Gun Researcher Tom Gabor is back, and he's not any more factual than last week. Weer'd issues the appropriate corrective.
    • And our Plug of the Week is Silver Spoon, a really awesome Russian cop drama on Netflix.
    Thank you for downloading, listening, and subscribing. You are subscribed, right? We are available on iTunes, Stitcher Radio, and Google Play Music!

    Listen to the podcast here.
    Read the show notes here.

    Thanks to LuckyGunner and Remington for their sponsorship, and a special thanks to Firearms Policy Coalition for their support.

    Blue Collar Prepping Transcript: 
    Air Guns
    As I mentioned in the introduction, I received an air rifle, a Gamo Wildcat Whisper, from my friend Charles Lee Scudder. While not strictly necessary, an air rifle is something very nice to have in your preps for a variety of reasons.
    • They are inexpensive. A decent air rifle costs between $100 and $150, depending on what options you choose. 
    • So is the ammunition. The most common caliber for air rifles is .177 -- from now on, I’ll just call this .17, okay? -- and this stuff is ridiculously cheap. 500 rounds of .17 cost about $6. 
    • Because of this, you can practice a perishable skill economically. Air guns are better than .22 rifles in that regard. 
    • It’s a good training platform for children. The rifles are light, there’s no recoil, and there’s no “bang”, which means there’s no startle reflex to overcome.
    • They’re quiet. When I used mine in the backyard, the only sound I could hear was the PING! from the bullet hitting the trap. My mother, who was about 20 feet away inside the house, couldn’t hear it at all. This means you don’t have to go to a range to practice; you can practice in your yard or inside your home, so long as you have a good backstop. 
    • It’s not a legal firearm. This means that you can buy it online, have it delivered to your home, and there’s no paperwork to fill out. 
    When considering an air rifle for purchase, there are two big choices to make: caliber and action.

    While there are actually four popular airgun calibers - 17, 20, 22 and 25 - to my mind there are only two worth considering due to availability and effectiveness: 17 and 22.
    • .17 caliber is cheaper, more readily available in stores, and comes in variety of ammo types: greater penetration, greater impact, greater expansion, and match grade for practice and competition. It is also a flatter-shooting round.
    • .22 caliber pellets are slightly harder to find in stores and cost twice as much, but have MUCH more impact when used for hunting.
    Ultimately, caliber choice comes down to what you want your rifle to do.
    • If you want to hunt with it, you should get a .22, because a .17 is likely to pass through an animal without killing it, allowing it to run away and die later.
    • If you want it for practice or training, get a .17.
    • If you plan to use it for vermin control, either caliber will do, although .17 is probably more cost-effective.
    When it comes to what kind of action to use, your choices are CO2 cartridge vs Pump.
    • CO2 rifles are easier to use and faster to shoot, because you won’t have to pump the rifle up after each shot, but add another consumable to your preps and extra layer of complication.
    • Pumps are slower to load, and it can be a pain in the rear to un-shoulder the rifle, put the buttstock on the ground, break the barrel open, load the pellet, close the barrel, re-shoulder, and fire, but they also have fewer complicated parts and all you need are pellets.
    • For this reason, I recommend pump action rifles for preppers.
    When it comes to pump actions, there are different choices, but that risks getting into the weeds of break-barrel versus pneumatics. For those who are interested in learning more about air rifles, please check the show notes for a link to a Blue Collar Prepping article on air rifles. Give it a read!

    Friday, November 24, 2017

    Black Friday Prepping Deals

    Not actually Erin.
    & is used with permission.
    You folks didn't think I'd miss my annual post telling you about all the great prepping deals out there, did you?


    The best deal I've seen so far is a refurbished 7" Kindle Fire 7 with 16GB memory for $20 plus shipping at Woot.com. Now some of you are probably saying "Why would I want a used Kindle?" and I'm happy to answer that for you.
    1. "Refurbished" does not always mean "used" or "repaired". If someone buys an electronic device, opens it, and then returns it, it cannot be sold as new. 
    2. This model comes with 16GB memory; a new Fire 7 with just 8GB costs $30. If you want a new Fire 7 with 16GB, that will cost you $50...
    3. ... at which point you're just better off getting a new Fire 8 instead. Same price, same memory, but a larger screen and a newer model. 


    My love for Power Practical is well known and they didn't disappoint me this year. They have a great item called a Luminoodle, which is a 5', 10', or 20' long string of LEDs which is powered via USB. I have several of them, and they're great for lighting up campsites or inside tents.

    From today through Cyber Monday, if you buy any 5' or 10' Luminoodle, you get a second absolutely free, and if you buy a 20' you get a free battery pack! You also get 20% off all other products, so please check them out.


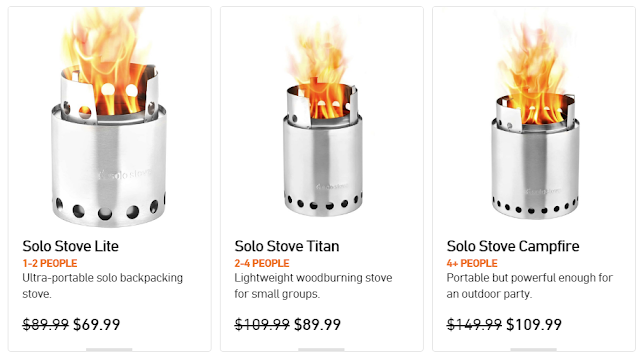
    Another perennial favorite of mine is the Solo Stove and their Lite (1-2 people), Titan (2-4) and Campfire (4+) stoves are also BOGO through Monday. I've reviewed the Solo Stove and I enthusiastically recommend it to all preppers, campers, and backpackers.


    Finally, Klymit is giving away a free Extra Large inflatable pillow with purchases of $135 or more along with a 20% sitewide reduction. I use Klymit products when camping and in my bug out bags; they're made of quality materials and I recommend them to all.


    Thursday, November 23, 2017

    Fasting

    I know that this post is going to be posted on Thanksgiving, a day of feasting, but I wanted to write a bit about the opposite: fasting. I'll cover the effects in my normal “Four parts of a person” method.

    Fasting, for those who've never heard the term, is temporarily abstaining from food and/or drink for a period of time. Normally not more than a day or two long, an intermittent fast can have benefits for those of us who don't have medical issues that would prevent us from skipping a few meals. Diabetics and people with metabolic or digestive disorders should talk with a doctor before attempting a fast, as missing meals could be dangerous for them.

    Fasting is nothing new, although there are salesmen who are trying to make it a “diet” plan for losing weight and will over-hype its benefits. Records of fasting rituals predate all modern religions; it is a part of the human experience whose origin has been lost to time. Most religions have a place for fasting in their rituals --  it is a well established method of showing piety and commitment -- but it has benefits for the non-religious as well. Here are a few:

    Body
    Intermittent fasting gives your body a chance to “take stock” of its reserves and start processing some of them. Without the demand to digest new food, your body will switch to using stored energy (fat) for its needs and will make more efficient use of the food that is still present in your gut. Using fasting as a diet doesn't work very well, since a long enough fast (durations vary widely) will signal your metabolism that you are starving. In starvation mode, your body will try to store as much energy as it can, and once you break the fast you will still be in that mode and you'll gain back any weight you may have lost. 

    Fasting will not “cleanse” or “detoxify” your body; your natural processes do that whether you eat or not.

    Mind
    Fasting is a good way to train your mind that it is in control of your body, and “mind over matter” is the basis for taking charge of your stomach. This is good training for times when food may be harder to come by and will also help build self confidence, self control, and discipline which are all good things to have is stressful situations; you'll be less susceptible to giving into hunger pangs if you know that you aren't going to die if you don't eat three meals a day.

    Spirit
    By giving up eating for a day or two, you free up a lot of time to contemplate, meditate, or pray. This is usually a good way to clear your head and improve your state of mind. Think of all of the time you spend in a normal day planning, buying, prepping, eating and cleaning up after your meals; that's time that you will have during a fast to be doing other things.

    Soul
    If you choose to fast for spiritual reasons, the act of denying the physical self clears the mind of earthly attachments and brings us closer to God (or whatever you choose to call the higher being that is the center of your belief system). In times of crisis, many of us are going to be talking to our God, looking for a way through, around, or out of those hard times. Fasting may help you focus on those communications.

    Christians are told that our fasting is to be a private matter between ourselves and God, never a public display (Matthew 6:16-18). The various sects have specific dates when you should fast, but the goal is to guard against gluttony and get closer to God.

    The Old Testament records fasting for various reasons;
    • As a sign of mourning or grief (2 Sam. 1:12, 3:35, 12:16 and many others)
    • As a form of repentance or seeking forgiveness (Est. 4:13-16, Deut. 9:9, 18, 25-29; 10:10. )
    • To aid in prayer (Daniel 10:3-13)
    • As a public show of ceremonial prayer (1 Kings 21:27-29 )
    Ashura is a remembrance of Moses and his fast to celebrate the freeing of the Israelites, and is also recognized by Sunni Islam.

    Islam, Hinduism, Buhdism, Taoism, and Yoga all have rules and dates for fasting' only the Sikhs reject it as a spiritual aid. Consult your local religious leader for clarification of your particular belief's stand on fasting.


    How and when to fast is up to you, but I'd start slow and simple if you're new to the idea. Try skipping a meal or two before going on a three-day, food-free binge, just to get a feel for it. Different folks will feel the need to fast at different times and for different durations. It is a particularly personal experience that can make a meaningful difference in your life.

    Now, go enjoy your turkey and stuffing. Happy Thanksgiving!

    Wednesday, November 22, 2017

    Prudent Prepping: November Buffet Post

    The dust has settled and the First 72 Hours have passed. Follow along as I build a long term plan via Prudent Prepping.  

    A round-up of topics I'm unable to make into stand-alone posts.

    Unfinished Business
    As a follow-up to last week's handle-making post, I've found a design I think I can make without the use of power tools. I'll only need simple hand tools like chisels, carving knives and sandpaper.

    ...that is, once I find someone with a band saw or table saw to split the block. I'm still looking.

    Thanksgiving
    I don't need to wait until November to count my blessings. 
    • I have a job; many people don't, and would take my place for less money. 
    • I have family close by and get along with most of them.
    • I have friends that look out for me and call to check up if I haven't called them recently. 
    • I have more than enough food and also shelter from the weather. 
    • I have money to spare after my bills are paid.
    I regularly donate to my local Food Bank. It covers Contra Costa and Solano Counties, and Solano County was only touched a little by the recent fires in the San Francisco area, so aid will be sent if needed. Nevertheless, this time of year is really stressful for people, and a lack of food can add even more stress to the mix. I gave a turkey along with some of the hot chocolate mix that was nearing the 'Best By' date from the Buckets of Holding. Between now and Christmas, I will be donating at least one more turkey directly to the Food Bank and adding canned goods to the Food Drive barrels at the local supermarkets.

    Car Prepping For Winter
    This week I replaced the wipers I installed back in July due to one edge starting to separate. The local car parts chain had a radio ad for wiper blades, so I purchased a set. The coolant checked out as almost new when I did my last oil change, and my tires have 75% of original tread. I am going to buy a set of cable snow chains, because I do plan to travel to the mountains in the next few months. Frankly, keeping fresh blades installed and adding a bit of low temperature windshield washer fluid to the tank is about all the winterizing I have to do where I live.

    Don't hate me; I pay more for everything just for the privilege of not freezing to death most winter evenings. If you have real winter weather, you already know what is required and I'm not knowledgeable in everything you all have to do.

    The Takeaway
    • I'm thankful every day for what I have. Sharing the extra is not hard, but it takes some thought to make it count.
    • Taking care of your car should be on your schedule, just like scheduling a check on your other gear or rotating your food.

    The Recap
    *Wiper blades from the local store were considerably higher, even on sale.


    Just a reminder: if you plan on buying anything through Amazon, please consider using our referral link. When you do, a portion of the sale comes back here to help keep this site running! 

    If you have comments, suggestions or corrections, please post them so we all can learn. And remember, Some Is Always Better Than None!

    NOTE: All items tested were purchased by me. No products have been loaned in exchange for a favorable review. Any items sent to me for T&E will be listed as such. Suck it Feds.

    Tuesday, November 21, 2017

    Mapmaker, Mapmaker, Make Me A Map

    We live in a wonderful time where virtually the entire earth has satellite coverage and GPS devices can tell you where you are, where you're going, and how long it will take to get there. When they work properly, they're the height of navigational technology.

    When they don't work properly, they can very easily get you killed.

    The easiest way to prevent GPS tragedies is to use an ancient navigation technology: maps. They require no batteries, are durable, and are fairly cheap to obtain. They come in a variety of styles to suit your needs, and are useful from the very planning stages of your trips (in other words, before you even leave home). Pair them with a GPS and a bit of common sense, and you can find your way there and back again without unforeseen incidents.

    There are a wide range of map styles and scales available, and the ones you choose will depend on your intended use. For road trips, I reach for a road map or an atlas. When I leave the pavement for the backcountry, I pack topographical maps.

    Road maps focus on the highways and byways. Individual maps detail a single area, usually a state, while an Atlas is a collection of maps. In the USA, atlases commonly show all 50 states at a decent resolution, and may provide main street details of major cities. Very large cities like New York, Los Angeles, or Chicago can warrant full-size road maps of their own.

    When I get off the blacktop, my map choice shifts to topographical maps. These maps focus on the contours of the land and any natural features and landmarks in a given area. The better ones also show if parcels of land are privately or publicly owned, or have restricted access. My favorite topo maps are from the US Geological Survey. They're accurate, priced well, and are scaled to a very useful size.

    Whether they're road maps or topo maps, all maps need two things to be of any use. The first is an orientation indicator, which lets you point your map and compass in the same direction, so you have an idea where you're headed.

    The second needed item is a scale, which gives you a consistent reference for distance on your map. Because a 1 inch:1 inch map would be useless, they are scaled down -- shrunken to a more usable size while keeping everything in the same relative places on the map. This article gives a great explanation of how scales work and what scales are useful for specific applications.

    Your homework for the week is to get familiar with maps. Next week, we'll look at compasses, and how they make maps truly useful.

    Lokidude

    Monday, November 20, 2017

    Bicycle Trailers and Cargo

    As a prepper, and as a fairly broke one at times, I have found myself with an opportunity to get something useful (55 gallon drum, free tools, lumber, mobile fire pit, etc.), but no way to transport it.

    At other times, I have found myself with a bicycle as my primary form of transportation and had to plan accordingly, even when carrying tools to a job site.

    If TSHTF and you need to evacuate, a bicycle does not require fuel (beyond the food that you eat, which you need to do anyway), can reach a surprising number of places, and is relatively easy to repair and obtain replacement parts for.

    Methods of Bicycle Cargo Transport

    Panniers (aka saddle bags)
    These are bags, boxes, or baskets in pairs that hang over the frame or wheel, typically the rear wheel, and can be anything from canvas bags to old ammunition containers. If the loads aren't properly balanced (see Cargo Balance, below), you will expend a lot of effort just staying upright, which exhausts you quickly. If properly loaded, they can still cause some hassle when turning but they are an excellent way to store and carry smaller loads, such as groceries.

    If you have a locking pannier it is an excellent place for a small tool kit or a first aid kit. I like to keep my tool kit on one side, with my bike chain and lock on the other while I ride.

    Baskets
    They can come in a variety of forms, from small wicker affairs strapped to the front of the handlebars to large wire baskets that hang over the rear wheel. These make the best transport for things that come large enough to not slip through the gaps and will be taken out quickly.

    I like to line mine with IKEA blue shopping bags, so that if I need to quickly weatherproofed what's inside, I can just tie the bags shut.

    Holders
    These are almost always purpose-built for something like a water bottle or a smartphone, and can be super useful to access something without having to dig it out of your bag.

    Cargo Racks 
    Typically a platform that you strap things to. I find it very useful for carrying certain kinds of loads that will not fit well into a basket or pannier, such as a car battery or a tool box.

    Trailers 
    These are a wide field in and unto themselves, but break down into two broad categories: utility/cargo and passenger.

    Passenger trailers tend to have fabric floors and walls in order to save weight, making them much less useful as a cargo trailer, but I have carried water bottles to a parade in a passenger trailer. Unless it was a true emergency I would never put a child on a utility trailer.

    Utility trailers are the real workhorse of cargo on a bicycle. Trailers are best for things that are oversize/weight and will not fit the other carry options: I have actually seen someone bike to a junkyard, pull an engine, and put it on their flat bed utility trailer to take home. Not something that I would want to do, but a lot better than nothing. They are also fairly easy to pack and leave packed in case of bugout.

    Straps, Bungee Cords and Rope
    I don’t really recommend these on their own (they work, but are a pain in the butt), but they make an excellent addition to just about any other method mentioned here.

    Bags 
    These are something that you generally carry on yourself. This is the first go-to for most people that use bikes, and is sometimes the best option, but in the case of a utility vehicle may not be enough.

    Cargo Load Balance
    This is important when carrying large loads over a distance, especially if you use panniers, and can make the difference between carrying 30 pounds of cargo and carrying 130 pounds of cargo.
    • Make sure to balance right to left first, and then front/back if it applies. 
    • Try to balance weight so that it presses slightly to the rear of the center of balance, typically around the seat. 
    • Most mountain bicycles can handle around 450-500 pounds (including rider) if properly distributed and still be a comfortable ride.
    • If you are towing a trailer, make sure to balance weight to the front of the axle. It can cause disastrous problems if you accidentally balance it to the rear, and the trailer comes unhitched. I have done this, and had the trailer roll right back down the hill I was biking up.


    Whichever options you choose, remember that using care when installing can save a load of hassle later, and that if you decide to use these cargo options, you are being good for your wallet, your heart, and the environment.

    Don’t forget to practice.

    Sunday, November 19, 2017

    GunBlog VarietyCast Radio #170 - Weer'd Underpants


    Erin wanted to call this the "Zombie Miguel Episode" but figured that would just confuse people.
    • Beth feels that  RSO's (Range Safety Officers) are basically the black belts of the gun world. She and her husband explain why.
    • Homeless guy beats another man to death in a trailer. Sean looks at his permanent record.
    • Barron is on assignment.
    • Miguel is not so much on assignment as "wandering about Southern Florida, looking for his brain." His words, not ours.
    • In this week's Main Topic, Sean and Erin discuss the dumbest GQ article ever: "Inside the Federal Bureau Of Way Too Many Guns".
    • Pro-gun votes are good, but integrity is better. Tiffany weighs in with her opinion on the matter of Roy Moore.
    • Erin finally noticed that in 169 episodes, she's never once talked about sharpening your knives. 
    • Anti-Gun Researcher Tom Gabor speaks out against Stand Your Ground and whatever else comes to mind. Weer'd brings the facts.
    • And our Plug of the Week is the "Captain Underpants" series of books. Weer'd's daughter LaWeer'da tells us more.
    Thank you for downloading, listening, and subscribing. You are subscribed, right? We are available on iTunes, Stitcher Radio, and Google Play Music!

    Listen to the podcast here.
    Read the show notes here.

    Thanks to LuckyGunner and Remington for their sponsorship, and a special thanks to Firearms Policy Coalition for their support.

    Blue Collar Prepping Transcript:
    Keep Your Knife Sharp
    I have been doing this segment for three years and I only just now realized that while I’ve talked a lot about knives, I haven’t talked about sharpening them. This is an oversight I intend to correct immediately. 

    A sharp knife is essential for safe knife use. Not only does a sharp edge cut more efficiently, but it prevents operator injury; a sharp blade produces a smooth cut, while a dull blade can twist in your hand while cutting or come to an unexpected stop.  

    However, sharpening a knife is more art than science. It’s very, very easy to do it wrong and damage your knife and maybe even yourself in the process. Fortunately for us, there are some handy and affordable sharpeners out there which are pretty much idiot-proof. 

    My current favorite is the Lansky Quadsharp. Like the name suggest, it has four sharpening angles for different applications:
    • a 17 degree angle, which gives an incredibly sharp edge suitable for filleting and fine slicing, but which is also easily dulled or damaged through hard work;
    • A 20 degree angle, which is less of a razor but is better suited for repetitive or difficult work, such as skinning or kitchen tasks;
    • A 25 degree angle, which is far more robust and is a good all-around edge for outdoor knives;
    • And a 30 degree angle, which is for heavy-duty cutting and chopping blades, like axes, hatches and machetes. 
    The use is very simple: Select an angle; put the blade in the slot, and gently -- DO NOT PRESS DOWN -- pull the blade through the carbide cutters. 
    There’s no set number of times you should do this; just keep going until it's as sharp as you like or it isn't getting sharper. You can usually hear the sound of the knife change, and the pull will feel different, when the majority of the work is done.

    Sometimes a pull-through sharpener will build up a burr line on one side of the blade. This is not unusual; variations in stroke or carbide surface can do that, and I fix this by alternating the direction of sharpening strokes. Just turn the knife around so that you’re pulling away from yourself rather than toward yourself, and a few strokes ought to clean that burr right up. 

    However, there are times when you can’t use a pull-through sharpener. Maybe it’s an axe and the blade won’t fit, or maybe there’s a ding or other damage to the edge that needs to be repaired before it can be sharpened. When that happens, you need more aggressive tools. My go-to tool in situations like this is a two-grit puck sharpener. This is less easy than the pull-through sharpeners, so you’ll want to watch the video linked in the show notes, but it’s pretty forgiving for beginners. 

    A sharpening puck will put an edge on practically anything; I use it to sharpen my mother’s hedge trimmers, but it will put a working edge -- i.e. not terribly sharp, but sharp enough -- on practically anything. This is fine for tools which do most of their cutting with weight and impact, like an axe; if you want a finer edge, you’ll need go to something different. 

    Diamond sharpeners are great for sharpening troublesome knives, but you need to be careful with them. Not only do they require more skill because you are essentially eyeballing the angle and freehanding the sharpener, but they also have a tendency to scratch the heck out of the knife. If you have a knife with an attractive finish or patina along the surface, be advised that diamond work will leave track marks! However, with some practice you’ll soon discover you can quickly fix most knife problems and sharpen them in the field, so don’t be afraid to practice on a cheap knife!

    When you become comfortable with estimating angles by eye and sharpening without a guide, you should consider carrying sharpening tools with you as part of your every day carry. After all, if you carry a knife as part of your EDC, you should carry a means to sharpen that knife as well. I carry the EZE-Lap Pen Style Diamond Sharpener and the Speedy Sharp carbide tool. Both of them are small enough to be carried in a pocket, and between the two of them you ought to be able to repair, sharpen and hone any blade. 

    Speaking of honing, did you know that you can touch up any blade using just a coffee cup? It’s true. Take a ceramic coffee cup, turn it upside-down, and hone the blade on the unglazed portion of the cup using small, circular strokes. There’s a link in the show notes with plenty of illustrations on how to do this. 

    Friday, November 17, 2017

    Heating Your Home, Part 3


    Passive solar heating using bubblewrap? Really?

    I'll do a follow-up in February on how well it worked.

    Thursday, November 16, 2017

    Miscellaneous Updates

    Since this is my 201st article on this blog, I'm going to update a few of my previous posts.

    Emergency Ration Bars
    I wrote a few reviews of some emergencyration bars that I found on Amazon this last summer. I recently had a reason to break a few of them out and eat them and found a few more data points:
    • Below 40°F or so, both the Quake Kare ER Bar and SOSFood Lab bars became hard as rocks. I'm not sure if it is the palm oil or some other ingredient, but I found that I had to carry them in a pocket next to my body for a while to warm them up enough to be able to bite a chuck off. 
    • Opaque packaging is good for storage (it keeps the light from breaking down certain chemicals), but bad for customer quality assurance. I got one 3-day bar that had been in the oven a bit too long and was almost burnt. It was enough to change the taste, but fortunately not bad enough to make it inedible. 
    • Part of the US Coast Guard certification for emergency rations requires that at least 25% of the rations have to be mixable with water. This is to provide a source of food for infants or someone who can't open their mouth due to injury. I ground up a “meal's” worth of one of the bars and made a gruel out of it to test. The taste was the same and while it wouldn't go through a straw, I could eat it with a spoon without problems. 

    Vehicle Recovery
    In part 2 of my series, I covered various chains, cables, and straps for towing a vehicle. My pickup recently decided that it needed a new starter (with no warning) while I was in a gas station, so I had to go home and get the big truck to drag the miscreant home so I could work on it.

    I kept a nylon tow strap in the pickup and a good chain in the big truck. The helper who was steering my pickup while I drove the big truck managed to break both of them. I had to improvise and use a heavy tie-down strap to make it the last half mile.
    • The tow strap met its end when it went slack and the towed pickup's front tire ran over it. This has been eliminated for future towing by the purchase of a spring-loaded tow strap that will not go slack and hit the ground. I'm sure that I'll get a chance to use it some time this winter. 
    • The chain snapped when my helper stomped on the brakes. Since the big truck weighs a little more than twice what the pickup does, the pickup's brakes weren't going to stop both vehicles. This can only be prevented by further training of my helper (or finding a different helper). As I mentioned in the original article, chain is easy to repair once you have the time and tools. 

    Blisters
    I discussed how to prevent blisters on your feet a few years ago and recommended that you learn how to treat them, but I never got around to giving the simple treatment. Fall is convention time around here and I've had to teach a few friends how to take care of blisters caused by costume shoes that don't quite fit right. 

    Blisters don't just happen to your feet, either. One of my newer co-workers has limited experience with a shovel and hasn't learned that gloves are good things to wear. His first two weeks were painful, but he's starting to develop some calluses.

    If you do end up getting a blister, they're not hard to take care of properly. Small blisters will heal themselves if you leave them alone, but the bigger ones will need to be drained to make walking or using your hands possible again. Here's how it's done:
    1. Leave the skin covering the blister intact. Don't tear off the loose skin, it's best to leave it there to protect the flesh underneath. 
    2. Clean the blister with soap and water. Antibacterial soap or hand sanitizer is best if you have them around. 
    3. Find a sharp needle or pin (I've used fish hooks when that's all I had) and sterilize it with hand sanitizer or alcohol. Don't use a flame unless it is your only option, you run the risk of getting soot on the needle and into the blister. 
    4. Puncture the blister in several places along the edge where the loose skin meets the good skin. If you feel pain, you're digging into the good skin. 
    5. Lightly press on the blister to squeeze out the liquid. Blot it dry with gauze or clean cloth. 
    6. Apply a layer of antibacterial ointment (if you have it) to the blister. 
    7. Cover the blister with a non-stick bandage. Change the bandage at least once a day until the flesh under the blister has hardened and dried into new skin. 
    I'm hoping I can get at least another 199 articles in the next few years, just to make my total a nice even 400. That will also mean that nothing drastic has happened, and that's always a good thing to hope for.

    Wednesday, November 15, 2017

    Prudent Prepping: Getting It Handled

    The dust has settled and the First 72 Hours have passed. Follow along as I build a long term plan via Prudent Prepping.  

    I've been inspired by Lokidude's post about tools and knife sharpening to get going on a project that has been sitting on my desk for a while now: putting a handle on a knife I was given.

    Lauri Knife # 105h
    A customer (and now friend) gave me an unfinished blade for helping him out with a warranty issue. I wrote about doing this over a year ago, and I now want to get it done right. Here is the blade:

    Lauri 105H blade


    In the previous post, I mentioned a source for blades and parts (but not handles!). It seems the website has not been updated in a while and many items are out of stock, so I'm hesitant to send people there without everyone (myself included) doing their due diligence. Since the above-mentioned site doesn't sell handles, I'm planning on making my own.

    Wood
    I have a Rockler Woodworking store nearby, and when I stopped in to see what they stocked in short lengths of wood I found a bin of 1.5"x1.5"x6" blocks intended for turning on a lathe. There is a guide on the rack listing the codes printed on the blocks cross-referenced to the actual species of wood, but the code on the block that I picked isn't clear. Here is the wood:

    Exotic wood


    I really like the grain and color of this piece of wood as it is shown in the store. To prevent warping and other damage, these blocks are coated in wax, so the color shown in this picture is about how the finished handle will appear.


    Tang outline

     I drew an outline of the tang on the block so I can actually see how much wood will need to be removed to finish this project. At 1.5" square, this is much too thick to simply split it in half, chisel out the area for the tang, glue it back together and round off the corners.

    There are options for finishing the handle-to-blade area, and nowhere can I find a decent picture showing a bolster or ferrule, which are the caps that finish the handle and give a finished look to a knife -- in other words, they're nice but not a requirement.

    I'm still in the planning part of this project and don't see myself needing to pick a design right yet, so there is plenty of time to source parts. Wish me luck!

    The Takeaway
    • There's no time like the present to do a project that's a year old.

    The Recap

    Just a reminder: if you plan on buying anything through Amazon, please consider using our referral link. When you do, a portion of the sale comes back here to help keep this site running! 

    If you have comments, suggestions or corrections, please post them so we all can learn. And remember, Some Is Always Better Than None!

    NOTE: All items tested were purchased by me. No products have been loaned in exchange for a favorable review. Any items sent to me for T&E will be listed as such. Suck it Feds.

    Tuesday, November 14, 2017

    Product Review: the Lansky Quadsharp

    A sharp knife is the only acceptable knife. We've discussed sharpening knives before, and that information remains useful and relevant. However, I always have my eye open for new and better ways to keep a blade sharp.

    I've been using a Lansky Sharpening System for almost 20 years now, and it produces wonderful edges. I also keep a couple Smith's Pocket Pals around for quick touch-ups. Between these tools, I can keep an acceptable edge on most knives, but they do have some glaring weaknesses: the Lansky kit doesn't work well with large or very small knives because of the nature of the blade clamp, and the Pocket Pal works well for touch-up but doesn't give me the precise angle control that I've come to love, so I always end up running the blade through the Lansky when I get home anyway.

    On a recent trip to the sporting goods store, a new offering from Lansky called the QuadSharp caught my eye. It combines the form factor of the Pocket Pal with the angle control of the full kit, and at the same time improves upon both items.

    For size comparison, the QuadSharp beside a Pocket Pal and a SOG Flash II pocketknife.
    Instead of a diamond rod like the Pocket Pal, serrations are sharpened with a ceramic block, which also serves as a dressing block. It also has all four of the angles used in the full Lansky kit, allowing you to sharpen in the field without worry about losing your chosen blade angle.

    Because it doesn't require a clamp on the blade to work, the QuadSharp also corrects the weaknesses of the full Lansky kit by sharpening nearly all blade sizes with equal effectiveness. I've run it on blades as short as 2-3/8" and as long as my 12" kukri, and it also doesn't balk at the deep belly of the kukri like many sharpeners do.

    The big downside to the QuadSharp is that its cutters are only a single grit. They work fine for a blade that already has most of an edge, but they don't do as well on a knife that needs serious edge work; for that, I'll still need the full kit. However, for most sharpening tasks, the QuadSharp performs as well as the full kit in a fraction of the time. It's also ten dollars cheaper and much easier to toss into a backpack or pocket.

    Lokidude

    The Fine Print


    This work is licensed under a Creative Commons Attribution- Noncommercial- No Derivative Works 3.0 License.

    Creative Commons License


    Erin Palette is a participant in the Amazon Services LLC Associates Program, an affiliate advertising program designed to provide a means for sites to earn advertising fees by advertising and linking to amazon.com.