Sunday, July 31, 2016

Gun Blog Variety Podcast #102 - HEAT DOME!

Bust a deal and face the wheel with us as we enter the HEAT DOME! Two podcasts enter, one podcast leaves!

Who run Podcast Town? WE RUN PODCAST TOWN!
  • This week Beth tells us about a special someone's first time at the range: her 12 year old daughter. 
  • Sean takes a closer look at the story "Two in Fuquay-Varina wrestle AR-15 from man during dispute."
  • Barron gives us his thoughts on how some computer techs are treating Tiffany's computer problems.
  • In the main topic segment Sean and Erin discuss the "hack" of the DNC emails, and how the Democrat Party is responding to Trump's invitation to the Russians to release any Hillary emails they might have.
  • It's hot. There's a Heat Dome. (HEAT DOME!) How does that affect what you carry? Tiffany gives her thoughts.
  • Are you truly prepared if you don't have any way to provide emergency medical care? Erin give us some ideas on small, easy to carry blowout kits.
  • The Massachusetts Attorney General held a press conference and unilaterally declared Assault Weapons Ban-compliant rifles to be illegal. You knew that Weer'd was going to do a Patented Weer'd Audio fisk (TM), right?
  • And our plug of the week is for the Archangel OPFOR Mosin-Nagant Stock.
Thank you for downloading, listening, and subscribing. You are subscribed, right? We are available on iTunes, Stitcher Radio, and now on Google Play Music!

Listen to the podcast here.

Read the show notes here

Thanks also to Firearms Policy Coalition for their support. Go to www.FirearmsPolicy.org to join.

And a special thanks to our sponsor, Law of Self Defense at www.LawOfSelfDefense.com . Use discount code "Variety" at checkout for 10% off.

Upcoming Law of Self Defense Seminars:
  • August 7 - North Carolina specific - Raleigh, NC (Sold Out! - look for another Raleigh class February 19th of 2017)
  • August 13 - Oregon and Washington specific - Sherwood, OR
  • August 20 - Tennessee and Kentucky specific - Nashville, TN
  • September 10 - Alabama specific - Talladega, AL
  • September 17 - Minnesota and Wisconsin specific - La Crosse, WI
  • October 1 - Pennsylvania and New Jersey specific - Bensalem, PA
  • October 15 - New York specific - Poughkeepsie, NY
  • October 22 - Iowa specific - Johnston, IA

Friday, July 29, 2016

Prepping for Going to the ER

Not actually Erin.
& is used with permission.
I must apologize for my absence lately. As some of you my know, I live with my two elderly parents (80 and 77) and help take care of them and the house. Unfortunately, both of them went to the ER recently*, and that has rather understandably distracted me. However, it also gives me the topic for today.

If you've been to the ER recently, you know that unless you are hemorrhaging or otherwise close to death, the first thing you will have to do is fill out paperwork. The admitting nurse will ask you questions which, while important for treatment -- What medications are you on? Are you allergic to anything? What is your medical history? -- require a certain clarity of thought and memory that you may not currently possess.

Therefore, it makes sense to answer these questions now, while your head is clear and your health is good, so that you may have them for later.

Write It Down
For purposes of this article, I assume that these entries are being written on a word processor and not longhand.

Medical History
Going back as far as you can remember, write down every major procedure you have experienced, the month and date that it happened, and any other pertinent information (such as if it were resolved).

  • Example 1: mom was diagnosed with cataracts in 1999, but no surgery was performed until 2014. So her entry reads Cataracts -  discovered (no surgery) Aug 1999 - surgery Sept 2014.
  • Example 2: My thumb was cut very badly when I was working for the Census -- so badly that I required surgery. My file reads 
    • Injury - Cut left thumb (stitches) - June 2010
    • Surgery - Nerve Conduit - Spet 2010
  • Example 3: I am prone to kidney stones, so I have kept a record of all the ones which required a trip to the ER. 

Family History
If you have a direct blood relative with conditions like diabetes, hypertension, cancer, make a note of this and when it was diagnosed. If your relative dies of the condition or complications thereof, be sure to write that down, too, and the age at which they died if it was unusual. This will help in diagnosing an inherited or genetic defect, and alert doctors to the fact that you may be at risk to certain things.

Medicines and Supplements
If you're on a prescription medicine, write it down.

If you take something often (such as in my chase, painkillers for frequent headaches and an allergy suppressant + decongestant), write that down too. This can include inhalers and nose sprays.

If you take herbal or dietary supplements, wrote those down. They can have interactions with other prescribed drugs.

Allergies
If you're allergic to medication, then obviously write down that information. But don't forget regular allergies, as well, like if you're allergic to peanut butter or latex or even seasonal allergies like pollen.

If possible, write down your reaction to them as well. For example, mine says PENICILLIN WILL KILL ME. That gets attention quickly.

Bad Habits
Look, I know that nobody likes confessing to their doctors, but if you're in the ER they only care about what might hurt you. So if you abuse drugs, write down what you take and how. If you smoke or drink a lot, write down how much and how often. If you're a caffeine fiend or eat a lot of sugar, put that down. And, yes, write down if you're sexually active, with whom, and if you're using precautions or not.

Doctors and Next of Kin
It wouldn't hurt to include the names and telephone numbers of your doctor (if you have more than one, list specialty next to the name) and your spouse, children, or anyone else who needs to be notified if you are injured. That way all you have to do is show the file to a doctor or nurse (or email it to them) and they can make the appropriate calls as necessary.

Now Upload That Sucker
After you write all of this out, put it somewhere you can easily access. For most people, this will involve putting the document on a smartphone or tablet that they always have with them; others may decide to put it on a thumb drive.

I would caution against putting this information "in the cloud" for security reasons.

Don't Forget to Update
Every time you have a new injury, or a new procedure, or otherwise have new medical information, write it down as soon as you are able. That way you will always be up to date the next time you find yourself in the Emergency Room!


*Friday morning, mom was on a ladder when it shifted and she fell off, hitting her head on the concrete below. She received an MRI to check for concussion and other injuries, and aside from a gash on the back of her head that required three stitches, she was declared fine. She came home that afternoon and other than being sore from the fall and exhausted from all the procedures was fine.

Saturday noon, dad started having chest pains and was taken by ambulance to the ER. He has a history of problems with his heart as well as hypertension, and it's my assumption that worry and stress about mom caused this. He was admitted that day and is still there as I write this now (Sunday afternoon). They're going to do a stress test on him tomorrow, and that will determine when he comes home.

Thursday, July 28, 2016

Tools and Rust

Many preppers have tools and supplies cached or stored for use after TSHTF. Personally, I have a large selection of hand tools at my primary BOL, with a smaller collection at the secondary BOL, and an even smaller collection that ride in the pickup with me. Hand tools are great to have if you repair things as often as I do, and after TSHTF you won't be able to go to the store to replace that broken chair, firearm, or backpack; it will be reuse, repair, recycle instead of replace.

You'll need to know how to repair the things you use and have the tools needed to effect the repairs. Power tools are faster than hand tools, but I don't expect to have the power to run them in a crisis, so I collect hand tools.

Storing tools has a few problems, rust being the main one. Stainless steel is a wonderful invention, but there are only a few stainless alloys that are suitable for use in tools, and it is three to ten times the price of carbon steel. I'll be focusing on carbon steel for this article. 

Storage and Maintenance
On large equipment (plows, bulldozers, etc.), rust isn't much of an issue since it will be scoured away as soon as you start to use the equipment. Smaller equipment needs more TLC, and the smaller it is, the more attention you have to give it.

Larger hand tools like hammers, axes, mauls, hand saws, and shovels should be stored clean and lightly oiled. Oil evaporates over time, so you'll have to check them occasionally and re-coat them. If oil is not available, a fine coating of wax will work just as well. Long term or cached storage, where you don't have easy access to the tools, will require a coating of heavy grease or cosmoline. The goal of all of these is to keep moisture and air from getting to the metal.

Smaller hand tools like wrenches and screwdrivers need to be kept clean and dry, preferably stored in a water-tight container. A good tool box should not allow rain or spray inside once the lid is closed. Be careful buying the cheap tool boxes and look them over carefully. Dollar store plastic food containers work, as long as you keep them out of the sunlight (UV degrades the plastic rapidly). Look for pasta containers to hold your longer tools.

Cutting tools like files, rasps, and drill bits are hard to reproduce and should be treated with care. Always store them separate from each other, since hardened steel bouncing around in a drawer or tool box tends to dull itself. A layer of fabric between files is sufficient as long as it stays dry, which is why you used to see them stored rolled up in canvas “tool rolls” where each had its own pocket. Simple to make from an old pair of jeans, a tool roll will prevent damaged and lost tools.

Gripping tools like pliers, pipe wrenches, and adjustable wrenches like to rust where the moving parts meet. It's harder to clean there, and getting them oiled becomes more important.

Tiny tools like sewing needles need to be kept in water-tight containers. Rust on a needle will make it difficult to pull through fabric and they're a PITA to clean. Precision screwdrivers and other small tools are almost as bad as sewing needles.

Rust Removal
If you have a tool that is already rusty, there are ways to remove the rust and save the tool. I actually look for old tools (they havebetter steel) that have rust or grease built up on them at farm sales and antique stores. As long as the rust hasn't damaged the structural strength of the tool, I can usually get it working again. They're also cheaper than clean old tools.

Abrasives
  • Sandpaper is easy to mimic using actual sand and a piece of leather.
  • Placing a rusty part in a box full of sand and then shaking the box mimics the effect of a sand-blaster (just a lot slower) and is about the only way to clean chain mail and other intricate metal assemblies.
  • Sand is just rocks that have beat each other to pieces. If you don't have access to sand, bashing two rocks together will produce some. It also works wonders for venting frustrations, but watch your fingers.
  • Steel wool stores well as long as it is kept dry. Metal shavings from a drill, mill, or lathe will cut like the coarsest steel wool.
Cutting/Scraping
  • Files are handy for sharpening cutting tools and can also be used to remove rust from surfaces. Check your files to see if they have a “safe” edge, which is an edge with no serrations. These are  handy for working on a surface without removing anything from adjacent areas.
  • Scrapers work best on large, flat surfaces. I managed to resurrect a 10” table saw by scraping the rust off with a large paint scraper, followed by using the back edge of a commercial (railroad, actually) hacksaw blade which was 24 inches long. The long blade helped take down high spots and kept me from gouging the surface. The table was then coated with wax, since oil would stain any wood I was cutting.
  • Using the back of one tool to clean another eliminates the need to buy/store/maintain specialized scrapers. Broken saw blades are hardened steel and make good improvised scrapers.
Chemicals
  • Acids will remove rust, with the stronger acids attacking the metal as well. Use with care.
  • “Naval jelly” is a chemical compound sold under various names that converts the rust to a stable compound capable of sealing out moisture and air. I've used it once or twice and it worked as advertised, but I didn't care for the appearance of the tools afterwards.
  • There are a few newer chemical systems on the market, but I haven't had a chance to play with them. Check the local auto parts stores.

Protection
Once the rust is removed you need to get something on the metal as soon as possible to keep moisture and air away.
  • Paint works if you have it available, but making your own paint is an extensive project that I wouldn't try without the resources of at least a small town.
  • Wax is a natural product that is fairly common. Beekeepers will be very popular after TSHTF.
  • Grease doesn't have to be petroleum based, but be aware that animal fats oxidize and go rancid unless they have a preservative added. Lanolin, which is the grease removed from wool, works well but has a low melting temperature. Lard and such need to be rendered down and cooked to drive out all excess water, since you're using it to keep water away.
  • Vegetable oils work for coating tools, but evaporate quickly and may polymerize into thick goo if applied too liberally. Olive oil beats out corn or soybean oil for general lubrication.

Tools are handy to have for making repairs and for trade goods. For example, once the chainsaws run out of gas, those old hand saws and axes are going to be the only way to clear fallen trees and cut firewood. Learn how to use them and take care of them now, while you have the chance.

Wednesday, July 27, 2016

Prudent Prepping: Back to the Basics

The dust has settled and the First 72 Hours have passed. Now we concentrate on what to do in, and how to plan for, the long term via Prudent Prepping.

Our wonderful, talented, and all-around amazing Editrix Erin recently sent me a link to the San Francisco Department of Emergency Management prepping page. This lead me, Alice-like, down the Internet Rabbit Hole of related pages -- some of which had useful information, some that should be ignored, and others that should be nuked from orbit. Sorry, no links to those last ones.

While looking at the good, the bad and the truly horrible, it seemed to be the right time to review Basic Prepping, in case there are new readers or if (like me) there are people that are receptive to emergency planning in your circle of friends.

Prepping Basics 
Every one of the authors here have covered Prepping 101. I recommend reading from the start to see what all of us bring to the table. Another good resource are the "Other Blogs We Read" in the sidebar on the right. While these are not the only places to find information, every site in that list is a source we approve, for what is there.

Where To Start
Believe it or not, the San Francisco page has an easy-to-read layout and a simple, inexpensive plan for beginning preppers. Please don't be put off by the talk of earthquakes, since the three most common natural disasters -- tornadoes, hurricanes and earthquakes -- all do much the same damage and leave the impacted areas looking very similar: smashed or toppled buildings and homes destroyed. Specific planning can be easily tweaked for your area.

Talk to your friends and co-workers
Ask the people you see daily and who talk about camping or hiking what, if anything, they have for disaster preps. Not only may you find a more experienced person than yourself, you may turn out to be the Old Pro and the source of good information.

Where to find good information?

Prepping and Other Books 
One of our original authors, Evelyn Hively, shared this book review of Country Wisdom two years ago, along with this guest series of Electronics For SHTF. Chaplain Tim has suggested several books, and so have I, and Erin has shared a .pdf library of useful information.

What every site, book and author that targets budget preppers says is this: Start with what you have and use right now. One of my friends, who started prepping after finding out I do, inventoried his pantry and was amazed at how well stocked he was to start!

Buy what you use right now. Just get one more can, bag or box this shopping trip and one more of something else next trip. Store your extra items where you can get to them in an emergency AND so you can rotate older things into you day-to-day pantry. As you add to your stored food week by week, in three months you will be well on your way to a 72-Hour supply of food! 

As your friends get more and more serious about prepping, the book options expand very quickly. I wrote about the books I gave as gifts and the reasons for the particular book going to each friend.

Other Websites
During my trip down the Internet Rabbit Hole, I found a site that has a mixed bag of pages on Prepping. This is not an "approved by Blue Collar Prepping site"; it's just another place where some good info can be found. While many other pages have bigger followings than some on our Recommended List, you will have a hard time finding pages that are as down-to-earth as the ones we have endorsed.

I would like suggestions from all of you about other books and places to find prepping on a budget information. And if you can, please write a short article about the reason you like it and submit it to our Editor as a Guest Post!


The Recap
There is no Recap this week, just a reminder to talk to your friends and family about keeping them safe from natural or man-made disasters. You will feel better and it may keep someone safe in an emergency.


Just a reminder: if you plan on buying anything through Amazon, please consider using our referral link. When you do, a portion of the sale comes back here to help keep this site running!

If you have comments, suggestions or corrections, please post them so we all can learn. And remember, Some Is Always Better Than None!


NOTE: All items tested were purchased by me. No products have been loaned in exchange for a favorable review. Any items sent to me for T&E will be listed as such. Suck it Feds.

Tuesday, July 26, 2016

Cammer Hammer Review

Through some wonderful Editor-in-Chiefing, Erin was able to obtain a T&E hammer from a company called Cammer Technologies. Designed specifically for the 1911 model pistol, the Cammer Hammer addresses one of the major complaints of the 1911: that it can be very difficult to rack the slide, especially for smaller or weaker shooters. This is accomplished through the use of a "camming" relief in the face of the hammer, reducing the amount of force needed to cycle the slide by hand.

L: original Colt hammer. R: Cammer Hammer. 

The scallop cut on the Cammer Hammer is what makes it work. When cycling the slide, it works in a similar principle to a compound bow:
  1. Full force is required for the first fraction of travel. I'd estimate 20% or so on this unit.
  2. Once the hammer angles far enough back that the slide reaches the cut, only minimal force is required. 
This force reduction is particularly noticeable in a gun like mine, which has the heaviest recoil spring that Wolff offers. My wife usually has problems cycling this pistol, but could run the slide quite readily with the Cammer Hammer installed.

The test bed: a Colt Series 80 with a few modifications.
Cammer claims that their hammer reduces felt recoil. Unfortunately, I'm a terrible judge of that and am the wrong person to make that assessment. I will say that I felt every bit as fast making follow-up shots as I am with the OEM hammer, without without breaking the rules of "rapid fire" that my range has. (This rule is understandable, judging from many folks I see at indoor ranges.)

Installation of the Cammer Hammer is very simple, and requires minimal tools. I was able to swap hammers in and out in about 10 minutes on my kitchen counter. Brownells describes the process better than I ever could:


Note that Cammer ships their hammer with a strut already installed, which saves a couple steps and a few minutes of work. This is a small thing, but I definitely appreciate it. Also, if you don't have a bench block, get one. It's about the most awesome gun tool ever (especially if you own a 1911), and it's surprisingly affordable

Cammer claims that their hammer is particularly suited to competition guns, and I cannot argue that. Along with the heavy spring mentioned earlier, my 1911 has had some trigger work done. The Cammer gave the same clean break as my original trigger, as well as solid ignition on every shot.

MSRP on the Cammer is $98, which is a fair bit higher than a standard Commander-style hammer, but is right in line with some of the more innovative custom hammers on the market. It is also machined from bar stock as opposed to being metal injection molded, and is manufactured in Oregon, if those are considerations for you. Cammer Technologies also offers a variety of other 1911 parts to completely tune your internals.

My final assessment of the hammer is this: if you have problems cycling your 1911 slide, the Cammer Hammer will truly make a difference. It can also be a major part of building a dedicated single stack race gun. In the name of thorough testing, I'm now passing the hammer on to Evelyn to mount in her 1911. She's quite a bit smaller than I am, and I look forward to seeing what difference she sees manipulating her gun with this installed.

Lokidude

(FCC disclaimer. The Cammer Hammer was provided at no cost for test and evaluation. My opinions and statements are entirely honest and without any bias, and no conditions were put on this review by any party.)

Monday, July 25, 2016

Archangel OPFOR Stock for the Mosin-Nagant

Not actually Erin.
& is used with permission.
Today I'm doing something I really should have done sooner, but I felt I needed to test it thoroughly before I reviewed it. That feeling of "needing to test it a bit more" lasted for over a year. During the course of that year, not only did I shoot it extensively, but I allowed other people to shoot it as well and they all had good things to say about it.

As I am not a hunter I did not take it hunting, nor did I deliberately abuse it as I do not believe in testing to destruction. However, it is my opinion that this stock is rugged enough to take whatever punishment you dish out, as the plastic is definitely not flimsy.


[This space is reserved for all the purists who will undoubtedly object to modifying an old rifle. Consider your opinions voiced, noted, and ignored.]

The Price: 
$205.75 MSRP, $174.95 Amazon$152.99 MidwayUSA
I'm going address the elephant in the room first: Why would anyone buy a stock that costs as much as the rifle it goes on?

The first and best reason is "Because of the magazines." Archangel has created a 10-round detachable box magazine for the Mosin that is still reloadable from the top via stripper clips. The sheer convenience of this is not to be underestimated:
  • Do you have a scope over the action that prevents you from using stripper clips? This solves your problem permanently. 
  • Do you get tired of loading via clips and wish there was a faster, easier way to reload? This is your answer. 
  • Would you like to double the ammunition capacity of your Mosin and you haven't been able to get in touch with Riflemods to order an extended magazine? Not only does this answer your prayer, you get a more convenient way to reload your rifle. 
A word of warning: Archangel makes both 5-round and 10-round magazines. If you buy the stock, make sure you get one with the magazine you want! I believe the stocks on Amazon are 5-round magazines only. Price at MidwayUSA: $13.79 for a 5-round magazine, $16.49 for a 10-round.

The other two reasons are "Better ergonomics than any other Mosin stock out there" and "It automatically floats the barrel." Combine this with being lighter than the typical wooden Mosin stock and the ability to pick the color you want, and it's a winner.

Now, if you were to ask me "But is it WORTH paying the cost of a second Mosin?", then I'm afraid I can't answer that, as worth and value are not the same thing as price and cost. What I can tell you is that for about $350 to $400 and some elbow grease, you can buy a surplus rifle and turn it into a really nice shooter. It may not perform as well as a $1,000 Remington 700, but you'll also end up paying half that Remington price.

What You Get
The basic package comes with a single magazine and a stock that "Fits most M1891 rifles, hex / round receivers on 91/30, Soviet M-38 / M-44 / Chinese T-53 carbines" and "Fits Finnish M39 models with some modification". However, given the large variation in styles and manufacturing standards of Mosin Nagant rifles (especially WW2 era), some mild fitting may be required.

The stock also comes with two action screws, a wrench for same, and a barrel tensioner (in case your barrel doesn't shoot properly while floated and needs to be seated).

Installation
Other than one issue explained under "Cons" below, installation was drop-in simple for me. I understand, however, that this is not the case for everyone, and some fitting may be required. 

Pro:
The stock comes pre-inletted for a Timney trigger and bedding pillars, so no extra work is required to install those either initially or later.  

Con:
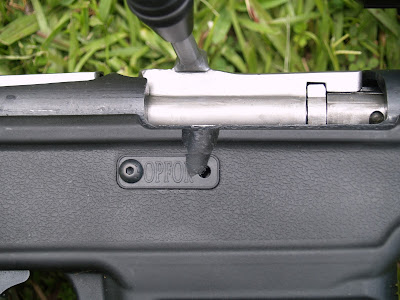
The stock does NOT come pre-inletted for a bent bolt, which will require modification. This is nothing that a Dremel tool won't solve, but it is both annoying and a strike against the product in my book, because 
  1. A notch for the bent bolt should have been part of the design from the beginning, and
  2. There is a hex screw for a completely pointless "OPFOR" plate right where the bolt goes, and
  3. The plate covers an even more pointless hole into the action of the rifle. Simply removing the plate would not be a good idea. 
So not only will you need to Dremel out a notch for your bolt, but you will also need to remove one of the screws. Fortunately, the OPFOR plate is just plastic, so a single screw will hold it in place.


Ergonomics
This is where the Archangel stock shines. The gooseneck pistol grip with palm swell feels great in my hand and makes reaching the trigger far more comfortable for my Hobbit-sized hands, and the adjustable comb riser allows me to achieve a proper cheek weld instead of my previous chin weld. 

Similar to the comb, the buttstock also extends for anyone who desires an increased length of pull (for my readers who don't speak Gun Lingo, length of pull or LOP is the distance from the trigger to the butt of the gun. If you're a short person with short arms, you want a short LOP; taller people with longer arms will be happier with a longer LOP).

There's also a groove for you to place your support hand under the rear of the stock, sniper-style.

Pro:
Everything feels comfortable and natural, which helps improve accuracy.

Con:
If you are kind of person who needs to elevate the comb for a good cheek weld, you had best memorize how many clicks you need to get there, because after 15 there is no way you are removing the bolt for maintenance without lowering the cheek pad.


Other Features

Pro:
The stock comes with a half-inch thick rubber recoil pad already installed. However, the 7.62x54R cartridge can weary a shoulder quickly after a day of shooting (especially if you're shooting more often due to the convenience of magazine changes), and so I am pleased to report that a large (one inch thick) Limbsaver pad will fit over the buttstock for added comfort. 

There is also a small storage compartment within the pistol grip itself, suitable for holding things like hex wrenches, lens cleaning cloths and broken shell extractors.

https://images-na.ssl-images-amazon.com/images/I/41uEFTzWJwL.jpg
Con:
Notably absent, however, is a rail system for mounting accessories like a bipod. For that you must separately purchase and install a forend rail. At $16 and Prime shipping from Amazon it's not a major dealbreaker, but (aside from the principle of the thing) installation requires you to remove the action from the stock. If you think you will want the rail, get it along with the stock and install it at the same time to save yourself the hassle.

Both:
Neither good nor bad is the sling attachment system. Rather than providing eyelets for traditional sling swivels, the stock instead sports three cups (one in front, 2 on either side of the buttstock) for quick-detach push-button swivels. If you have these kind of swivels lying around, that's great; if not, you're going to have to buy a pair before you can sling your rifle. 

Magazines
I know I talked these up earlier, but I want to address a curious feature about how the magazines interact with the rifle. I may end up horribly butchering firearm terminology while explaining this, so please forgive and correct me if I do.

The Mosin-Nagant has an internal magazine, and because of this there is a feed interrupter inside the action which prevents all of the cartridges from ejecting up and out every time the bolt pulls back. However, this feed interrupter has made devising detachable magazines for the Mosin tricky at best.

http://www.archangelmanufacturing.com/#!AA76R 02/zoom/c188b/image_1v34
Archangel gets around this dilemma by making the feed interrupter in integral part of the mechanism instead of trying to bypass it. When a magazine is inserted, the feed interrupter interacts with the magazine and causes the top cartridge -- which had been held in place with a retaining loop --to come out of the magazine and advance upwards until it is stopped by the ejector.

If you aren't certain what I'm talking about, watch this video starting at the one minute mark for a better explanation.


What this means is that when you insert a magazine, that top round is going to pop free regardless of whether or not the bolt this closed. If you then decide to remove the magazine without chambering that top round, it's going to be loose and will fall away. This can result in lost ammunition.

There is a way around this, however:
  1. Move the bolt fully to the rear. 
  2. Apply downward pressure to the topmost round until it fully depresses into the magazine. 
  3. Eject the magazine before re-seating the bolt. 
The magazine is ejected via an AK-47 style release lever that is easily worked by the thumb of your supporting hand, but the magazine does not need to be "rocked" in or out like AK mags. Here is a video of the magazines being swapped

My Grade: A
I would have given the Archangel Mosin-Nagant OPFOR Stock an A+ if it had an already inletted notch for a bent bolt and came with a forend rail standard.

I think that this stock is definitely a worthy upgrade to an already dependable rifle. Having detachable magazines that can still be top-loaded via stripper clips is worth the price alone; that fact there are other ergonomic features and performance improvements (like the floated barrel) make this stock worth getting.

As an example, here is the tightest shot group I have ever made with this rifle, and it was made with this rifle stock installed.


I cannot say how much of this grouping is due to the performance increases made by the stock, and how much is simply my shooting technique improving over time. The answer is likely some degree of both. What I can say is that the Archangel OPFOR stock is incredibly comfortable, and that makes everything about operating the rifle easier.

Con: 
Stock costs as much (or nearly so) as the rifle.

Pro:
The stock improves the rifle immensely. The entire magazine system is, in my opinion, enough to justify buying the stock.

I recommend this stock to all Mosin-Nagant owners, despite its price tag. 

I promised Sean I'd do this

Not actually Erin.
& is used with permission.
Folks who know me know that I don't like asking for help.

But my co-host Sean Sorrentino wants me to have better audio gear, so he's trying to raise money for me to get it and he asked me to share this with you.

As he says in his post, When we’re done, Erin will have the ability to record her own interviews, plus will have better control of her locally recorded audio for the podcast.

I will confess that the Zoom H5 recorder will be very useful if I end up doing telephone interviews about Blazing Sword. The headphones and amp are (I think) there to prevent some of the buzz that occurs when I speak; if I recall correctly, Sean thinks it's EM interference from the cables. I'm not an audiophile so I can't really speak to that.

Anyway, he asked me to share this, and I said I would, so... here it is:
Erin, 
Please start a special Amazon Wish List for "Podcast" and make it a "Public" list.
  • PNY Elite Performance 32 GB High Speed SDHC Class 10 UHS-I, U1 up to 95 MB/Sec Flash Card (P-SDH32U195-GE) -http://amzn.to/29U9fPZ  Bought! Thank you!
  • Hosa XVM-105M Right-Angle 3.5 mm TRS to XLR3M Microphone Cable, 5 feet - http://amzn.to/2aEKmVK  Bought! Thank you!
  • Hosa CMS-103 3.5 mm TRS to 1/4 inch TRS Stereo Interconnect Cable, 3 feet - http://amzn.to/2a7DDFh  Bought! Thank you!
  • Mediabridge 3.5mm Male To Male Right Angle Stereo Audio Cable (2 Feet) - 90° Connector For Flush Connections - Step Down Design for iPhone, iPod, Smartphone, Tablet and MP3 Cases - (Part# MPC-35RA-2 ) - http://amzn.to/2abSr6O  Bought! Thank you!
We now have $300 in your "Buy Erin a Multitrack Recorder" fund. We need $320 just for the recorder. We need about $550 for everything, including the headset and the XLR/TRS which is the lowest priority. 
I think that by putting it into a list, we might be able to have people buy something off the list and save them having to give us cash. But at the very least, when I have the money, it will already be set up so I can send it to you.
As requested, I've made a public wishlist titled Podcasting.

So there you go. If you enjoy the Gun Blog Variety Podcast but are annoyed by the audio artifacts every time I speak, you can donate to make those go away.

Sunday, July 24, 2016

Gun Blog Variety Podcast #101 - the TIE Fighter episode

Join our ragtag group of pro-gun freedom fighters as they struggle against the evil Empire of malice, stupidity, ignorance and lack of due process or legislative oversight!
  • Beth is tired of "Smart" anti-gun answers to pro-gun statements so, she answers the anti-gunners in turn.
  • Sean looks at the two suspects in the murder of an elderly woman in Kinston, NC.
  • "Legitimate malware?" Barron shows us how to avoid malware served up from sources you thought you could trust.
  • In our main topic, Sean and Erin take a brief look at the recent decision by the Massachusetts AG to unilaterally redefine State law to ban so-called "Assault Weapons."
  • Before you can go somewhere, you first need to know where you are. Erin tells you what kind of maps you need and how to get them.
  • In a special double segment, Tiffany and Weer'd compare their shared history. Both started out as anti-gunners, and both have become pro-gun activists. How did that happen?
  • And our plug of the week is for Merrell Jungle Moc shoes.

Thank you for downloading, listening, and subscribing. You are subscribed, right? We are available on iTunes, Stitcher Radio, and now on Google Play Music!

Listen to the podcast here.

Read the show notes here

Thanks also to Firearms Policy Coalition for their support. Go to www.FirearmsPolicy.org to join.

And a special thanks to our sponsor, Law of Self Defense at www.LawOfSelfDefense.com. Use discount code "Variety" at checkout for 10% off.

Upcoming Law of Self Defense seminars
  • August 7 - North Carolina specific - Raleigh, NC (Sold Out! - look for another Raleigh class February 19th of 2017)
  • August 13 - Oregon and Washington specific - Sherwood, OR
  • August 20 - Tennessee and Kentucky specific - Nashville, TN
  • September 10 - Alabama specific - Talladega, AL
  • September 17 - Minnesota and Wisconsin specific - La Crosse, WI
  • October 1 - Pennsylvania and New Jersey specific - Bensalem, PA
  • October 15 - New York specific - Poughkeepsie, NY
  • October 22 - Iowa specific - Johnston, IA

Friday, July 22, 2016

The Firehand First Aid Kit

Or at least the current version thereof.

I found this bag at a gun show:


It cost $20, $5 less than the others because it wasn't a proper tactical color. I didn't tell the lady I'd have paid the higher price for either white or International Orange, as this is something I want to be able to find fast.

It opens up to three small compartments in front, and one big in the back:

Pocket One has the "OhGodgetsomethingtostopthebleeding!" stuff:

A CAT tourniquet, two packs of Celox gauze, and a pressure bandage.

Pocket Two has more general stuff:

Gauze pads and roll, alcohol wipes, antibiotic, tape, elastic wrap, band-aids.

Pocket Three doesn't have much:

just burn gel and a couple more gauze pads.

Pocket Four has extras, and stuff that won't fit in the others:

a HyFin chest seal, ace bandages, a surgical stapler and staple remover, a big bandage, and nail clippers.

I'm trying to figure out what I need to add to this, or if I need more of what I have, and how to arrange it for best use (which is a whole other post). This is the stuff that was handy when I cut myself; the two things I really needed were the big gauze pads and tape. In my case, had we been further from medical assistance, those two would've still done the job; had the cut been worse, I'd probably have wound up using all the pads and more tape to control the bleeding. And, as noted previously, I have no sterile saline or anything of the sort for cleaning a wound, which is something I do need to add. Maybe a small bottle would fit in the big pocket?

Thursday, July 21, 2016

Everyday Preps

I was sitting down to eat dinner tonight and the power goes out. This wasn't completely unexpected, since the temperature has been well over 90° F for days and the humidity doesn't drop below 50%. We had a storm roll through early Monday morning that took out the power for about six hours, but tonight's outage was likely caused by too many air conditioners running for too long. How does this prepper react?
  1. I reach into my pocket and get out my  EDC flashlight. It provides more than enough light to keep from tripping over things.
  2. I grab the battery-operated lantern from the stairway and get some area lighting. Since it has a wide base, I can set it down and have both hands free to go to the next step.
  3. I light two oil lamps to provide light on the main floor and upstairs. One has a reflector built in, the other is placed on the hutch near a large mirror. There's no use wasting the light output on a wall, so I use reflectors to get it out into the room. I turn off the battery-operated lantern to save the batteries; Lamp oil is a lot cheaper than D-cell batteries. There's still time to finish eating dinner before it gets cold. 
  4. It's been 20 minutes and the power is still out. This indicates that it will likely be out for several hours. Minor outages around here are resolved through automated resets, but this is lasting longer than normal for a minor outage. I open the windows upstairs to get airflow through the house; I hate to let the humidity in, but there is a breeze and the house is warming up anyway. I also open a couple on the main floor to get the hot air to rise and exit through the upstairs windows.
  5. Our power company has a smart phone app, so I check for updates on the outage. Of course they're not updating the information in anything close to real-time. I pull up the webpage and see that the whole town is out, as is the next town north of here; looks like a transformer blew. My phone battery is getting low from a full day's use, so I get the USB battery supply out of the computer bag and charge the cell phone. I may have to take it our to the pickup to get a full charge.
  6. I check on the neighbors that I care about. Everybody is doing OK; a few have left for anywhere that has lights (many people can't handle being in the dark, yet make no preparations for it). I let a few neighbors know that I have extra candles and such if they need them, but those are folks I have known  for many years. The newer neighbors are the ones I don't trust for a variety of reasons -- they can sit in the dark.
  7. I have a blog post due tomorrow, and since there are fewer distractions with the power out,  I get started writing. My laptop battery is good for at least 4 hours, so I shouldn't have any problem getting this post together. If I have to, I can save it to a thumb drive and switch to the other laptop, which also has a 4 hour battery. I always write in a word processor program and upload the finished post to the blog, so the loss of the Internet isn't going to slow me down. I use the same word processor (Open Office) on both machines, so there will be no issue of compatibility. If the power is not back on by the time I'm done, I'll use my phone as an Internet hotspot to upload the article.  This sucks up my limited data plan, but it works. I would normally have hyperlinks to a few things, but don't want to kill my data plan. I may update this post when the power comes back.
  8. I leave the fridge and freezer alone. As long as the doors stay closed, they will stay cold for at least 24 hours. I'm sweating just sitting here and a cool drink will help with that. I have instant tea and a couple of different sugary drink mixes in the kitchen and down in the pantry, so I make myself a tea. There's no ice for it, but the water from the tap is cool enough. I check the weather app -- it's still 84°F outside, at a quarter to eleven at night.
  9. If the power stays out overnight, it will be a challenge to sleep. It's hard to sleep when you're sweating profusely, so I clear a few things off the couch in the basement in case I need to sleep down there tonight. It's cooler and quieter, but darker with not much natural light; I have a habit of oversleeping in the basement because it's hard for me to wake up without daylight.There's enough of a breeze that I should be able to sleep upstairs tonight, but I have options.
  10. I dig out the wind-up alarm clock, wind it up, and set it to the correct time. My normal alarm clock will come back when the power does, but it will need to be reset. My phone has an alarm app for a backup. I'll make it to work tomorrow, but if the power is out there I'll probably end up coming back home.
All of this is normal life to me. There's no use getting upset about losing power for a while, as that won't make it come back on any sooner. I had things in place to replace the essentials. Dinner could have been eaten cold if the power had gone out earlier, or I could have gotten into the camping gear and got out the pack stove. Candles are still an option for lighting, but I don't mind the odor of oil lamps so I use them when I need to.

P.S.: No, I will not make it easy for our editrix by adding a Step 10. No “10 Step Program” jokes will be made that easily. (Editrix's note: You gave me a second paragraph in Step 9. Nice try, but you need to be craftier than that.)

Wednesday, July 20, 2016

Prudent Prepping: Camping & Gear

The dust has settled and the First 72 Hours have passed. Now we concentrate on what to do in, and how to plan for, the long term via Prudent Prepping.

My first camping trip of the year is in two weeks and my gear is being sorted and organized right now. I don't have any vacation hours available, so I won't be doing any hiking; just a Friday night to Sunday trip to a local lake for a bit of fishing.

I have all of the gear that I need, but since bargain hunting is how I have to shop for my equipment, this bundle from REI might just fill someone's wish wist -- or might even be the starter set for their way to prepping success!

Camp Bundle From REI
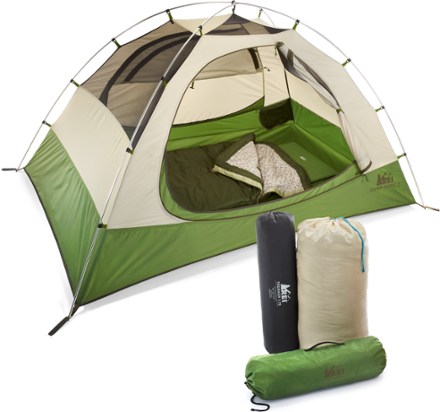
This is a combination of three items everyone needs: a tent, a pad and a sleeping bag, all in one box.

https://www.rei.com/product/100402/rei-camp-bundle

From the website:
  • Get your adventure started! Bundle Includes Camp Dome 2 tent, Siesta 30 sleeping bag (Regular size) and Trekker 1.75 self -inflating mattress (Long Wide size) 
  • REI Camp Dome 2 tent is lightweight and easy to pitch, sleeping 2 comfortably across 3 seasons and offering plenty of ventilation through 2 easy-access doors 
  • REI Siesta sleeping bag offers plenty of room to stretch, turn and snuggle in for the night with a rectangular shape that will keep you comfortable in cool weather 
  • REI Trekker self-inflating sleeping pad offers low weight, comfort and warmth for backpacking and camping 
  • R-value equals 5.6; most sleeping pads we sell range in R-value from 1.0 (minimally insulated) to 9.5 (well insulated) 
  • Weight per piece: Siesta sleeping bag (reg) 3 lbs. 12 oz.; Trekker pad (long wide) 3 lbs. 3 oz.; Camp Dome 2 tent (packaged weight) 5 lbs. 
  • Value of items sold separately $269.85; you save over 25%! 

The Components

Trekker 1.75 Self-Inflating Mattress
I have seen the Trekker pad in person, and I have a friend that uses one. It is REI's house brand Therm-a-Rest style pad, and it's held up to my friends' use very well.

https://www.rei.com/product/870759/rei-trekker-self-inflating-sleeping-pad

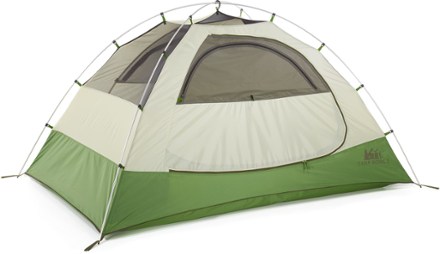
Camp Dome 2 Tent
The Camp Dome tent was a model I looked over and was possibly going to buy, until a great tent was offered to me by a friend.

https://www.rei.com/product/893927/rei-camp-dome-2
From the website:
  • Durable, equal-length aluminum poles and pole-clip design offer quick setup
  • Polyester taffeta rainfly and a bound, cut-in floor provide a taut, water-resistant pitch
  • Polyester fabric resists UV degradation
  • Mesh storage pockets inside tent keep small items organized
  • Includes stuff sack, pole and stake bags, 4 stakes, 2 guylines with tighteners and pole repair tube
  • Large mesh windows secured by zip open panels
  • Awnings enable views and ventilation while providing weather coverage

Siesta 30 Sleeping Bag
The REI Siesta is a retangular poly-fill 3 season bag that is not the most compact bag, but in a pinch is backpack-able.

https://www.rei.com/product/870766/rei-siesta-sleeping-bag

From the website:
  • Polyester synthetic fill offers all-conditions warmth down to about 30°F; offset quilt construction prevents cold spots and stabilizes the insulation
  • Two-way main zip lets you open the bag fully for use as a quilt or unzips at the bottom for ventilation
  • Short zipper on the other side lets you fold down the top for a bedlike feel
  • The bag can also be zipped to another Siesta bag, forming a double-wide camping bag
  • Polyester shell is treated with a durable water repellent finish to repel moisture and stains
  • The REI Siesta Sleeping Bag includes a stuff sack and a storage bag

Recommendation
From the specs, there is absolutely nothing wrong with any of this gear, especially for someone needing to buy everything at once, from a reputable company with an outstanding reputation and equally amazing return policy. $200 for all of this is a fair and reasonable price for the contents of the package when REI's "1 year, no questions" return policy is factored into the decision.
You'd better hurry if this is interesting to you, since this is a Limited Quantity deal!

MSR Red LED Tent Light
My street at 5AM
Last year I, was walking to the local doughnut shop when I had a conversation with a local police officer about safely navigating my neighborhood. He politely told me that it was bad to be walking with a dark jacket and a black backpack in a neighborhood that doesn't have sidewalks, whose streetlights are very far apart and whose streets have needless curves. 
I used to have a small light that clipped to my bag, but it fell off and I never replaced it. But I always look for closeouts or other specials when I'm in REI, and after looking at the Camp Bundle I found a replacement light for my bag.

This is a closeouts item in REI, and has been dropped from the MSR catalog. I like the fact that this light can be used as a blinking or constant on light.

From the Amazon page:
  • Two Colors: Available as a white tent light or a red tent light
  • Ultra Bright: Tent light produces six Lumens and lasts for more than 10 hours
  • Multiple Modes: High, Low and Strobe functions provide a variety of options
  • Tent Light Includes: Two magnetic tabs, two 2016 Lithium batteries

Its listed run time is 30 hours in the blink mode, and since the light will only be used on the weekends, the supplied batteries should last quite a while.

The light has a handy clip for hooking on a belt or on a MOLLE loop. I'm not sure how well I'd trust the two magnetic hangers to keep the light from falling in a tent, but this will be tested soon!

The Takeaway
  • Shop for bargains and ads. Pre-made kits can be a way to save big money.
  • If you are willing to buy discontinued items, the savings can be even better.

The Recap
  • Purchased this week: One MSR Red LED Light,  $11.93 from REI on Close-Out. Available from Amazon for $11.99 with Prime.

Just a reminder: if you plan on buying anything through Amazon, please consider using our referral link. When you do, a portion of the sale comes back here to help keep this site running!

If you have comments, suggestions or corrections, please post them so we all can learn. And remember, Some Is Always Better Than None!

NOTE: All items tested were purchased by me. No products have been loaned in exchange for a favorable review. Any items sent to me for T&E will be listed as such. Suck it Feds.

Tuesday, July 19, 2016

The Weakness of the Mora Knife

It is a commonly known fact that the entire BCP staff are fans of the Mora knife, and its low price and common availability make it quite appealing. However, none of us has yet written it up after putting it through its paces.

Testing the Mora
I'm not a fan of "torture tests," as a rule; they're unrealistic, and all they really tell is the failure point of a tool without giving any idea of its actual capabilities. I much prefer real-world testing, so I put my Mora through the most rigorous environment I could find in the real world: camping with my Boy Scouts.

Methodology
The rules of our testing were simple.
  1. We'd reach for the Mora first for any knife task. 
  2. If it failed, we'd move on to a more appropriate blade for that chore. 
During several camping trips, I moved to a different blade just twice.

Performance
Breaking down the various camp tasks it was put to, the Mora performed as follows.
Vegetable Cutter: One of the biggest camp tasks is cooking, and we cook a lot of veggies. Potatoes and carrots were an easy slice and dice, and even onions weren't difficult, though an extra inch of blade would have been nice. Grade: A-
Fish Cleaner: Our boys caught trout on one of our campouts and cleaned them, running the Mora head-to-head against a traditional filet knife. The shape and size of the Mora outperformed the filet knife and made short work of the trout. The shorter blade was especially forgiving to young and inexperienced fish cleaners. Grade: A
Meat Cutter/Deboner: The Mora quite obviously sings as a steak knife. It proved itself while cutting a variety of cooked meats, but breaking down a bone-in roast is one of the two places where it encountered failure and I had to resort to a different knife. The short, stiff blade was less than ideal at cutting out bone and cubing meat for stew, a task that lends itself far more to the thinner, more flexible blade of a filet knife. Grade: C- for prep, A for eating dinner.
Editor's note: Mora also offers a Fillet knife in both 3.5" and 6.1" lengths.
Whittling: I did say all camp tasks went first to the Mora. Scouts in the woods get bored at times, and one of their favorite ways to entertain themselves is with some good old fashioned whittling. As their leader, I would be remiss if I didn't play along. My Mora cut wood at least as well as any knife I've owned, from skinning bark off sticks to making some delicate detailed cuts. It also splits kindling nicely, but I wouldn't baton too aggressively with it, as the spine of the blade is still a bit thin. Grade A-
Random Tasks: The knife cuts rope like a sharp knife should. It also makes short work of t-shirt fabric (we needed to make muzzleloader patches in the field). It's a dandy box opener and paper cutter as well.

The Weakness of the Mora
I did mention a second failing, and it's what I consider the Mora's true weakness: It's a really bad butter knife. It doesn't like to scoop or spread well at all! It's a humorously minor quibble for me, but if you're looking for a jam spreader, you're going to want to look elsewhere.

http://amzn.to/2arwTR1

But Seriously Folks...
As a side note, my Mora arrived sharp. Not "acceptably sharp" or "functionally sharp," but a level of sharp that I'd be happy with had I put the edge on it myself. It's held its edge well, having only needed quick dressing a few times.

All told, it's a wonderful tool, easily worth more than the asking cost and worthy of a place in anyone's kit.

Lokidude

The Fine Print


This work is licensed under a Creative Commons Attribution- Noncommercial- No Derivative Works 3.0 License.

Creative Commons License


Erin Palette is a participant in the Amazon Services LLC Associates Program, an affiliate advertising program designed to provide a means for sites to earn advertising fees by advertising and linking to amazon.com.