Sunday, February 27, 2022

Software vs. Paper Maps

A major part of my job for the last seven years has been driving a medium-heavy truck (10-25 tons) to rural destinations, and I have had to rely on maps and apps to get me through areas that I'm not familiar with. A good portion of the area I cover is where I grew up, so I know a lot of the roads, but things change over the years and my coverage area has spread to include the neighboring counties. 

No route survives the day without change, but I have to try.
  • My home county is about 700 square miles in size, with dozens of rivers and streams, which means hundreds of bridges. Bridges have weight limits, something that doesn't affect you if driving a car but can close off a route for anything bigger. I have seen a few that are so limited that a loaded pickup would not be safe to drive across.
  • We have a couple of railroads that pass through as well. Railroad crossings aren't much of a problem, but the underpasses can be old and low. During the flooding we experienced twice in the last 10 years, hundreds of truck and RV drivers found a 12' clearance underpass on a detour route for the Interstate highway. That route was blocked by a stuck vehicle at least twice a day in spite of the nine warning signs leading up to the underpass. The pile of AC units stripped off of the tops of RV's and campers kept the local scavengers busy hauling them to the scrapyards.
  • We get ice and snow up here. Paved roads get cleared fairly fast and well, but gravel roads can be a challenge. Some of the hills are impassable for a few days after a good snowstorm, because it takes time to get plows out into the rural areas.
  • About 30 years ago the smaller counties ran into financial difficulties, and one of the cost-saving measures they instituted was “abandoning” roads that did not have an occupied home on them. A lot of shortcuts that I once used to get from point A to point B are now “Class B maintenance” or “Minimum maintenance roads”, commonly called an MMR. Minimum maintenance means no gravel, and they're the last to get the ruts bladed out. These are true dirt roads in very hilly country that has a couple hundred feet of soil on top of the bedrock.
  • Rural addresses have an E911 (Enhanced 911) house number plate on the road near the entrance. This is to help emergency responders find houses when needed, but it makes my life a bit easier.
Those are the conditions I have to deal with, so I use my experience and several aids to plot a route every morning.

Online Maps
The more remote you go, the fewer modern conveniences you can rely on. We still have areas with no cell phone coverage, and I've been in a few steep areas where I lost GPS signals. 

There are a few other online mapping services, but Garmin, Apple, Mapquest, and Google Maps are the four that most people use. Garmin is a subscription service that I've never been fond of, as their devices age out too fast and they charge too much for updates.

I don't own any Apple devices so I have very limited experience with their app, but Apple maps was the butt of a lot of jokes when they first launched due to their horrible accuracy and routing. Idiots are still blindly following their GPS app instructions into lakes and rivers, so not everything has been fixed.

I've used Mapquest and Google Maps a lot over the years. My dispatcher uses Mapquest to try to get my deliveries in the same general area because he doesn't know my county very well; it's a good start, a general grouping of locations that need to be visited that day. Once I start driving I use Google maps on my phone to get detailed routing. Both services work well on Federal and State highways, but they fail on county roads. Once you leave the paved roads, their usefulness drops by at least 50% due to the following:

  • MMR's are shown as actual roads on both, so unless you have a 4WD vehicle and like to get muddy, you'll have to find another route.
  • Neither service acknowledges weight-limited bridges or low underpasses. I am training Google to show railroad crossings because I have to stop at all of them.
  • Road construction outside of metropolitan areas won't show up.
  • New roads and closed bridges can take a year to be added to their databanks. New houses can take longer.
  • Street addresses are only about 80% accurate outside of towns.
Paper Maps
In order to fill in where the apps fail, I have maps: good, old-fashioned, paper maps. A trip to the county courthouse got me a map of all of the bridges (with their weight limits) for $5.00; the county address booklet showing every house and its E911 number was $20.00. 

If I'm hauling to fields instead of houses, I have a plat book that shows field boundaries and owners (another $20.00). We also have large laminated maps on the wall at the shop (up to $100.00 each) that are easier to use when planning a long route, since the plat book and E911 booklet are broken down by one township per page. 

I also have my personal collection of maps at home, mostly topographic maps of everything within 40 miles of home. There are plenty of places online where you can get maps; one of our authors covered some in this article. 

If you're planning on traveling outside your home territory, get paper maps and learn how to read them. They work when the power is out, and they don't require a GPS signal. Keep them updated at least every two years, as things do change, even out in the hinterlands.

We've covered map reading before; it's a dying art that require hands-on training to become really proficient. The age of electronics has tried to make paper maps obsolete, but batteries die and somebody else is in charge of the data you're receiving. Google and Apple have both been caught deleting data from peoples' devices over the years, so they are not 100% trustworthy.

If you're traveling locally, do so often. Keep yourself up to date on changes around you, as that evacuation route you planned five years ago may not be usable today.


Not being able to get there is as bad as getting lost.

Friday, February 25, 2022

Product Review: BioLite CampStove

Not actually Erin.
& is used with permission.
At some point in the semi-distant past, likely some time between 2017 and 2019, I took advantage of a Black Friday sale and purchased a BioLite CampStove kit for significantly less than this Amazon price, and then owing to some sort of family drama I promptly forgot about it until now. 

For those who don't know, the BioLite CampStove is a double-walled camp stove in the style of the Solo, except that has a battery-powered fan to drive air into the fire, not only keeping it burning but also supercharging it. While the battery can be charged via USB, the really clever part of the CampStove's engineering is that the fan is also powered by the temperature differential between the fire and a probe that extends into the burn chamber, which means that the simple act of combustion will turn on the fan when it hot enough. The fan feeds air to the fire, which makes it burn hotter, which then charges the onboard battery. Moreover, you can use this battery to charge USB electronics, either directly as the fire burns or by using the battery-fan unit as a power bank. 

As someone who likes fires but has problems getting them started, and who also likes electronics, you can see why this would intrigue me. I truly wanted to like this camp stove, but... well, you'll find out. 

Again, the tests are: 
  1. How easy is it to light and keep fed, using natural materials. 
  2. How quickly it will bring 16 ounces of water to boil in a steel mug. 
  3. How quickly it will bring 24 ounces of water to boil in an uncovered aluminum pot.
  4. How quickly it will cook a single egg on an aluminum skillet. 
All tests were performed on my back porch where wind would not be a factor. I used natural fuels, but since this was not a referendum on my fire-making skills, I used a lighter to start them.

https://amzn.to/3IohxvQ


First Impressions
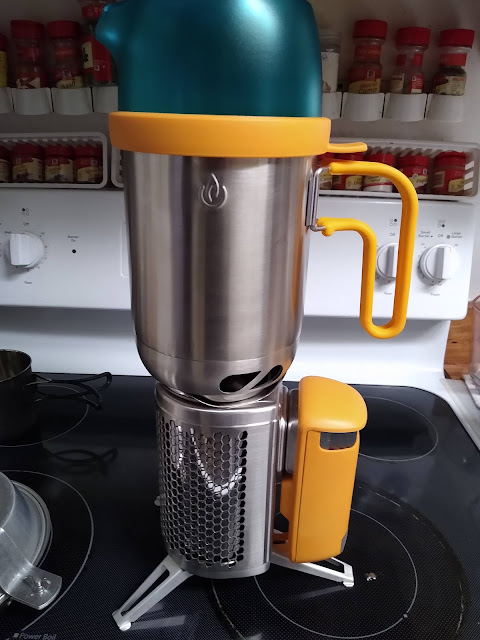
The BioLite CampStove stores inside the KettlePot in a handy, but rather bulky, 10.2" high by 5.2" across cylinder that weighs 3.1 lbs in total. The stove assembles quickly, and the instructions are pretty idiot-proof; I have full confidence that I will achieve a spectacular burn with this stove. 

I do have concerns, however. First, the burn chamber isn't very large, especially since the fire sensor/charging probe extends a good way into it. 

https://amzn.to/3IohxvQ


Second, this is a tripod design with a fairly heavy battery on one end. Admittedly, the battery is positioned over the strongest leg, but this is not the steadiest of designs, especially with it being so much taller than it is wide; four legs would have been better. 

https://amzn.to/3IohxvQ


Finally, the mouth of the stove is shaped such hat I cannot place my 16 ounce steel mug on it, because doing so will completely cover the combustion chamber. 


Fortunately, I had the KettlePot, which is designed to sit atop the CampStove. 


You can see it has a raised bottom with vents cut into it to prevent obstruction of the burn chamber. 


This forced me to change the parameters of some of the tests. 

Test 1: Fire Starting
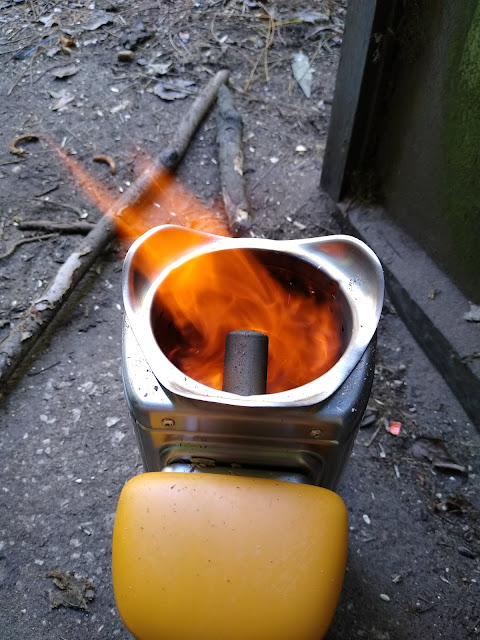
As I predicted, starting a fire inside the CampStove was insanely easy. I filled the burn chamber with locally sourced sticks, set them on fire, and turned on the fan. Within seconds I had a very pleasant whirlwind of flame roiling within the stove. I tried to capture a picture of it, but my phone's camera isn't good enough. Just imagine a tornado of flame and you have the right idea. 


As you might expect, turbo-charging your fire means it goes through fuel at a much faster rate than non-turbo stoves. What's more, I discovered that I needed a long stick to act as a poker to break the burned wood so that I could add more. If you think this will be a problem when trying to boil water, you are absolutely correct. 

I wish to make it clear that I used the highest fan setting for these tests, not only because I was timing them, but also because the instructions for the stove say that when you trying to boil you should have the fan on high. Lower settings are for using the grill accessory or for slower cooking.

From left to right: Fire intensity gauge, fan speed setting, battery charge level.


Test 2: Cup KettlePot Boil
Since I couldn't use my regular cup, I placed 16 oz of cold water into the KettlePot, and because I had to change the testing medium anyway I decided to put the top onto the kettle because that's how the instructions say it's supposed to be done. 
Protip: if you use the KettlePot, instead of firmly affixing the silicone ring around the kettle's lip, just place it gently on top of the kettle. This is because the transparent lid of the kettle becomes covered with condensation pretty much the moment the water starts to bubble, making it impossible to see if the water has reached a rolling boil or not. If the lid is firmly affixed you will need to look through the pour spout, in which case you get a face full of steam. However, if the lid is just resting on the kettle, you can lift it up to see the status of the boil and then put it back down. Just don't forget to put the top firmly in place before pouring!
Be careful!


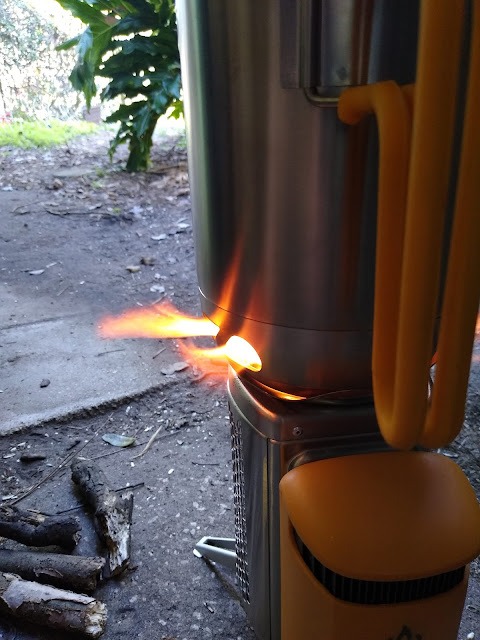
It took 8.5 minutes to get 16 oz of water to boil. At first the fire was blazing along merrily, with jets coming out of the vents -- which means you need to be very careful with people giving it enough space! -- however, the fire dwindled fairly rapidly to the point where I was able to feed small sticks through the vents. Eventually it reached a point where the fan shut down, and I had to take the kettle off to add more fuel and re-start the fire. 

Test 3: Pot Boil
This simply didn't work. While my pot did fit on the stove, there wasn't enough room between it and the burn chamber to feed fuel into the fire, and after 10.5 minutes the fire dwindled. I picked up the pot by the bail, but somehow I didn't lift it just right, and I managed to knock the Campstove Over. 

I'll repeat that: Lifting the pot to add more fuel resulted in a BURNING STOVE falling on its side. Fortunately, neither I nor my porch were burned, but I decided that using anything except the KettlePot wasn't safe. 

I allowed the kettle to cool, filled it with 24 oz of cold water, and restarted the test. It took 14.5 minutes of work just to get it bubbling, and by 17 minutes it was mostly boiling (but not rolling), By this time I was out of fuel and patience and ended the experiment. 

A Realization: Use Wood Pellets!
I was about to give up on this stove when I realized that wood pellet fuel existed, and I could fill the stove pretty full with it. This would give me a longer burn time, and if I needed to refuel it would be easy to do. 

Let me tell you, wood pellets makes all the difference with this stove. I recommend you use this fuel exclusively, as you will see from the performance below. This eliminates the CampStove from consideration as a backpacking or survival stove, but it is still a very convenient tool for use while car camping. 

Test 2.5: 16 oz KettlePot Boil with Wood Pellets
4 minutes to a rolling boil, and I didn't need to add more fuel. Then I extinguished the fire to allow the kettle to cool. 

Test 3.5: 24 oz KettlePot Boil with Wood Pellets
6 minutes to a rolling boil, and still I didn't need to add more fuel. 

Test 4: Egg Cooking
1 minute, and I still had enough fuel to perform a bonus test.

Bonus Test: the Kelly Kettle
If you don't recall my original test of the Kelly Kettle, go here. It's an amazing way to boil water, but it's not good for much else. 

The Kelly Kettle was able to sit on the CampStove fairly well, but at a slight angle. I positioned the pour spout such that it was on the high side, because the last thing I wanted was for boiling water to spill out onto the stove, especially the electronic fan. 

It only took 2.5 minutes to bring 16 oz of water to boil, and though my fire was burning there wasn't much fuel left.

While this combination doubles the bulk, it's pretty much an ideal combination for car camping, although it might be advisable to look for a grate to stabilize the kettle. Picking up a hot Kelly Kettle is a special technique at the best of times, and doubly so when it's sitting unevenly. Still, I managed to do it and not get burned.

My Rating
This is one of those "Well, it depends" situations. If you're going car camping and have a bag of wood pellets with you, its performance is A+. However, given its price and limitations, I can't say that it's a good use of your money. I think you're better off cooking with a gas stove while camping, and a barbecue grill at home. 

For a camping or survival stove, it's a C- at best. The fan is useful, but I can build a fire in the much lighter and much easier to feed Solo Stove that works just fine without a fan. The ability to charge your electronics is nice, but the same can be achieved with any number of solar-powered banks or hand-crank generators. 

I really wanted to like this stove more, and I am disappointed that it didn't live up to my expectations.

Wednesday, February 23, 2022

Got (Dry) Milk?

The dust has settled and the First 72 Hours have passed. Follow along as I build a long term plan via Prudent Prepping.

Following on last week's post about buying now, I did some shopping! 

Following A Plan
I listed my rough outline last week for extending my stored food and one item was dry milk. After reading the post to several  friends, one mentioned the powdered milk already in the house, the Nestle Nido brand. I didn't think about this, as I don't use powdered milk or creamer in my coffee.

From the Amazon ad:
  • https://amzn.to/3JQV9vu    


    One 28.2 oz (approximately 26 servings) canister of Nestle NIDO Fortificada Dry Whole Milk Powdered Drink Mix. EBT item in eligible states
  • Nestle NIDO Fortificada powdered drink mix delivers 5 essential vitamins and minerals in every cup
  • This milk drink mix is easy to mix for a nutritious beverage the whole family can enjoy
  • Dry whole milk beverage contains calcium, zinc, Vitamin A, Vitamin C and iron
  • Stir 4 tbsp of NIDO Fortificada Dry Whole Milk beverage into 1 cup of warm water

I mixed some in cold water following the directions and, while it certainly isn't the same taste as milk from the dairy counter, it wasn't bad! I've since used it in my coffee and on hot cereal and it was also very good. 

The container in use here is the largest size, 3.52lbs. I decided not  to buy that for my gear and instead purchased two of the smaller, 1.76lb cans. One reason for buying this is the fact it is whole milk powder and most things on grocery store shelves are reduced fat items. If it gets to the point of using this in an emergency, having all the fat available for calories will be a big help. 

Besides the convenience of two smaller cans for dividing gear between packs/users, one drawback to Nido is also the reason for me adding to my gear: it is full fat and that makes it much more heat sensitive and potentially liable to spoil faster. As this is something currently popular in the house, I am confident that with the inspection and rotation schedule in use with my gear, spoilage will not be an issue. 

If you decide to not order from Amazon*, Nido is something that can be found in many different ethnic markets, especially Hispanic and Asian/Filipino stores. By buying locally you prevent Amazon from shipping you dented and almost expired product, which is a common complaint in the online reviews. 

*No joke, every little bit helps keep this site up.

Recap And Takeaway
  • Purchased from my local Asian market: Nestle Nido Fortified Powdered Milk, $13.99. Yes, it will definitely be cheaper from Amazon, but I'm okay with the price difference for the reasons listed above.

* * *

Just a reminder: if you plan on buying anything through Amazon, please consider using our referral link. When you do, a portion of the sale comes back here to help keep this site running!

If you have comments, suggestions or corrections, please post them so we all can learn. And remember, Some Is Always Better Than None!

NOTE: All items tested were purchased by me. No products have been loaned in exchange for a favorable review. Any items sent to me for T&E will be listed as such. Suck it Feds.

Tuesday, February 22, 2022

We Have An AR At Home, Part 5: Assembling the Upper Receiver

Now that the lower receiver has been assembled, it’s time to move on to the upper receiver. If it’s any comfort, there’s much less work involved with this portion of the process.

The star of this article is the upper receiver itself. Depending on the style of upper, it may or may not have provision for a forward assist, and the port door may or may not be installed.

There are two distinct general types of AR upper receiver, the traditional A1 or A2 with the so called “carry handle” (it’s not, but that’s a history lesson for another time) and the flat top with Picatinny rail. For those interested in assembling early A1 style ARs, Retro Black Rifle is the best reference I’ve found.

Forward Assist
If the upper receiver is designed for a forward assist, it’s usually necessary to install the parts. I say "usually" because some uppers are available with small parts fully assembled.

  1. Secure the upper upside-down in a padded vise.
  2. Place the forward assist spring on the forward assist body.
  3. Note the notch or relief in the forward assist body. This goes towards the upper receiver.
  4. Using a proper size roll pin punch, start the roll pin in the forward assist housing.
  5. Insert the forward assist assembly, making sure it is properly oriented, and compress about halfway.
  6. The goal is to make sure the roll pin clears the notch.
  7. Gently tap the roll pin until the forward assist assembly is retained.
  8. Drive the roll pin home until it is flush with the bottom of the forward assist housing.
  9. While looking inside the upper receiver, test the forward assist to make sure it moves freely.

Ejection Port Door
This is another sub-assembly that should be done inside a clear plastic bag. The tiny C-Clip can all too easily go flying, never to be seen again. It’s also a good idea to have a spare or two on hand.

In addition to the port door itself, the parts required are the aforementioned C-Clip, port door spring, and port door axis pin.

While the C-Clip can be affixed to the axis pin once installed on the upper, I find it much easier to do this step first. Based on something I saw in a SOTAR video, I designed and printed a fixture to simplify this process. Remember my post on 3D printers?

If installing the C-Clip manually, I again stress the benefit of a clear plastic bag to retain flying parts.

  1. Secure the port door axis pin in a vise with soft jaws.
  2. Position the open end of the C-Clip against the groove in the port door axis pin.
  3. Using a pair of smooth jaw pliers, compress the C-Clip onto the port door axis pin.

Once this step is accomplished, it’s time to tackle the port door assembly.

  1. Secure the upper receiver in a vise with soft jaws, ejection port facing up.
  2. Insert the port door axis pin from the front of the upper receiver,  with the C-Clip end on your right.
  3. Position the port door in the open position and slide the port door axis pin through until it’s just visible in the central gap of the port door hinge.
  4. Place the port door spring on the port door axis pin with the long leg to the forward end and against the port door.
  5. Using a hemostat or needle nose pliers, grip the short leg of the spring and rotate it around the port door axis pin once clockwise.
  6. Be careful, the spring will attempt to escape!
  7. Continue to hold the small leg of the spring and slide the port door axis pin through the other half of the port door and through the lug on the upper receiver.
  8. The C-Clip should wind up against the front lug.

The core of the upper receiver is now complete. Next we install the  barrel, gas block and tube, muzzle device, and forend. However, that needs to wait until a later post.

In the meantime, good luck and safe shooting.

Saturday, February 19, 2022

Magical Thinking

I've switched jobs again. It seems like every year the company finds another problem that they think I can deal with; the most recent change is due to staff shortages caused by an aging workforce and the various societal issues we're all dealing with. We're not alone; there are “help wanted” signs everywhere, and finding people willing to work is getting harder. My new job is mostly delivering propane to customers, and it has made me aware of just how bad the “magical thinking” has gotten in our world.

Magical thinking is when people choose to be ignorant of how things work, just so long as they work. One former co-worker described it as “You don't have to know how the TV works as long as it turns on when you press the switch”. Unfortunately, our jobs required us to repair the “TV” that he was referring to, so he had a lot to learn.

There is a running joke about “First-world problems”, and I'm sure you've seen a few memes or cartoons that mention the concept: problems that most of the world doesn't have to deal with because they're too busy trying to stay alive and put food on the table. Those of us in the “first-world” have life easy and have the luxury of complaining when non-essential services fail or we are inconvenienced by the lack of what most of the world would consider a luxury. Magical thinking is a big part of those “first-world problems”.

I've run into customers that can't read an analog gauge on their propane tank. We're talking a 1.5 inch diameter dial with an arrow that points from 5-95%, not rocket science. This is in Iowa, where temperatures drop below zero every winter and most rural houses use propane as a source of heat, either as a primary source or as backup heat. Magical thinking tells them that the propane just appears in the tank and the heater just runs when they turn it on, so they don't think about it beyond that.

Magical thinking is:

  • Not caring what happens when you flush the toilet. It just “goes away”... until it doesn't. Then it becomes an emergency for someone else to fix.
  • Not knowing, or caring, where your food/fuel/water comes from.
  • Thinking that you will always be able to buy a replacement for something that wears out of breaks.
  • Thinking that everything works now, so it will always work.
  • Trusting others to make decisions that will have a major impact on your life.

I've fought against magical thinking for most of my life. I'm a curious person; I like to learn new things, and I like to teach others things that are new to them. I've been staff at a couple of military schools, a Cub Scout leader for a decade, a safety and compliance trainer at three companies, and done a bunch of impromptu teaching as the opportunities arise. Knowing how and why things work is part of my being a prepper, because it gives me the insight to see potential problems and look for ways to work around them.

 Unexpected problems are easier to deal with if you can find a way to make things work... but that requires knowing how they're supposed to work in the first place.


Friday, February 18, 2022

Erin Makes Fire?

Not actually Erin.
& is used with permission.

Last week I told you that I wasn't happy with my fire-making skills and that I would make it my mission to learn how to start a fire without cheating and then report back. As a result of this exercise, I learned some very important things, including things about myself:
  1. I seem to be incapable of using a ferro rod correctly. Most of the time the sparks went everywhere except where I wanted them to go, and those that went where I wanted refused to catch, even on dry, powdery tinder. 
  2. That same powdery tinder just would not catch fire. Not with a spark, and not with an ember from a slow match, not even when I applied a flame directly to it!
  3. The carpenter's pencil sharpener produces quality shavings. 
  4. I applied flame to those shavings, and those caught, but burned out quickly and didn't want to catch other shavings on fire. 
  5. Failure makes me cranky and impatient and willing to cheat to win. 
  6. All it took was just a little bit of alcohol gel to catch the other shavings on fire, and they caught the smaller sticks on fire and then it was a proper fire burning larger sticks. 
  7. So I do know how to build a good fire, I just have abysmal luck and/or no skill in getting it started without accelerant.
  8. That tinder powder, while not good at catching a flame or spark, burned really well once the flames were hot enough. Not only did the powder on the bottom (from where I'd started with it) help with the success of the fire, when I put more of it onto the flames it really served to boost their intensity. This is really good information to have.
I'm very disappointed in myself, not just because I thought I was better at this, but mainly because this is something I should have known years ago. As a result, I've been carrying gear that is useless to me. 

Armed with this information, these are the changes I'm going to make:
  • Until I figure out what I'm doing wrong, I'm going to remove the ferro rod and slow match from my BOB and GHB. Without the skill to use them, they're just wasted space and additional weight. The carpenter's pencil sharpener is going in, though. 
  • I'm going to increase the number of things in my packs which produce flame, like matches and lighters. Then, in a survival situation, the first thing I'm going to do is light a candle and work with that steady flame. 
  • I'm going to carry extra accelerant, like hand sanitizer and my Sterno squeeze bottle, to overcome my skill gap in this department for the time being. 
  • I'm also going to investigate several types of fire starters so I can find a sweet spot between price, size & weight, stability, and effectiveness. My goal is to find something which can replace the aforementioned accelerant. 
  • I'm going to add the Smith's Tinder Box to my preps because that powder is almost as good an accelerant as alcohol -- once the fire is going, at least -- and it's easier to acquire and more shelf-stable and pack-friendly than a liquid or gel. 
I will report back on this as I learn more and my skills develop. 

Thursday, February 17, 2022

Buy Now, or Bye-Bye

The dust has settled and the First 72 Hours have passed. Follow along as I build a long term plan via Prudent Prepping. 

I'm looking at my paycheck after getting a raise this year -- the first one in a while, actually -- and listening to the news telling me that, as of right now I can buy less with it than I did last year. I need to think about how to do the best with the money I have, before there's even less.

Inflation
I am not smart enough to explain inflation, its causes or its cures, so I will give you an explanation from the smart source Forbes Magazine. I'm sharing this with everyone because it is clearly written and if there are technical terms, the article takes to time to explain their meanings. As I understand it, inflation is what happens when the number of purchasers is larger than the amount of available goods.

What can be done about inflation? There are several possible answers in the linked article that depend on your personal circumstances. One thing is certain, though: inflation affects poorer people first and hardest. Unless your wages have increased dramatically (mine didn't), 7.5% inflation (that some say is possibly closer to 15%, depending of who you listen to), gas prices up $1.50 per gallon, and grocery store shelves empty of totally random items week to week isn't helping me feel good about the economy. 

Now, saying that doesn't mean I predict the U.S. turning into Venezuela next year. Nor do I recommend hoarding Charmin and Bounty in expectation of there being a black market in toilet paper. What I do suggest, however, is stocking up on your basic food items you buy now.

What Is The Goal?
Acquire three months' worth of food sufficient for three meals a day, if you don't already have that. If you are thinking of buying larger packages, plan out where you can put everything first. 

How much do you need on hand for three months' worth of meals? Start by actually adding up how much of whatever you are using for each meal, and do that for a week. Multiply that by 90, and you now have a solid goal. 

When you do your planning, don't forget to add up potential spices for your meals. Even simple recipes can call for things other than salt and pepper. 

I have space in a closet where my supplies are stored that should have room to keep another month of goods without forcing things. Since my buying plan is based on "What If Something Happens" and not "Suddenly, Venezuela", I'm buying a bit more than normal of the usual items, but without going crazy. Where is this extra money coming from, you ask, since prices are rising faster than wages? I have almost stopped going out for dinner and other entertainment spending. 

As my area has frequent blackouts, all my stored food is canned, with minimal frozen meat. I will be adding some items from companies that specialize in freeze dried food, since their sizes are more economical when figuring prices-per-serving, just not when you see the purchase price. To store the odd-sized stuff, I'm looking to buy two more food-grade 5 gallon pails for rice, since a 25lb bag fills one nicely. This will also work with beans or other bulk grains. 

I'm looking to add this to my stored food in the next 4 weeks:
  • 2 lbs steel-cut oatmeal
  • 2 lbs of powered milk
  • 4 three-packs of Spam. While I'd really like to buy canned bacon, the price per pound is not in my budget.
  • 5 cans of chicken breast.
  • One can of powdered butter. Here is where a prepping company shines: Augason Butter Powder is very good and easy to use. It's not the same as stick butter from the dairy counter, but it works.
  • 25 bs of rice. We use rice a lot, and when stored correctly, it won't go bad. 
  • 5 lbs of pasta
  • 5 lbs of salt
  • 5 lbs of sugar
  • After checking with the Head and Assistant Chef, their list of assorted spices and sauces.
  • Mustard, mayonnaise, hot sauce and whatever else the Chef says is needed.
There's no need to get things through Amazon, especially as the cost to subscribe just went up $40 per year.  The only odd item on my list is the butter powder, which can be ordered from other retailers.

Recap and Takeaway
  • If starting a Three Month shopping list seems hard, there are many places that will have suggested items. My tastes never seem to line up with the list authors, so I've taken to seriously looking at what is used per week and buying from my own list.
  • Nothing was purchased this week, but several things will be bought very soon.
* * *

Just a reminder: if you plan on buying anything through Amazon, please consider using our referral link. When you do, a portion of the sale comes back here to help keep this site running!

If you have comments, suggestions or corrections, please post them so we all can learn. And remember, Some Is Always Better Than None!

NOTE: All items tested were purchased by me. No products have been loaned in exchange for a favorable review. Any items sent to me for T&E will be listed as such. Suck it Feds.

Wednesday, February 16, 2022

We Have An AR At Home, Part 4: Assembling the Lower Receiver

With tools and parts in hand, it’s now time to start putting things together. For those readers who are interested in a deeper dive into everything AR, I highly recommend the SOTAR (School of the American Rifle) YouTube channel.

I’m going to start with assembling the lower receiver, as it's the most involved portion of the process. My first step before doing this is to make sure the Lower Parts Kit (LPK) came with all the parts; I have unfortunately received LPKs with bits missing.

If any small parts are missing, or they go missing during assembly, several manufacturers offer sets of the most commonly lost parts. One such is the appropriately named Ooops Kit from Aero Precision. They also offer their slightly more comprehensive Field Repair Kit.

To help students in my classes with parts identification and organization, I put together the following diagram.

The hammer and trigger pins are identical and interchangeable, as are the takedown and pivot pin detents and springs. The selector switch detent and spring are different and should not be confused with the others.

Once the parts are all present and accounted for, assembly can begin.

Magazine Catch
One of the easiest steps to start with is installing a standard magazine catch. This involves three parts: the magazine catch, button, and spring. Use blue painter's tape to protect the anodizing from scrapes.

  1. From the right side of the lower, insert the spring and button.
  2. Using a punch, hold the button all the way in the receiver and insert the catch from the left side.
  3. Rotate the catch clockwise until the threaded portion starts to bear against the punch or the catch bar gets very close to the receiver.
  4. When properly installed, the end of the threaded part should be just below flush with the face of the button.

Now that the magazine catch is installed, most of the following steps can be completed with the Lower Receiver Vice Block in place. Place the vice block in the magazine well and secure it in a vice with the front of the receiver facing up.

Forward Pivot Pin
Installing the pivot pin has been known to cause considerable profanity, but the method I use has had good results. Placing a large clear plastic bag over the end of the receiver during installation can reduce the chance of lost parts.

The pivot pin spring and detent can launch at high velocity!
 Please wear safety glasses when completing this step!

  1. From the left side of the receiver, slide the Clevis Pin through the pivot pin ears.
  2. Line one of the clevis pin holes up with the pivot pin spring channel and drop in the spring.
  3. Place the detent on top of the spring.
  4. Using a punch or hex key, drive the detent into the channel until it is completely past the clevis pin.
  5. Using the punch as a handle, rotate the clevis pin so it holds the detent in place.
  6. Line up the pivot pin with the end of the clevis pin. Make sure the flat side of the pivot pin end cap is lined up with the spring channel.
  7. Firmly place a finger in the junction between the two pins opposite the force of the spring.
  8. Carefully use the pivot pin to push the clevis pin past the spring channel. 
  9. The detent should snap into the slot in the pivot pin. 
  10. Make sure the pivot pin slides freely back and forth in the receiver, but is held in place at both ends of travel. 

Bolt Hold Open
Installation of this assembly can be a bit stressful, but if taken slowly and with proper care, it will turn out well. Use blue painter's tape to protect the anodizing from scrapes.

  1. Using a proper size roll pin punch, start the roll pin in the forward bolt hold open lug on the receiver and drive it in just enough to hold.
  2. Put the bolt catch buffer and spring together, and insert them into the relief cut in the receiver.
  3. Place the bolt hold open over the buffer with the grooved pad towards the top of the receiver. 
  4. Use another punch, or a short section of drill rod, to keep the bolt hold open lined up.
  5. Using a proper size roll pin punch, gently tap the roll pin the rest of the way through until it is flush on both sides.


For the next steps, the vice block should be repositioned in the vice so the lower has its top facing up.

Fire Control Group

Trigger Assembly

  1. Place the smaller of the two-legged coil springs on the sides of the trigger, with the loop under the front of the trigger bar.
  2. If necessary, install the disconnector spring in the rear of the trigger bar. The wider end of the spring goes in first.
  3. Position the disconnector in the trigger bar with the hook facing forward and the holes aligned. 
  4. Use a short section of drill rod, or even part of a toothpick, to keep the disconnector and trigger lined up.
  5. Place the trigger assembly in the receiver, making sure the legs of the trigger spring are flexed forward.
  6. Drive the trigger pin through until it is flush on both sides.
  7. Confirm the trigger returns forward when pulled.

Hammer Assembly

  1. Place the larger of the two-legged coil springs on the sides of the hammer, with the loop to the rear and the coil running over the top.
  2. Place the hammer into the receiver, making sure the legs of the spring are flexed backwards and rest on top of the trigger pin. 
  3. Drive the hammer pin through until it is flush on both sides. 
  4. Carefully cock the hammer and make sure it engages with the trigger bar.
  5. While controlling the hammer with a finger, pull the trigger to release the hammer.

Do not let the hammer drop against the receiver with full force!
It can crack the receiver!

Buffer Tube & Rear Takedown Pin

Buffer Tube
This is the process for installing an adjustable stock receiver extension, also known as a buffer tube. 

  1. Thread the castle nut all the way onto the receiver extension, notched end first.
  2. Followed this with the receiver plate, with the raised portion towards the open end of the extension. 
  3. Start threading the receiver extension into the lower receiver.
  4. Stop before the extension reaches the buffer retainer relief inside the receiver.
  5. Insert the spring and buffer retainer, then screw the extension just enough to catch the edge of the retainer. 
  6. Do not rotate the extension in completely or adjust the castle nut yet. 


Rear Takedown Pin

  1. Insert the rear takedown pin from the right side of the receiver, slotted side to the rear. 
  2. From the back of the receiver, insert the other detent and spring.
  3. Make sure the receiver plate can clear the detent spring, then rotate the extension into place.
  4. Carefully push the receiver plate forward, compressing the spring into the receiver.
  5. While holding the receiver plate, screw the castle nut firmly into place.
  6. Make sure the pivot pin slides freely back and forth in the receiver, but is held in place at both ends of travel. 

For the remaining steps, the receiver can be removed from the Lower Receiver Vice Block. 

Butt Stock
This step is very easy.

  1. Position the butt stock on the receiver until it stops.
  2. Pull the lock lever out until the internal pin clears.
  3. Slide the butt stock the rest of the way onto the buffer tube and release the lock lever.
  4. Check to make sure the butt stock both adjusts and locks smoothly. 
Trigger Guard
The AR trigger guard is designed to fold down against the pistol grip so that it may be operated while using mittens or heavy gloves. This means the roll pin needs to go through the rear of the trigger guard.

Never use any force on the trigger guard ears without the trigger guard in place. 
Doing so can break the receiver.

  1. Place the receiver leftside-up on a firm surface.
  2. Position the trigger guard in the receiver with the pass through hole at the rear and the front spring pin locked into the front of the trigger guard opening.
  3. Using a properly sized roll pin punch, start the pin into the trigger guard.
  4. Confirm everything is lined up, then gently tap the roll pin the rest of the way through until it is flush on both sides.

Safety and Pistol Grip

  1. With the receiver still leftside-up, maneuver the safety lever over the trigger bar until it sits flush.
  2. Turn the receiver upside down and place the detent point-first into the hole below the safety lever.
  3. Make sure the safety lever stays in either the safe or fire position.
  4. Place the safety spring into the hole in the top of the pistol grip.
  5. Guide the spring against the detent while positioning the grip onto the receiver.
  6. Install the lock washer on the grip screw, then place the screw on the proper driver bit. 
  7. While holding the grip in place, lower the receiver onto the grip screw and fasten it snugly, but not too tight. 


At this point, the lower receiver is complete and can be set aside while we put together the rest of our rifle.

Stay tuned for more adventures in AR assembly!

Sunday, February 13, 2022

Fire Making Tools

Not actually Erin.
& is used with permission.

The post I wanted to publish on Friday couldn't be finished for a variety of reasons, some of them technical and some of them logistical, and hopefully I will have those issues sorted out by next Friday. 

However, in the course of trying to overcome some of those issues I realized that I wasn't happy with my ability to build fires. Specifically, I can't seem to start them without cheating, and by cheating I mean using accelerants like Sterno or alcohol or lighter fluid. As as been said before, "In a life or death situation you'd better cheat to win," so I don't mind having those tools at my disposal, but this bothers me enough that I've decided to prioritize learning how to build a fire using just a flame or a spark.

Of course, knowing myself as I do I acknowledge that I will likely screw up more than a few times, and so I will need lots of tinder and kindling before I get this to work. To that end, I acquired some things from Amazon which ought to be useful in this pursuit, and if they aren't, I'll tell you about that too. 

Keep in mind that I'm going to making small wood stove fires, not big campfires, so my fuel needs will be smaller than what you see listed below. 

The first thing I'm going to need is tinder, and quite a lot of it. Since I'm starting from scratch I figure I might as well try to teach myself how to build a fire using a spark or ember instead of open flame, so my tinder needs to be plentiful and super fine. To that end I bought a Smith's Tinder Box to use with some dry, almost-crumbly wood. I've read the reviews and I know opinions of it are mixed; I bought it mainly as a novelty, but if it works then so much the better. 

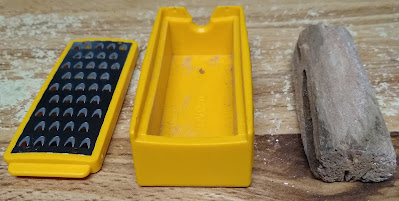
Its use is fairly simple: you run some wood over the blades like cheese over a grater, and the tinder catches in the box. I think the hole in the box is so that you can dump the tinder out without removing the grater, but I'm not certain. 

The grating was quick and easy, although I don't know how much of that is due to the dryness and crumbliness of the wood, and how much is due to the Smith's tool. What I can tell you is that at least half the gratings didn't make it into the box, so I just grated into a bowl. 


The picture looks deceptively small. That's a soup bowl, and there's a fair amount of what is basically dust in there, all for just a few minutes' work.

In theory you ought to be able to store tinder in the box, but I don't trust it to do that. Instead I just shaved down that stick until it fit into the box. That way I have it handy and can always make more without the risk of making a mess. 


For kindling, I bought a carpenter's pencil sharpener. It's made to sharpen those flat, non-rolling pencils that carpenters and contractors use, so it will accept a larger diameter piece of wood and has a beefier blade. Then I took off the inside collar so I could fit larger sticks inside. 


That produced very nice shavings to feed to an ember-based fire to help it grow. 


I also split some finger-thick sticks into thinner pieces, closer to popsicle sticks in shape and thickness, but I didn't feel the need to photograph them. 


I've been talking a lot about using an ember to start a fire, and to do that I plan to use a slow match, which is just a length of cotton rope and a spark wheel. You spark the wheel to create a smoldering ember on the rope, which in theory lasts long enough for you to coax the ember into a fire, and if you don't, you just spark another ember onto it. 

I've handed these slow matches out as gifts to prepper friends, and they all say it's a nifty if old-fashioned bit of kit. I'll let Lokidude explain in detail in this video from last year. 


Oh yes, here's another infographic you may find useful. The trees behind my house are pine ("burns messy, don't use as your exclusive firewood") and maple ("should season at least one year", which of course this scavenged wood hasn't done), which may also explain why I'm having such a hard time starting fires without cheating. 

Found across the internet in various places.


So that's what I did this weekend when I wasn't able to finish my testing for the post I wanted to write. I'll let you know how these tools helped me, or didn't as the case may be, when I try to build a fire next week. 

The Fine Print


This work is licensed under a Creative Commons Attribution- Noncommercial- No Derivative Works 3.0 License.

Creative Commons License


Erin Palette is a participant in the Amazon Services LLC Associates Program, an affiliate advertising program designed to provide a means for sites to earn advertising fees by advertising and linking to amazon.com.