Thursday, March 31, 2016

Proper Storage of Metal Objects (updated)

And by "metal objects" I mean such things as firearms, ammunition, and knives.

What brought the subject to mind was this article I ran across, where a cache of weapons -- firearms, ammo, explosives, and fuses, hidden for German spies and saboteurs behind Soviet lines -- was found in Latvia. Seventy years later and there is no rust and no corrosion; it all looks ready to use.

In their case, the weapons were properly greased up and wrapped, and everything was sealed in airtight containers. (No mention if there was any kind of desiccant included to absorb any moisture.) By keeping the air and wet outside, the inside stayed dry and clean.

So if you store things properly, they can last a long time.

What 'Proper' Storage Means Nowadays
I'd start with a 4" or 6" diameter PVC pipe, and caps. That stuff won't corrode in any reasonable situation you can think of.
  1. Use standard PVC cement on one end and glue a cap on. 
  2. Insert your contents. 
  3. Cement the other cap. 
  4. Bury it. 
You can even use a removable screw-on cap on one end if you wish; it uses an O-ring to seal against the outside, and no saw is needed to open the tube.

Storing Firearms
First you must clean them. After that, you've got choices:
  • For short-term storage, or something you might have to dig up/dig out and use in short order, give them a coat of a good gun oil. 
  • For long-term storage, use grease or cosmoline. Just about any quality grease should do, and bearing grease from a auto-parts store doesn't cost much. 

Then stick it in a plastic bag -- I'd suggest one of the heavier freezer/storage-types -- and squeeze out all the air you can as you seal it. For longer times, or to make absolutely sure that your gun or ammo is protected, we have a very handy item: vacuum food-storage machines and bags. This uses a heavy plastic designed to keep food from losing moisture in the freezer over long periods, and usually holds up very well. Several brands out there use either pre-made plastic bags or a roll of the material for custom sizes: you use the unit to seal one end, put your stuff inside, then vacuum out the air and seal the other end.

If you want to be double-extra sure, grease the firearm up before putting it in the bag, and add some desiccant as well before you vacuum and seal. I've not tried it with a gun or ammo, but I once took a knife blade, gave it a light coat of oil, sealed it in a bag, and buried it in the garden for (as I recall) two months. It came out with not a spot of corrosion.

Storing Ammunition
No grease or oil here! You need plastic bags and desiccant (something to absorb any moisture in the bag). There are lots of commercial products out there that work well, or you can make your own:
  1. Get a piece of drywall (the stuff used in houses). 
  2. Cut a 2" x 3" piece for a gallon-size bag. 
  3. Clean up the edges so it doesn't shed bits. 
  4. Bake it in the oven for a few hours at low heat to completely dry it out. 
  5. Put in bag with ammo and seal. 
There's more information out there you can find, including this Mas Ayoob article at Backwoods Home Magazine. If you can find the physical magazine, the January/February 2009 issue has an article by a man who used PVC to hide a Mini-14, ammo, and parts for fifteen years. It worked nicely.*
Update: Thanks to a reader, said article has been found: Bury a gun and ammo for 15 years

Concealment
If you bury something of this sort, you need some kind of way to make sure you can find it again. That can be a map, GPS coordinates, things like that. Each of these has plus and minus points, and Mas addresses some of them in his article. Keep in mind that if it's easy for you to get to, then it's easy for someone else to find!

Making it harder for someone else to find your cache could be done by putting it in a place that would mess with metal-detection and ground-penetrating radar gear. One or both could really be messed with by simply burying metal in random places; people getting hits all over have to decide where to dig. I'm not really up on GPR systems, but I'm pretty sure that using one to try to find a buried gun is not a 'fly a helicopter over the area and look for hits' thing.

Make sure it's well-hidden, but not so hard to get to that you can't when you need it:
  • It has to actually be hidden, whether inside a structure or buried. 
  • It has to be somewhere that risk of accidental discovery is minimized. 
  • It has to protect the contents from moisture and air. 
  • You actually have to be able to find it again. 
  • You actually have to be able to get it out. 

If you decide to bury a PVC pipe, do so vertically to minimize its signature. Dig a hole so that the PVC's top is top three feet below the surface, and make sure you give yourself plenty of room around the sides as well; as the ground settles, it'll lock the pipe tightly into place, so if you want to remove the whole thing you'll need working space around the hole -- so don't bury it in cramped quarters!

*I read the article once, and I really wish I had it now.

Wednesday, March 30, 2016

Prudent Prepping: Get Stuffed and Dry Too!

The dust has settled and the First 72 Hours have passed. Now we concentrate on what to do in, and how to plan for, the long term via Prudent Prepping.

In preparation for summer trips, I have been cleaning and organizing my camping gear -- most of which has not been used since last century. (Around the time of the Bush 41 for some, a bit before that for the cold weather stuff.) Everything was stored correctly, out of direct sunlight and kept from extreme heat, but even so there were items that need to be replaced due to being old.

One of the first things I checked were the stuff sacks used for my sleeping bag and rain gear, both of which had the drawstring pull out of the top when I tried them. The sack for my sleeping bag was already a bit suspect, since the waterproof vinyl coating was wearing off. A dry sleeping bag is very important to me since I spent two miserable nights in a soggy down bag several years ago!

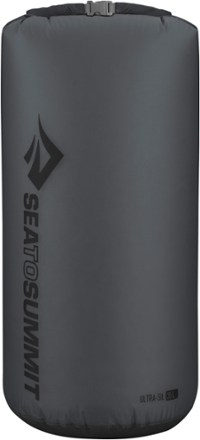
Sea to Summit Ultrasil Dry Sack
The replacement sack for my sleeping bag was purchased at my local REI store, as I wanted to touch the bag and see how it closed. What I bought is this:

Ultrasil Dry Sack details:
    ASST COLORS
  • Siliconized on the outside, tough Cordura® nylon is weatherproof, lightweight and durable for hiking and backpacking in wet conditions
  • Polyurethane coating on the inside permits the fabric to be seam taped; waterproof seams are double-stitched and factory-taped for added weather protection
  • Hypalon® watertight roll-top closure keeps contents secure and protected; fold the Hypalon strip down first and make at least 3 rolls before closing the buckle
  • Roll-top fabric sacks are not intended for complete submersion; sensitive electronic devices should be double-bagged or packed in a waterproof hard case for maximum protection
  • Ultra-Sil sacks are designed for use inside a backpack and are not suitable for boating
This sack holds my sleeping bag easily, and is actually waterproof if loaded correctly and the top folded as directed.

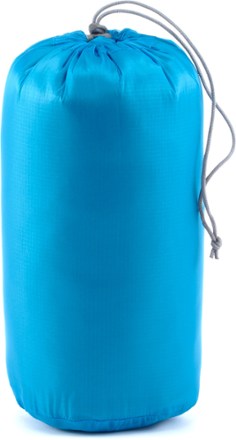
REI Lightweight Stuff SackEGGPLANT
My other stuff sack was also purchased from REI, and isn't waterproof since waterproof gear is going to be stored inside.

From the REI website:
  • Strong nylon fabric is coated to provide excellent water repellency 
  • Drawcord opening cinches to secure contents 
  • Bottom haul handle makes it easy to carry the sack and unstuff your bag 
  • Available in a range of color-coded sizes: 5L, 10L, 15L, 20L
My Gore-Tex rain shell and pants fit nicely into this sack, but not anything that could be damaged from getting damp. This bag is water repellent at best and not to be used for critical items; all of my critical gear will be going into waterproof storage bags like the Sea to Summit dry sack or zip top storage bags for smaller items. I've got another 4-8 weeks to prepare my gear (and myself) for a short 'shake down' trip before a longer trip into the Sierras.

The Takeaway
  • Critical gear needs to be tested before use and protected from damage that can hurt you or the item. 
  • Shop for the correct size bags for the gear to be stored. Slightly too big is better than too small. 

The Recap

Just a reminder: if you plan on buying anything through Amazon, please consider using our referral link. When you do, a portion of the sale comes back here to help keep this site running! 

If you have comments, suggestions or corrections, please post them so we all can learn. And remember, Some Is Always Better Than None!

NOTE: All items tested were purchased by me. No products have been loaned in exchange for a favorable review. Any items sent to me for T&E will be listed as such. Suck it Feds.

Tuesday, March 29, 2016

Environmental Sign

We've already talked about the two better-known types of animal sign, tracks and scat. There are other signs left by animals that can fill in blank spaces in the story you're seeing. Antlers and claws leave scrapes and rubs on trees. Some canine and feline species bury their waste, leaving visibly disturbed soil. A sharp eye can catch tufts of hair and broken twigs as animals move through brush. All of these signs help determine the size and type of animal, and the direction and speed it was moving.

Rubs and Scrapes

Animals with antlers have to rub them on trees after they grow in to remove the "velvet," a fuzzy covering that supplies blood and nutrients to the antlers while they grow. Once they're done growing, this needs removed. A rub is a rather visible bare spot in the bark on one side of a tree. Deer usually rub between 4 and 6 feet above the ground. Elk and moose rub from 6 to 8 feet and possibly higher.

A textbook deer rub.

Just like a domestic cat uses a scratching post (or your furniture), many wild carnivores will scratch at trees, leaving clear marks. These can be anywhere from ground level to above 8 feet in the case of a large bear.

Disturbed earth

Many animals bury their waste to mask their presence. This occurs with varying levels of completion, and is usually seen as disturbed leaves, piles of twigs, or mussed soil. Inspection of these areas can reveal the scat and identify the animal.

As animals move around and bed down, they leave some tell-tale signs. Bedding areas of large animals will have bent and broken grasses in a large circle or oval. Slow-moving animals won't likely leave much disturbance as they pass, but areas they travel frequently will begin to look almost like a footpath. These routes are called game trails, and are like animal highways.

As animals move faster (usually either pursuing or being pursued), they take far less care in their movements and leave more sign behind. Broken twigs and small branches along the trail are an obvious sign. A less-obvious but very telling sign is small tufts of hair snagged on those same twigs and branches. Areas that are more disturbed had more animals going through, at a faster pace.

Keep your eyes open and your head moving for your best chance to see these signs. You can learn much about the world around you by simply being observant.

Lokidude

Sunday, March 27, 2016

Gun Blog Variety Podcast #84 - The Alchemist and the Monkeysphere


It's time for another exciting episode of The GunBlog VarietyCast!
  • Erin Palette explains the Monkeysphere and how it affects you and the people around you.
  • She's mocked everyone else in the race, so now Nicki Kenyon tells us what she thinks about Hillary's foreign policy. Can you say "schizophrenic?" I knew you could.
  • Beth Alcazar tells us about some strange goings on around her local Target store and how you can keep yourself a little safer.
  • Still holding down the Tech Tips chair while Barron B is "On Assignment," Silicon Graybeard tells us about all the interesting things we can use those fancy new radios to listen to.
  • And The Alchemist, Colin Goddard gets his chance to get run through the Weer'd Audio Fisk-a-tron. Yeouch!

Thanks for downloading, listening, and subscribing. Please like and share The GunBlog VarietyCast on Facebook, and if you use iTunes, give us a review!

Please consider donating or subscribing at the PayPal link in the show notes. Our podcast runs on your donations.

Listen to the podcast here.
Read the show notes here.

A special thanks both to Firearms Policy Coalition for their support and to our sponsor, Law of Self Defense. Use discount code "Variety" at checkout and get 10% off.

Saturday, March 26, 2016

Ionizing Radiation for Dummies

Not actually Erin.
& is used with permission.
PREVIOUSLY: Hard vs. Soft Radiation for Dummies

Weeks ago, I gave a brief overview of radioactivity and why the ionizing radiation it emits is bad. This week is a more in-depth explanation about how ionizing radiation works and how to protect against it.

What It Is
Put simply, ionizing radiation is anything which is strong enough to knock an electron out of an atom's orbit, thus ionizing that atom.

Why This Is Bad
As Chaplain Tim has explained, atoms prefer to exist in a neutral state where the number of positively charged particles in the nucleus (protons) equals the number of negatively charged particles in the orbit (electrons). When neutral atoms gain or lose electrons, they become ions and possess an electrical charge. Since having a charge is the opposite of having a neutral state, these atoms will seek to balance themselves by forming chemical bonds with other atoms While these chemical reactions are fine in nature, they become a problem when the atoms so affected are the ones inside your body.

Remember that you are made of cells, and your cells are programmed by your DNA, and that your DNA (like everything else) is made of atoms. If parts of your DNA atoms are given an electrical charge, they will bond with other atoms to return to a neutral state, which means that your DNA changes. This is bad on a variety of levels, as it can result in such things as cells growing at an accelerated rate (cancer), or parts of your body not working the way they should (leukemia), or your body attacking itself (autoimmune diseases).

Of course, this very nature is why radiation is often used to kill cancers: if you can precisely aim the radiation at the cancer cells, you can destroy their DNA using the same method that turned the cells cancerous in the first place.

Types and How to Protect Against Them
There are several kinds of ionizing radiation.
  • Alpha Radiation: A helium nucleus (2 protons, 2 neutrons, no electrons) that is emitted from a larger atom as a result of nuclear decay. 
    • Since it lacks electrons it will try to acquire them from other atoms, either by forming bonds or by stripping lone electrons from the highest levels of their shells. 
    • Alpha radiation is stopped by something as simple as a piece of paper or your skin, although it can be very dangerous if inhaled or ingested.
  • Beta Radiation: A lone electron expelled from an atom as a result of nuclear decay. Because it has much smaller mass, it moves faster and penetrates further than alpha radiation. 
    • This electron will try to occupy an empty orbital position within an electron shell, ionizing that atom. 
    • Beta radiation is stopped by aluminum foil or thick clothing.
  • Gamma and X-ray Radiation: Unlike alpha and beta, gamma radiation is an energy wave.* The main difference between the two is that gamma radiation comes from the nucleus of the atom and x-ray radiation comes from the electron cloud. 
    • The energy from these rays will knock electrons from their orbits, which will leave their atoms positively charged. 
    • Both forms of this radiation are stopped by dense materials like iron or lead; the denser the material, the thinner it needs to be.
  • Neutron Radiation: A lone neutron expelled from a nucleus as the result of atomic decay. 
    • This is technically not ionizing radiation because it doesn't affect the electrical charge of an atom it interacts with. Instead, what happens is much nastier: when the free neutron becomes absorbed by another atom's nucleus, it changes that atom's mass, often turning it into a radioactive isotope. 
    • All it takes is two free neutrons to be absorbed by a stable carbon atom to turn it into radioactive carbon-14... and 18.5% of your body is carbon. In other words, neutron radiation can turn your body into a radioactive element. 
    • Neutron radiation is absorbed by concrete, gravel, and water, and the more of it the better. 
  • Delta and Epsilon Radiation: These are secondary and tertiary forms of radiation that are a result of gamma rays or x-rays knocking electrons free. These are relatively insignificant, because if you are shielded against the previous three forms of ionizing radiation, you will also be protected against these. 
https://www.mirion.com/introduction-to-radiation-safety/types-of-ionizing-radiation/

Shielding against x-ray, gamma and neutron radiation isn't an easy fix like with alpha and beta particles. The amount of material needed to reduce a certain intensity of radiation by half is known as the half-value layer, and therefore the greater the intensity the greater the thickness. I did some quick and dirty calculations in my previous blog post and came up with values of 10 feet of water and 12.5 inches concrete or 18 inches packed dirt being sufficient to protect against most such radiation bursts, but I do not guarantee these numbers. If anyone is more inclined to number-crunching, please be my guest; you might find this page to be of use.

What's This About Electron Energy Levels?
This is complex but I'll try to give you the simplified version; perhaps Chaplain Tim will go into more detail later.

Electrons orbit atomic nuclei in in levels (and sublevels, but those are too complex to explain here). These levels form the electron shell (or cloud) around the atoms, and each level has a maximum number of electrons it can accommodate. The larger the atom, the more electrons it has, and these occupy levels starting nearest the nucleus and extend outward. Only the outer level of electrons can be affected by anything, as the outermost level protects the others.

An electron level that is at full capacity is stable and non-reactive; the noble gases are non-reactive because their upper levels are complete. However, a level that is incomplete is always looking to complete it, either by capturing other electrons (often through ionic bonding with other atoms, such as how hydrogen bonds with two oxygen atoms) or by giving up single electrons that exist in the highest level. In the latter case, once the lone electron disappears, that energy level essentially 'disappears' and the atom now has a stable electron shell.


Footnote
* Technically, both gamma and x-rays are high-energy photons, and because of the double-slit experiment photons are simultaneously particles AND waves. This is known as wave-particle duality, No, I don't know how this is; like much of quantum physics, it simply is and you either accept it or you go mad.

In fact, it's now theorized  that all subatomic particles are waves to some extent. Electrons definitely have some characteristics of particles and some of waves, and at least one researcher believes that atoms are waves -- essentially, waves of matter.

TL;DR quantum mechanics is confusing. It's not truly important whether or not ionizing radiation is a particle or a wave, as it's bad for you regardless.


NEXT: Preventing Radiation Sickness for Dummies

Thursday, March 24, 2016

Chemistry for Preppers: Soil pH

Spring is finally here (at least according to the calendar), the time of year when some of us start to pull out the plans we made over the winter and start working on our gardens. Seeds should have been ordered months ago -- although there are still plenty of high-priced packets in the stores -- so it's now time to start playing in the dirt.

Since I don't live where you do, I can't tell you what or how you should grow in your garden, but there are some basics that apply. Soil pH is one of those basics and is chemistry-related, so I'm going to blend a gardening/farming post into a chemistry post. I'll even try to keep the math to a minimum.

What Is pH?
It is a number that represents whether something is acidic, neutral, or basic. Technically, that number is the negative logarithm (base 10) of the concentration of H+ ions present in a solution measured in moles per liter.

To break that down, if you measured how many moles (explained a few weeks ago) of H+ ions were present in a liter of a solution, you'd get a number. That number is commonly expressed in “scientific form” as a small number times ten raised to some power, like 1.8 x 10^6 which is a short way to write 1,800,000. Logarithms were used before the invention of calculators and computers to make working with large numbers easier and quicker. Multiplying two numbers is the same as adding their logarithms; dividing two numbers is the same as subtracting their logarithms.

You can find log tables in old math books, but the concept is similar to the “scientific form” of expression: every number can be expressed as a power of ten (1 = 10^0, 10 = 10^1, 100 = 10^2, 1000 = 10^3 and so on). For numbers between 1 and 10, the exponent (the number that ten is being raised to) is going to be a fraction of one. Lets go back to that example of 1,800,000 and find the logarithm for it.
1,800,000 = 1.8 x 10^6
Since there is a multiplication sign in there, we can find the logarithms for the two parts and add them together. The log of 10^6 is simply 6, and by looking on a table I see that the log of 1.8 is 0.255. Add the two together and we get 6.255 as the logarithm.

When dealing with pH, the number of moles of H+ ions per liter of solution is going to be a lot smaller -- generally between 1 and 10 mol/l. The pH scale is the inverse log of that concentration, so we need to flip the fraction upside down. Say we have pure water, which will have some free H+ and OH- ions floating around in it. They balance each other out at about 1.38mol/l H+. The log of 1.38 = 0.14, which is about 1/7, so the inverse log is 7/1, which is how we get the “neutral” pH of 7.0 for pure water.

Acids will have a lot more H+ ions present, so the inverse log will be smaller; alkalies will have fewer H+ ions and have a larger inverse log.

How pH Affects Plants
As plants grow, they take nutrients out of the soil. This can change the pH of the soil enough to hinder the growth of future plants. Fertilizer, especially manures that are too “green”*, can swing the soil pH enough to slow or stop plant growth. The dreaded “acid rain” that we were all warned about in the 70s and 80s can affect topsoil over time, as can ashes from forest fires carried on the wind. Trying to plant a garden in a new spot, or on soil that has been moved, can be a challenge if you don't make sure the soil is ready for planting. All of these, and more, are reasons to check the pH of your soil.

Plants generally prefer a slightly acidic soil. According to the Old Farmer's Almanac and various other sources, a pH of 6.0 to 7.0 works best for most crops. If you need to fine-tune soil for a specific crop, the optimum pH range for several common plants are found on this site, but I'll list a few of the common ones.
  • Corn: pH  6.0-7.0
  • Beans: pH   6.0-7.0
  • Potatoes: pH   5.8-6.5
  • Tomatoes: pH   5.5-7.0
  • Onions: pH   6.2-6.8
  • Garlic: pH   5.0-6.0
  • Carrots: pH   5.0-6.0
  • Cucumbers: pH   5.0-6.0
  • Cabbage: pH   5.6-6.6
How Do I Check Soil pH?
There are several types of electronic soil testers on the market, and they all work about the same. If you have access to one, they make testing a lot quicker. If you don't have one, then we need to find another way to check pH.
How Do I Adjust Soil pH?
Common lime (crushed gravel or limestone) is used to raise the pH of soil.

Powdered sulfur was once the preferred method of lowering the pH of soil, but with various government entities trying to keep all of the dangerous things away from us, sulfur is getting harder to find. (I work with agricultural chemicals, and our insurance companies are really getting anxious for us to stop selling it, due to the fire hazard and liability if someone uses it to make a bomb). Aluminum sulfate seems to be the most common, current choice for lowering the pH; organic matter will break down and cause a lowering of pH as the acid-forming bacteria digest it, but it takes a long time.

Nothing is going to change the pH of your soil overnight. Adding lime or sulfur should be done at least two or three weeks before planting, since it is going to take some time for the microbes in the soil and the chemical reactions within the components of the soil to make use of it, so till it in and wait. Aluminum sulfate does work quicker, taking days instead of weeks, but the effects may not last (the pH may trend upwards) as the growing season progresses.


I hope I didn't make too many eyes glaze over with the explanation of pH and logarithms. Logarithms and how to use them may come in handy if you find your self in a situation where you have reference books, but the batteries on your phone/calculator/computer have died. We sent men to the moon using slide-rules, which are physical logarithm tables for doing multiplication, division, and some geometry functions. Old tech is still good tech to know.


* Manure has to be aged for at least a year to break down properly and provide nutrients. More on that in a separate post.

Wednesday, March 23, 2016

Prudent Prepping: Get Covered and Stay Sharp

The dust has settled and the First 72 Hours have passed. Now we concentrate on what to do in, and how to plan for, the long term via Prudent Prepping.

This is not a Buffet Post, but it does have two completely different items reviewed.

I have a big head. No, not an exaggerated opinion of my self-worth, but a physically big head; luckilym not San Francisco Giants Manager Bruce Bochy (size 8 1/8!!!) large, but close. I have to try hats on, which makes ordering hats online a non-starter for me, as returning items over and over is not my favorite way to find products. As I've said before, it doesn't matter if it is an addition to my preps, clothes, or something I have not purchased before, I like to see, feel and try on things before spending my money.

I am blessed to have many fantastic places to shop for outdoor equipment within 30 miles of my house: several REI and The North Face Outlet, which is close to one of my weekly stops for my job. I went to both places looking for a summer hat -- not anything water repellent or insulated, but wide-brimmed and, if possible, UV blocking. I found what I needed at REI.

REI Sahara Outback
From the REI website:
  • UPF 50+ protection 
  • When not needed, the cape can stow inside the crown of the hat* 
  • Eyelets in the crown help dissipate excess heat 
  • Polyester headband wicks sweat 
  • Foam in the brim keeps the hat afloat if it gets dropped in water 
  • Adjustable chin strap

*The hat has been improved in that the neck cape is now stored in a pocket on the back portion of the brim.

I have found the size Large/XL fits me well, and the chin strap keeps the hat on my head in windy conditions.

The other addition to my gear is something I lost a while ago and have now replaced via Amazon.

Gerber Diamond Knife Sharpener
As Lokidude has mentioned here and elsewhere, keeping knives and other things sharp is very important. Not only will the job get done faster, there will be less energy spent, meaning you will not be tired and running the risk of being sloppy and having an accident.

From the Amazon entry:
http://amzn.to/1UM0Ywv
  • Rugged and reliable design in all our products
  • Can be used in various military, hunting, survival, tactical, industrial and outdoor situations
  • All products are field tested
  • Triple diamond plated design
  • Sharpens serrated and fine edge blades
  • Fish hook sharpener
  • Limited lifetime warranty
The Gerber Diamond Sharpener is "Great for putting a quick edge on your fishing hook or blade in the field". This is intended to keep a blade sharp or dress a blade, and not put a good edge on a dull tool.

Not shown in this picture is the flat portion of the extendable diamond rod, and just barely visible is the groove for putting a point back on fish hooks. I think this tool will only be used on my flat or non-serrated blades, since the curved profile does not fit into either Spyderco or Kershaw serrations.

The Takeaway
  • A good fitting, sun blocking summer hat with a neck drape. Everything I wanted!
  • A pencil size sharpening tool that is going into my camping gear, with the second one in my GHB.

The Recap
  • Sahara Outback Cape Hat: $34.50 from REI.
  • Gerber Diamond Sharpener: $8.52 from Amazon.

Just a reminder: if you plan on buying anything through Amazon, please consider using our referral link. When you do, a portion of the sale comes back here to help keep this site running! 

If you have comments, suggestions or corrections, please post them so we all can learn. And remember, Some Is Always Better Than None!

NOTE: All items tested were purchased by me. No products have been loaned in exchange for a favorable review. Any items sent to me for T&E will be listed as such. Suck it Feds.

Tuesday, March 22, 2016

Tracking, part 2: Scat

Does a bear crap in the woods? Well yes, actually, and so do a whole lot of other animals. As a hunter, I use droppings to find game; as a hiker, scat can tell you if the animal crossing your path is a bear or a bunny.

Scat
Scat is any digestive leavings from an animal. In most cases, that's feces. It also includes "pellets" coughed up by certain birds of prey; these pellets contain all the parts of a meal that the bird couldn't digest.

Before you get too involved in investigating scat, be aware that animal waste can contain bacteria, parasites, or viruses. Some of these diseases, such as hantavirus, can even be transmitted by merely breathing air contaminated by waste. Latex gloves are called for in any feces handling, and a surgical-style mask is not out of line in confined areas such as caves and outbuildings.

The form that scat takes depends on the diet of the animal. Animals that eat a lot of plant matter (rabbits, deer, etc.) tend to have droppings that are small and spherical or oblong, and range from the size of small raisins to roughly half an inch in diameter. Animals that consume lots of protein have longer, corded droppings; if you have a dog or a cat, then you have a perfect example of carnivore waste.

Deer pellets (from icwdm.org)
Bear scat. Note the size. (icwdm.org)

Birds and lizards have very similar leavings, and those are different from any other animals. They have a tendency to be smooth and ropy, and are frequently entirely white, or have a white portion on one end. As with tracks, larger droppings or larger piles of droppings indicate a larger animal.

In many species, bird stools are loose to the point of being runny. Think about how pigeon droppings look on your windshield in the morning, and you get an idea of the consistency of some of these leavings.

An owl pellet. (tvja.org)
Next week, we'll look at the other signs animals leave behind and what they can tell us.

Lokidude

Sunday, March 20, 2016

Gun Blog Variety Podcast #83: Steve McQueen Peels Oranges in Safetyland

Adam, Sean and the gang bring you Episode 83 of The GunBlog VarietyCast!
  • Erin Palette discusses "Safetyland," and why it's not a good place to be.
  • We all know that Nicki Kenyon doesn't think much of Donald Trump. So you'd think she'd like John Kasich a bit more. Not so much, really.
  • Last week Adam and I talked about the Florida woman accidentally shot by her 4-year-old. Now we get a mother's perspective from Beth Reoch Alcazar 
  • He gave us some basics on radio receivers last week. This week Silicon Graybeard is back to name names. What radios should you consider buying?
  • And you know those Aurora shooting victim parents who sued Lucky Gunner and lost? The ones who now owe legal fees for filing a frivolous lawsuit? Weer'd found a video interview of them and it's Audio Fisking Time!
Thanks for downloading, listening, and subscribing. Please like and share The GunBlog VarietyCast on Facebook, and if you use iTunes, give us a review!

Please consider donating or subscribing at the PayPal link in the show notes. Our podcast runs on your donations.

Listen to the podcast here.
Read the show notes here

A special thanks both to Firearms Policy Coalition for their support and to our sponsor, Law of Self Defense. Use discount code "Variety" at checkout and get 10% off.

Friday, March 18, 2016

The Passport Card

Not actually Erin.
& is used with permission.
(I had a headache all afternoon, so I'm taking a break from my Radiation series to give you this quick-but-relevant post.)

The Passport Card, much like the Mora knife, is one of those things which isn't actually a secret but is so little known outside of certain circles that it might as well be.

What Is It?
It's a photo ID the same size as your driver's license. It's issued by the federal government, meaning that (like a passport book) it's identification that must be recognized as valid by state and local governments. And because it's a passport, it allows you re-entry to the country -- although it has limitations compared to the passport book.


Differences
Unlike the passport book, which is good for all forms of entry into the US, the passport card (hereafter called passcard) is valid only for entering the United States from Canada, Mexico, the Caribbean and Bermuda at land border crossings or sea ports-of-entry. It is not valid for international travel by air.

These limitations do come with some benefits, though. The passcard is much less expensive than a passport ($55 vs. $135 for adults), costs less to renew ($30 vs. $110 for adults), and lasts for the same amount of time as a passport (10 years).

And unlike the booklet, the passcard is waterproof!

Why Carry One If It's Limited?
I will admit that if you're in the middle of the country -- say, Nebraska -- its utility is limited. If you live near one of the borders (Canadian or Mexican) then it makes a lot more sense. For someone like me, who lives in Gulf state and who could (if she had the money) book a cruise to the Caribbean, it's ideal. I specifically got mine in case I needed to leave the state in an emergency, and the only way out was via boat.

But there are other good reasons for carrying it outside of border crossings. As I said earlier, it's federal identification, meaning that if some bureaucratic drone requires a photo ID that isn't a driver's license, this will work. It's also absolute proof of American citizenship, which in a true SHTF scenario might be a necessity to be evacuated or receive medical care.

As a point of interest, the passcard has RFID technology inside of it. To prevent unauthorized personnel from accessing that information, keep it in a signal-blocking sleeve when it is not being used. Fortunately, it comes with a blocking sleeve, and I keep mine inside an RFID-blocking wallet.


How Do I Get One?
You apply for one just like a passport booklet, online or at the post office. If you've ever gotten a regular passport, you know how to get a passcard. In fact, if you get both, there's a discount: getting them separately would cost $190, but when applied for simultaneously it only costs $165. 

Think Of It Like Cheap Insurance
For $55 (plus the cost of having your photograph taken and whatever processing fees may apply), you get a Federal ID that lasts for a decade and allows you to re-enter the country along its most common border. You can keep it in your wallet, so you'll likely always have it with you. And because it's made of plastic, it's a lot more durable than a paper booklet. 

Get one. They're great. 

Thursday, March 17, 2016

Chemistry for Preppers: Make Your Own Bleach

While trying to find solidly prepper-oriented uses for having some knowledge of chemistry, I started thinking about priorities. This blog talks a lot about water and how to make it potable (fit to drink), so I started researching Sodium Hypochlorite (NaOCl, aka bleach).

I covered how to use bleach to disinfect water last year, and mentioned that one of the main problems with bleach is its relatively short shelf life. Store-bought bleach will decompose into mostly salt water in about 18 months of sitting on a shelf, so what would it take to replace it if TSHTF and there was none at the store?

Well, with a 12V DC power supply (car battery, solar panel, etc.), some table salt, and a little knowledge, you can make your own bleach.

Here's how it works
  • When you dissolve NaCl in water, the ions separate into Na+ and Cl-.
  • When you pass electricity through a solution of salt water it electrolyzes some of the water into Hydrogen gas (H2) and Hydroxide ions (OH-).
  • Electrolysis also causes some of the Cl- ions to gain electrons and form Chlorine gas (Cl2) which reacts with the Hydroxide ions to form hypochlorous acid (HClO).
  • These various parts recombine at the electrodes, forming Hydrogen gas (H2) at the anode and Sodium Hypochlorite (NaOCl) at the cathode..

The chemistry is fairly simple
  • At the anode: 2 H2O + 2 e- → H2 + 2 OH-
  • At the cathode: 2 Cl- → Cl2 + 2 e-
  • In the solution, the hydroxide ions (OH-) combine with the Cl2 gas to form HClO: 2 OH- + Cl2 → 2 HClO
  • When the Na+ ions still floating around in suspension knock the Hydrogen off it finally produces the bleach we want: 2 HClO + 2 Na- → H2 + 2 NaClO

What kind of equipment do you need? 
I've already mentioned a source of electricity (12V DC seems to be the most commonly used voltage in the texts I've read), but you'll also need the following:
  • 2 electrodes. The carbon rods from the insides of dead flashlight batteries will work, as will metal wire or rods. Be aware that metal will corrode rapidly in an electrified salt solution and may need to be cleaned or replaced often.
  • A container to hold the salt water, preferably something that is not metal. 12V DC isn't going to zap you, but shorting out a car battery can cause it to explode.
  • Some wire to connect the battery to the electrodes, I'd put a switch on one of the wires for safety
  • Some way to vent the H2 gas away from the anode. Hydrogen is very flammable, even at low concentrations, and should be treated with care.

Setting the system up
  1. Fill your container about 2/3 full of warm water.
  2. Add salt to the water until no more dissolves.
  3. Insert the electrodes into the salt solution.
  4. Connect the power supply to the electrodes.
  5. Turn on the power.
  6. Wait about 20 minutes and the process should be done.
The bleach produced by this method will be much more dilute than store-bought bleach -- about 0.5% instead of 5-8% -- so just use more of it to account for the dilution. Instead of 4 to 8 drops of commercial bleach (0.3 to 0.5 mL), you'll need to use 10-15 times as much, which works out to 3.0 to 7.5 mL. (A teaspoon holds 5 mL and that's about mid-range, so you can put away the eye-dropper and use a spoon.) Remember that you are looking for residual chlorine in the treated water after at least 20 minutes, and your nose will tell if it's there (see this link to my post from last year for details).

Another Option
If you have followed the chemistry but don't care to try to set up your own system, there is a group that makes a portable bleach generator. Theirs is a pass-through design and they suggest cycling the solution through at least 5 times to get the best results. They produce these for use in third-world countries, but will send you one (if they have them available -- most of them go overseas) for a $100 donation. This is on my wish list of things to get and try out, once I get the time and money to play with things.

Wednesday, March 16, 2016

Prudent Prepping: Pad of Comfort

The dust has settled and the First 72 Hours have passed. Now we concentrate on what to do in, and how to plan for, the long term via Prudent Prepping.

Last week I mentioned the new gear that I added to my supplies. The featured item was a new sleeping pad purchased at REI, and I said hadn't the time to try it out.

Well, this week I had the time.

Cirrus Air Pad
As mentioned in the post, the Cirrus Air Pad is a replacement for an old Thermarest. I'm familiar with self-inflating pads, and while this is a bit different, it's not by much.

Size and weight are listed in last week's post, so I am not going to go over them here.

Inflating the Pad
Per the instructions:
  1. Open the fill port
  2. Place your hand over the opening
  3. Pump up the pad using a CPR- like motion. 
There is an embedded video here which demonstrates the process, but since there are several down-rated reviews on this pad, I thought I'd try it myself:


The total time from unrolling to inflated to a pretty firm level was just over two minutes. To me, this is not excessive time, nor does it require excessive effort to fill this pad. You do have to exert some effort, raising your hands off the fill port to get the air into the pad, but as shown, the process is simple.

I will have to test this overnight to see how comfortable it really is, but after lying on it for 20 minutes, I think that sleeping on it will be very comfortable. There is a little bit of an air mattress feel and sound as I move around on it, but one thing the pad has over my old one is the row of separate 'pillows' at each edge (I think I will have a difficult time rolling off at night!) I will definitely need a separate pillow for neck support, but those used to a flat surface might find it acceptable.

Deflation is extremely simple:
  1. Open the deflation port to release the air
  2. Fold up
  3. Roll slowly to force the air out 
  4. Replace the deflation plug to keep everything tightly rolled. 
Most of the air rushed out after I opened the port (seen on lower right corner of the pad in the picture below), so repacking the pad was as easy as rolling up a sleeping bag, if not faster.


The Takeaway
  • Shop your usual places for sales, closeouts and discontinued items. As long as you know and trust the source, on-line is great! 
  • I should have replaced my pad before now, but finances prevented it. 
  • The Cirrus Air Pad is fast to inflate, deflate and store. 
Recap
  • Cirrus Air Pad from REI: originally $139, but $71.20 after all the markdowns!

Just a reminder: if you plan on buying anything through Amazon, please consider using our referral link. When you do, a portion of the sale comes back here to help keep this site running! 

If you have comments, suggestions or corrections, please post them so we all can learn. And remember, Some Is Always Better Than None!

NOTE: All items tested were purchased by me. No products have been loaned in exchange for a favorable review. Any items sent to me for T&E will be listed as such. Suck it Feds.

Tuesday, March 15, 2016

Tracking, part 1: Animal Tracks

We're teaching my Boy Scouts about animal tracks and signs this week, and I realized I've never talked about that here. Since there's so much to talk about how to track and the critical elements of it, I've broken it into multiple parts.

This week, we're going to talk about what tracking is, and what kind of tracks to look for and what they mean.

What It Is
Tracking is a very underrated skill among folks who don't hunt. The obvious use of tracking is following game that you'd like to turn into tasty meat; the less-obvious, but probably more useful employment of this skill, is being able to determine what animals are in the area that may want to turn you into tasty meat. Whether you use your skills as a predator or to avoid becoming prey, the same basic elements apply.

At its core, tracking is the art and discipline of identifying and interpreting signs left behind by animals as they go about their regular routines.The most commonly thought of sign is a footprint, but other common signs such as scat or disturbed or damaged environmental bits. All of these parts combine to tell the story of what went where, and when.

What to Look For
Animal signs fit into three main categories: tracks or prints; scat; and disturbed environment. Signs are unique to various types of animals, and when taken as a whole, they will tell a great deal about the fauna around you.

The particular signs, and animals you find, will depend on the area you're in, and a  good guidebook will give a comprehensive breakdown of the types of signs a particular animal leaves. My favorite guides are James Halfpenny's Scats and Tracks series. Scats and Tracks of the Desert Southwest happens to be the one that applies to my home are and favorite vacation spots, but there are guides for the whole country.

While a guide will give you great detail about the animals in your area, there are some universal constants in tracking that apply to the entire country.

Tracks
In general, a deeper track comes from a heavier animal.

A new track will have sharp, clean edges and more defined details. As a track ages, edges crumble and details wash out. After just a couple days, the detail can be almost entirely gone.

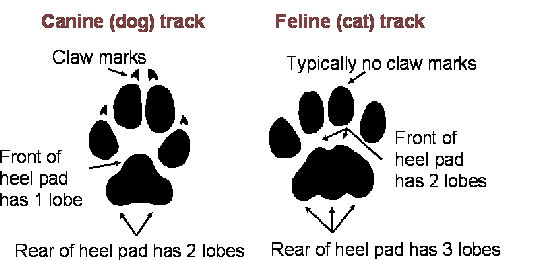
Different animal genera and species will make distinctly different tracks. For example, cat and dog tracks are very similar, but the differences between them are easily seen.

Picture from Michigan DNR.

Deer and other wild herbivores have a split hoof. As with predators, a larger, deeper track means a larger animal. Herbivores are generally harmless, but if they feel threatened, they can be even more dangerous than a predatory animal: for instance, a fully grown moose weighs upwards of 1200 pounds, with massive antlers and sharp hooves. Such an animal rampaging through camp would be like having a car drive through it.

Image from wildawareutah.org

Tracks can also tell how fast an animal was moving. A slower-moving animal leaves tracks that have even, vertical sides; faster movement leaves a track with sloping edges as the foot rolls out of the track.  Faster movement also means that tracks are spaced further apart. 
http://wildfound.weebly.com/tracking/basics-of-tracking-part-2-reading-prints
For more information about animal tracks, including lots of examples and photographs, check out The Basics of Tracking part 2: Reading Prints on WildFound.

Next week, we'll shoot the poop as we talk about scat.

Lokidude

Monday, March 14, 2016

Gun Blog Variety Podcast #82


It's another great episode of the GunBlog VarietyCast!
  • Erin Palette asks you an important question. Do you have a Vacation State of Mind?
  • We had Reaganomics. But what about Trumpanomics? Nicki Kenyon tells us what Trump's economic policy means for America's Foreign Policy.
  • What's it like to be a mom with a gun? Beth Reoch Alcazar tells us what it's like for her.
  • Sitting in for a few weeks while Barron B is "On Assignment," Silicon Graybeard gets us started on that wonderful, underappreciated world of ham radios.
  • And Weer'd finds a video of the leader of Oregon Ceasefire, Penny Okamoto, hectoring the Portland PD Gang Unit about gun control. You know what that means. It's time for another Patented Weer'd Audio Fisk!™
Thanks for downloading, listening, and subscribing. Please like and share The GunBlog VarietyCast on Facebook, and if you use iTunes, give us a review!

Please consider donating or subscribing at the PayPal link in the show notes. Our podcast runs on your donations.

Listen to the podcast here.
Read the show notes here.

A special thanks both to Firearms Policy Coalition for their support and to our sponsor, Law of Self Defense. Use discount code "Variety" at checkout and get 10% off.

Friday, March 11, 2016

Sharpen Your Splitter

Much like with a knife, keeping your axe, hatchet, maul, or other splitting tools sharp makes working with them far more efficient and much safer. A dull axe won't bite well into wood and can bounce off, causing serious injuries to the user or people in the area. Thankfully, splitting tools are about the easiest blades in the world to sharpen: the edge is less delicate than a knife, and their large, beefy dimensions let you use virtually any method you like to hone them. In fact, they're the one blade where a file is considered a proper method of honing.

To me, the tool of choice for sharpening an axe is a simple mill file. I like an 8 or 10 inch file for general work, as it's large enough to get work done quickly, but small enough to be controllable and not get out of hand.

(There is an astounding range of files available, with a variety of shapes and cutting surface patterns. A discussion of files would be at least an article in itself, but Wikipedia gives a great overview.)

With very few exceptions, files only work while being pushed. Pulling a file may damage both your file and the material you're working on. 


The edge of my tomahawk is pretty hammered. It leads a hard life and sees quite a bit of use. It's in obvious need of some help, especially with camping season in the very near future.

How to Sharpen Your Axe/Tomahawk/Etc.
  1. If you have a vise, clamp the head of your axe in it, blade up. This will help you match the original bevel of the edge. If not, you can lay the blade on a workbench or your leg, but be careful.
  2. Push your file parallel to the existing bevel on your blade, maintaining light, even pressure. 
    • The main focus while sharpening your axe is to maintain the bevel angle, being sure to avoid rolling the file over the edge as you push. 
    • On an axe, this is fairly easy. On smaller blades, it is far more difficult, which is why files are not usually recommended for honing those.
  3. After just a few strokes with the file, a clean, sharp edge should begin to appear.
  4. At this point, any damage to your edge becomes very visible, and it is easy to see where you need to focus. 
  5. After any nicks or dings are repaired, there isn't much visual change, and you'll have to depend on feel for sharpness.
  6. Once the file has given me a decent edge, I run a whetstone over both sides of the blade to polish it down just a touch further. 
    • Again, pay close attention to the bevel as you run your stone, and don't roll over the edge. 
    • As with the file, light, even pressure is what gets the job done. 
    • You can lay the stone on a flat surface and use it just like you would with a knife, but I prefer to pick it up and run it just like I do the file, as I can see and maintain the bevel more easily that way.
  7. Once your blade is sharp to your liking, rub the head with a little oil on a rag like you would any other cutting tool, then store it somewhere safe and dry.

Care for your tools, and they'll care for you for a lifetime.
Lokidude

Thursday, March 10, 2016

Chemistry for Preppers: a DIY Battery

Most of you have seen the grade school science project where a kid pushes a couple of coins into a potato or lemon and measures the voltage produced. The potato/lemon is acting as the electrolyte in a simple voltaic cell: the electricity is coming from the interaction of the metals (Cu in a penny, Ni in a nickel) in the coins. Modern coins aren't made of the same metals as they once were, so you'll need to find a penny dated before 1982 if you want 95% copper instead of copper-coated zinc.

Electrode Potential
The voltages produced are calculated using the electrode potential* for the reaction that takes place at both the anode (-) and cathode (+). The reaction at each electrode is called a “half-reaction” because it doesn't occur by itself; there has to be a complimentary reaction at the other electrode to produce electricity. Half-reaction equations are completely reversible, but you have to reverse the sign on the voltage if you run it backwards. Ignore the temperature, pressure, and concentration specifications since they are mainly for use in a lab; what we're looking for is the math to figure out how much voltage an improvised cell will produce. That will allow us to work out how many cells we'll need to string together (in series) to produce the voltage we desire.

A Copper/Zinc Cell
I chose this type as an example because I am testing a very simple DIY battery for charging a cell phone or radio. Zn has a lower (more negative) potential, so it will oxidize before the Cu will. That means the Zn will lose electrons (oxidize) and become the negative post (anode) of our cell.

At the anode, the half-reaction is Zn → Zn2+ + 2e- with a potential of +0.763 Volts.
(reverse the voltage since we reversed the reaction shown in the table)

And at the cathode, the half-reaction is Cu2+ + 2e- → Cu with a potential of +0.337 Volts.

0.763 + 0.337 = 1.10 Volts per cell

For my DIY cell I'm taking a short piece (~3 inches long) of ½ inch copper pipe for my anode, sealing one end to make it water-tight and filling it with a weak acid (electrolyte). I chose ½ inch pipe because it is still found in a lot of houses and can be purchased at any home improvement store. Around here, a 10' stick (enough for ~40 cells) costs about $8.00. That's $0.20 per cell. The cathode is a zinc-plated roofing nail stuck through a cork or stopper that is inserted into the piece of copper pipe. So far I have produced about 1.0 Volts, so I know I'll need to tie 5 or 6 of them together in series (a battery) to get the voltage I need for a USB connector (5 VDC). I'm trying to find a small enough load for it so I will be able to measure the milliamps produced and get an idea of how long it will last in use before needing to be refreshed. Once I know the amperage, it's just a matter of linking several batteries together (in parallel) to get a useful amount of electricity out of it. It will look like something cobbled together, but I'm less interested in how it looks than how well it works.


As I get more data and time to play with this idea, I will post updates. I already have several ideas for how to improve the output, but I want to get a basic cell working before I go off on tangents. There may even be pictures if I remember to take them while I'm playing with things.


* Electrode potential is also an indicator of how “active” an element (usually a metal) is. The more negative the potential, the easier it is for that material to oxidize. Placing two metals with large differences in electrode potential in contact with each other will cause the one with the more negative potential to corrode. This is why steel bolts are such a pain to take out of aluminum engine blocks.

The Fine Print


This work is licensed under a Creative Commons Attribution- Noncommercial- No Derivative Works 3.0 License.

Creative Commons License


Erin Palette is a participant in the Amazon Services LLC Associates Program, an affiliate advertising program designed to provide a means for sites to earn advertising fees by advertising and linking to amazon.com.