Showing posts with label Firehand. Show all posts

Wednesday, October 2, 2024

Saving Sourdough Starter Long-Term

Let's say you've got a good sourdough starter going, but circumstances arise where you won't be able to use it for quite a while. It has to be fed regularly, or it will die. Or let's say you want to send some to someone, and shipping a container of working starter isn't really an option.

The solution is to dry your starter. 

This started as a "Will this work?" experiment, and it does. I spread some starter out on a plate and left it on the table. A couple of times a day I'd stir it around as it dried, and after a few days I had a lot of little chunks of dried starter. I put some in a baggie, squeezed out most of the air, and left it on the table for several months.

To determine if the starter was still alive, I put some of those bits into a bowl, added half a cup of unbleached flour, stirred in enough warm water to make a very soft dough, put on a loose-fitting lid, and set it out of the way. By the second day it was bubbling, showing that the yeasts had come out of hibernation and were growing, and it worked normally for baking. Success!

The next method I tried was easier. I spread out some of the starter on a sheet of no-stick aluminum foil, then set that in a safe place while it dried. By spreading it thin it can dry faster, and when dry you can flex the foil and it will flake off, giving thin, light pieces that can be crushed up easily or stored as-is.

At this time I haven't tried vacuum-packing it, which is next to on my list of things to try, but it should work nicely.

Tuesday, September 13, 2022

"It's just a scratch. Why the big deal about cleaning it?"

Because not cleaning it might lead to a real problem, up to and including death.

This is a tale about cellulitis infection. It's caused by common bacteria that are harmless unless they can get into your body, and all it takes for that to happen is a little scratch or scrape. It's a personal tale.

Last summer, the evening after a day trying to get some mowing and cleanup done between rain, my left foot was a bit sore. No big deal, I thought, I probably banged it on something earlier. That was a Tuesday. The next day it was a bit swollen and a tiny bit more sore.
By Thursday, it was a bit more of each, but no big deal. Come Friday evening, it was noticeably more swollen and definitely had more soreness. I promised myself that if it wasn't better by Monday, to the doctor I would go.

Saturday morning, I knew I had a real problem when I woke up in the driveway, wondering why I was face-down and bleeding. I'm not sure how long it took to get my mind to the proper line of thought, which was "I need help, and that means a phone." I finally made my way back into the house, where I kind of collapsed on the desk. Eventually I remembered why I was there, and called my daughter.

How serious was it? When she first got there she thought for a moment that I might be dead. I passed out again while she was calling 911, and again while the ambulance guys were working on me. 

This was my first ambulance ride, and I'd rather not repeat it. There were no red lights or sirens, but I'll tell you this: if you have a bloody head injury and they've called ahead that you've gone unconscious twice since they arrived, you practically fly into a treatment room.

Happily, various antibiotics will kill this infection. They had me on an IV full of them for two days, then sent me home with a prescription for the oral versions. 

Which brings me to this year. Last month I had pruned some holly and everything seemed fine, but when I got up in the middle of the night to go to the bathroom a few weeks ago, my hand was sore. Yes, I'd gotten a few scratches on that hand, but right after I finished pruning I'd washed and put some New Skin on them. As it turns out, I probably should have done that when the scratches happened.

That morning my hand was more sore, and it had a swollen patch on the back. I went to work about 9 am; by 10 am, it was more swollen and painful, so I called the doctor's office to see if could get in. No joy; it was the Friday before Labor Day, and most people were already gone. By 11 am I told my coworker "I need to head to the emergency room." He wondered why I waited this long, so off I went. 

When the doctor came into the exam room I told him about last year,. He took one look at the hand and said "I think that's what this is," so once again I wound up in a treatment room with an IV of serious antibiotics running. I think part of their motivation involved me suddenly getting woozy and having trouble speaking properly -- again, like what happened last year. This time it was caught early enough, or maybe the hand/arm is easier to treat; in any case, after about an hour of the antibiotics I felt much better, and shortly after that they sent me home. 

In a survival situation, this same illness would have been bad at best, and at worst could easily turn fatal. Take care of those scratches and dings as soon as possible with soap and antiseptics. 

Wednesday, November 18, 2020

The Ice Storm Aftermath

As you probably heard, a large part of Oklahoma (and a couple of other states) had an ice storm two weeks ago, which led to all kinds of fun with limbs/trees breaking and power lines down. Here are some things that stood out for me:

Heat
Unless you have some kind of heater that doesn’t need a blower, no power means no heat. Several years ago I bought an indoor-safe kerosene heater; after assembling, fueling, testing, then draining and prepping it it’s been in storage ever since. If it’s seriously cold outside it won’t make the whole house toasty, but it will take the edge off, and if you can close off other rooms it’ll keep two to three (depending on size) of them a lot more comfortable. Mine is similar to this model

Two notes on the heater: 
  1. Use only K1 kerosene; it burns cleaner and has less smell to it.
  2. There is a fuel stabilizer available for kerosene that both prevents it from picking up moisture in storage, and kills even more of the scent. It worked pretty well here.

Light
Being a fan of flashlights I’ve got several, and I have a nice LED battery-powered lamp (I now have two). I also have two of these Aladdin kerosene lamps. They put out a lot of light and some heat, which is always a good thing in cold weather. They’ll light up a room pretty well, and if you have something shiny to put behind them as a reflector*, you can direct the light better.

You have to watch these, as if you try to turn them up too high too soon you can wind up with the flame touching the mantle** inside and it’ll start smoking and smelling. And you really should fuel them outside. Same notes for lamp fuel as for the heater.

Whether oil lamp or candles, you need either matches or lighters. I have at least half a dozen butane lighters, but I could only find two of the damn things. I need to buy another pack of them, and paint them orange or something. Also, the new ‘green’ version of ‘strike anywhere’ matches suck compared to the old ones.

On battery lights: have spare batteries. Buy good ones, as they have a longer shelf life, and my personal desire is to have more than I think I might need.
* I’ve got a roll of 10” wide, 10 feet long aluminum roof flashing. It’s good for lots of things, and it makes great reflectors. 

 ** The mantle is a chemically-treated gauze cone that sits above the circular wick inside the chimney. It's a good idea to have a spare one, just in case. 

Cooking and Fuel
If you have an electric stove, a propane camping range is really nice to have when the power goes out. I wouldn’t want to try to cook a fancy meal on one (partly because I’m lazy), but it’s handy for heating water, soup and such. Also, make sure you have stuff that’s easy to heat for it: soup, stew (canned or dried), hot chocolate, tea, coffee, things like that.

Make sure you have kerosene and propane before you need it! This was an unseasonable storm, and while I had enough of both fuels to get through, it would’ve been better if the kerosene can had been full and a couple more propane cylinders would’ve been nice.

If you go the kerosene route, check farm & garden stores as you can often get K1 there for a lot less than buying it by the gallon at a store, or buying lamp oil (which is just a somewhat more-purified kerosene). Have a fuel can that’s NOT red, so it’s obvious which one contains what.

Other Thoughts
When you go outside, make damn sure you’re dressed for it and be careful about walking. In this case (other than overpasses and some bridges) the roads and walks never iced, but you don’t want to just stroll out and land on your ass- or head- because your porch did ice up.

Have some cash on hand. A debit or credit card isn’t much use if the network is down.

Finally, know in advance where to get dry ice. I lost the stuff in the refrigerator, but was able to get enough to keep the big stuff in the freezer safe. It wasn’t easy to find, either I knew where to look, but the demand was high.

Friday, August 21, 2020

Custom Hearing Protection

Whether using firearms or operating noisy machinery or (especially if you ride motorcycles) dealing with wind noise, there are times you need hearing protection. Sometimes earmuffs, fancy or plain, may not be the best fit for the conditions, or you may need more than just muffs.

The usual fix for this is earplugs like these, or these, or these.  All of them work; however, the problem some people run into is that they won't stay in place (especially the foam plugs) when you have to talk or move around much, or they just don't fit your ears well.

This brings me to these: do-it-yourself custom earplugs.  They may not be quite as nice as those you can sometimes find being made a gun shows, but they cost a lot less, too.

How they work:
  1. Make sure your ears and hands are clean.
  2. The kit comes with two small tubs, each with a lump of compound in it.
  3.  Take half of each, and knead that together for 30-45 seconds, no more, until the color is even.
  4. Roll it between your palms into a smooth ball with no creases.
  5. Put it into your ear and push it in place. (A mirror helps.) Don't try to shove it all in; it needs to go a little into the ear canal but not too far, and there should be enough, after you push and fold it in and smooth it, to fill the inner bowl of the ear.
  6. Sit down for ten minutes without no chewing, drinking, or talking. 
  7. After a few minutes you'll start hearing popping sounds as the mix starts to cure and harden, which will increase for a couple of minutes, then start dying down.
  8. After ten minutes you should be able to get hold of the top edge and pull/roll it out.  
  9. Set that one aside and do the other ear.  
  10. Let them sit for a few hours to completely cure.

The Good: I really like these because, unlike any other earplug I've used, they don't start working back out after a few minutes. They'll fit under a motorcycle helmet, they're washable, and can be had in several colors (my last set was pink, which is very easy to find if I drop one).  They'll also last a long time; one of my sets is almost two years old.

The not really Bad, but keep in mind: the package shows a Noise Reduction Rating(NRR) of 26, which is the same as a lot of low-profile earmuffs, less than some of the foam-type.  Shooting outside, or around loud equipment or power tools they work well; for an indoor range I'd want them and muffs, especially around rifles and shotguns.

For what they are, I give them a five-star rating.

Thursday, June 4, 2020

Cleaning After Corrosive-Primed Ammunition

Lots and lots of people have bought or are buying ammunition made somewhere in Europe, mostly 7.62x39 and 7.62x54r, sealed in ‘spam cans’. This ammo is generally quite reliable, reasonably accurate, and sealed up in that manner it’ll store for years without problem. If you use some of it, though, you will need to clean your arms properly afterwards. It’s not referred to as ‘corrosive primed’ for nothing, after all.

One detail first: the ammunition itself is not actually corrosive. One of the chemicals used in the priming compound leaves traces of salt behind in the barrel (and the action of a semi-automatic) when it ignites. The salt attracts moisture, and that is what causes the corrosion. Most modern cleaners are not designed to remove that salt, so you can clean, oil, and still get rust in very bad places.

Cleaners
What does clean out this salt? At its simplest, water. People used water to clean black powder muzzleloaders and cartridge firearms for a long time. Fortunately, we now have some things that work better:
  • If you want to buy stuff, any cleaner designed for black powder will work (Thompson Center #14 for instance).
  • Windex makes a window cleaner with vinegar; some people dilute it with three parts water and say it works very well. (I pour straight Windex down the barrel of my Mosin and I've never had a problem with my barrel corroding. -- Editrix)
  • Want to make it yourself? Household ammonia (many people recommend the sudsy variety) mixed with one part ammonia to three parts water. You can dilute it further if the smell is too strong. 
  • You can also mix some vinegar with water (there’s no hard & fast answer to ‘how much’, all I can find is a ‘weak solution’).
My favorite is Ballistol. This stuff was developed in 1904 as a cleaner / lube / protectant for the German army, with one aim specifically being to clean out the residue from corrosive primers. Its use is simple: take a bottle, put in one part Ballistol and add ten parts water, cap, and shake; this gives you a milky-looking cleaner that cuts that fouling beautifully. Use this solution to clean the bore and any parts exposed to the fouling, then dry it and lube with your favorite oil (yes, Ballistol is now a lube as well, but there are better ones now).

How to Clean After Corrosive Ammo

For cleaning a barrel:
  1. Get a patch wet. Not drippy, but wet
  2. Use a cleaning rod and a proper fitting jag and push it through the barrel. 
  3. Let it sit for a few seconds, then repeat. 
  4. Run a dry patch through, then an oily one. 
That’s it. If you want to really scrub it out, after the dry patch run another couple of wet ones through, then dry, then oil.

For cleaning the other parts of a firearm:
Bolt-action and single-shot rifles are easy because the cartridge case keeps the fouling in the bore.
  1. Use a damp patch to wipe off the bolt face, then dry it, then wipe with an oily one. 
  2. Clean the rest of the bolt and action same as you usually do.
  3. If you’re worried about the chamber, take a bronze or brass brush, wrap a damp patch around it, and use it to scrub, then dry and oil.
Semi-auto firearms are a bit more involved because the gas that operates them can carry traces of the primer fouling. Use a damp cloth to wipe the gas tube or piston down, then dry, then oil where appropriate.

And that’s it.

Friday, August 9, 2019

A Lesson on Preparedness from Summer Camp

A story from Army Reserve summer camp, told to me by a guy I know. The camp was in late July, in Kansas. Not exactly a time and place known for “I wish I’d brought a sweater”.

Toward the end a front came through, bringing rain and about twenty degrees cooler temperatures, so that night it was in the 60s instead of 80s, and the next day was 80 instead of 100. This doesn’t sound bad, unless you’re wet and tired, at which time even fairly mild temperatures can become dangerous.

This guy is the cautious sort, so he’d taken some cool/mild cold weather gear along, just in case, so he was able to change into it. Nobody else in the unit had brought that gear. In the morning, people felt downright chilly, and the ones who had gotten wet and decided “Screw it, it’s summer and I’m tired” and went to sleep woke up shivering, because in those conditions wind chill is a thing even in summer.

Worse, that chill can lead to hypothermia.  Here there were medics to take care of them, but for a small group or lone person, in a situation where things are already difficult to bad, it's potentially life-threatening.

So remember: even in summer, depending on where you are or going, having something a bit warmer to change into is a good idea because Murphy is a bastard.

Friday, March 15, 2019

Steel: What Kind and From Where?

Steel isn't hard to find, generally not expensive, and you can do lots of things with it. But what kind do you use, and where do you find it, once you’ve decided on a project for it?

Mild Steel
For a lot of things (basic ironwork, braces, learning the art of forging) you can use mild steel. This is a basic steel, composed of iron and up to 0.2% carbon. It’s used in rebar (the bar with a textured surface used to reinforce concrete), angle iron, steel straps of many sizes, and lots of other things that require the strength of steel but don't need to be flexible or hold a cutting edge. You can get it at a salvage yard, or if you need a particular size (width, thickness, shape) you can call steel companies and see if they have it.

If you want to try to grind or forge cutting tools, keep it simple in the beginning. That means using a steel with at least 0.6% carbon, but not a highly-alloyed type that requires intricate heat treatment. There are two I recommend for this task: 5160 and O1.

Both of these types of steel are oil-hardening steels [which means that the alloy is heated and then quenched in oil], and people have used vegetable oil, commercial heat-treating oil (there are different types for different steels), and 5-weight motor oil. Both types need to be quenched to harden from a critical temperature of 1500º F (which can be reached in a charcoal or coal fire, or in a small fire-brick enclosure using a couple of torches), and can be tempered, depending on intended use, at anywhere from 375-500º F. Neither requires the very high and ‘must be just right’ temperatures of stainless or the highly alloyed steels, and they also temper at lower temperatures, In fact, you can do the tempering in a kitchen oven*.

5160 Steel
5160 steel can be found all over, as it’s used to make leaf and coil springs for car and truck suspensions. It can be found in many sizes as well; hit a salvage yard and you can get it for scrap price, which was around $0.20/lb the last time I bought some (prices will vary). The carbon content for this steel is 0.6% and you can use it for chisels, knives, swords, and springs. It’s really good for bigger knives that will be used for heavy cutting or chopping, but it will work well for a small knife as well.

O1 Steel
O1 is a high-carbon tool steel. It’s best to order/purchase this from an industrial supply so you know exactly what you’re getting; it’s also sold as “oil-hardening drill rod.” It’s not as good for big, heavy cutting blades, but is truly excellent for other knives and chisels.

Generic Medium-Carbon Steel
That’s steel for large projects addressed, but what about for small? Perhaps you need something with which to make a small flat or v-shaped spring intended for light duty?

Take a look around the hardware store, or someplace construction is being done. See that thin steel strap they wrap bundles of brick and such with? That just might work, as might a worn-out hacksaw blade. I’ve known of people making a new magazine spring for a bolt-action rifle using these.

One more source for small medium-carbon stock, good for springs and flint strikers and the like: overhead garage door springs. It's really handy, and you can often get a piece of a broken one for free (or at least cheap) from companies that install and maintain the doors.


*Make sure you clean all the quench oil off first; it smells bad if you don’t.

Tuesday, May 15, 2018

Boresighting

aka "Saving a lot of ammo with a new sight".

Imagine if the scope/red dot/iron sights on a rifle get damaged and have to be replaced. If you're in a nasty situation (like an emergency), you don't want to spend any more ammo than necessary to get that new sight zeroed in. Boresighting is a way to do that.
Note: this only works on a firearm where you can remove the bolt (bolt-action rifles and some semi-auto) or the bolt group (AR-style rifles) to see through the barrel.
  1. Have a spot selected as your aiming point, somewhere from 25 to 50 yards away. I've got a round piece of wood painted bright yellow that I can stick on a fence.
  2. You'll need a solid, stable place and way to set the firearm up. A table or the hood of a car will do, with a couple of sandbags to hold the gun steady.
  3. Clear the weapon of any ammunition, then get it ready. In this case let's say you've got an AR that needs a new scope mounted, so you will need to take the upper receiver group off the lower, remove the bolt carrier group, and then set the upper onto your stable rest.
  4. Look through the bore and line it up with your aiming point in the center. Take your time. Then look through the sight, and adjust it so that it's on the aiming point. Look back through the bore in case anything shifted while you were fiddling with the sight and adjust if necessary. Repeat as necessary.
  5. When you've got them both dead-on, walk away for a couple of minutes to rest your eyes, then check both again. When you're sure both are on, you're ready to put the rifle back together, go to a suitable place and shoot to do final adjustments.

Do it well, and at the least you'll be on the paper and pretty close to zeroed, which means less shooting time and less ammo used in getting the final adjustments made.

Tuesday, February 27, 2018

Into Every Life a Flat Tire Must Fall

Sooner or later, good weather or bad, your vehicle will get a flat. Then you have to get out the jack and lug wrench to change the tire. The latter tool is what this is about.

This is the wrench that came with my truck, which is like the one in most cars and light trucks. It's a little over a foot long, which means that unless you're fairly stout in the arms and shoulders, getting a really tight or rusty lug nut off can damn near give you a rupture. If that happens, find a piece of pipe to slip over it to give you a longer handle and more leverage.


Lots of people pick up a four-way wrench. It's not much longer, but since you can use one arm to push and one to pull, it works better. It also allows you, once the nut is loose, to loosely hold the arm opposite the nut and spin the wrench, removing the nut quickly.


I think this is best for loosening and tightening the nuts. This is a two-foot breaker bar with an end that fits into a 1/2" drive socket. It creates serious leverage that'll make it easier to take the nuts off, and to put them back on tightly when the spare is on. Get an impact socket to fit your lug nuts, put it on, and leave it in the car.


Why an impact socket?  A standard socket has a number of points inside, which bear on the corners of the nut or bolt. An impact socket is different in two ways: 
  1. It's made of steel intended to take the shock of being used in an impact wrench (usually air-powered);
  2. It only has six points, with the "flats" in between actually convex in shape, This means the flats bear on the flats of the nut or bolt, not the points, which means the socket can put a lot more torque on it without having to worry about stripping the corners. That's a very good thing when you're taking off a lug nut that's been in place a long time and may have some rust/dirt/Mystery Universal Adhesive holding it in place.

Ozat is a brand of impact sockets.
Image from http://alltorcusa.com/sockets-backup-wrenches/
Get a breaker bar and an impact socket for your tires. You'll be glad you did. 

Tuesday, December 19, 2017

Don't Ever Do This

I used to do a bit of blacksmithing when I was younger, and my favorite thing to make was blades. Big and small, all shapes. These all had to be sharpened at the end, so I tried a bunch of different ways to do that.

If you've not seen it, there's a show starring a guy named Bear Grylls in which they drop him somewhere and film while he demonstrates various survival techniques. One of the episodes featured this scene, which caused me to use some monumentally bad language and wonder what the hell was wrong with him.


A nice smooth rock all by itself, preferably with a little water poured on, will do a fine job of touching up your knife's edge. The basic idea behind sharpening a blade is simply "Use something hard enough and coarse enough that it will actually wear some metal off the sides of the blade, thus creating a new, sharp edge." That's it. Whether it's a ceramic stick or stone, a fine Arkansas stone, a diamond sharpener, all of it does that. The smoother the abrasive surface, the finer the grit it has and the slower it will remove metal, and the smoother and finer the edge can be made.

Do you know what happens if you break up another rock and add that grit onto a surface? You get a crapped-up edge from all those nasty, course bits of rock, because they'll stick and catch and roll and prevent the blade from making good contact with the surface. So if you're out somewhere and your blade needs touching up, use a nice, smooth rock often found in or near rivers or creeks (he was right on that part).

And if you put sand or broken rock into the process, the ghost of some ancient blademaker is going to haunt your dumb ass.

Monday, October 2, 2017

Gunsite Lowered Thumb Safety


If that title makes no sense, then you're not familiar with the 1911 pistol made by John Browning (peace be upon him): on the left side of the frame is a manual safety you move to 'off' or 'on' with your thumb.

Full-size 1911A1 with this safety pointed out.
Original picture from IMFDB; arrow added by me. 

It's simple, effective, and - like any other such - has a lot of variations out there, usually involving making the shelf which your thumb presses on longer, or wider, or both. However, there is another version in which the shelf is located lower on the safety, and that's what we're looking at here.

Original (from my gun) on the left, Gunsite low mount on the right.

 As you can see, that's a large of difference in the shelf location.

Why make a lowered safety? Some people have small hands, and a lower position makes the safety easier to manipulate. In my case, it's arthritis; sometimes my thumb doesn't want to go high enough to push the safety to 'off'. On the range, that's a nuisance; in a self-defense situation, it could be bad.

I'd read about these lowered safeties, so I dug around and found two companies that make them, Wilson Combat and Gunsite, in both stainless and blued steel versions. I decided to go with the Gunsite model because the thumb shelf appears to be located lower than the Wilson model. There were warnings in the reviews that the stainless tends to have a somewhat rough finish, so I was prepared for that.

Also, be aware that a new safety may require some fitting to your pistol, and fitting a safety is one of those "If you do not fully understand what you're doing, and how to do it, DON'T DO IT, take it to a gunsmith" things because  there will probably be some polishing needed on the piece that blocks the hammer and sear (shown below) to make it perform as it should.


I'm not going into how to do that; there are some very good instructions on the subject available online if you're interesting in changing the safety on yours.  Some new safeties will actually drop-in and work perfectly, but don't count on it.

I polished the outside with some 220-grit wet-dry paper to clean up the surface. The frame on this pistol has a bead-blasted finish*, and next chance I have I'll blast this to match.  Here it is installed:


I put it through the standard function checks (adding a lot of "slap it, bang it, try to make it fail") and it passed. A couple of days later, I was able to put a box of ammo through the pistol. The safety worked perfectly, and is a lot easier for me to use than the standard issue.

We'll see how it holds up in the long term, but right now I have to say it was worth the price and work, and is something you might consider for your sidearm.


*Literally blasting the surface with glass beads

Tuesday, September 19, 2017

Firearm Records

You should have a record of pretty much anything with a serial number, but for now I'll concentrate specifically firearms.

I know of several cases in which firearms were stolen in a burglary (one involved a personal friend - in his case, guns from his father and grandfather) and there were no descriptions or recorded serial numbers, which meant about zero chance of ever getting those guns back. This happens a lot, so don't let it happen to you.

Make records, and make copies. In these days of digital cameras and flash drives and writable CD/DVDs, there’s no reason not to use them. My suggestions on firearms:
  1. Make a list of important information for each firearm such as brand, model, serial number, other identifying marks or numbers, etc.
  2. Take a picture of each firearm. If there are identifying/proof features on both sides, take one of each side.
  3. Label each picture as to what it is. Either put the serial number in the picture name, or keep the list together with the pictures. Preferably both.
  4. Make a hard copy of the list to keep with the other media, just in case something happens to the electronic copies. Paper and ink are cheap. 
  5. Make at least two copies: one to keep with you, preferably in a fire-resistant storage box or safe, and one in a secure off-site location (with relatives, safety deposit box, whatever).
Flash drives or other re-writable media are great; you can update them at any time. Paper records will have to be printed again when things change; again, paper and ink are cheap.

Don’t store your only record on your computer! In fact, you shouldn't leave any copy on the computer; once you copy anything on it to the storage media, securely wipe the files on the PC (laptop, tablet, whatever), just to be safe in case of viruses.

These records are good for more than just theft; if there's a fire, or flood, or a small SMOD, you'll need to be able to show the insurance people just what you have. These directions will also work on other things, like your computer or TV or power tools. But if, for some reason, you don't have an inventory of everything, at least make one of your firearms.

Monday, June 19, 2017

Oddball Cartridges and How to Make Them (Sometimes)

This post is brought  to you by a friend having bought an old German single-shot rifle chambered for 8.15x46R: 8.15 millimeter bore and a 46 mm long, rimmed, case.

https://commons.wikimedia.org/wiki/File%3AMunit07.jpg


No, I'd never heard of it either.

So now my friend has this lovely old boomstick with no ammo to be found for it. The saving grace of this is that it's a cartridge that can be made by taking a cartridge case that's close enough, and using the sizing die from a loading set to form it to the right shape,,, or at least close enough (which I'll explain later).

Making .300 Blackout from .223/5.56
First, I'm going to use a much more simple example.

1) Take a .223 case and trim it.


2)
Lube it.
3) Run it into the sizing die.
4) Trim to final length.

(Read this post for a more step-by-step description of the process.)

Family photo:

L-R: .223/5.56 cartridge, trimmed cartridge, resized .300 Blackout cartridge.

For a lot of cartridges, this (sometimes with a little variation) is all it takes... but then you get to something like that oddball 8.15mm. 

Making  8.15x46R from .30-30 Winchester
Fortunately, the recommended case to start with (.30-30 Win) is an easy one to find. But we'll have to do several things to it to make it fit:

1) Cut it to approximate length (a little too long is better than short).

2) Remove any burrs from the new case mouth.

3) Lube the case, both the entire outside and the inside of the case neck.

4) Run it into the sizing/depriming die.


It comes out looking like the picture on the right. ->

That's the easy part, and often the only part. Some cases will need to be trimmed to final length (if they're a bit long) and deburred. After that, they're ready to load. Then, the first time you fire it, the heat and pressure will fire-form the brass to the chamber, and -- since it's a single-shot rifle -- you'll probably never need to resize it again. 

But not here, oh no. Because there was a lot of variation in these rifles, sometimes it needs more steps. 

5) The rim of the case was a little too large in diameter, so it needed to be cut down a bit. In this case. I took a coarse file and, holding it steady, dragged the rim down it while rotating the case to take off a few thousandths. 

6) Try it until it's right. In this case, it reduced the diameter from the standard .506" to .486".

7) At this point we discovered that the rim was a bit too thick for his rifle. To thin it, we used a piece of 220-grit wet-dry sandpaper on a thick piece of glass. Use plenty of water on the paper, work the base in a figure 8 pattern, then turn it in your grip a bit and repeat. (Yes, it's a slow process.) The original thickness was .063"; now it's .040" and the action closes on it snugly.

Yes, it's a lot of work for just one cartridge. We're going to find a small lathe to use, which should make trimming the diameter and thickness of the rim a lot faster. He'll never have a lot of cases, but they should last a long time.


That's the basic course in forming brass for a new use. In some cases, the actual forming is far more involved since the difference between the original case and the thing you're after is drastic enough that the forming has to be done in steps. 

For some old black-powder cartridges, there are companies that make, say, a '.45-caliber basic' case; it's long enough and large enough in diameter that with the correct dies you can form it to a number of different cases. And with most of these being for single-shot rifles, take care of these cartridges and they'll last many firings, so it can indeed be worth it.

Tuesday, June 13, 2017

Managing Shotgun Recoil

Lots of people have a shotgun for their home-defense gun, and there's reasons for that: a shotgun loaded with buckshot can deliver the kind of energy you get from a magnum rifle in a short, fairly light package.

A shotgun is also fairly versatile. You can load one with light birdshot (often referred to as field loads) and take rabbits and birds; heavier steel shot ammo is legal and effective for waterfowl; and (especially if your scattergun has sights) you can load with slugs that can kill any animal in the Americas (and most anything else for that matter) and easily reach out to a hundred yards or more. All of these things could be important in a real bug-out or long-term situation.

The most common shotgun people think of for home defense or hunting is the 12 gauge.

Good Points:
  • Power, as noted above.
  • Ammo of various types is available almost anywhere, with shell lengths from 2 3/4" to 3 1/2".
  • Ammunition versatility, as noted above. 

The Tradeoffs:
  • A 12-gauge shotgun loaded with buckshot or slugs has serious recoil, and that's with standard ammo; the magnum stuff can be brutal.
  • It does not have the same range as a rifle, no matter how well some slugs work.
  • Like a rifle, some loads will pose serious overpenetration hazards for home defense.

For most people, the better choice for a home-defense shotgun would be 20 gauge: it's not as powerful, and there aren't as many choices in ammo, but it has less recoil and anyone hit with a 20-gauge load of buckshot won't care that it's not as powerful as a 12. 

But say you want to go with 12 gauge, perhaps because of versatility and power reasons, or maybe that's all you've got. There are three ways to tame the recoil a bit with buckshot or slugs.

1) Put a really good recoil pad on it

Such as something like this.They're made to fit particular stocks, so you need to find the one that matches your gun, remove the original pad, and screw this one on. 


They also make slip-on pads that will fit almost anything.  A good pad makes a real difference.

2) Add weight to the gun
This can be the old method of drilling a deep hole under the buttplate and filling it with lead shot, or it can be a factory-made recoil reducer which are generally some type of sealed metal capsule full of something heavy, like mercury, that has to be mounted in the stock (sound familiar?).

There are also stocks specifically made to help absorb recoil (read a review of the Knoxx system here). They're not cheap, and they only fit specific shotguns, but they work.

3) Ammo choice
Several companies make low-recoil or reduced-recoil ammunition. These either use fewer buckshot pellets, or use the standard number loaded to a lower velocity. For instance, Winchester Super X 00 buckshot in a 2 3/4" shell uses the standard 9 pellets and has a velocity of 1325 feet per second; the Ranger low recoil in the same size has a velocity of 1145; this makes a real difference in recoil. 

Now compare that to their 3" magnum buckshot, which has 15 pellets and a velocity of 1210; less velocity than the standard, but the weight of six more pellets means a real step up in recoil (see 'brutal', above).

Just as with as buckshot, some companies make low- or reduced-recoil slug loads.  Picking Winchester again, their 2 3/4" Super X throws a 1 oz. lead slug at 1600 feet per second; the Ranger low recoil uses the same slug at 1200 fps.  Newton's laws of motion will not be denied, the energy to push that weight to the higher velocity makes one helluva equal and opposite reaction.

There's a lot more we could go into on shotgun ammo, but I think this covers the basics.

Thursday, May 4, 2017

The Everywhere Sharpener

You're out somewhere, your knife is a bit dull from use, and you need to bring the edge back.  But for some reason you don't have any of your usual equipment for this.  What to do, what to do...

Find a coffee cup or mug, and flip it over.


The ring on the bottom that actually contacts the table (the saucer if you're fancy) is not glazed, so the bare ceramic is exposed.  That ceramic is quite abrasive, and you can use that ring to sharpen your blade.

I deliberately dulled this knife to the point it wouldn't cut anything (including paper) cleanly, and it took about a minute of strokes with light pressure on this mug ring to bring it back to a quite usable edge.


Note that it might upset the waitress at a cafe if you start using your coffee cup for this, so keep that in mind.

Friday, March 24, 2017

Using the Fire Brick Forge

A while back, I showed you how to stack some fire brick to make a simple forge, using a propane torch.  I was finally was able to actually set it up for use this week.

There are two types of heads for propane torches:


The one on top gives a 'pencil' flame: thin, focused, very good for some things but not what you want here.  The bottom one gives a much wider flame: uses more fuel, but heats a wider area, and that's what you want.

With the assembly, er, assembled, it looks something like this.


Light the torch, work the head into place (in this case it's pointing a bit down and toward the back), and let things heat up a few minutes. This really ought to be in the shade, but the trees haven't leafed out yet; shade lets you see the inside better.


For instance,  you can see the hot spot formed on the brick opposite the torch.


I stuck a piece of 1/4" diameter round steel in, and by working it back and forth in the hot spot,  I was able to get about 2" of length to a low red heat in a minute or two. This wsa high enough to anneal high-carbon stock, but not really hot enough to forge, so I went to the next step:


Bore a hole in the brick on the off-side, and set in another torch, this one angled up and back. This increases the amount of heat in the chamber, hot enough for light forging, or to harden a small piece like a chisel or punch.


With propane you're limited as to heat, but if you can get hold of an acetylene torch with a large tip, you're really in business. Putting that in place of the left-side torch and leaving the other one out, I was able to get the same size section of rod up to heat much faster. With a larger diameter tip than I currently have, it would've worked better.

http://amzn.to/2n0LmrV

If you can use an oxy-acetylene torch (this is a small one), you're in a whole new class. These use both an oxygen and acetylene bottle, and with with a rosebud tip (think of the 'wide' flame tip on the propane torch, supercharged) you could get real heat going inside the chamber*. Alas, I don't have one.


What I ended up doing was taking this small blade that's previously been forged and ground and worked it in the chamber. It's wider but thinner than the 1/4" stock, 3.5" long, and by working it back and forth in the sweet spot, I had no problem getting it hot enough to harden. This means I could have gotten the stock that it's made from (a broken epee blade) up to forging heat.

That's the basics of using one of these. Depending on the torch(es) you have, you can adjust things for what you need to work on, so don't be afraid to make the chamber narrower or more shallow to suit your needs.


*These are more expensive than a acetylene torch, and you'll have to get both the oxygen and acetylene bottles filled.  They also can be used as a cutting torch and for brazing as well as a general heating tool.

Friday, January 27, 2017

A Small, Simple Forge

So, you need to make a tool and you want to forge it, or maybe just need a way to heat one up to harden it. Is there a simple forge that doesn’t require coal or charcoal, and could use, say, a torch?

Oh yeah.

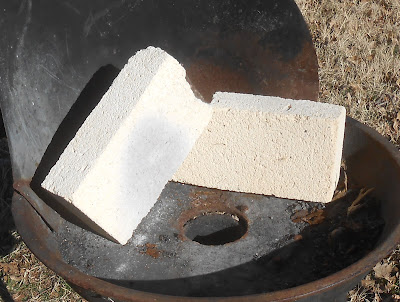
First, you'll need some firebrick.


Why not regular brick? Firebrick is a ceramic material specifically designed to tolerate high temperatures. It’s also relatively soft. You’ll see why that’s an important property in a minute.

You'll need a place to set it that is solid, fireproof (or at least heat-resistant), and big enough to stack these on. I’m using my small forge, because it’s handy.


As a general rule you want to keep the area you’ll be heating small, so it’ll get hot faster and take less fuel to keep it hot. Here I’ve got three bricks on the bottom as a floor, and two on edge for the compartment. (Yes, you could use one, and a couple of regular bricks for the outside positions on the bottom; they’re not going to be subjected to any real heat.)


Now, take the side brick of your choice, figure your angles, and use a large screwdriver to bore a hole in it.


This is why the ‘relatively soft’ is important -- it’s easy to bore a hole in, or even saw, if you have to.

NOTE: I’m told you really don’t want to inhale the dust from boring or sawing, so do this in a suitable place and use a good dust mask, especially if you’re sawing

You want the hole to be angled toward the fire chamber, and should be angled a bit up; that’ll help the heat swirl in the chamber and give you a more evenly-heated chamber. And remember, it needs to be big enough to put your torch tip in, no bigger.

Here you can see it's in on the left, out on the right.


Now stack things up with a brick on top and in the back.


Don’t close the chamber completely; leave a small crack for flow. You’ll want to keep the chamber as small as you can for the piece you’re working on, to make it easier to get to and keep the temperature you need.

Light the torch, ease it into place, and turn it up. Give it a few minutes for the chamber to heat up, and you can start working.

The size of metal you can work is limited by much heat you can put in. If you've got an acetylene torch available, you can use a big tip and get a lot more heat in. I have also seen this done with two torches, one on each side, with one hole angled a bit forward and up, the other a bit forward and down, to help the heat swirl.

The Fine Print


This work is licensed under a Creative Commons Attribution- Noncommercial- No Derivative Works 3.0 License.

Creative Commons License


Erin Palette is a participant in the Amazon Services LLC Associates Program, an affiliate advertising program designed to provide a means for sites to earn advertising fees by advertising and linking to amazon.com.