Friday, April 29, 2022

Is Prepping in the Cards?

I apologize for the lack of content lately. Life has been kicking me from several directions at once, and my free time to write has been one of the casualties. Most of my online activities were the first things cut in order to make time for more important things like sleep and family. I care about my online friends and our readers, but I'd be a poor example if I didn't take care of myself and my family first.

I've been playing around with a set of "survival" cards for a few days. These are thin steel cards with various useful tools punched or cut into them. Amazon has several different sets, so I bought a few to test out. 

Here are my thoughts and observations on these cards in general:
  • They're all made of thin 304 stainless (aka 18-8 stainless), which is a medium-grade steel. This means that the steel will bend and hold its new shape rather than try to spring back. Commonly used to make dinnerware and corrosion-resistant tools, 304 stainless will rust and pit eventually.
  • These are either precision stamped or laser cut, so don't expect sharp edges on any of the knives. The hooks and arrowheads will be sharp enough to do the job, but the knife edges will be flat. 
  • The knives are small and the metal is thin. Best suited for skinning game or cutting up wild fruits, they'll get the job done but it will take longer than a good camp knife. 
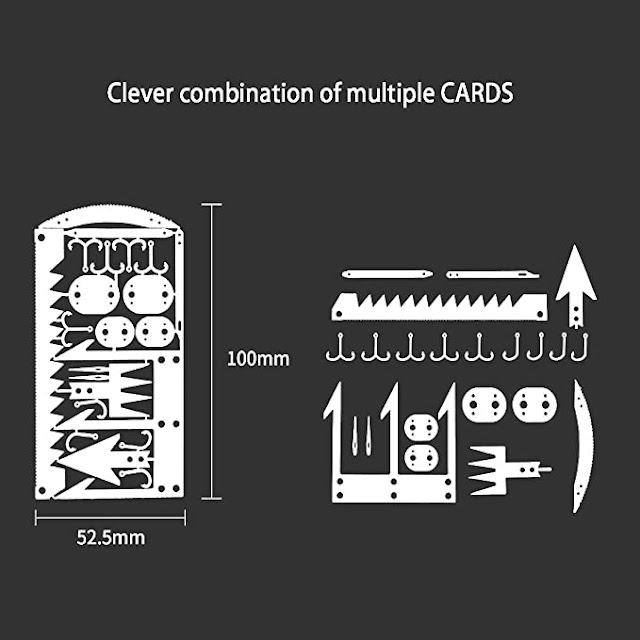
  • In fact, everything is small. Viewed on a normal monitor, most of the pictures below are close to half size. These cards are sized to fit in a pocket or wallet, so they're only about 3 inches wide and 4 inches long.
  • All of the sets have the same problem; how do you store the tools once you've taken them off of the card? Two sets come with a felt "wallet" with a single snap closure, but I don't see how they'd hold the tiny tools through any rough terrain. Finding fish hooks loose in the bottom of a pack is not a good time, and it usually happens in the dark. 304 stainless is only slightly magnetic, and I did find one version that shipped with a flat magnetic card to hold the pieces.

This is a single card with 30 different tools for $14. It's not the cheapest set per piece, but it has a good selection of tools. The saw and knife are more substantial than most of the others, making them easier to work with. This kit came in a gift box with a thin flexible magnetic sheet; toss the carboard box and use the magnet to hold the pieces after you've removed them from the frame.


https://amzn.to/3OKWQxG


Buspoll 22 in 1 Card

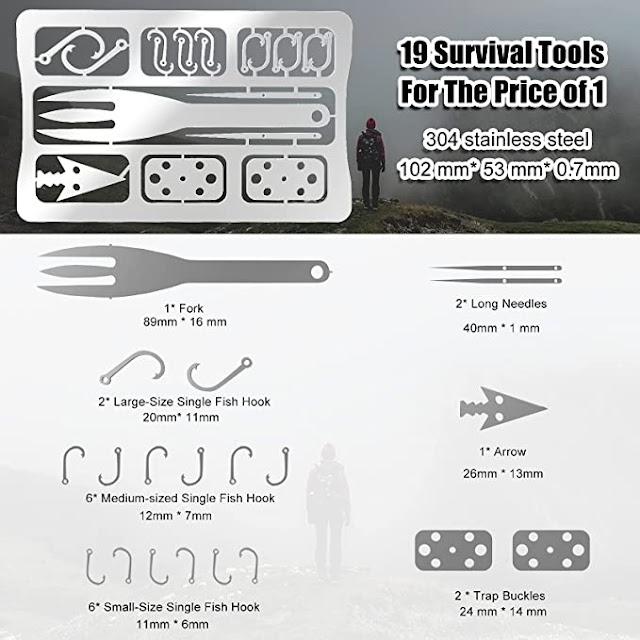
This is a set of three identical cards, perfect for testing with one and storing the other two in a bag or pack. This cost $14 for the set of three cards, so about $4.67 per card. It has basic tools for fishing and trapping, but no knife. What they call a harpoon, we call a "gig"; gigging frogs and snakes for food is similar to fishing, and the tools will work for fish as well. 


https://amzn.to/375d6J2


4 Piece Survival Tool

This has four different cards with a good mix of pieces. The set costs $9.19, and it comes with a cheap felt carrying case. The fork is a nice addition, and the variety of saws is going to require some testing to see how well they work. 

https://amzn.to/3Kts74W


The Big Collection

This set has six different cards, 124 different tools, and a coil of fishing line with a plastic "reel" to store it on. 

With a total of 60 fish hooks, 3 knives, 8 saws, 16 sewing needles, and a bunch of other toys, this set will keep you supplied for longer than the other sets. The cost was $14, the same as some of the smaller sets.


https://amzn.to/3EYcbGM


I may try some of the fish hooks this summer to see how well they hold up; my normal hooks are made of better steel, and I'm afraid these might bend too easily. More testing is always a good thing.

I'd place all of these tools in the "Gilligan's Island" category of preps: there are better alternatives to all of the tools on these cards, but what these offer is better than trying to make your own out of rocks and twigs. 

Tuesday, April 26, 2022

Vacuum Sealers Suck

Unlike the ancient techniques of dehydrating or smoking, vacuum sealing is one of our youngest food preservation techniques. As with many newer technologies, this one came out of the industrial boom of World War II.

Vacuum sealing as we know it was developed by a German citizen named Karl Busch around 1940 for preserving food on a small scale. He didn’t introduce economical industrial vacuum sealers until 1963, beginning a worldwide revolution in food preservation. The Busch Vacuum Solutions Company is still in business today and continues to innovate.

The basic concept of vacuum sealing is simply the removal of air from the Mylar or plastic package that contains the food. This reduces oxidation, and most notably freezer burn, preserving the food for longer periods. In addition, the vacuum sealing process helps prevent spoilage by minimizing the growth of harmful bacteria, fungi and micro-organisms.

The first thing needed is obviously a vacuum sealing machine. We have a model similar to this; when we got ours it was considerably less expensive. However, there are quite a few budget friendly options available.

The Author's Vacuum Sealing Machine and rolls of bags

Most machines come with a small starter roll of sealer bags, but more bags can be purchased as needed

All vacuum sealing machines have certain standard features such as a bag cutter, but some have additional accessories, such as an attachment for sealing different types of containers.

This is the process we follow when vacuum sealing meat, using chicken quarters we bought in a value pack from our local grocery outlet as an example

  1. Stage all the equipment and supplies ready at hand.
  2. Rinse the chicken and pat dry.
  3. Seal one end of the bag and cut to length.
  4. Place the chicken in the bag, pushing it against the bottom seal and avoid getting any juices on the opening.
  5. Place the open end of the bag in the sealing chamber, making sure there are no fold or creases.
  6. Activate the vacuum sealing function.
  7. Check to make sure the bag was properly sealed and there are no leaks.
  8. Label the bag with the contents and date.
  9. Clean any food residue off the machine.

Two chicken quarters sealed and ready for the freezer

Maintenance is generally fairly simple: we wipe it down and disinfect the unit after each use. Our model has a vacuum chamber tray that can be readily removed for easy cleaning.

Many different items besides food can be vacuum sealed using these machines. I know people who have sealed packets of ammunition, emergency clothes, and even matches.

A good vacuum sealing machine and quality bags can provide a valuable resource for preserving and protecting our preps.

Sunday, April 24, 2022

This Is a Post

Not actually Erin.
& is used with permission.
Dear readers, how are you these days?

I must confess that for about the past month I have struggled to stay on target. I wouldn't call it depression, exactly (although I suppose it could be and I just haven't noticed -- I call it "the creeping darkness" for a reason); I've just found myself caught by a one-two combo of not sleeping well and an increasing amount of family drama. This has resulted in me not having as much energy as I used to have and needing to spend a good chunk of that energy on my family, which means that when I finally have the opportunity to write I'm either upset or exhausted. While I am able to push through these feelings when necessary, it is increasingly difficult. Just writing these words has taken more time and more effort than I feel it should. 

There's probably a lesson relevant to prepping there, but I can't find it. Check in with your friends? Practice self care? Change your socks and hydrate? I don't know. Please tell me if you can find it, because right now it's all opaque to me. 

I have recently acquired some Work Sharp tools and it's been my intent for a while now to give you my thoughts on these products, but I just don't have the wherewithal to do that tonight. I apologize for that. 

I do seem to have worked out the kinks with my rucksack and now it's just a matter of making small adjustments until I have it dialed in just the way I want it. When that's done I'm probably going to give some more attention to my Get Home Bag; it feels like it sticks out more than it should. 

It's strange that even though writing seems difficult, I'm able to find the time to tinker with my packs. It probably uses a different part of my brain. 

I was going to write more, but my little dog Daisy came into my room and wanted attention. She's developed a nasty cough lately that the vet can't seem to fix, and it's getting worse. We don't know exactly how old she is (she's a rescue) but we're sure she's at least 10 years old. Given her age and how the cough is getting worse, mom and I are worried that she won't be with us much longer. (This is just part of the family drama I was talking about.)

So in conclusion, as I attempt to make this rambling post vaguely about prepping:
  • Check on your friends to see if they're all right. Maybe you'll be able to see what's troubling them and give them advice. 
  • If you can't be productive one way, be productive another way. At least you'll get something done. 
  • Love your pets. They won't be with you forever, and you'll never regret the time you spent with them.
Sorry, I know this isn't a very good post. I tried my best. 

Tuesday, April 19, 2022

Building an AR PCC

Over the past few months I wrote a series of posts about assembling an AR at home. I hope this helped some of our readers with their projects.

What I did not mention is that I’ve been sourcing parts to build a Colt Model 6450 9mm Carbine replica (the commercial version of the full auto Model 635), and it’s finally done.

Throughout this post are links to some of the 9mm AR PCC (pistol caliber carbine) specific parts. It’s an incomplete list, because I already had some of the parts and certain parts have become difficult or impossible to source in the last couple of years. For example, the proper retro receiver halves are almost unobtanium right now. NoDak Spud was the premier source of retro AR upper and lower receivers, as well as some other specialized parts, and they are no longer in operation.

According to Mike, the former owner of NoDak Spud and current head of the Harrington & Richardson brand, “It will easily take until summer before we have things rolling. So many elements need to come together.”

But enough of that! On to the build details.

The author's Colt 6450 Reproduction

Two of the major considerations for proper operation of a 9mm AR PCC are buffer length and the combined weight of the bolt and buffer. The 6450 is a straight blowback firearm, and the bolt is not locked at the moment of firing; therefore, the weight of the bolt and buffer are of considerable importance. More details can be found on this websiteFurthermore, a 9mm bolt is shorter than a 5.56 bolt carrier group. This means the 9mm buffer and bolt will go further back into the receiver extension in recoil. This can cause two issues:

  1. The front of the fire control pocket is exposed at full recoil, increasing the chance of fouling, debris, or even an empty shell casing winding up in there and interfering with operation.
  2. The bolt has more forward travel, picking up more speed before hitting the bolt hold open, potentially damaging or breaking that part.

There are two options to resolve the buffer length issue: either a buffer with a longer base or a spacer that goes at the rear of the recoil spring. Both will work well to ameliorate this concern, so it’s buyers choice.

For the buffer, I went with a KAK Industries configurable buffer kit. This comes with three sets of weights, allowing the user to configure them for best performance. Me being me, I accidentally ordered the standard length buffer instead of the extended version, so I had to get a spacer for the other end of the recoil spring.

Assembly of the firearm is pretty straight forward. There are only two elements of significant difference from a standard AR.

  1. The magazine well adaptor. There are several different styles. Some are installed through the top of the lower receiver, others through the bottom. The one I bought inserts through the bottom of the magazine well and is held in place by two set screws at the mag well opening and a third screw at the top, making it very secure.

    Being of the Colt style, my mag well takes modified Uzi magazines. Either vintage or new production. Uzi magazines need to be modified by having a magazine catch hole cut in them and the spine of the magazine relieved at the top so the bolt has proper clearance. 
    Uzi magazines altered in this manner will function in an AR style PCC, but they won’t lock the bolt back after the last shot is fired.

  2. The ejection port door assembly. The original Colt style uses a shortened door and a rubber gas deflector. To clarify, it’s not a brass deflector, it’s a gas deflector. As I mentioned, it’s a straight blowback system, and the bolt starts moving at the moment of firing. Excess combustion residue exits the ejection port fairly early in the extraction process and without the gas deflector, could pepper the user in the face.

    Installation of the port door and gas deflector is only slightly different than a standard AR, but may require an extra hand due to the additional parts needing to be wrangled.

Once everything was all together and had passed the mechanical function and safety checks, it was time to test fire my creation, and I’m happy to say it operated flawlessly. Brass ejected consistently and landed in about a three foot circle. After dialing in the sights, accuracy was excellent and it cut one ragged hole in the target with a few flyers that were the fault of the shooter rather than the gun.

50 rounds at 10 yards freehand.
Not too shabby!

While I don’t expect this style of PCC is everyone’s cup of tea, I’m pleased with how it turned out and it’s a welcome addition to my collection. This was a fun project, and a welcome distraction from both personal and global troubles.

Monday, April 18, 2022

Head Lamps and Night Hikes

Not actually Erin.
& is used with permission.
If you are Christian, Jewish, or Muslim, then I wish you happy holidays.


This past week has been very busy for me, so in the spirit of David Blackard I'm going to make a Buffet Post where I talk about some very loosely related topics.
 
I live in a semi-rural area, which means that streetlights are few and far between. This isn't much of a problem, but I do like to take walks through my neighborhood at night to avoid the heat, and that means I need some kind of light so that I can see where I'm going and avoid the nocturnal wildlife (usually deer, although I have seen alligators and black bears in my neighborhood, and now that it's warming up the snakes are coming out). 

My previous headlamp choices were "cheap but functional light made of thin plastic which takes 3 AAA batteries and produces less than 100 lumens" and "1000 lumen headset which is sometimes too bright and uses bulky 18650 lithium batteries." I wanted something in between these two settings, preferably with a red light or filter so that I could maintain peripheral night vision while still being able to see in front of me. 

The EverBrite 350 does all that and more for $18. It also has a green light (which I'm told is good for hunting because it doesn't startle animals like white light does) and four white light settings (high/medium/low/strobe). The battery is a 1500 mAH lithium-ion that recharges via micro USB port. 

The light can't be focused or diffused, which is unfortunate, and for those who want to buy American please be advised that this product is made in China. Its most annoying feature are the blue charge lights which shine right into my eyes when I first turn it on, but that's easily solved by masking them with a strip of electrical tape. 

The EverBrite 350 also comes with a detachable red rear light powered by a button battery (I removed this and attached it to my camping pack) and a rather anemic rescue whistle built into the buckle. 

I like mine and plan to pick up a few more. 

High Sierra 90L Camping Pack
Speaking of nighttime walks, I finished loading my rucksack (mentioned in this post) and put it on. I succeeded in my goal of not loading it up with too much extra stuff, because I was able to pick it up and put it on. The weight felt balanced and manageable, and since everything felt good I decided to make a quick jaunt through the neighborhood while wearing it. 

The pack I have is a High Sierra Long Trail 90L. I don't think it's made any more, which is a shame because I really like mine. Here are its specs, along with some pictures, because someone wanted to know more about it. 


Specs:
  • 90-liter, expedition-sized backpack with extra cargo capacity.
  • Top-load main compartment with gusseted drawstring closure and adjustable top lid.
  • Drop-bottom sleeping bag compartment with divider.
  • ERGO-FIT shoulder harness, constructed with HEX-VENT mesh and foam padding.
  • Dual, contoured aluminum frame bars
  • Molded foam back panel with AIRFLOW channels.
  • Waist belt, with HEX-VENT mesh and high-density foam padding.
  • Side and bottom compression straps.
  • Internal hydration reservoir sleeve and dual exit ports for tube.
  • Front access to the main compartment.
  • Adjustable sternum strap.
  • Webbing daisy chain for attaching other gear.
  • Soft lashing hardware.
  • Mesh pockets hold water bottles.
  • Tuck-away rain cover also protects pack when checked for air travel.
  • Capacity - 5500 cu. in.
  • Weight: 6.91 lbs.
According to Google Maps, I walked about 0.8 miles (1.3 km), and I'm pleased to report that everything felt stable and comfortable, which means I loaded my rucksack properly. My plan is to take increasingly longer walks until I know I can comfortably carry this pack for 2 miles. And after that, who knows?

Wish me luck!

Friday, April 15, 2022

Should You Buy Gold?

With the current set of economic upheavals, we're seeing the “BUY GOLD!” ads, and ads disguised as information, in a lot of the prepper-sphere. There are always a few such ads -- investing in precious metals as a hedge against inflation can be a good strategy -- but whenever the world starts to tilt a bit off-center, the metals merchants ramp up their advertising. Let's go over some basics about precious metals.

Gold is, and has been, a form of money for millennia. As a fairly rare metal that doesn't tarnish or rust, it is easy to store and work with. Being soft and dense for a metal, gold is well suited for ornamental use. For the first half of the existence of the USA, our paper money was backed by gold and was very stable. Other than the small percentage used for making jewelry and artwork, all of the gold that is mined is still in circulation, even if it is sitting in a vault somewhere. Large transfers of gold rarely involve physically moving it; the custodians just change the name on the paperwork that tracks who owns it. Gold is currently (Q1 2022) selling for around $2000/oz on the spot market, making it a very compact way to store fairly large sums of money.

Silver is a slightly different story. Since it is used in several industries, silver actually gets consumed over time. Being the best conductor of electricity we have, some gets used up in the creation of electronic devices. Old-school photography used to use tons of silver in the chemicals used to produce film, to the point that “mining” old x-ray sheets was a profitable way to get silver. Some US coins minted before 1965 (dimes and quarters mostly) were actually made of silver and are now collectible. Well-worn or “circulated” silver coins are called “junk silver”, and bags of them pop up for sale on occasion. Silver prices are floating around $25.00/oz right now, making it more suitable for use in small transactions.

Other rare metals like Platinum and Palladium are a specialty market; they have industrial uses and are not common enough to use as currency. Copper and Nickel have been used as money in the past when they were fairly hard to get, but modern mining techniques have made them too common.

Buying precious metals is your choice, but I can't recommend basing your preps on them. Here are my reasons for being less enthusiastic about gold and silver than the salesmen are:

  • You can't eat gold. Basic preps are water, food, and shelter, and gold is none of these. It may let you purchase the basics, but only if there is a seller that wants gold/silver.
  • Counterfeiting coins has existed for as long as coins has. Ever wonder why dimes and quarters have ridges around their edges? Their purpose is to show if someone has shaved the coins to harvest a bit off of the edges. Foreign coinage and miniature bars may have official markings, but there is a level of trust involved every time they change hands.
  • Gold is compact, which makes it easy to store, but also makes it easier to steal or lose.
  • Gold is too compact for everyday purchases. How are you going to “make change” for a $10 meal if all you have are coins worth $2000 each? Divisible coins like the Spanish dollar, made up of eight “Reales” (the “pieces of eight” of pirate lore) were one solution, but we don't have anything like that in circulation.
  • Governments have outlawed the private possession of gold in the past and can do it again.
  • Being a physical commodity, metals are finite. Unless you have won the lottery, you won't be able to store enough to carry you through a long-term crisis. Preppers need to be able to produce something or provide a service that others are willing to trade for in able to survive long- term.


Personally, I don't store gold or silver, preferring to stockpile things that are of immediate use and easier to trade. Given a time machine, I would like to go back and put more of my retirement savings into gold, but that is nothing more than 20/20 hindsight. None of us know exactly what the future will bring, so we just have to plan and prepare as best we can and figure out ways to get through the surprises that life is going to throw at us.


Tuesday, April 12, 2022

Prepper's Pantry: the Tomato

In a previous article I discussed the apple, so it seems only proper to discuss its unrelated cousin the poisonous love apple, also known as the tomato.

Tomatoes are actually a fruit (specifically a berry) and not a vegetable, although the United States Supreme Court ruled otherwise in 1893 for taxation purposes. Based on culinary usage, tomatoes generally fall under the vegetable umbrella as well: tomatoes are used raw, in soups and stews, as well as in sauces and glazes.

Coming from both Southern Italian and Eastern European ancestry, tomatoes always played a large part in family dishes.

Pot Roast
Tomatoes give the gravy in my mother’s traditional Pot Roast recipe  its familiar reddish brown color, as well as a richness of flavor that wouldn’t be possible otherwise.

The pot roast should be cooked a day or two before eating.


Ingredients

  • Brisket of Beef (½ lb per person)
  • 3 Onions
  • 1 Green or Red Pepper
  • 5 Celery Stalks + Leaves
  • 4 Plum Tomatoes
  • 3 Large Carrots
  • Garlic to taste
Recipe

  1. Brown meat on all sides. If there is not much fat on the meat, put a bit of oil in the pot. Brown covered.
  2. Add cut up veggies and steam until soft, about 3/4 hour. Add salt and pepper.
  3. Add water to cover. Cook covered for about 2 hours.
  4. Remove meat, wrap in foil, and refrigerate.
  5. Remove as much fat from the top of veggies and liquid as possible.
  6. Pour remaining juices and veggies into food processor or blender and process until all veggies are pulverized and gravy is smooth.
  7. Refrigerate.
  8. When ready to eat, put some of gravy into roasting pan, add sliced pot roast and heat in oven being careful not to "evaporate" the gravy in the pan. Heat the remaining gravy in a pot.

While this recipe calls for fresh tomatoes, canned may also be used.

Tomato Sauce
My family's tomato sauce has been handed down from generation to generation since long before they left Italy or Sicily, changing slightly after each handoff. Because of the cooking time requirement, I make a large batch in a 16-quart stock pot. This recipe makes 12-14 quart canning jars of sauce, and can be frozen or hot water canned.

Even more so than with most family recipes, this one is very vague on quantities except for the garlic -- that, you measure that with your heart.


Ingredients

  • Olive oil
  • 2-3 Large yellow onions, diced
  • 2-3 Green peppers, diced
  • Garlic, crushed
  • 3 #10 cans of tomatoes
  • Dried oregano
  • Dried basil
  • Bay leaf
  • Crushed red pepper
  • Tomato paste (if needed)

Recipe

  1. Drizzle a thin layer of olive oil in the bottom of the pot.
  2. Dice the onions and peppers, add them to the pot, and sauté over a medium heat until soft, stirring regularly. About five minutes.
  3. Crush the garlic and stir into the other veggies.
  4. Lower the heat and add the tomatoes.
  5. Cover the top with a layer of oregano and slightly less basil, a handful of crushed red pepper, and a few bay leaves.
  6. Mix thoroughly and let cook for 5 or 6 hours, stirring occasionally.
  7. When near the end of the cook time, check the texture. If it’s too thin, add a small can of tomato paste, stir thoroughly, and cook for another hour or so until the preferred consistency is reached.


Tomatoes can be eaten fresh off the vine, stored in the refrigerator for a week or two, cooked in any number of ways, as well as canned for preservation. Every grocery store has a variety of canned tomatoes available year round that are whole, diced, or crushed. Such a versatile and healthy ingredient deserves a place of pride in every prepper’s pantry.

Remember: Intelligence is knowing that a tomato is a fruit; Wisdom is knowing not to put it in a fruit salad.

Erin says: Salsa is a tomato-based fruit salad, David. 

Sunday, April 10, 2022

Lightening the Load

Not actually Erin.
& is used with permission.
Last year my prepping mission was to lighten and reorganize my Get Home Bag, and I succeeded in that task. My task for this year has been to do the same to my Bug Out Bag, and I while I'm not finished with that, I am definitely making progress. 

As I believe I've said before, my biggest problem when it comes to prepping is that I over-pack. This is the result of the entirely-reasonable-to-my-mind thought process of "Well, if I'm bugging out, then I'm probably never coming home again, which means I'm a refugee, which means it'll be a long time before I have anything stable in my life, so I need to prepare for all sorts of contingencies." Unfortunately, that's how I end up with a BOB which I can't carry, and that doesn't do me any good. 

How does one slim down a BOB? I did it by defining what I needed my bag to do:
  • It had to be something I could not just lift, but wear for an extended time and walk at least a mile while wearing it. 
  • It needed to be able to provide me with shelter, light, heat, and clothing. 
  • It needed to carry food and water for at least three days. 
  • It needed to charge my cell phone. 
  • It needed first aid capability.
  • All of this needed to fit into a single bag.

I admit, I'm still working on all of this. The biggest breakthrough I had was when I reflected on something I've said since the beginning of this blog -- "If you have camping gear, you have preps" -- and I realized that I was so focused on long-term disaster that I neglected the short term to the extent that I was unprepared to go camping. Yes, that's correct; I would have needed to unpack and then repack my bag for a weekend camping trip. This, I decided, Would Not Do. 

With that philosophy in mind, alongside the other realization that packing my BOB for camping would fulfill all of my requirement, I stopped thinking of it as a Bug Out Bag at all and started thinking of it as a backpack suitable for a weekend of camping and hiking. I have no catchy acronym for such a thing, so I'm just going to call it a rucksack. 

I'm still at the "Magic: the Preppering" stage of packing my rucksack. I have the essentials handled, although it's just not possible to physically carry three day's worth of water (using the formula of "one gallon per person per day", that's twenty-five pounds. Not going to happen!); I do however have ways to filter and boil that water, and store it for drinking later, so while it's not perfect it's the best I can do barring magical advancements in dehydrated water technology. 

Ahem. Everything else is taken care of, however, and now I'm in the stage of "Do I really need this, or do I just want it? And if I only want it, how badly do I want to carry it, especially at the expense of other things?" Right now I'm still debating on whether or not I want to carry a hatchet and a camp shovel, because while they are both useful they're also rather bulky and heavy.

I don't know when I'll be ready to unveil my new rucksack loadout, because once I get my current dilemma sorted out the next step will be "What can I add, without being ridiculous or going over weight, to easily extend this beyond a camping weekend?" This is a process which may never end, if I'm being honest, because the urge to tinker is strong with me and I lack the willpower to abandon the quest for the perfect in order to be satisfied with the merely good enough

I wrote this article as much for personal accountability as for blog fodder, and I hope that later in the year I can show you what I packed and why. Until then, I have plenty of things I can talk to you about, including some more product reviews of things that I think you all will like. 

Wish me luck, and spare a thought for my aching back. 


Thursday, April 7, 2022

Keeping Records

Reading and writing are two things which separate humans from animals, giving us ways to record information and relay it to others, or refer back to it  ourselves, at a future date. Keeping records is a two-edged sword for preppers: it helps us keep track of things, but is also a potential security risk if those records fall into the wrong hands. For example, having a map of all of your cache sites might make it easier for you to find them, but if a thief were to find it, that map would lead them to your carefully hidden supplies.

(Use the search box in the upper left corner and search for “OPSEC” if you want more articles that cover Operational Security and some things that need to be kept secret.) 

There are other types of records that don't require secrecy and just make your life easier and safer. Electronic records are open to easily hidden deletion or alteration, and they require electricity to use. I like to keep things simple; pencils last longer than pens and work in the cold, but most inks will outlast the graphite markings a pencil makes, so it's a personal choice and I use both as needed. 

Records require media; I prefer pencil/pen and paper for most of my records, and have supplies of both set aside. Hitting the stores well after the start of school season and in the spring after schools let out is a good way to find sales, and buying in bulk and at estate auctions are other ways to keep costs down. Not everything has to be in a hand-crafted, artisanal journal, but keeping good notes somewhat organized will help.

Here are a few examples of the types of records I keep:

Seedlings
When I start a garden, I start some of my plants from seeds. These are planted in starter trays inside the house before winter is fully over in order to have seedlings ready to transplant as soon as the threat of frost is gone (mid to late April around here). Since a lot of plants look similar as seedlings, I note what is planted in each cell of the starter tray on a simple “map” drawn on a piece of paper. If I have too many starter trays to keep track of easily, I'll mark the trays with an identifying number and use the same number on the map.

https://amzn.to/3Kntxie

I try to keep track of information such as what plant it is, where the seed came from, when it was started, and any other details that can help me decide if I need to make changes next year. Some brands of seeds aren't worth buying, but the only way to find that out is by keeping records of germination rates and the general health of the plants. Commercially grown hybrids won't breed true, so their seeds aren't as useful as heirloom seeds, which is important to know when you've got a fairly large garden and want to keep growing the good stuff year after year.

Reloading
A few of us have written about reloading over the years. It's a good way to get the most bang for your buck, being cheaper than buying factory ammo, and it allows you to “tune” loads to your specific weapons, all of which means more practice time and better accuracy. This is a rabbit hole of a hobby -- you can get lost in the amount of data available -- but one that is common among preppers.

At the basic or beginner level of reloading, there are things you have to keep track of for safety: powder and primer selection, bullet weight, bullet material, and brass brand are all basics that influence your final product. Getting a little more advanced, you'll be recording overall length of finished cartridges, lot numbers of powder/primers/brass, and test velocities/group size. Going whole-hog into precision reloading will mean testing and recording lots of information about each piece of brass and each projectile, aiming for as much consistency as possible in every round of each lot.

https://amzn.to/3uiFhgc

Feeding a self-defense pistol will require less accuracy than feeding a long-range hunting rifle, but you do need to keep track of which components you used in order to weed out bad combinations or bad lots of components. Both need to go bang when you pull the trigger, but the pistol's use requires more attention to reliability than accuracy. 

Practice ammo is generally the least restrictive type to reload, but still needs to be kept track of. Look online for examples and you can tailor your log book to the information you need, making your own log book if you can't afford a pre-printed one.

Vehicle Maintenance
I keep a log book in the glove box of any vehicle I buy for at least a few years. The first few months I'll log fuel and mileage to see if it is performing as expected; after that I keep track of all of the things I have to fix or replace. At some point the vehicle will start to cost me more than the benefits it provides, and having a log of how much money I've dumped into it makes that decision a bit easier to make. My memory is good, but it does have limits, and tracking tires and oil changes is a lot easier when you write them down. Trying to track my wife's car as well as my own makes having a log book a necessity. 

For this I just use a cheap notebook with a few dozen pages. The first page will have the make, model, engine model, VIN, and other specific data on it. This makes trips to the parts store much quicker since they're going to ask for that information to find me the right parts.

Things Not Recorded

  • Locations of caches. I know where they are, as do a few trusted people.
  • Serial numbers of “paperless” firearms. I do buy guns from private sellers that have no government papers.
  • Information on anything that might be illegal, or could become illegal in the near future.
  • Combinations to safes and lock boxes. I have encoded methods of keeping track of the ones I can't change to numbers that I can easily remember. Passwords are the same.


Records don't have to be a four-drawer filing cabinet, and keeping log books near where they're used is simple and efficient. Keep the records you want and need, try to set aside a few blank books or binder for keeping records after TSHTF, and use common sense with what you record for posterity.

Tuesday, April 5, 2022

Cosmoline

Any collector who has acquired a Curio & Relic military firearm knows the smell of Cosmoline or one of its foreign counterparts. We both prize and curse this stubborn preservative. Its ability to protect a firearm through decades of storage earns our appreciation. Its ability to strenuously resist almost any removal method earns our ire.

Cosmoline is the trademark name for a class of petroleum based preservative and rust preventative products first trademarked in 1892 by E.F. Houghton & Company. Interestingly, it was originally marketed as a pharmaceutical product. Cosmoline was used as an ointment to disinfect wounds on people. It was used by veterinarians to treat cuts, bruises, and other minor injuries on animals. It was even used to relieve swelling in cow's udders.

It's still offered as a health product in different parts of the world, such as India.

In addition to classically branded Cosmoline, there are other products available (such as Brownells Rust Veto) that are nearly indistinguishable from the original.

There are many ways to attempt removal of Cosmoline. Some work fairly well; some are actually dangerous; and some are a waste of time. Since Cosmoline melts at around 120 degrees Fahrenheit, most of the better methods involve application of heat. However, Cosmoline has a flash point of 365 degrees Fahrenheit, so be careful not to apply to much heat or expose it to open flame.

If the Cosmoline is fairly fresh or was stored in a hermetically sealed container, it may retain its initial grease-like consistency and should wipe off (mostly) with a rag, leaving only a thin film that responds well to traditional cleaning techniques. However, if it has been exposed to air for any length of time, the volatiles will evaporate leaving behind a thick, wax like, solid material. The longer the exposure to air, the tougher this residue is to remove. This is when the cursing usually begins.

Some of the methods that I have heard of or have tried myself are: using a heat gun to melt the Cosmoline, allowing it to drip off or wiping it off as it loosens; boiling the parts (if they are small enough) in a pot of water; wrapping the item in paper towels or rags, then wrapping black plastic over that and placing the bundle in the sun for a few hours. Using solvents is another popular technique. I’ve heard people recommend everything from gasoline to rubbing alcohol, followed by scrubbing. There’s also packing the parts in an absorbent material such as Whiting or talcum powder and applying heat; and last but not least, running the disassembled gun through a dishwasher.

I cannot recommend using gasoline, paint thinner, or industrial solvents for this process. They are either too dangerous, too expensive, or likely to damage the finish or wood of the firearm.

I have tried soaking Cosmolined parts in kerosene. While it softened the Cosmoline to some degree, other things worked better. Surprisingly, I had better luck with Simple Green and scrubbing with rags. Note, I’ve read that Simple Green can react with aluminum. Purple Degreaser is another solvent I’ve heard works very well, though it can also be hard on aluminum.

Regardless of which method used, the firearm will need to be cleaned further as Cosmoline has a tendency to hide in the smallest nooks and crannies. 

I did try the dishwasher method on rifle stocks. This was done under agreement with my wife that I would replace the dishwasher if it broke during the process. When we sold the house several years later, the dishwasher still worked just fine. As a bonus, the stocks came out looking nearly new.

A few warnings on the dishwasher method: do not use it on a stock with important cartouches or stampings as the hot water will likely raise the grain enough to obliterate them; second, be prepared to immediately oil any metal parts that cannot be removed as they will be completely free of oil and will flash rust as they cool; most importantly, do not use this method on a stock that has been repaired as the heat and moisture will almost certainly break down any adhesives.

After going through this process the stock may need to be sanded and will certainly need to be refinished. For military firearms a few coats of Boiled Linseed Oil will usually suffice.

There are many additional references for Cosmoline removal online. Each individual needs to find the method that works best for them. Anyone attempting Cosmoline remove should take their time and be cautious. It’s the best way to have a harmonious outcome.

Friday, April 1, 2022

Product Review: AOTU Isobutane Stove

Not actually Erin.
& is used with permission.

This is a review of the AOTU gas stove and Coleman gas cannister I mentioned last week

For comparison across all the different products I've tested, the tests have always been and will continue to be:
  1. How easy is it to light and keep fed, using natural materials. 
  2. How quickly it will bring 16 ounces of water to boil in a steel mug. 
  3. How quickly it will bring 24 ounces of water to boil in an uncovered aluminum pot.
  4. How quickly it will cook a single egg on an aluminum skillet. 


First Impressions
The AOTU burner didn't come with any instructions, but its operation was pretty obvious; the only problem I had was that it's not clear which is the "on" position for the gas flow. I assumed that "off" was to the left, as that's the position it was in when I pulled it from its package. Furthermore, when the fob is all the way to the right the stove sticks out preventing proper storage, but when all the way to the left it folds nicely under the legs. 

Gas Off position
Stowed position

The hiss of escaping gas as I screwed the stove onto the cannister showed that I was wrong in this assumption.

https://amzn.to/3wEYfiP

Other than that, I really like this stove. I greatly prefer four legs to three for stability, and the fold-out feet provide a greater area for cups and pots. 

Test 1: Fire Starting
Once I sorted out the gas-flow issue I had no further issues. I turned the knob to let some gas out, clicked on the red button, and an electric spark lit the gas. 

The built-in electric starter is very convenient, although seeing the electrode glowing orange from the heat is disconcerting. I assume that the heat won't bother it since it doesn't have any moving parts and is just there to conduct a spark to ignite the gas, but I still worry that it'll break somehow. Still, in a worst-case scenario I'll just light the gas with a match or similar. 

There was (of course) no issue with keeping the fire fed as I had a full cannister of gas which burned consistently and without issue. 

Test 2: Cup Boil
Being inexperienced with cooking over gas, I had no idea at what rate I should set it at for testing, so I turned it on until the flames reached the bottom of the cup and decided that was good enough. 

It took 6 minutes for 16 ounces of water to reach a rolling boil, and I was worried that it took so long because perhaps I didn't have the gas up high enough, so once the cup had cooled during Test #2 I did it again, this time with the burner on "full blast". 

I increased the color and decreased the light so you could 
more easily see the flame around the edges.

This cut the boil time down to 3 minutes, but felt super wasteful to me because the flames were licking around the outside of the cup, so I won't be doubling up the other tests. Still, now you have an upper and lower bound for boiling 16 oz of cold water. 

Test 3: Pot Boil
This test was a bit strange in that it seemed to take forever for the water to bubble, and then it suddenly went from bubbling to steaming to boiling. 

This also took 6 minutes, which perhaps can be attributed to aluminum conducting heat less efficiently than steel. More gas and a steel pot would likely result in faster cooking times. 

Test 4: Egg Cooking
To no one's great surprise, cooking a single egg takes much less time than heating water. The egg was done in about a minute.

I say "about" because I took the pan off the flame at 1:16 because I was stirring the egg, and while the egg wasn't specifically burnt there was an impressive amount of egg residue baked onto the pan that needed a Scotch-Brite pad to remove. 

If anything, I think I had the gas on too high for this test. 

https://tinyurl.com/2tk2mz93

Speaking of the Coleman Gas, reviews on it on both Amazon and Walmart.com are mixed, but I found that it performed fine in this limited test. I would occasionally see little bursts of yellow-orange flame mixed in with the blue, but the gas burned evenly and dependably for me. I just wish I knew how much was left; something as simple as "provides an average of X minutes of burn time" would be useful. 

My Rating: A
(mainly for cost and ease of use)
I like the performance of the AOTU stove, and (so far) the value to cost ratio is high. I don't know how it will hold up over time, and it may break from future use, but for right now I'm happy that I bought it. 

My biggest complaint stems from not having any experience with gas cooking. I have no idea what intensity I should have set it on, and the completely analog and unmarked dial was frustrating. Some sort of scribed indicator would have been very helpful. 

Hopefully, further experience with gas cooking will give me a better idea of which settings work best. Until then, and barring any further developments, this is a welcome addition to my preps.

The Fine Print


This work is licensed under a Creative Commons Attribution- Noncommercial- No Derivative Works 3.0 License.

Creative Commons License


Erin Palette is a participant in the Amazon Services LLC Associates Program, an affiliate advertising program designed to provide a means for sites to earn advertising fees by advertising and linking to amazon.com.