Sunday, February 25, 2024

Guest Post: Titanium at the Mammoth Sniper Challenge

by George Groot


George is a member of our Facebook Group and has written for us before.


In January of 2023 I participated in the Mammoth Sniper Challenge, a three day endurance event where you have to pack everything except water and live out of your pack. This year I used an ALPS OutdoorZ Commander freighter frame and pack bag, stowing an AR-15 in the rifle retention system on the pack and carrying 150 rounds of 5.56x45 and 100 rounds of 9x19 on the opposite side pouch to balance the load. Magazines went in the outer utility pockets. My food, clothes, cooking kit, and pistol went in the upper compartment, my sleeping system went in the bottom compartment, and my sleeping pad was rolled up and strapped to the bottom. 

https://amzn.to/49HtERS

All told, my pack weighed in at 59 lbs at the beginning. I had 2.2 lbs of food per day, with around 3,000-3,500 calories per day. At the end, with most ammunition expended and two days of food gone, my pack was around 45 lbs.

Cooking
I’ve served in the US Army for 25 years, and I have plenty of experience long distance rucking, but I always had the opportunity to make a small cooking fire or to re-supply with MREs at logistics points. Since fires aren't allowed during Mammoth by Fort Eisenhower Range Control, I had to purchase a packable cooking solution. I went to Walmart and picked up this Coleman Peak One butane-propane stove for my cooking needs.

https://amzn.to/3T8kFDH

The good: It works, it’s small, and it is easy to use. It was available at my local Walmart for about $14 when I bought it in 2022.

The bad: It’s 6.7 ounces, or nearly 200 grams. 6.7 ounces feels light in the hand, but I learned the hard way, again, that ounces make pounds, and pounds make pain.

For Mammoth 2024, I used a titanium stove that weighs only 26 grams:

https://amzn.to/3uMZMEW

The good: It works, it’s small and it's light. At $24, its price is competitive with the Peak One whose 2024 price has risen to $22 at Amazon. 

The bad: It’s slightly less efficient at turning fuel into heat than the Coleman, adding about 20 seconds of time to boil one liter of water. My partner for Mammoth picked up the same stove, and neither of us had any issues actually using it throughout the event.

Fuel
Another thing I learned is that I should pack the absolute smallest isobutane canister possible. Since Mammoth only lasts three days, I only really need to cook about seven meals, and even the smallest fuel container can cover boiling water to re-hydrate nine freeze dried camping meals. 

In 2023 I bought the “econo-size”450g canister at Walmart, and I’m still using it multiple campouts later. While it was good value for my money, it was also weight that I didn’t need to carry for three days. This time I bought the absolute smallest canister I could, and it lasted the entire event just fine, and because the location hardly ever drops below 25° F, I chose a pure isobutane fuel instead of an isobutane/propane mix. If you live in an area where it does get colder than the boiling temperature of isobutane, you’ll want an alternate cooking method.

Mess Kit
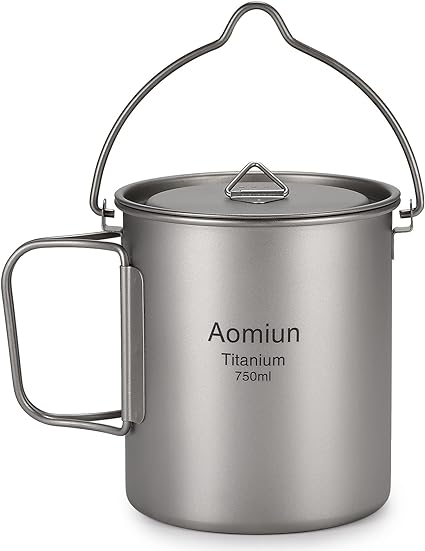
The second upgrade to my kit was going from two stainless steel cups to a titanium cup and a titanium pot. The 450 ml cup was 20 dollars and comes with a lid...

https://amzn.to/3uNrTnn


... and the 750 ml pot with lid was 18 dollars.  
https://amzn.to/3USdnoT

As you’ll see later, the real upgrade is going to vessels with lids, which makes it easier to cook over a fire without cinders or ash falling back into your food. 

Weight Savings
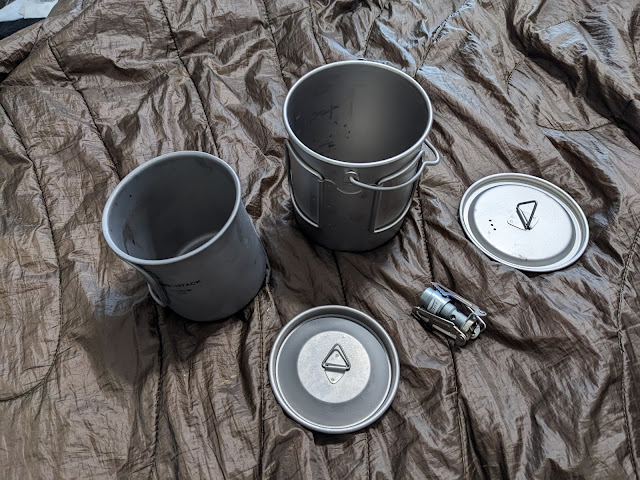
Between the burner and the two vessels, I’m shaving six ounces off my load.  

Old Stainless Kit: 14.9 ounces (no lids). This “heavy” loadout cost me about $23 because I got the burner on sale and one of the stainless cups from the Goodwill thrift shop for 99 cents. 

Stainless Steel


Pure Titanium Kit: 8.9 ounces, including lids. This new loadout cost about twice as much, for just over half the weight. My partner at Mammoth 2024 used a stainless steel Stanley cup with a plastic nesting cup, and he’s already decided to replicate my Titanium loadout if he competes in Mammoth 2025. 
I also  have two teenagers, one of whom needs his own backpacking setup, so he can get the “heavy” option until something better comes his way.  
 
Pure Titanium

If you're curious, my old stainless kit with a new titanium lightweight burner weighs in at 9.2 ounces, but don't get any lids for the cups, and I have no idea where you can get my bigger cup that I got from Goodwill. 

For me, the weight savings are worth the cost. For those of you who might need a “get home bag” that isn’t carrying a long gun with 150 rounds of ammunition and a  pistol with 75 rounds of ammunition, your weight budget might easily handle a stainless steel cup or pot, or even a 1.7 lb Kelly Kettle. If you plan on “bugging in”, then having a stainless Kelly Kettle at your location is very good at rapidly boiling water.

https://amzn.to/3SUotY8


Recommendations for Blue Collar Preppers
If your “get home bag” doesn’t need to include food prep items, this entire article doesn’t apply.

I am a big fan of stainless steel, as it is affordable and durable, but it's also heavier than aluminum or titanium. I am against cooking in aluminum, as over the long term it can negatively impact health, but if you just need to get from Point A to Point B over a few days rather than a long term thing, I’d have no issue with boiling water in aluminum vessels (the human body routinely cleans out aluminum ions, but too much can overwhelm the system). 
  • If you are really pinching pennies and just need it for insurance in your go bag, or are really trying to cut weight for a short term survival kit such as on an aircraft, aluminum is the best value and weight option. 
  • If you need something to cook with long term, and are pinching pennies, stainless steel is your best choice. 
  • The cost premium is titanium, which is a good long term cooking option that is lighter than stainless steel (but not lighter than aluminum), but the weight savings only really matter if you're going to be walking a lot.
My recommendation is that you get a titanium burner since the cost difference is minimal at best, and stainless steel cups with at least one lid since they cost half that of the titanium equivalent.

https://amzn.to/3UNzWv9

Whichever setup you choose, I highly recommend keeping some black teabags in your kit in a ziplock bag. They weigh just a few grams, and heating up the 750 ml cup in the morning with two Tetley brand tea bags gave me and my partner a hot, caffeinated drink that tasted pretty good. In Mammoth 2023 I used Starbucks Cafe Vita instant coffee packets, but those are expensive, and I honestly think the hot tea was easier on our bodies this year, especially on Saturday when it rained from 0100 until 0900. There's nothing like ruck marching in the rain, soaked to the bone, and when your life really sucks a hot beverage is great, and tea just brews easier than instant coffee (and cleans up easier too).

Additionally, if you search Amazon for “long handled titanium camping spoon” you’ll see quite a few options. I didn’t use one the last two years, but it is now on my purchase plan because when you're rehydrating freeze dried meals, the long handle allows you to stir the food without sticking your hand deep into the bag. 

One final thought: a three day endurance event isn’t a disaster “get home” rehearsal, but it is pretty close to the same level of physical exertion and “outdoor surviving” required to go from point A to point B. I never had to worry about getting clean water (it was provided to us, and I never needed to carry more water than I planned to drink on the ruck march), but you probably will, so bring at least a Sawyer Mini filter or iodine tablets

Friday, February 16, 2024

Guest Post: Car Roof Cargo Bag Review

by George Groot


George is a member of our Facebook Group and has written for us before.


Due to the price of gasoline (and airline tickets over the holiday season) my wife and I decided to take the extra time and drive from Georgia to Washington state. The problem was that our two vehicles aren’t great options for a family of 4 on a long road trip. My Nissan Frontier is fine, but doesn’t have a canopy over the bed and the gas mileage is not great (seriously, it’s shaped like a brick; not the most aerodynamic option). The wife’s Subaru Outback is better on gas by about 5 miles per gallon, but even with the station wagon-level storage, there wasn’t enough room for everything we’d need. We looked at hard-shell roof cargo options, but I ended up purchasing a soft roof cargo bag.

https://amzn.to/3SImCFB

The Good
These are cheap, and you get good quality for the price. They also fold up into a really small storage bag so you can throw one on the shelf in the garage, or toss it inside the car if you need to bring it with you to pick up stuff.

The Bad
These aren’t very secure at all; anyone with a knife or improvised cutting tool can get into your stuff. They also aren’t convenient to access routinely, and they can slip a bit over a 3,400 mile drive (we had about two inches of slipping, as the front straps got tighter and tighter).

The Utility
You can hold a lot of stuff in these bags. About five fully packed out green GI duffel bags fit snuggly, which represents a lot of sleeping bags, tents, and other stuff you might need to bring along, so long as you don't need it inside the car for immediate access.

Mileage
Over the course of 3,400 miles the Subaru Outback averaged 23.7 miles per gallon. This didn’t concern me too much, but it does represent a drop from the 30 - 32 miles per gallon a Subaru Outback would normally get on mostly freeway driving. Even with that decrease, it was still more efficient than using my pickup. With the bag installed and filled, the Subaru's top profile only came up to match the Frontier).

The Interesting
I went with the “international safety orange” version since I plan on re-using this bag to support my local Trail Life troop in the future. Having a great big, highly visible beacon has a lot of utility for normal outdoor recreational activities. However, if you wanted to be more clandestine, there is a grey option available. If you need to camouflage an orange version, keep some olive drab spray paint on
hand, or actual fabric paint to reduce the visible signature.

The Final Verdict
If you have a car with a roof rack or rail system, this is a great option. Even beyond using it to haul stuff from point to point, having a weather-resistant storage bag has plenty of utility at a campsite or location where some additional protection from the elements is needed (such as hand tools, spare batteries, extra rope, etc).

Tuesday, February 13, 2024

Rotate Your Carry Ammo

We've talked at length about rotating your preps to keep your supplies fresh and at maximum benefit to you. While most of the time this applies mainly to food and fuel, it really should apply to all consumables you stock, even ones not traditionally considered perishable.

This point was driven home to me on a recent range trip. Having acquired some new carry ammunition for my 10mm, I decided to shoot the old ammo in my magazines, just for the heck of it. It's pretty well established that modern ammunition stored properly will last almost indefinitely, but while that is indeed true, it isn't foolproof. 

The rounds in my magazines were a couple years old, from a major US manufacturer. In the 15 rounds in my primary magazine (the one actually in the pistol) I had 3 failures to fire. On the range, this is an annoyance; in a hunting scenario, that 20% failure rate is bad, but recoverable. In a self-defense situation, however, a failure rate like that has an unacceptably high chance of being fatal.

While I don't have any conclusive answers what caused my failures, ammunition in magazines is subject to the conditions that tend to cause failure, namely humidity and heat changes. Even here in the desert, being out and about means you'll encounter some increased humidity, and obviously temperature swings are a thing.

Ammunition is definitely less perishable than food, and good ammo is expensive to rotate every range trip, so the schedule I'm implementing at home and proposing here is to shoot through your magazines of carry ammo on the same schedule as you change the batteries in your smoke detector, and for the same reason. Having fresh consumables in life-saving hardware can mean the difference between seeing another sunrise... or not.

Lokidude

Friday, February 9, 2024

Some "Must Have" Pack Items

The dust has settled and the First 72 Hours have passed. Follow along as I build a long term plan via Prudent Prepping.

These are some of the things that are really high on my list of "Must Have" items. All of these items are in my Get Home Bag and in the bag Purple Pack Lady has in her car. In no way is this the most thorough, amazing set of items; they're just what fell out of my bag as I was switching out some smashed energy bars, and inspired this article. 

I have previously used a much larger battery storage box, but due to a change of circumstances I've gone back to a much smaller set of boxes for my standard batteries. These fit into any size pouch or side pocket, and I like how the latch is reasonably positive for a simple box. I also like how the colors show up well in low light, and even the clear box is easy to find!

https://amzn.to/3OCh4v2
From the Amazon ad:
  • Package included:4 pcs of battery cases
  • Convenient and intuitive to use, can combine in row
  • Holds either 4 AA or 4 AAA rechargeable batteries
  • Colors: Clear, Pink , Blue, Green
  • Batteries are not included.


One of the first First Aid items I bought to go into my GHB after a basic kit full of band-aids was this handy pouch right here. I've had one in my work gear for several years now, and actually used the gauze and QuikClot once, even though it probably wasn't necessary for how big the cut was.   

https://amzn.to/498WBWS
From the Amazon ad: 
  • Includes QuikClot gauze, trauma pad, triangular bandage, and other key supplies for your trauma kit
  • Nonallergenic QuikClot first aid gauze speeds up natural clotting and stops bleeding within minutes
  • Used by hospitals, EMS/first responders, military, law enforcement, general public & outdoorsman
  • Fits perfectly in any first aid kit, suture kit, medical kit, iFAK pouch, EDC pouch & survival kits
  • Travel safely with QuikClot in your car first aid kit, camping essentials & backpack emergency kit
You can see a more detailed description of contents, and a very nice video showing what is included in the pouch, by following the link to the Amazon listing. 

While this isn't what many would call a starter Individual First Aid Kit, if I were to try buying all these bits and pieces separately they would certainly cost a lot more than the kit itself. I keep one of these and the Adventure Medical pouch above, in my work supplies and another in my motorcycle saddle bags with a mini zip-tie through the pouch top and the kit carry handle to make pulling them out fast and easy. 

As my fellow bloggers have mentioned over the years, North American Rescue makes very high quality equipment that isn't cheap. This leads to a problem when shopping for their gear: counterfeit goods sold with the NAR logo. I was pointed to this website for a nice writeup on how to tell the fake from real NAR tourniquets, but the short answer is "expect to pay no less than $30-$40 for a genuine NAR CAT tourniquet". 

https://www.narescue.com/outdoor-adventure-products/medical-kits/m-fak-mini-first-aid-kit-red.html

   From the website:

  • NAR's most compact, versatile Mini First Aid Kit
  • Contains the First Responder's most requested critical point-of-wounding medical equipment for treating penetrating, blast or other traumatic injuries in the line of duty
  • Super compact, rugged nylon platform that allows attachment both vertically (MOLLE backing) and horizontally (3 in. belt loop)
  • Clam shell configuration utilizes (2) two main sleeves that open on both ends for easy access
  • Multiple elastic loops for secure gear organization
  • Vertical mount can be set to open left-to-right or right-to-left based on shooter preference
  • Horizontal mount on a belt allows opening directly to your C-A-T. tourniquet

Kit Contents:
  • 1 x C-A-T (Combat Application Tourniquet) Orange
  • 1 x 4 in. Flat Responder ETD
  • 1 x NAR Wound Packing Gauze
  • 1 x HyFin Vent Compact Chest Seal, Twin Pack
  • 1 x Pair, Responder Nitrile Gloves, Large
Dimensions:
  • L 6 in. x W 3 in. x D 3 in.
  • Weight: 13 oz

Some Closing Thoughts
Even in the middle of winter it's a good time to go through your gear and see what might be out of date (first aid cream, pain relivers, etc.), what is damaged or broken (my energy bars), and what might need recharging or fresh batteries, like flashlights.

After being reminded by seeing the IFAK, I looked through the paperwork in my wallet and saw that it's time to go back to the Red Cross and re-up my First Aid training. During Covid, no one was doing classes for the general public and a blogger didn't qualify for special treatment. If my work would have certified it was necessary I could have gone, but no such luck.

Stay safe and expect the best, but plan for less that that!

* * *

Just a reminder: if you plan on buying anything through Amazon, please consider using our referral link. When you do, a portion of the sale comes back here to help keep this site running!
 
If you have comments, suggestions or corrections, please post them so we all can learn. And remember, Some Is Always Better Than None!

NOTE: All items tested were purchased by me. No products have been loaned in exchange for a favorable review. Any items sent to me for T&E will be listed as such. Suck it Feds.

Tuesday, February 6, 2024

Prepper's Pantry: Corn

In my earlier post about the Three Sisters planting method, I mentioned how corn (also called maize) was an integral part of that cooperative gardening system.

Corn is an ancient cultivated new world plant, descended from wild grasses. It was discovered by Europeans during the Age of Exploration in the fifteenth century, and was quickly accepted in the old world. Corn became a staple in many areas with remarkable speed, and is now the most popular grain in the world by weight, with an excess of one billion tons produced each year. 

Corn is consumed in many different forms, some seasonal, such as corn on the cob, and some year round, such as dried, canned, and frozen. Baby corn has become a staple of Asian cuisine, especially in America. Corn meal and corn flour are commonly found in the recipes of several ethnic groups, whether traditional Mexican tortillas, Italian polenta, or American grits. (As I live in the south, I am required by law to speak out against instant grits.)

Corn can be eaten as is or used as an ingredient in many recipes. I always add some to my Shepard's Pie, certain soups, my chili, and of course, my corn bread. Also, right next to the corn meal in the cupboard, I have a bag of corn masa for when I have an urge to make tortillas at home. While we generally use fresh or frozen corn in our household, we also keep a supply of canned corn in our long term food storage.

Corn Tortillas
While somewhat labor intensive, these flatbreads are really quite simple to prepare, with a tortilla press being the only special item called for. I don't own one, so I use two cutting boards and my body weight to similar effect.

Homemade Taco Bar


Ingredients

  • 2 cups corn masa
  • 1 1/2 to 2 cups hot water
  • 1 teaspoon fine sea salt

Instructions

  1. In a large bowl, whisk together masa and salt. 
  2. Gradually add the hot water, and stir the mixture with a wooden spoon or silicone spatula until an evenly-mixed dough begins to form. 
  3. Use your hands to knead the dough for 2-3 minutes in the mixing bowl until it is smooth and forms a cohesive ball. 
  4. Cover the bowl with a damp kitchen towel (or paper towel) and let the dough rest for 10 minutes.
  5. Portion the dough into 2-tablespoon balls (about the size of a golf ball), then use your hands to roll the ball until it is nice and round.
  6. Place the dough ball between two pieces of plastic in a tortilla press. Then gently press the dough ball until it forms a 4- to 5-inch tortilla.
  7. Heat a non-stick skillet over medium-high heat. Once the pan is nice and hot, peel the tortilla away from the plastic wrap and lay the tortilla flat in the skillet. Cook the tortilla for about 40-60 seconds per side, flipping it once speckled brown spots begin to appear on the bottom of the tortilla. The tortillas will likely bubble up while cooking, especially on the second side.  
  8. Once it's cooked, transfer the tortilla to a tortilla warmer or a bowl wrapped in a clean kitchen towel, so that the tortillas do not dry out.
  9. Repeat with the remaining tortillas. Keeping the cycle going by cooking one tortilla while pressing the next dough ball at the same time.
  10. The tortillas will continue to soften a bit more as they sit in a stack in your tortilla warmer (or wrapped in a towel). So use the tortillas at the bottom of the stack first, they'll be the softest.

Remember, with only a little effort, any day can be Taco Tuesday.

The Fine Print


This work is licensed under a Creative Commons Attribution- Noncommercial- No Derivative Works 3.0 License.

Creative Commons License


Erin Palette is a participant in the Amazon Services LLC Associates Program, an affiliate advertising program designed to provide a means for sites to earn advertising fees by advertising and linking to amazon.com.