Friday, February 26, 2021

Get a Sleep Study/CPAP Rx Without Insurance

Not actually Erin.
& is used with permission.
 Like many people in America, I do not have a lot of money. 

Also like many people in America, I am without health insurance. Add that to above and it means getting to the doctor is rare and expensive. 

Also also like many people in America, I snore. I have long suspected that I have sleep apnea, because my father has it and because as I get older it has become harder and harder to wake up feeling rested. My body can get up and function after 8 hours of sleep, but my brain needs another 2+ hours to fully wake up. 

Finally, in America it is impossible to get a CPAP (Constant Positive Air Pressure) machine, a device which prevents sleep apnea without a prescription. I suspect this is because an uncalibrated CPAP can cause damage to to someone's lungs if turned up to high, or be useless if not turned up high enough. In order to be prescribed a CPAP you first need to have a sleep study performed. 

Add all of this together and it means if you don't have health insurance and you don't have the cash to pay the doctor, you cannot get the necessary sleep study done, which mean you cannot be prescribed a CPAP, which means your sleep apnea will go untreated, which means you will suffer the health affects of obstructed and interrupted sleep. 

When I received my stimulus check, I decided that I would spend the money on having a sleep study done, even if I had to pay out of pocket, because I was tired of feeling tired and angry all the time. I did some internet research and quickly found CPAP My Way, a website where you can order an in-home sleep study for $195. I ordered mine, and the package arrived within a week alongside an email which contained video instructions for how to put on the monitoring equipment. 


I found the device very easy to assemble and, strangely, was able to get a good night's sleep while wearing it. (Note to women: fasten the velcro strap under your breasts.) In the morning I packed it up and sent it back to CPAP My Way using a pre-paid return label. 

I received my results in about 5 days. Not only did I have sleep apnea, but I have obstructive sleep apnea with evidence of hypoxia and a lowest oxygen saturation of 65 percent!


I quite naturally found this distressing and decided to order a CPAP for my health. Because I had a doctor review the study, I was able to get a prescription issued for a CPAP on their website, and if you order a CPAP along with it the prescription is free. What's more, I was able to use the code 10off to get a 10% discount on my device -- which, given that they start at around $400 and can go over $1000, is a rather substantial savings. 

I also think it's worth mentioning that CPAP My Way takes PayPal. I understand that PayPal is not in favor among many people due to its anti-gun stance, but PayPal Credit is literally the only form of credit card which I have (I make too little to be eligible for regular credit cards). Using PayPal credit's "no interest if paid off in 6 months" policy, I was able to make my stimulus check go further so I could a nice model with features that I wanted, such as an inbuilt humidifier and a "pressure ramp" feature. 

https://tinyurl.com/y8otp2df

I am still getting used to my CPAP, so that review will have to wait for another time. All I can say right now is that it is difficult to fall asleep with it on, but if I can do that I feel much better in the morning. 


All in all, I recommend CPAP My Way for people who think they have sleep apnea, or know they have it, but lack the health insurance to get a sleep study or a CPAP prescribed. 

Thursday, February 25, 2021

Hoof Glue

A couple of weeks ago I wrote about hide glue, an adhesive made from animal hides that has been in use for thousands of years. Very simple to make and use, hide glue is not the only “animal glue” that humans have developed over the years.

Hoof glue is exactly what the name says: a glue made from the hooves of animals. For most of human history people have not had the luxury of “too much”, and we figured out uses for every part of any animal used for food. “Use every part of the pig except the squeal” was the philosophy before everything became disposable.

Whereas hide glue is made from the collagen in hides and bones, hoof glue is made from the keratin in hair and hooves. Animal hooves are nothing more than very thick versions of fingernails and are mostly keratin, the same protein that is a major component of hair. Animal horns (but not antlers) are also made of keratin. 

Both collagen and keratin are proteins (chains of amino acids) that have binding or adhesive qualities. When hydrolyzed (dissolved in water), they become “plastic” in the material sense -- soft, workable, and easily molded -- and when the water is removed they revert to their hardened state. Hoof glue retains more flexibility when dry than hide glue, making it a better choice for binding things that need to move or flex in use.

One of hoof glue's many uses was for sealing and bonding the sinew or fiber cordage used to hold arrowheads on the shafts of arrows. While not waterproof, the hoof glue was flexible enough to stay in place though the shocks of being launched from a bow and hitting a target. Binding layers of wood together to form a laminate which is stronger than solid wood was another use.

Like hide glue, hoof glue has a very long shelf-life. When stored in a dried form, there is a slight chance of fungal growth, but periodic heating and using it will keep it fresh and clean.

Making hoof glue is as simple as making hide glue but can be done on a smaller scale.

  1. Collect hooves or pieces of hooves (if you trim your livestock's hooves you have a good source).
  2. Break them into small enough pieces to fit into a small pot. Smaller pieces create more surface area and speed up the process.
  3. Add enough water to cover the pieces.
  4. Gently heat the mixture until dissolved, skimming off any debris that floats to the surface.
  5. An acid can be added at this time to form a gel if you have one available.*
  6. Add water or continue to heat (to remove water) until you get the desired consistency of glue.
  7. Apply while hot and allow to dry.

I remember first seeing hoof glue in a museum of natural history, it was in a display of some of the methods native Americans used to make arrows and bows. The hoof glue was a blob of dark material on a stick; it looked like a grotesque lollipop more than anything else, and it had a small clay jar with it. Since most of the tribes in the center of the US were nomadic, anything they carried from place to place was carefully thought out and size and weight were minimized. The “glue stick” was used by placing hot water in the clay jar and then stirring the water with the “glue stick” until enough had dissolved to make the consistency of glue needed. Any leftovers in the jar were warmed near a fire to drive off the excess water and then scraped back onto the stick for transport. Efficient, conservative of materials, and simple to use, this was a good way to have a multi-purpose adhesive on hand without taking up space or weighing too much.

* I'll see if I can put together a post about naturally occurring acids and bases for addition to the “chemistry for preppers” category.

Wednesday, February 24, 2021

Prudent Prepping: Purple Pack 1st Aid and More

The dust has settled and the First 72 Hours have passed. Follow along as I build a long term plan via Prudent Prepping.

The First Aid kit mentioned here was well accepted by my friend and put into her primary vehicle alongside additional items that were moved in temporarily from my camping gear. Full replacement of things will come later, when it gets closer to camping season. 

What are these items, you ask?

I have several of these which I purchased separately and salvaged out of trauma packs. From the Amazon ad:

https://amzn.to/3koGLiC
Celox Rapid is suitable for:
  • Severe high pressure bleeding
  • Arterial and venous bleeding
  • Bullet, blast, knife and shrapnel wounds
  • Wound packing. Applying through strong blood flows. Application to all bleeding wounds

This has been recommended by many different sources, both here on BCP and around the web on First Aid sites. More than one will be added very soon. If the Celox is not readily available, I've also purchased the Adventure Medical Quikclot Advanced Clotting Sponge.

North American Rescue CAT Tourniquet Gen 7

https://amzn.to/2Mm95FA
I've purchased several of these as well, and moving one from camping supplies isn't running me short. 

I originally purchased a two-pack and when it comes time to fill the camping First Aid kit, I will more than likely buy another two pack.


So far, the additions to the kit are being accepted better than I really expected. I am however  a little surprised at the push back on using the steering wheel lock I mentioned in this post two weeks ago.

With her car having been stolen and only taken for a joy ride (as far as anyone can tell), the lock is currently not being used. It is marginally heavy, which may be why she isn't using it; putting it on and off can be a pain, but compared to losing a car it shouldn't be a struggle.


I'm trying to make headway with her for using it only at night, since where she parks is visible to many people during the day and the car was taken at night. It has been used at least once at night, so baby steps have to be made before running a marathon.

Recap And Takeaway
  • Getting all users familiar with their equipment is important, especially in a potential life saving situation.
  • Nothing was purchased this week, just moved around from one pack to another.
* * *

Just a reminder: if you plan on buying anything through Amazon, please consider using our referral link. When you do, a portion of the sale comes back here to help keep this site running!

If you have comments, suggestions or corrections, please post them so we all can learn. And remember, Some Is Always Better Than None!

NOTE: All items tested were purchased by me. No products have been loaned in exchange for a favorable review. Any items sent to me for T&E will be listed as such. Suck it Feds.

Tuesday, February 23, 2021

Battery Back That Thing Up: Big Battery Options

We've all seen the portable battery packs that charge cell phones and tablets. They work great for small electronics, but they lack the capacity to power anything that has a serious demand. For that you need larger, more advanced batteries.

I've used GoalZero's site and data as a reference when considering battery back ups, and for good reason: they publish actual numbers on their equipment, and their quality of build has made them the gold standard for backup power storage. Their equipment is also a self-contained solution, with the charging system, battery storage, and inverter all in one package. If you were to assemble a backup battery system for your home, you'd need to source a charging method, the battery cells, and DC to AC inverter separately, then assemble and mount or store them. GoalZero (and other companies) do this in a package about the size of a large suitcase.

The first step in deciding which system to get is to figure out how much battery you need, and this will depend on how much you need to run and how long you expect the power grid to be down. Notice that I said "need" and not "want;" the more you run, the shorter your battery pack can keep you rolling. In my area, blackouts rarely last more than 24 hours, and even those are uncommon, although in the past year we did have a windstorm accompanied by a nasty cold snap that took out power to some residents for almost a week. For somebody like Erin in a hurricane zone, though, a week without power is a regular occurrence. Look at your area's history for the past few years and decide how long you expect it to be dark.

Now that you know how long you expect power to be down, figure out what you need to keep on. I would want to keep my lights, my refrigerator and deep freeze, and the receptacles* in my bedroom powered, at a minimum ( I use a CPAP machine when I sleep, so I need to be able to power it at night). During the winter, I'd also want to keep my furnace powered. I wouldn't make that choice if I had electric heat, but my furnace is gas, so the electricity just runs the controls and fan on a 120 volt circuit. I'd also stretch my power even further by turning off the breakers for receptacles I wasn't needing, and using the lights only when necessary.  
* A receptacle is where you plug something in. Outlets aren't always a receptacle; technically, any place you wire power to a device is considered an outlet.

All receptacles are outlets. Not all outlets are receptacles.

Big batteries aren't exactly cheap, but they're a great solution when your power only goes out occasionally, or if you're in a place like an apartment where you can't use a generator or other backup means.

Lokidude

Monday, February 22, 2021

Container Gardening

With spring fast approaching, I thought I’d get back to the topic of growing our own food. In a previous post I mentioned raised bedgardens, which are great if you have a yard, but not so helpful for urban or close in suburban dwellers. This is where container gardening can come to the rescue.

Container gardening is exactly what is sounds like: a garden grown in various size containers. At the very basic level is the window sill herb garden, going all the way up to pots of vegetables so large they have to be moved on dollies or rollers.

There are some pros and cons, of course. On the one hand, indoor plants need just as much sunlight as their outdoor cousins, and if your house or apartment has limited window space, it will likely reduce your yield; on the other hand, indoor plants are much more insulated from weather, allowing us to grow fresh produce year round. On the gripping hand, house pets, especially cats, can spell doom to any attempt at having an indoor vegetable garden. Sorry kitties.

The author's cat Arya.

For the beginner container gardener, I recommend starting with basic herbs. Parsley, oregano, and dill are all good choices, assuming you like them. These generally don’t grow too large, and it’s easy to snip a few leaves or stems for a specific dish, leaving the rest of the plant to continue growing.

Image property of www.hgtv.com

As with all the plants in this article, these can be grown from seed or young plants can be purchased locally in early spring.

If that works out well, or you’re already beyond that level, a good next step is onions. In fact, you can grow onions from onions. If you cut off the root end of an onion and leave about an inch of body, you can get the onion cutting to take root simply by suspending the cutting, roots down, in a container of water. I’ve done this with toothpicks and an empty cat food can; keep an eye on the water level (just enough to cover the roots is all that’s needed) and top it off as required. After a few days, you should start seeing some sprouts. Once the roots and sprouts have established themselves, they can be transferred to a garden soil-filled container.

Onions can be perpetuated indefinitely with some care and luck. Simply remember to save the cuttings from the onions you grow and continue the cycle.

Image property of www.alphafoodie.com

The next step up the indoor home garden ladder is vegetables that require a bit more space. I can’t recommend zucchini or cucumbers, as they have a habit of taking over, but tomatoes, peppers, or lettuce are generally well-behaved in that regard.

As with most plants, one of the most important things is to make sure they have enough root space: if they become root-bound, the plants will not flourish and may die. Obviously, water and sunlight are also essential, but different plants will have different requirements.

Image property of www.countryliving.com

Whether you’re just starting out as an indoor gardener or you’ve kept houseplants and would like to expand into edibles, there are many resources available. One of the best online sources of information for all things plant is this Cornell University Home Gardening Extension.

For print references, I’ve heard good things about Indoor Kitchen Gardening by Elizabeth Millard and Year-Round Indoor Salad Gardening by Peter Burke. 

No matter how big or small your living environment, there are options available to supplement your food budget by growing your own herbs, spices, and vegetables. 

Good luck and happy gardening!

Friday, February 19, 2021

Bad Gas

A friend of mine on Facebook has a dilemma in relation to fuel storage: it seems he has about five gallons of gasoline that has been in a container for a year or two. He's been burning a bit of it at a time in his backyard fire pit, but unless you're aiming for a raging bonfire, that's real slow going. When he asked if there were any ways to consume it faster, it led to a great conversation.

Why is old gas a problem?
As petroleum fuels age, they begin to break down. Diesel fuel stays good for about a year, while gasoline starts to come apart at about six months. As they break down, their ability to burn degrades significantly, and they leave nasty deposits in engines. This can be prevented by using stabilizers and rotating fuel, as covered by Chaplain Tim here. Sticking to his advice means you'll always have fresh fuel to provide maximum power and efficiency in your engines.

What if your gas does go bad?
If your fuel does go bad, all is not lost; there are a couple things you can do to salvage it. If the fuel is in a tank already, the Seafoam product Tim mentioned does a wonderful job of "recovering" bad gas. I use it in my track car, because I ended up with half a tank of old gas that I thought had been drained. So far, it still makes good power and starts every time I hit the key.

If your fuel is in a gas can, the fix is even simpler: just dilute it with good gas. A ratio of 10:1 or better will burn just fine, and shouldn't harm an engine in good repair. Running a higher ratio like 15:1 will burn your bad fuel slower, but will burn easier in your engine, if you're worried. For clarification, that means 10 or 15 gallons of good gas to every 1 gallon of old fuel.

You can also run old fuel in gasoline yard tools, diluted with good fuel. The ratio can be a bit shorter in gasoline tools, as low as 5:1, since their engines are simpler with fewer places that can get gummed up and minimal electronics to be affected.


Prevention is always the best course. Rotate your fuel stocks and use fuel stabilizers whenever possible. If all else fails and you find yourself with some old gas, you haven't lost that money or that resource; hit it with fuel conditioner or dilute it with good fuel and carry on.

Lokidude

Thursday, February 18, 2021

Keystone Canned Beef

Wandering through WalMart last week, killing time while my wife was shopping, I ran across a new-to-me canned meat. Looking at the can, it met most of my requirements for adding to the food storage part of my preps:

  • Made in the USA. I don't trust any foods coming out of Asia and very few from South America. Most of Europe is safe enough, but I try to support local businesses when I can. Food poisoning leaves lasting memories, so I'm a bit paranoid about the sources of my food.
  • Ready to eat. This means fully cooked, so meal prep is simplified and in really harsh times it can be eaten cold -- not having to build a fire for meal preparation is a bonus in my book. Power outages are a problem right now and I don't see that trend going away soon, so having pre-cooked foods on hand makes sense.
  • Usable size. Too small and it's hard to get a meal for two out of a can; too large and you risk wasting some or having it spoil before you can use it. #10 cans are common, but unless you're feeding more than 10 people they can lead to waste. These cans are 28 oz, which is about the same as two pounds of beef after it's been cooked. This company also packages in smaller 14.5 oz cans, which would be a better fit for my family.
  • Shelf-life. As I write this, it's February 2021 and the cans were marked with expiration dates in the middle of 2026. Five years is a fair shelf-life, especially for meats. Kept in a cool, dry pantry I'd expect it to be good for a few years longer than that.
  • Simple. No preservatives other than a touch of salt, no added flavors or colors. The label lists two ingredients: beef and sea salt. They don't even add water to bulk up the meat.
  • Not over-priced. A lot of prepper goods have inflated prices because of the low demand or small market. Under $7.00 for the equivalent of two pounds of ground beef is close to what fresh ground beef costs around here right now.

I bought two cans each of the ground beef and just “beef”, which appears to be chunks of roast. After I got home I started researching the product and found out that they offer chicken, turkey, pork, and several broths and soup bases as well.


Keystone Meats
The company is Keystone Meats, located in Ohio. It started out as a family farm raising cattle, and after WW2 they opened a shop to sell meat from their own cattle. In 1977 they upgraded to USDA standards and set up a small cannery, offering small-batch canned meats to local shops. Business has grown, but they still process meats in small batches, slow-cooking the meats in the cans before sealing them.

Their products are available on Amazon, but the prices are sky high and extremely variable. As much as I like using Amazon links, I can't suggest using them in this case; order directly from the producer instead and you'll save money, even with shipping added.

You will be ordering by the case of 12 large (28 oz) or 24 small (14.5 oz) cans, so shipping may seem to be high until you realize that you're getting 21 pounds of meat delivered. Using the shipping calculator, it worked out to about a dollar a pound for shipping to my address, but the case price was lower than the store price so it was almost the same total price.


The Taste Test
When I mentioned canned meat on the Discord, the first question was “But how does it taste?” I opened one of the cans of ground beef the other night and made spaghetti as a test. The sauce is a mild, not overly spiced favorite of mine, so the flavor of the beef could come through. Here's a picture of the opened can sitting on my dirty stove.

The fat or tallow had separated from the meat and was mostly sitting on top, but it was a solid piece and came off with no problem. There were a few globs along the sides, but none in the meat itself. 

I removed the tallow for a personal reason: if you want extra flavor and calories, mix it into the meat as you cook. There were maybe 3 ounces of liquid broth in the can, enough to keep the meat moist without soaking it or being used to make up weight. 

The meat itself was a firm mass of slightly compressed ground beef in the center of the can. It pulled apart with a fork easily, breaking up into small crumbles suitable for use in sauces and soups. Being pre-cooked I don't think it would do well as a base for meatloaf, and it lacks the fats to give it the cohesion needed to form patties for hamburgers. Recipes are available on the company website, but I like to play with my food sometimes and this is going to be a new challenge. The chunked beef looks like a good base for soups and stews, maybe tacos and wraps as well. I'll keep playing.

I did sample the meat straight from the can. It had no gristle or chewy bits, and the taste was that of unseasoned cooked beef (mild to bland). I couldn't detect any salt, which is a huge difference from most prepper foods, and I did end up adding more to get to my preferred taste.

Simmering in the sauce for an hour or so, the few larger chunks didn't fall apart on their own and had to be broken up by stirring. We eat a protein-heavy diet, so 28 oz of beef went into about 3 quarts of sauce and it looked and tasted fine. There was no metallic taste from the can and no “off” taste from preservatives or colors, so it would be hard for me to tell the difference from ground beef that I had cooked myself and added to the same sauce.


All told, I highly recommend this product for addition to your “deep pantry”. Having animal protein that doesn't require refrigeration and isn't loaded with chemicals is a good way to maintain a healthy diet, and this is something that you probably already know how to cook with.

Wednesday, February 17, 2021

Prudent Prepping: First Aid Additions

The dust has settled and the First 72 Hours have passed. Follow along as I build a long term plan via Prudent Prepping.

I had a small emergency recently that had me digging into my car First Aid kit. It wasn't anything serious, but it showed me I need to go through all of my kits and inventory and update the contents as needed. What happened was a cooking mishap that resulted in a smallish cut. That in itself would not be a problem, but the injured person was on blood thinners and the cut just would not stop oozing.

I carry an all-purpose First Aid kit in my car, so I pulled it out and looked for some bandages. I had several different choices, but nothing too different from what was being used and not doing the job already; what was needed was a good, old-fashioned butterfly bandage, I thought, but there were none in the box. I do have butterflys in other kits, but not in my car box. 

Since I didn't have what I wanted in my kit, and even that might not have done the job, the decision was to head to Urgent Care for a professional decision. Which, after review, turned into 2 stitches. 

Afterwards I did what I normally do, which is head to Amazon! I bought two things. However, before I get into the details:

I am not a Doctor. Anything you read is my personal opinion and in no way should you rely on the information as useful for saving, treating, diagnosing any and all conditions.

CURAD Waterproof Butterfly Bandages

https://amzn.to/3k39V6v
I've had other brands of butterfly bandages in the past, but this was offered as a 2 Pack at a reasonable price, so I ordered it.

 From the Amazon ad:

  • Thin comfortable backing
  • Moisture resistant
  • Close and secure small wounds and incision
  • Strong adhesive for stability and support

Since this is two packs of 12, one is going into my car kit and the other is going in the First Aid kit that will be carried in The Purple Pack. (More on that later.) 

The main benefit of butterfly bandages is that they are easy to apply and don’t cause any pain when you apply them. The downside is they aren’t very good at treating serious cuts. Stitches can be needed if the cut goes deep into your skin, whereas butterfly bandages only hold the wound closed at the surface.


3M Steri-Strip Reinforced Skin Closures

https://amzn.to/2LZ5Mny

I've not used these personally, but I've seen them used on others and they were recommended to me as a good second choice if the cut is in an area that might get some movement or flexing. These were sold in a bulk pack of 20, so the same thing is being done with these as was done with the butterfly bandages: half for me and half in the PP. 

From the Amazon ad: 

  • Provides wound support and increases the tensile strength of the wound compared to sutures
  • Sterile, breathable and comfortable to wear
  • 1/2" x 4"
  • Hypoallergenic adhesive 

 Since I have not used these, I went looking for online info and found a very easy guide to the use, care and removal of Steri-strips here on a page at WikiHow

Both of these bandages are going to be used by me in 'Last Resort" situations only, and wounds will be looked over by the professionals as soon as possible.

New First Aid Kit
I'm pretty lucky in that Purple Pack Lady is a trained nurse (but not currently active/licensed) and knows why First Aid supplies are needed; she just needs to be sold on carrying supplies. Again, I do understand her point -- we will be doing things together -- but her job takes her driving and not having even a basic kit in her car bugs me. So I bought her the Swiss Safe 2-in-1 First Aid Kit (120 Piece) + Bonus 32-Piece Mini First Aid Kit.

https://amzn.to/3s2PdXd
This is a fairly standard First Aid kit, with the addition of a small (very small) personal kit as a bonus. The sturdy zippered container is red, to make it easy to find and the pockets are mesh, so supplies are visible.

From the Amazon ad:

  • ★ NEW & UPGRADED FOR 2021: 2-in-1 Premium First Aid Emergency Kit with 120 medical grade items.
  • FULLY STOCKED: Organized interior compartments provides quick access. Rugged, sturdy, high density.
  • INCLUDES MINI-FIRST AID KIT: Amazingly small, lightweight Mini Kit with additional 32 medical items.
  • MULTIPURPOSE: Perfect for any occasion or events - family, home, workplace, emergencies, outdoors.
  • 100% MONEY BACK GUARANTEE: Swiss Safe Guarantees customer satisfaction or receive a 100% refund

This a good sized case, 9 x 3 x 6 inches, large enough to hold extra items, like the Large Hyfin chest seals I ordered last year, before really looking to see there were different sizes. Other additions are still to be determined, but one will be a tourniquet of some sort. Stay tuned!

Recap And Takeaway
  • It's better to discover you need something in town than finding you desperately need something in a real emergency.
  • Different wound closures are sometimes needed in certain situations and I like having options!
  • Three things were purchased this week, all from Amazon.
    1. Two 12 packs of Curad Waterproof Butterfly Bandages, for $4.99 with slightly longer than normal delivery through Prime.
    2. One 20 pack of 3M Steri-Strip Skin Closures, for $14.99 with Prime.
    3. And the Swiss Safe First Aid Kit for $24.79 with Prime.

* * *

Just a reminder: if you plan on buying anything through Amazon, please consider using our referral link. When you do, a portion of the sale comes back here to help keep this site running!

If you have comments, suggestions or corrections, please post them so we all can learn. And remember, Some Is Always Better Than None!

NOTE: All items tested were purchased by me. No products have been loaned in exchange for a favorable review. Any items sent to me for T&E will be listed as such. Suck it Feds.

Tuesday, February 16, 2021

Cold Weather Survival Without Power

Not actually Erin.
& is used with permission.
Everyone who is caught in the Texas snowstorm is in my prayers. Here are some cold weather survival tips, by me and by others in our Facebook group, that I hope help you out. Since many of you are checking on phones which may be low on batteries, please be advised that the following information is mirrored as a PDF which you can download once and use later even if you lose connection. 

Cold House Survival
If you run out of power and your home gets cold during the night, do the following:
  1. Gather in the smallest room you can stand to be in.
  2. Close the door and stuff the crack with blankets.
  3. Seal the windows with plastic wrap and duct tape. 
  4. If you need to be in a large room due to having a large number people and pets, wall off as much unused space as possible with hanging blankets. Use rope if needed. Blanket forts are your friend, so embrace your inner child!
  5. Get as many people/pets onto a bed as possible (if no bed, then make make a ground cloth with thick rugs and pull a blanket over you) and snuggle up. Your body heat, and the heat of any family and pets you have, ought to get you through the night.
  6. Those people who are naturally the warmest should plan on being on the outer edges of the group.
  7. Layer up, and cover your head and feet for maximum insulation. 
  8. If you feel yourself starting to overheat, take off layers until you are comfortable. The last think you want to do is start sweating, because dampness next to your skin will greatly accelerate heat loss.
  9. Avoid cotton, as it hangs onto moisture. Use wool or synthetics instead, and change out of anything which is wet or damp. 
  10. If you have a gas water heater, that means you have hot water. Take a hot bath or shower to warm yourself. Be a human hot water bottle!
Cold Weather Car Survival
If you plan to sleep in a running vehicle, make sure you do the following:
  1. Make absolutely sure your exhaust pipe is completely clear if your car is outside. A snow drift too close to your pipe (or worse, a pipe full of snow after backing into a snow drift) can result in the carbon monoxide filling up the interior and suffocating you. 
  2. If your car is in a garage, then your best bet is to move your car outside to prevent the door from falling while you are asleep. 
  3. If you have a powered garage door, look for a red pull handle close to the motor; this will release it from the track and allow you to open it by hand.
Prevent Frozen Water Lines
  1. Disconnect any hose attached to exterior faucets. 
  2. If there is an indoor shut-off valve for exterior faucets, turn it off, then open the exterior spigot to drain the line. 
  3. If there isn't a shut-off valve, open the spigot slightly so that a trickle of water comes out. 
  4. Wrap up your exterior faucets in blankets. 
  5. If your house is plumbed in series, then open the furthest faucets on each line to a trickle. If your house is plumbed in parallel, or if you don't know how it's plumbed, set all faucets trickling. 
Toilet Flushing Without Water Pressure
If you've lost the ability to flush due to a frozen water line, you can always force a manual flush by pouring a bucket of water into the toilet bowl. Most toilets just need a bucket containing a gallon or two of water; older toilets may need 3-5 gallons of water to start the flushing cycle.

With advance warning, you can fill buckets, plastic totes, and other containers and store them in your bath tub. (Most tub drains have some degree of slow leakage.) Alternately, you can line trash receptacles with heavy-duty trash bags and store water there.

If you don't have warning, but have a gas stove, you can melt snow to make water for flushing. If not, you may have to bring a bucket in and let it melt on its own. Keep that bucket away from your sleeping area, though, as it will make your bedroom colder!
 
To manually flush your toilet:
  1. Fill a bucket with at least one gallon of water.
  2. Begin by pouring the water into the bowl, from as high as you can comfortably pour (and control). Pour slowly at the beginning while gradually speeding up, and dump the remainder of the water into the bowl.
  3. If done correctly, the water should push the waste in the toilet through the pipes, and your toilet will flush.
Rule of thumb: If it's yellow, let it mellow (a capful of bleach can help neutralize the odor); if it's brown, flush it down.

Cooking Without Power
If you do not have a natural gas stove, it may be possible to cook food indoors, but you must be careful of two things: Carbon monoxide (CO) exhaust and fire safety. 

CO exhaust is mitigated by having fresh air available. Open a window a small amount to ensure good airflow; the little bit of cold air that comes in is offset by the heat from burning fuel.

If you have an alcohol burner, propane stove, or sterno (or other form of "canned heat") stove, then you should be safe from CO as they are very clean-burning, and your main concern should be fire safety. Cook on a level, fireproof surface with no nearby flammables in a well-ventilated area. 

If you have a camp stove which runs on charcoal or biofuel like wood, leaves etc, then CO exhaust is a real risk. Do not use this unless you have a chimney of some sort! If you have a functional fireplace, use this for heat and for cooking instead. However, some homes have small, decorative fireplaces which nevertheless have a flue; if that's the case, you may be able to cook with the stove inside the fireplace. However, be especially careful that embers do not escape and set your carpet on fire!

Finally, if you have an outdoor grill and have sufficiently warm clothes, you can always have a cookout. Just make sure you have nothing overhanging your grill! The last thing you want is to weaken snow or ice overhead and have it come crashing down on you and your grill. 

Monday, February 15, 2021

The Dough Will Rise Again

One of the things that people really enjoy, and which can significantly improve any survival situation, is fresh baked bread. Bread has been part of our cultural menu for thousands of years: remember the story of Exodus, when the Israelites had to flee before their bread had time to rise. This gave us the traditional Passover Bread of Affliction, or matzo.

At heart, bread is simply flour, sugar, salt, water, yeast, and time in the right proportions. Flour, sugar, and salt can all be stored for a good length of time, and potable water should be a priority anyway.

That leaves yeast. A jar of yeast kept in a cool dark place can last, without losing its leavening power, at least six months to possibly a year; I keep my jars of yeast in the freezer to help extend this duration. Packets of yeast, each of which contains ¼ ounce of yeast or two teaspoons, can last at least twice as long in proper storage.

Various other ingredients can be added to basic bread as long as the balance of ingredients is maintained. It’s often said that cooking is art and baking is science, and when modifying recipes, this is very true. One of the most important balances is the wet to dry ratio: too much liquid and the dough is a sticky mess, too little and it won’t hold together. I generally add slightly less liquid than the recipe calls for, mix the dough, then add an additional teaspoon of liquid at a time until the dough reaches the right consistency. The time of year, local humidity, and moisture content of the dry ingredients can all affect the amount of liquid need for proper consistency.

Consider this recipe for potato rolls. Other than one part which triggers my OCD, this is a relatively simple recipe that produces light, tasty potato rolls. You can modify the count by dividing the dough into fewer pieces to make bannocks or hamburger buns. Keep in mind that doing that will most likely slightly increase baking time.

Ingredients

  • 1 cup lukewarm potato water
  • 1 large egg
  • 2 teaspoons instant yeast
  • 3 to 3 1/4 cups all-purpose Flour
  • 1 1/4 teaspoons salt
  • 3 tablespoons sugar
  • 1/4 cup (4 tablespoons) unsalted butter, very soft
  • 1/4 cup nonfat dry milk

Looking at the ingredient list, you will see some additional items. These all have a purpose.

Potato water is water in which potatoes have been boiled. Lacking that, use a scant cup of water plus ¼ cup dried potato flakes. While the potato starch does add flavor and color, the primary purpose is to enable the dough to hold more water. This helps increase the moisture content of baked goods. Potato flour, when combined with wheat flour, tends to make yeast dough smoother and easier to shape and handle.

Eggs make yeast breads finer and richer. They add color, volume, and also help bind the ingredients together.

Butter, when added in small quantities, results in a greater rise volume, a crisper crust, and a longer shelf life.

Dry Milk, which consists of milk solids, improves the richness and texture of bread. It can also make for a softer crust that browns more quickly. Milk, like butter or oil, can also improve the keeping quality of bread.

Directions
Now on to the step by step. This can be done by hand in a large bowl or in a stand mixer; I prefer to use my old reliable KitchenAid Epicurean mixer with a SpiralDough Hook.

  1. Mix together the dry ingredients, stirring everything together as best you can.
  2. Mix together the yeast, egg and potato water. Allow to proof. Proofing means "Giving the yeast time to start working". Adding a pinch of sugar can help with this.
  3. Add the soft butter and mix and knead everything together until you've made a smooth dough. If you're kneading in a stand mixer, it should take 5 to 7 minutes at second speed, and the dough should barely clean the sides of the bowl, perhaps sticking a bit at the bottom.
  4. Place the dough in a lightly greased bowl. Cover the bowl, and allow the dough to rise, at room temperature, until it's nearly doubled in bulk, about 1 hour. Rising may take longer, give it enough time to become quite puffy.

    Rising temperature can significantly affect rising time. Yeast operates slower at lower temperatures. In fact, some recipes call for rising overnight in the refrigerator.


  5. While the dough is rising, lightly grease a 9" x 13" pan. I generally use canola spray oil. For certain recipes, I may also use butter or olive oil.


  6. Gently deflate the dough, and transfer it to a lightly greased work surface. Divide it into 16 pieces. Deflate means "To press out the excess gas produced by the yeast", not to be confused with kneading. 
  7. Once it’s flattened, shape into a rough rectangle and use a sharp knife or a pizza cutter, to divide the dough. For the work surface, I prefer to sprinkle a small amount of flour.
  8. Shape each piece into a rough ball by pulling the dough into a very small knot at the bottom, then rolling it under the palm of your hand into a smooth ball.
  9. Place rolls in the 9" x 13" pan, spacing them evenly; don't worry if they touch one another.


    Here’s the OCD trigger. We have 16 rolls to put in a 9x16 pan. Three rows of five rolls each is fifteen. Where does the extra go? Wherever it fits. Twitch, twitch.
  10. Cover the pan with lightly greased plastic wrap, and allow the rolls to rise till they're very puffy, and have reached out and touched one another. This takes about 1 hour. While the rolls are rising, preheat the oven to 350°F.


  11. Bake the rolls until they're a deep golden brown on top, and lighter on the sides. This should take 20 to 25 minutes.

    It’s very important in baking to have an oven that reliably and accurately keeps temperature. An oven thermometer can help with establishing this. Time will also vary based on oven type and size; if you’re new to baking, start with the shorter time and check the results.
  12. Remove the rolls from the oven, and after 2 or 3 minutes, carefully transfer them to a rack. They'll be hot and delicate, so be careful.


I have a shelf full of cookbooks, many of them specifically for baking. Some of my favorites are Secrets of a Jewish Baker, which was a gift from my late mother; the King Arthur Flour 200th Anniversary Cookbook, which my wife and I picked up on a trip to the King Arthur factory and store; the ultimate classic cookbook, Joy of Cooking; and finally, a book I picked up when doing WWII reenactments: a 1942 copy of TM-10-410, The Army Baker.

There’s an almost infinite variety when baking, so there should be something for everyone. Don’t be afraid to experiment; just take your time and read the recipe all the way through before starting.

Happy baking, and bon appetit!

Friday, February 12, 2021

Random Tips & Tricks

Not actually Erin.
& is used with permission.
In the spirit of David Blackard's "Buffet Posts", I give you an assortment of disorganized-but-hopefully-useful things that I either thought of or made use of during last week's trip out of state. 

Knuckle, Not Fingertip
If you need to press buttons on something that a lot of people have touched -- such as an ATM, or a pay at the pump gas station, or a credit/debit console, or even the floor buttons of an escalator -- use the middle knuckle of your middle finger to do it. 

https://en.wikipedia.org/wiki/Strike_(attack)#/media/File:Nakadaka_ken.png

Your knuckles are quite strong, which is why many martial art forms teach you to punch with them, and they are also quite dexterous. This makes them ideal for pressing small things like buttons with proper force and accuracy. I suggest you use your middle finger because not only is it longer and therefore the first to make contact, but also because you are highly unlikely to use your middle knuckle to touch your face, your smartphone, food, or anything else which could lead to contamination. It's also a very small surface area and therefore easily cleaned with hand sanitizer, disinfectant wipes, etc.

Clip Your Curtains
In almost every hotel and motel I've stayed, two things have been true: there are bright lights outside the window and the blackout curtains don't completely overlap. If you are bothered by that slit of bright light peeking through your window, bring along one or two "chip clips" to clip the curtains together, overlapping them if possible. 

https://amzn.to/2Zb18po

This also works with clothespins, but I prefer the chip clips as they have a larger gripping surface and, being brightly colored, are less likely to be forgotten and left behind. 

Pack a Shower Puff
I can practically hear the men saying "Hey now, I don't need this" but bear with me for a moment, because shower puffs belong in everyone's luggage for the following reasons:
  • The washcloths that hotels give you to use are awful. They're often scratchy and almost always thin. Why would you want something like that on your face and other delicate bits?
  • Shower puffs are amazing at making lather, which means those tiny hotel soaps go much further. 
  • They dry a lot faster than loofah body scrubbers, which like to hang onto moisture and, if put away wet, can result in a moldy surprise the next time you open your toiletry bag. 

https://amzn.to/2Zj8RSl

Not only do I have one in my overnight bag, I have one in my bug-out bag as well. I even attached a mini carabiner clip to the loop so that I can clip it to the outside of my pack for faster trying. 


Those are three tricks which made my life easier last weekend. Do you have anything similar?


Thursday, February 11, 2021

Hide Glue

While digging through the cupboards and drawers at my new work location, I ran across a container of something I haven't seen in years: hide glue. Once upon a time, this type of glue was the preferred method of joining pieces of wood due to its strength and clear finish. Modern chemistry has given us more convenient alternatives, but hide glue is still an option for times when the stores are closed or too far away and you have something that needs to be mended. Several decades ago I learned how to make this basic glue on a scouting trip, and if a bunch of pre-teen boys can make it, I'd bet that a majority of you could, too.

Hide glue is, as the name implies, a glue or adhesive made from animal hides. It was one of the first adhesives that humans developed and has been in use for at least 6000 years. It dries clear, is strong enough for furniture joints, and is cheap to make. The downsides are that is is not waterproof and it does have a noticeable odor when wetted for use. 

The ingredients are simply animal hide and water. The tools needed aren't any more complicated: a source of heat, a container that can handle that heat, a stirring stick, a piece of cheesecloth (or old T-shirt) and a knife. We used coals from a campfire and an empty stew can along with a suitable stick off of the ground and our ever-present pocket knives. The T-shirt didn't work as well as cheesecloth, but it did work.

Preparation

  1. Clean the animal hide as best you can. Remove all hair, fat and tissue that you can; you want just the skin. Tanned leather will also work, so recycling an old pair of boots or shoes that are made of leather is another potential source. Found some roadkill that isn't fit to eat? Skin it and use the hide.
  2. Cut the hide or leather into small pieces. Somewhere between the size of a dime and a quarter is small enough. Smaller pieces give more surface area and speed up the process, but if you get them too small they are harder to remove after processing.
  3. Toss the pieces of hide or leather into the container and cover with water. Let it soak overnight to absorb as much water as possible.

Processing

  1. Add more water if needed to keep the pieces covered.
  2. Place the container on your source of heat and bring it to a simmer. You don't want to boil the leather, just get the water hot enough to leech the collagen out of the leather. This will be a rather smelly operation, so working outside is a good choice.
  3. Heat the mixture until the pieces start to turn translucent. That's the sign that you've got most of the collagen out.
  4. Remove from the heat and pick out the chunks of once-leather and discard them.

Finishing

  1. Filter the hot liquid into a second container to remove as many impurities as you can. Cheesecloth will get the big chunks while still letting the thick, viscous liquid flow through.
  2. Place the second container on the source of heat and simmer until most of the water is gone.
  3. Test the resulting liquid by touching some to a fingertip and seeing if it is tacky or sticky. Once you have a sticky gel, you've made glue that is ready to use.
  4. To store your glue, evaporate off as much water as possible by pouring it into a shallow pan or container and letting it dry. We used a solar food dryer to speed things up a bit, something that another group had been building while we played with the glue.
  5. Once the glue has dried and is brittle, chop or break it up into fine pieces and place in an air-tight container in the normal cool, dry place that we all know is best for storing most everything. The shelf-life is indefinite once it has thoroughly dried.

To Use As Glue

  1. Pour some of your glue crumbles or powder into a small container and add a bit of water. Add more water for thin, runny glue that will seep into porous surfaces, or add less for a thicker glue that will fill in gaps or holes.
  2. If you need to speed up the dissolving process, stir and apply gentle heat until it is liquid again.
  3. Apply like any other glue that you've used. Brushes work well with paper and flat surfaces, and pouring into holes works well for woodworking.

I'll cover a few other types of home-made glues in the next few weeks, since glue has been around for a long time and is used more commonly than most people think.

Wednesday, February 10, 2021

Prudent Prepping: Idle Musings, pt. 2

The dust has settled and the First 72 Hours have passed. Follow along as I build a long term plan via Prudent Prepping.

Still more of some things I couldn't make into a full blog post right now.

New Flashlights: Part The Latest
The new NiteCore flashlights that are going into Purple Pack Lady's cars were charged and I was ready to mount them as I have done in my car, secured with velcro in the driver's door pocket. I had velcro glued to the flashlight holder, and just needed to clean the plastic on the door pocket when we had a minor setback: her car was stolen. 

Luckily for everyone, it appears to have been taken for a joy ride only, since the car was later found only 6 blocks away. Plans have been delayed on the install as we work on security instead. 

Car Protection
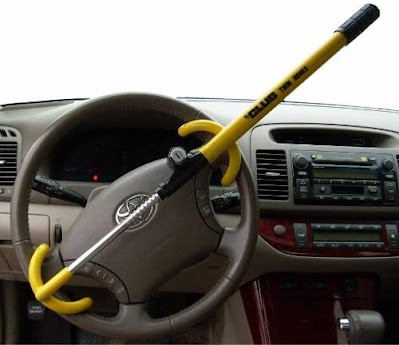
Due to the loss several months ago of the key fob/starter dongle that more than likely was used to take the car, I ordered steering wheel immobilizer units for her two cars When I started looking on Amazon, the listings were very large, and prices and types all all over the map! There were wheel-to-pedal, regular Club-like devices, wheel-to-dash and even one that covers the entire wheel. (That model was very nice and would prevent cutting the steering wheel to remove the lock, but it wasn't BCP budget compatible. Not even close.) What did work for my budget was a modified version of The Club with two sets of two hooks to hold the wheel. 

The Club 3000 Twin Hooks Steering Wheel Lock 

https://amzn.to/3tJOg7T

From the Amazon ad: 
  • The twin hook design is tougher for thieves to defeat
  • Universal fit that works on cars, vans, and SUVs. Max opening (inside of hooks) 365mm/ 14.4 inches
  • New and improved lock housing for added strength
  • The Club's patented self-locking feature locks with one pull
  • Cro-moly steel construction resists sawing, prying, hammering, and freon attacks

I really like how the double hooks allow the Club to be mounted around the spokes of the steering wheel, since merely cutting one piece of the rim on each side will not allow the Club to be removed! 

Purple Pack Additions
As I mentioned last week, I want to double up on gear so that everyone has supplies if something happens to one pack. I was able to make some headway and get a stove added to the Purple Pack! I'm adding an Esbit stove and fuel like this one to the bottom of the PP, since I was able to show exactly small and compact everything is. I believe this is going to be about all I can add until there is an opportunity to really use stoves for actual cooking. After that, there's the chance to upgrade to something easier to use and obviously cheaper to operate, like a Solo Stove!  

Stay tuned for more reports on What's In The Pack!

Recap And Takeaway

  • Some things just can't be planned for, like a stolen vehicle. They can, however, be prevented from happening again.
  • Show and Tell, politely done and explained, worked for adding a needed stove to the pack. I hope adding other things in the future will go as smoothly.
  • Purchased this week: two The Club 3000 Twin Hook Steering Wheel Lock from Amazon for $24.84 each with Prime shipping.
* * *

Just a reminder: if you plan on buying anything through Amazon, please consider using our referral link. When you do, a portion of the sale comes back here to help keep this site running!

If you have comments, suggestions or corrections, please post them so we all can learn. And remember, Some Is Always Better Than None!

NOTE: All items tested were purchased by me. No products have been loaned in exchange for a favorable review. Any items sent to me for T&E will be listed as such. Suck it Feds.


The Fine Print


This work is licensed under a Creative Commons Attribution- Noncommercial- No Derivative Works 3.0 License.

Creative Commons License


Erin Palette is a participant in the Amazon Services LLC Associates Program, an affiliate advertising program designed to provide a means for sites to earn advertising fees by advertising and linking to amazon.com.