Showing posts with label Ammunition. Show all posts

Friday, February 14, 2025

Rifle Gunpowder: Ball vs. Stick

When it comes to reloading rifle ammunition, the first choice to be made is whether to use stick or ball gunpowder. (Handgun ammunition is nearly always ball powder as we generally don't reload for long range pistol accuracy.) What follows is my own opinion, based on my decades of reloading rifle ammunition.

Why Two Kinds?
There are actually more than two kinds of gunpowder shapes, but stick and ball are the most common and effective for reloading. These powders have different burn characteristics due to varying compositions and grain sizes. 
  • Stick powder, aka extruded powder, has larger rodlike grains. Think of how a spaghetti noodle is made, but chopped very short. Because of its surface to volume ratio, it needs fewer burn retardants to produce a smooth pressure curve. 
  • Ball powder is made up of small, roundish grains whose volume are easily measured. Ball powder has more surface area that stick powder, so to mitigate its faster rate of combustion, powder manufacturers vary the amount of burn retardants to make the powder's pressure curve suit its final application. For an AR-15 this includes a maximum chamber pressure and a maximum and minimum gas port pressure. 

Image found on Reddit


Cost
When I started reloading decades ago, the cost difference between stick and ball powders for use in rifles was fairly close. However, current market conditions have made ball powders the “economy” option. For instance, an 8 lb jug of Winchester StaBall 6.5 Precision Rifle Smokeless Powder is currently $323 at Powder Valley Outdoors, while stick powder costs hundreds of dollars more: Shooter’s World 4350 costs $510 and IMR 4350 costs $462. This is primarily because of exchange rates and import costs. Ball powders are manufactured in the United States by the St. Marks factory in Florida, as well as around the world, such as Ramshot TAC from Belgium. 

However, stick powders aren’t manufactured in the United States at this time. The IMR line of powders comes from Valleyfield in Canada, and Shooter’s World Powders comes from Lovex in Europe. Other European powder companies include Norma, Vihtavuori, and more, and the Hodgdon Extreme line comes from ADI in Australia. 

This means that prices on stick powders will always fluctuate quite a bit with exchange rates between the Dollar and the Euro or the Australian Dollar, but only some ball powders will feel the impact of exchange rates. Exchange rates aside, the cost increases due to “supply and demand” seems to hit all powders equally. 

Accuracy
While ball powders are generally more cost-effective, stick powders tend to be slightly more accurate. The accuracy improvement isn’t  enough to matter for hunting, but may be just enough to score a few more points at shooting competitions.

For hunting, you want a rifle that will consistently place five shots under two inches at 100, and ball powders can easily achieve this with a standard workup. I know that a two Minutes Of Accuracy rifle and ammo combination sounds pretty lousy here in these days of “Sub-MOA Guarantee!” written right on the box holding your new rifle, but hunting bullets are designed for controlled expansion to provide good terminal performance, whereas match bullets are designed to make nice round holes in paper. In other words, they’re just built differently, so it’s useless to compare their performance. If your rifle can hit two MOA all day long with your hunting load, then you can make a “boiler room shot” on a deer out to 300 yards with confidence. 

Temperature Stability
Stick powders will generally be more temperature stable, meaning they exhibit less velocity shift with ambient temperature changes than ball powders. 6.5 StaBall is advertised as temperature stable, but in testing I found that it had significantly more velocity shift than Hodgdon’s H4350. However, 6.5 StaBall is more temperature stable than Reloader 15, a stick powder used in match ammunition, including M118LR sniper ammunition for the Department of Defense.

Final Recommendations
If you’re just starting in reloading, I recommend beginning with an economical ball powder as it’s easier to use with powder measures to get consistent charges. I’d be very surprised if you didn’t end up with a load that can consistently put five shots under 1.5 MOA after a normal load workup.

The time to spend the money on a premium stick powder is when you start winning competitions and still want to get better, or you’re going on that “hunt of a lifetime” in Africa or Alaska where you want your ammunition to perform more consistently across wild temperature swings.

Tuesday, February 13, 2024

Rotate Your Carry Ammo

We've talked at length about rotating your preps to keep your supplies fresh and at maximum benefit to you. While most of the time this applies mainly to food and fuel, it really should apply to all consumables you stock, even ones not traditionally considered perishable.

This point was driven home to me on a recent range trip. Having acquired some new carry ammunition for my 10mm, I decided to shoot the old ammo in my magazines, just for the heck of it. It's pretty well established that modern ammunition stored properly will last almost indefinitely, but while that is indeed true, it isn't foolproof. 

The rounds in my magazines were a couple years old, from a major US manufacturer. In the 15 rounds in my primary magazine (the one actually in the pistol) I had 3 failures to fire. On the range, this is an annoyance; in a hunting scenario, that 20% failure rate is bad, but recoverable. In a self-defense situation, however, a failure rate like that has an unacceptably high chance of being fatal.

While I don't have any conclusive answers what caused my failures, ammunition in magazines is subject to the conditions that tend to cause failure, namely humidity and heat changes. Even here in the desert, being out and about means you'll encounter some increased humidity, and obviously temperature swings are a thing.

Ammunition is definitely less perishable than food, and good ammo is expensive to rotate every range trip, so the schedule I'm implementing at home and proposing here is to shoot through your magazines of carry ammo on the same schedule as you change the batteries in your smoke detector, and for the same reason. Having fresh consumables in life-saving hardware can mean the difference between seeing another sunrise... or not.

Lokidude

Tuesday, August 2, 2022

Stop! Wrong Cartridge!

Back in November of 2021 had two different posts where I talked about how certain chamberings could fire multiple different cartridges safely. I stressed that this isn't always the case, however, and that care must be taken to stay on the safe side of cartridge combinations.

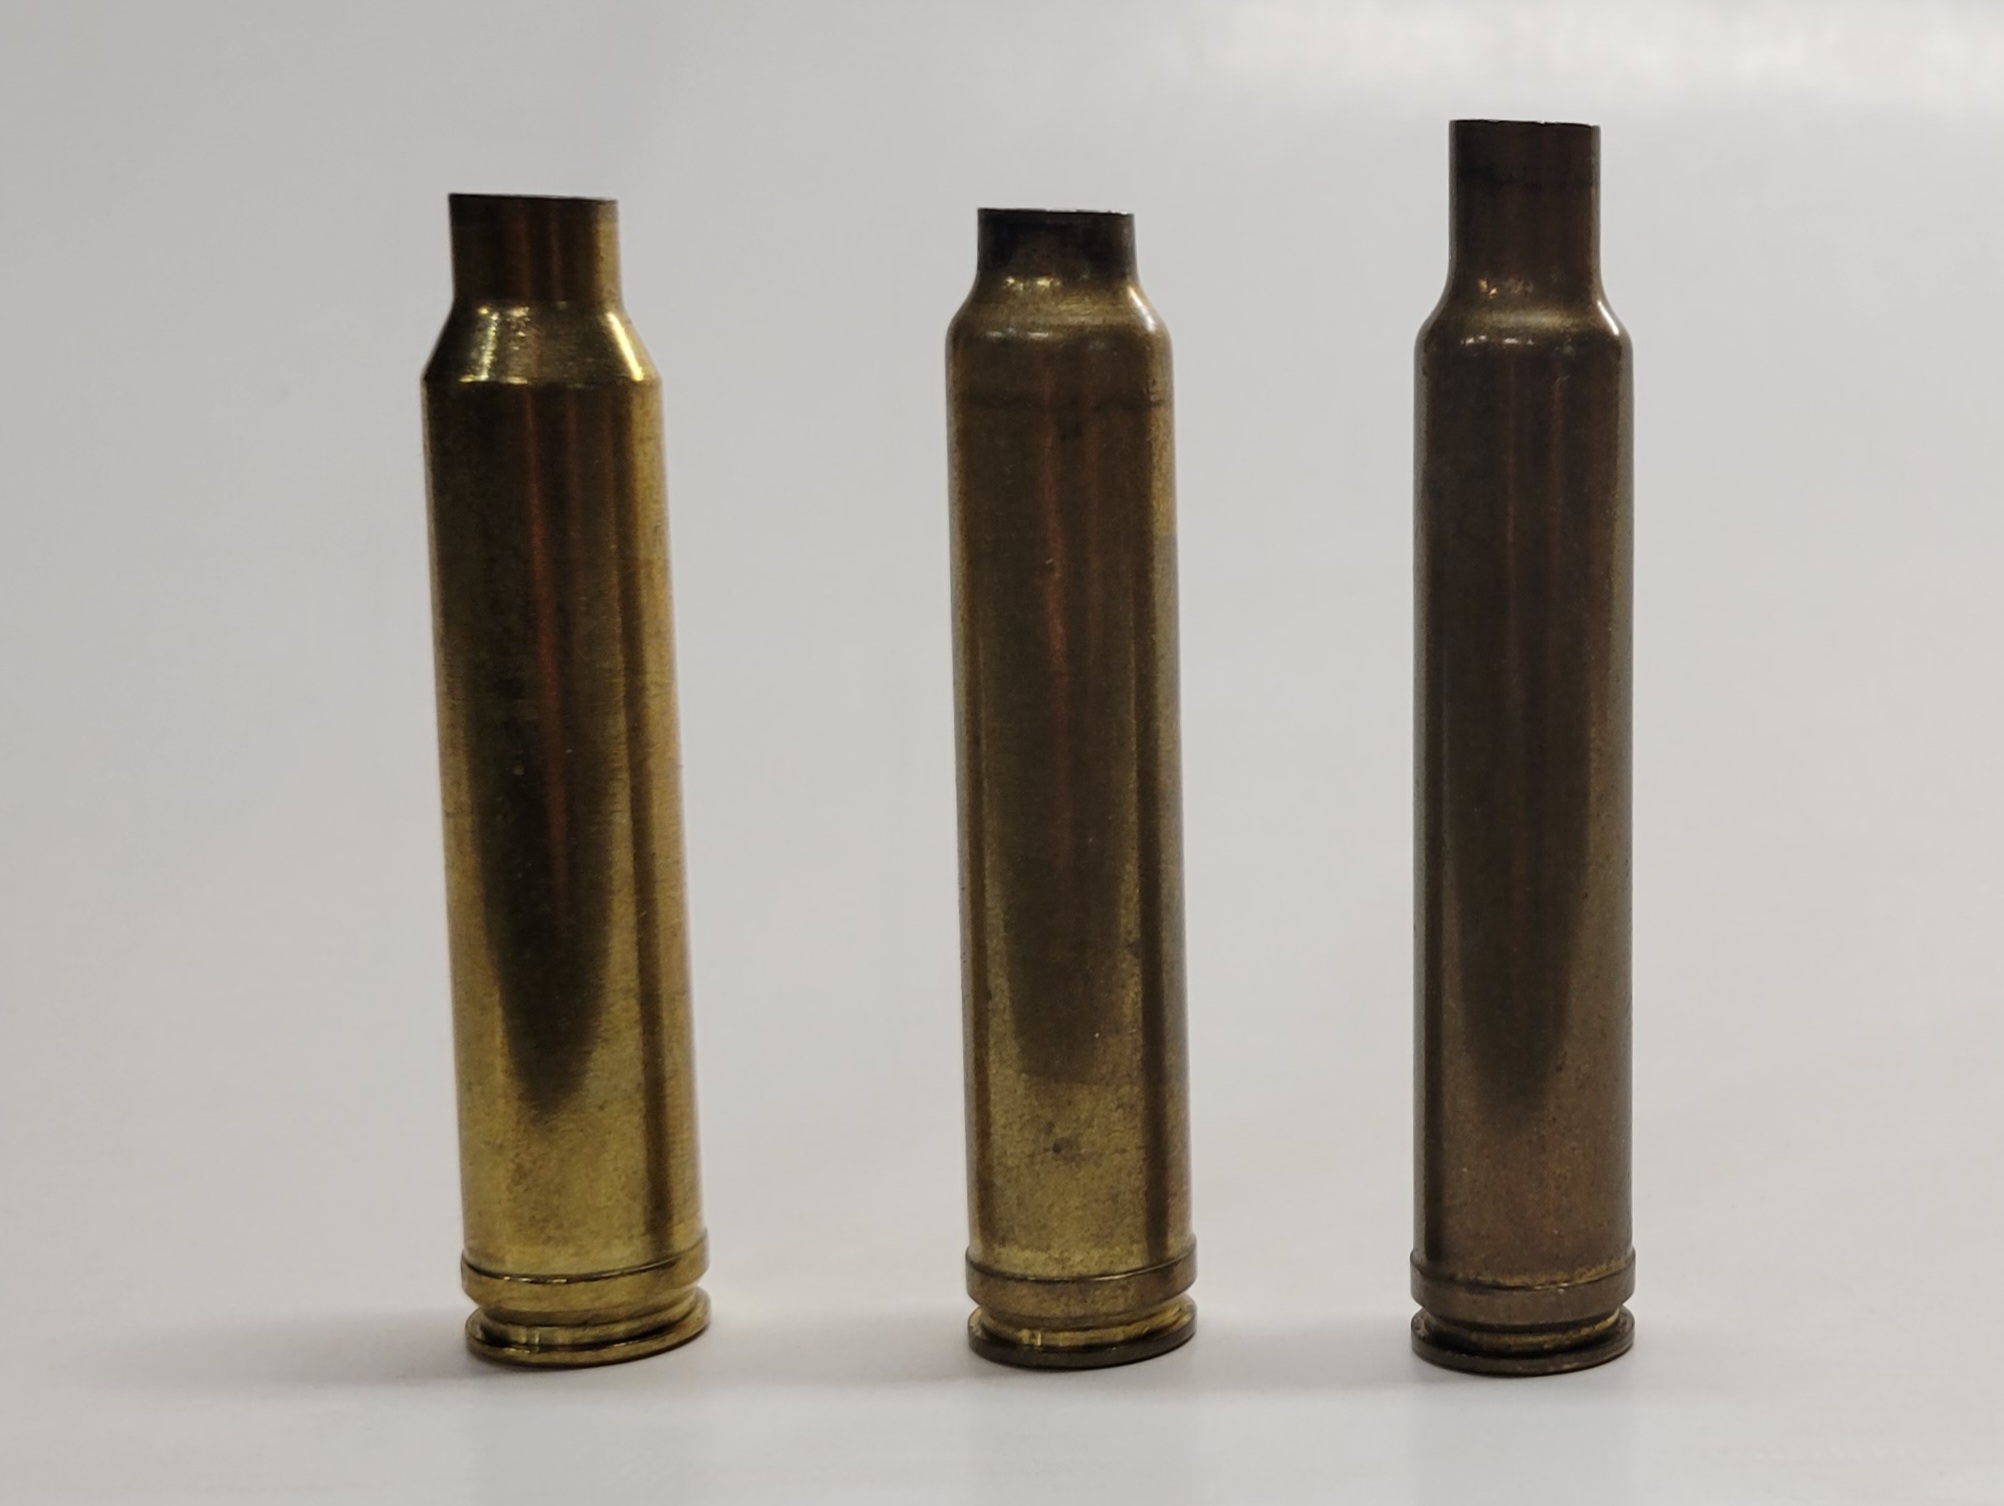
A friend recently shared an experience he  had at the range. A few benches over from him, some guys were shooting a very nice Weatherby rifle, and as is common on the gun range, he went over to chat. While there, he noticed their ejected brass looked odd. After a short conversation, he found out that while the rifle was chambered in .300 Weatherby Magnum, they were firing .300 Winchester Magnum.

As they told him, .300 Winchester Magnum was cheaper and easier to find, and it worked just fine in their rifle. With their permission he collected a couple of pieces of their fired brass. Later he sent me one of those fired cases, along with both .300 Weatherby Magnum and .300 Winchester magnum cases that had been fired in the correct rifles.

L-R: .300 Winchester Magnum; 
.300 Winchester Magnum fired in .300 Weatherby Magnum; 
.300 Weatherby Magnum

As can be seen, the cartridge fired in the wrong chamber has had its shoulder pushed forward, leaving a very short neck. If done intentionally, this is called fire forming and is part of the cartridge conversion process. In this situation, it was done out of false economy. While they saved some money on the ammunition, it was at risk of damaging or destroying a very expensive rifle:
  • For example, the unsupported case of the shorter cartridge could have separated and lodged in the end of the chamber or further down the barrel, and the next round fired would have hit that obstruction; the ring just behind the shoulder on the middle casing may be a sign of incipient case separation. 
  • Another possibility is the bullet of a fired round could hit the front of the chamber off-center, also potentially leading to an obstructed barrel.
  • Even if these events don't happen, if a number of the shorter rounds are fired they will cause a buildup of carbon and other combustion residue at the end of the chamber. If left in place, this can cause damage to the neck of the chamber.
  • Furthermore, if the correct ammunition is fired without the rifle being thoroughly cleaned beforehand, this ring of buildup can cause problems with extraction. Anyone who has experienced firing some rounds of .357 Magnum after a few cylinders of .38 Special is familiar with this experience.

.308 Winchester fired in .30-06 Springfield, 


Due to the difference in overall case length, the middle .308 Winchester cartridge has been transformed into practically a straight-wall case with the neck blown almost all the way out. Looking closely, there's a slight curl at the very end of the case where the shoulder of the .30-06 Springfield cartridge would start; in fact, it looks almost like an all-brass, rimless .410 shotgun shell.


There are other examples of this concept, such as .40 Smith & Wesson or .357 SIG in a 10mm chamber, that aren't generally dangerous but can still cause problems. Of course, there are also potentially disastrous combinations, such as .30-06 Springfield in a .270 Winchester, .300 Blackout in a .223 Remington, .40 Smith & Wesson in a .357 SIG, and others. While these combinations shouldn't always be able to chamber, it has been known to happen, with the result usually being damage to the firearm and, all too often, to the shooter as well.

More details on these cartridges and many others can be found on the SAAMI (Sporting Arms & Ammunition Manufacturers Institute) website.

Always make sure that the ammunition being used is correct for the firearm. There's no need to take unnecessary chances in life; the necessary ones are bad enough.

Friday, November 19, 2021

Prepper's Armory: Cartridge Versatility, Part 2

In my previous post I talked about cartridges that share enough common features to be used in a single firearm; these were mostly revolvers and other manually operated firearms. While I did cover some part swapping options, those were also mostly revolvers.

A request was made by our Editrix to talk about similar options for semi-automatic firearms. Due to the physics involved, this will almost solely deal with parts replacement. Keep in mind that not only can this get expensive fast, but it may also require a certain amount of part fitting.

A regularly repeated concept throughout the metallic cartridge era is a set of parts that will allow the use of .22 Long Rifle rounds in a centerfire firearm. Whether to reduce training expenses or increase versatility, this long standing idea has some value. The Colt Ace .22 conversion was one of the first successful options for use in a semi-automatic firearm, in this case the normally .45 ACP Colt 1911 and 1911A1 pistols. These conversion kits came with a lightened slide, barrel, ejector, barrel bushing, recoil spring guide, recoil spring, recoil spring plug, slide stop, and magazine, and could be used with any Government Model 1911.

Actual Colt branded kits are collector’s items and priced appropriately. However, there are other options on the market for converting semi-automatic pistols to rimfire. Among others, Advantage Arms offers a variety of kits for several different pistols. Pricewise, these can nearly equal the price of a dedicated budget .22 pistol. The Glockparts, Brownells, and MidwayUSA websites list this brand as well as others.

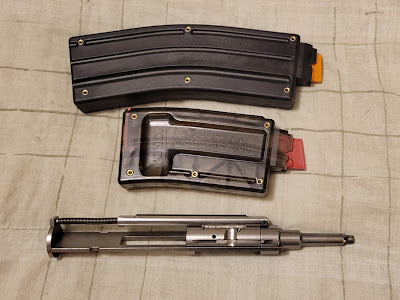
Similar concepts have been tried with semi-automatic centerfire rifles, and by far the most common today are for America’s Rifle, the AR-15. I have an earlier model made by CMMG and it works quite well, turning any .223/5.56 AR into a rimfire rifle suitable for training or small game hunting. The more recent versions of this kit lock back the bolt when empty, something my older one doesn’t do.

The author's CMMG AR-15 .22 LR Conversion unit

Other options are inserts and chamber adaptors like those made for many years by Sports Specialties/MCA Sports. These can be a much more economical option, but won’t cycle a repeating action. Inserts are for use in single shot and break action rifles and shotguns, and incorporate a chamber and short length of rifled barrel (usually around 10”) that fit inside the chamber and barrel of the parent firearm. A selection of these in popular calibers could make a single shot or double barrel shotgun very versatile indeed. However, at $95 each, the cost would add up quickly.

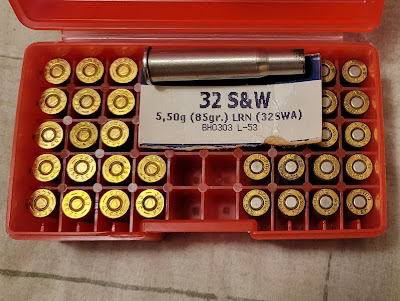
Chamber adapters, however, are the size and shape of a cartridge sans bullet and are generally for cartridges of similar bullet diameter. Inserts can be for almost any caliber smaller than the host firearm, and can be more easily used in repeating firearms. I bought one of MCA's more budget-friendly chamber adaptors that allows me to shoot .32 Auto and .32 S&W in my .30-30 Marlin. It’s reasonably accurate, and would be useful for small game at moderate ranges.

The author's MCA chamber adaptor for a .30-30 rifle

Finally, there are options to fire more than one centerfire caliber from semi-automatic pistols. This involves the purchase of spare barrels at a bare minimum, and possibly recoil springs and magazines as well. For example, buying a Glock or the new Smith & Wesson M&P in 10mm would potentially enable use of barrels in .40 S&W, .357 Sig, and 9mm, and a pistol in .40 S&W could potentially use barrels in .357 Sig and 9mm. 

It’s important to get the right initial pistol to start the process: always buy the largest caliber in the family first and work down from there.

I used the word potentially above because some caliber barrels have different external diameters and won’t mix and match with all slides. Having to buy an entire upper half of a gun (slide, barrel, and probably recoil spring) really puts this on the wrong side of a cost-benefit analysis. 

There are also custom barrels for wildcat or limited production cartridges, such as .460 Rowland, which can be used with many .45 ACP pistols. Obviously, this is not a budget friendly option.


That’s the semi-automatic side of the caliber versatility world. Hopefully this information was both interesting and useful.

Wednesday, November 10, 2021

Prepper's Armory: Cartridge Versatility, Part 1

When selecting a firearm, ammunition supply should be a fairly high level consideration. After all, what’s the point of owning a gun for prepping purposes that takes unusual or hard to find cartridges? (Guns bought for collection purposes are a different matter entirely.)

Beyond that, there are a number of firearms that can utilize more than one cartridge. This can be either due to cartridge development history, or the ability to switch parts quickly and easily.

The following list is not exhaustive, but represents some of the most common cartridge groups likely to be encountered.

.22 Short, Long, and Long Rifle
While .22 Long is nearly impossible to find even in normal times, .22 Short is frequently available. Out of a rifle barrel this diminutive cartridge is not only potentially quite accurate but is also nearly hearing safe in volume -- not a bad combination when taking small game during a survival situation.

Either cartridge can chamber in any .22 Long Rifle firearm, but being shorter, they may not feed through the magazine and will almost certainly fail to operate any semi-automatic action.

.32 S&W through .327 Federal Magnum
Introduced as a black powder cartridge in 1878, the .32 Smith & Wesson and 1896 follow-on .32 S&W Long survived the transition to smokeless powder and are still commercially loaded to this day. 

In 1984, the Harington & Richardson company introduced the .32 H&R Magnum, a lengthened version of the .32 S&W Long, intended to duplicate the ballistics of the classic .32-20 Winchester cartridge but in a straight-walled case. It proved to be quite popular with small game hunters. 

Just over 20 years later, the Federal Cartridge company lengthened the .32 H&R Magnum and called the new chambering the .327 Federal Magnum

Due to the design lineage, all four of these cartridges can be fired from any .327 Magnum revolver. Revolvers in .327 Magnum have been made by Charter Arms, Taurus, Ruger, and Freedom Arms, as well as custom designs or conversions.

.38 Special & .357 Magnum
Long considered the gold standard of personal defense cartridges, .38 Smith & Wesson Special was introduced as a black powder cartridge in 1898 but transitioned to smokeless within a year. It is likely the single most common centerfire revolver cartridge on the market.

In 1935, the .38 Special case was lengthened slightly so it wouldn’t fit in older guns and was loaded to higher pressure to produce the .357 Smith & Wesson Magnum. The new cartridge took off like a shot (pun intended) and achieved legendary status fairly quickly.

While unlikely to be encountered these days, .38 Short Colt and .38 Long Colt will both chamber in any .38 Special revolver, and all three cartridges will chamber in any .357 Magnum Revolver.

There’s also the .357 Remington Maximum, a slightly lengthened and more powerful .357 Magnum, but guns chambered in this caliber are rare as hen's teeth, and so is the cartridge.

While named similarly, .38 Smith & Wesson is a completely different cartridge, and no attempt should be made to fire it in a revolver chambered for either .38 Special or .357 Magnum! The .38 S&W case is slightly larger in diameter and won’t fit in a .38 Special or .357 Magnum chamber. Neither should .38 Special be fired in a .38 S&W revolver as, if it does chamber, the case will likely rupture on firing.

L-R: .38 Special; .357 Magnum; .44 Special; .44 Magnum

.44 Special & .44 Magnum
A similar story follows the design of the .44 Smith & Wesson Special and the .44 Remington Magnum. Introduced in 1908 as a smokeless cartridge, the .44 Special was well liked by hunters and target shooters for its excellent accuracy. However, many handloaders felt it didn’t live up to its potential. This issue was resolved when the .44 Magnum was introduced in 1955 to great fanfare. 

Again paralleling the .38 Special, the .44 Special was made by lengthening the older .44 Russian case. This means a .44 Magnum revolver can chamber any of these three cartridges. With the popularity of Cowboy Action Shooting, some limited runs of .44 Russian have been made.

.45 Schofield, .45 Colt, .454 Casull, .460 S&W
This family is another example of incremental development, but with a twist. The .45 Colt cartridge was introduced in 1873 with the Colt Single Action Army revolver, and the .45 Schofield was released two years later for the Smith & Wesson revolver of the same name. Due to the design of the Schofield revolver, the cartridge needed to be about 1/8” shorter than the parent .45 Colt.

.454 Casull was developed in 1958 during the Magnum craze of that era and, while based on the .45 Colt, it’s not only longer but was also reinforced near the case head.

At almost half an inch longer than the already lengthened .454 Casull, the .460 Smith & Wesson Magnum introduced in 2005 is nearly rifle-like in proportion: its 300 grain bullet loading equals the power of the .45-70 Government rifle round.

A .460 S&W Magnum revolver can chamber any of the shorter calibers with corresponding reduced power and felt recoil.

Part-Swapping Conversions
Several single action revolvers on the market are available with both .22 Long Rifle and .22 Magnum cylinders that can be interchanged with a few moments effort. The Ruger Single Six and Heritage Rough Rider are two examples of this design concept.

For centerfire fans, .45 ACP cylinders are available for some .45 Colt revolvers. E.M.F sells one for the Pietta 1873 style revolvers and Cimmaron sells one for their Model P revolvers.

There have also been custom conversions of Smith & Wesson Model 25 .45 Colt revolvers involving .45 ACP cylinders that use Moon Clips. This conversion would also allow the use of .45 GAP cartridges in the same handgun.

The T/C Contender was introduced in the mid-1960s and by using quick change barrels allowed for chambering from .22 Long Rifle to .47-70 in both rifle and pistol configurations.

There are also combination guns which have both a rifle and shotgun barrel based on the 19th century Cape Gun concept. Examples include the venerable Savage Model 24 or the modern Model 42 as well as the Springfield Armory M6 Scout.


Whatever style of survival or prepping firearm is being considered, don’t forget to think about ammunition options as well. You just need to look back at the past year and a half to see the importance of ammunition interchangeability.

Good luck and safe shooting.

Tuesday, August 3, 2021

A Primer on Reloading

While metallic cartridge reloading has been covered before on Blue Collar Prepping, it’s been a while. This post isn’t going to be an in-depth discussion of all the details involved in the reloading process, but rather more of a general primer. I’ll go into more detail in future articles.

For the record, if anyone claims reloading will save you money, they’re trying to sell  you something. Reloading simply enables you to shoot more for a similar expenditure. For example, if I’m spending X amount of dollars on practice ammunition, that money would go much farther if spent on reloading supplies.

Equipment
The equipment needed to start reloading need not be either extensive or expensive.  A basic single stage press, dies, shell holder (if it doesn’t come with the dies), powder measure, and calipers are really all the items needed to begin.

A set of reloading dies with shell holder

Nor does a reloading setup have to take up much space.  Aside from the press itself, all other components fit in a small tub which can be stored in a closet when not in use.

Consumables
The consumables used in reloading are brass, bullets, primers, and powder. 

  • Brass can be saved as it’s shot, and straight wall pistol brass can be reloaded many times over. Ask any friends who don't reload to save their brass for you; the calibers you don't shoot can be traded with other reloaders.
  • Cast or plated bullets are less expensive then jacketed and are fine for target shooting. 
  • Primers and powder can usually be sourced at a local gun show or retailer. If not, then they’ll need to be ordered online. This will be more expensive because of the required hazardous materials fee, which is generally twenty dollars per order.

To reload metallic cartridges, certain steps must be taken. Starting with a clean fired case it needs to be de-primed, resized, flared or belled, primed, powder added, bullet seated, crimped, and finally checked.

A series of cases from start to finish
 
The Reloading Sequence
I’ll review each step in turn.

Depriming is the removal of the old primer so that the case can be reused.  Depriming may be done before or after case cleaning. If done after cleaning, depriming is combined with resizing of the case. If depriming is done before cleaning, a universal depriming tool is used.  This is like a standard depriming die, except it only pushes out the old primer and doesn’t touch the case itself.

Resizing is done after the case is cleaned to prevent damage to the case and die from small particles of dirt and debris. Resizing squeezes the case back to starting size based on recognized standards.  These standards are maintained by the Sporting Arms and Ammunition Manufacturers' Institute or SAAMI.

Case flaring or belling is a slight widening of the case mouth to ease insertion of a bullet.  Jacketed and lead bullets require different amounts of case flare. This step can occur before or after priming, and can also be combined with powder dispensing.

Priming is the insertion of a new primer in the case.  This can be done either on a press or with a hand tool.  Regardless, pay special attention to make sure the primer is seated properly to prevent potentially dangerous issues.

Next is dispensing powder.  Always check the chosen powder in at least two recent reloading manuals for a starting load.

A powder scale and dispenser

Bullet seating is, as the name implies, placing a bullet in the belled mouth of the case and pressing it in to the proper depth. Overall Cartridge Length (OAL) is an important measurement made with a caliper and compared with the entry for that cartridge with that bullet weight and style in the manual.

Crimping is the removal of the flare that was added in an earlier step.  Depending on the type of cartridge, either a roll crimp or a straight crimp will be used. Roll crimping curls the case over and slightly into the bullet to help hold everything in place.  This type of crimp is most commonly found in revolver cartridges. Straight crimping is more common in cartridges designed for semi-automatic pistols and irons out the crimp, so the case mouth is parallel with the bullet.

At this point the cartridge is complete and ready for firing.

Testing
Testing is recommended whenever assembling a new load for the first time, or when using once-fired brass that wasn’t shot from your firearm. This testing can take the form of measuring with calipers, using a chamber gauge, or something called the plunk test.

The plunk test consists of removing the barrel of semi-automatic pistol, holding the barrel muzzle-down, and gently dropping the loaded case into the chamber. It should seat to the proper depth with no effort and make a soft “plunk” sound as it drops into the chamber. When you invert the barrel, the loaded cartridge should drop straight out with no sticking. If it doesn’t seat to proper depth or sticks on removal, it means the cartridge is out of spec and may require die adjustments.


If the idea of reloading ammunition is of interest, but there’s concern about making a large investment in equipment up front, reloading equipment can be found used either on various firearm discussion boards or online auction sites.

Since many people are more visually oriented, I created a series of videos that cover the reloading process.

Monday, May 24, 2021

Bullet Casting 104: Sizing and Lubing

If you’ve been following along in my bullet casting series, you should have a nice pile of cast bullets. However, they’re not ready to load and shoot just yet; before we can get to loading them, we need to go through three steps.

Inspection
First, we need to make sure that our bullets pass a basic quality check. This means looking for fill-out issues. 
  • Can we see any voids on the bullet? 
  • Are the edges of the bullet bases and grease grooves nice and crisp? 
  • Are the bullet bases clean and square? 
  • Some of the first bullets from any casting session are likely to be wrinkled, and this is caused by a mold that isn’t up to casting temperature. 
  • If the surface of the bullet is grey and appears rough in texture (aka "frosted"), this means the mold temperature was too high.

Any bullets that don’t meet the quality requirements can be tossed back in the pot for your next casting session.

L-R: a frosted bullet, two with poor fill-out, and two good bullets

Some badly wrinkled bullets

Lubrication
Next, the freshly cast bullets need to be lubricated. This does two things: it eases the passage of the bullet down the barrel and, more importantly, acts as a gas seal between the bullet and the barrel. 

No cast bullet will be a perfect fit in the barrel. Any imperfections, especially at the base, will likely cause gas cutting which is where hot combustion gasses from the propellant get in between the bullet and the rifling. This results in increased lead build-up in the bore, reduced accuracy, and more laborious cleanup after shooting.
There are several techniques which can be used for lubricating cast bullets, such as tumble lubing (which works better with specific bullet designs), pan lubing, powder coating, and using a lubrisizer. This last method combines bullet lubing with the third step, bullet sizing.

Sizing

Tumble (L) vs. traditional lube groove (R) bullets

As they come out of the bullet mold, cast bullets are generally a few thousands of an inch over size and their noses may also not be perfectly round. Both these issues can be resolved by running the cast bullets through a bullet sizer. At heart, any bullet sizer is a very precisely sized and very carefully polished ring of hardened steel that the bullets are pushed through and swaged down to their final size.

Recommended Models
Lee Precision makes a push through sizer that can be used on any single stage press. This is an inexpensive, simple, and effective method of sizing bullets, with lubrication done as a separate step prior to running the bullets through the sizer. 

Among the benefits of this sizing system:
  1. The bullets are pushed through the sizer nose first, which means that you don’t have to buy a selection of punches for your different bullet nose styles.
  2. This system pushes the bullets completely through the sizer, which can increase production speed.

Some bullet casters have even mounted a dedicated single stage press with this sizer attached upside down to speed things up even more.

The Lyman Model 4500 Lube Sizer dedicated bench top lubrisizer is a direct descendent of Ideal’s original Number 1 sizer which dates back over a hundred years (it even takes the same sizing dies and top punches). This type of sizer pushes the bullets in base first, and because of this it requires a top punch of the proper shape so it doesn’t damage the bullet nose. Once the bullet is pressed all the way into the sizing die, bullet lube is applied and the bullet is raised up for removal, then the next bullet is placed on the platform and the process is repeated.

This system takes solid cylinders of lubricant that you can either buy or make yourself. If you live in a colder climate, you might want to add a lubricator heater to your setup.

Finally, there is the Star Lube-sizer by Magma Engineering. This is an almost production level system, combining many of the best features of the sizers I’ve already mentioned. As with the Lee, the Star also pushes the bullets nose first, all the way through the sizing die. When the bullets are pushed through the Star, they drop out the bottom with no additional setup needed, and like the Lyman, the Star takes cylinders of lube and applies it to the bullets as they’re sized. It also has a lube heater. Obviously all these features come with a price, but if you’re going for quantity, it may be a good investment.

In Conclusion
I hope these posts have given you food for thought regarding bullet casting and plenty or resources in case you decide to pursue this hobby.

Remember: take your time, pay attention, treat the process with all due respect, and you’ll have a more harmonious outcome.

Good luck and good casting.

Monday, May 17, 2021

Bullet Casting 103: Casting Bullets

Now that we have a batch of clean alloy formed into ingots, we can move on to actually casting it into bullets.

The same camp stove we used to melt the alloys can be used for rendering ingots. While this keeps costs down, one issue with this method is that it is difficult to maintain a steady temperature in this way. If your melt is too hot, the tin and antimony can separate; if it isn’t hot enough, the alloy will start to harden before it can fill the mold, leading to poor fill-out and useless bullets.

If you go this route, I recommend that you not use the same pot for rendering as you do for casting, as the contaminants we spent so much time and effort filtering out in the rendering process end up caked to the sides of that pot and will end up contaminating the alloy when you go to cast. Instead, either use a dedicated cast iron pot for bullet casting, or use a modern casting furnace. These are electric and have thermostat dials for precise temperature control as well as integral melting pot. There are a number of manufacturers, such as Lee and Lyman, who offer quality products with different features and at a range of price points.

There are two main options when you’re ready to start making bullets: ladle pour and bottom pour casting furnaces. They come in different capacities, but 10 and 20 pound are the most common. 

Two of the author's casting furnaces

Once you have a means to melt your ingots, you need a way to get the molten metal into the bullet mold. With traditional furnaces, or the aforementioned iron pot over a camp stove, a ladle is used. There are a few different styles, and if you’re left handed like me, take note on which side of the ladle the pour spout is located. Obviously, with a bottom pour pot, a ladle isn’t necessary.

Bullet molds are next. One of the nice things about this hobby is that it’s been around for a long time, so used molds are available in plenty.* A new or new-to-you mold will need some prep before you start casting, but usually all that’s necessary is to give the mold a good cleaning with solvent and a nylon or bronze brush. Once it’s clean, put a small amount of heat resistant lubricant on the hinge of the sprue plate and it’s ready to go.

A selection of the author's bullet molds

At the start of a casting session, the mold is at room temperature. Using it now will cause the pour to harden too quickly, resulting in badly formed bullets. To heat the mold, you have several choices:
  • Some casters have a dedicated hot plate they rest the mold blocks on to bring it up to casting temperature;
  • Others will prop the mold on the side of the casting pot; 
  • Some casting setups have a dedicated mold pre-heat shelf.
  • Whatever you do, do not dip the mold in the melt! This can warp the blocks.
Even with preheating, the first few casts are not going to be acceptable. Don’t worry about it, and instead get a good rhythm going so the mold doesn’t cool down.

When filling the mold, make sure to fill the cut out in the sprue plate. This puddle of alloy helps make sure that there’s enough metal to completely fill out the bullet.

Depending on alloy and the size of the bullet being cast, the time for it to set will vary. The appearance of the puddle on the sprue plate can help: when it goes from shiny to dull, wait a few more seconds, then open the sprue plate by hand with heat resistant gloves or knock it open with a wooden stick; separate the handles; and, if all goes well, the bullet should drop out. If it doesn’t, tap the hinge of the mold with the stick. Never hit the mold blocks themselves. If it takes significant effort to get the bullet out of the mold, it likely needs maintenance.

I use a cigar box lined with an old towel to catch my bullets. Don’t drop them on a hard surface as they’re still hot enough to deform!

Shiny, freshly-cast bullets.

Once you’re done with the casting session, it’s common to leave an inch or so of alloy in the bottom of the pot to speed up the melt for next time. Take care if you’re using a bottom pour pot, however, as they can leak. After the mold has cooled, oil the blocks or wrap them in Vapor Corrosion Inhibitor (VCI) paper to help prevent rust.

Please review the safety brief from my previous post and follow proper post-casting hygiene. When everything is done for the day, keep your casting clothes separate from regular laundry and wash your hands and face thoroughly, or (even better) take a shower.

My next installment on this topic will deal with sizing and lubricating cast bullets so they’re ready for loading.

Be safe, have fun, and good casting.


* Editor's Note: David assures me that "available in plenty" is a perfectly cromulent phrase despite the fact that the bad grammar makes my teeth ache.  It may be a regional idiom I've not heard. Either way, please consider this my use of the term [sic]. 

Monday, May 10, 2021

Bullet Casting 102: Rendering

Now that we have our raw materials, we can’t just melt it and start casting bullets; our lead supply contains many impurities we need to clean out first. While some people refer to this step as smelting, it’s more properly termed rendering.

Safety
Before we go any further, I need to talk about safety. We’re dealing with molten metal at over 700 degrees Fahrenheit, which can cause terrible burns and permanent injury if we’re not careful. In addition, some of the gasses this process emits are not healthy either. I shouldn’t have to say this, but this process should be done outside in dry weather.

My recommendations for protective gear are as follows:
  • Heavy shoes, preferably leather
  • Heavy cotton clothing (don’t wear synthetics, they melt)
  • Heavy leather heat-resistant gloves (welding gloves work well)
  • Full face shield
  • Hat which will fit under the face shield
  • Leather or heavy cotton canvas apron
  • Respirator
One other safety item: Do not, under any circumstances, allow any liquid to get into the melt! When water converts from liquid to steam, it increases in volume 1,600 times, and this reaction can empty a twenty pound pot of lead in an instant. In the hobby, we call this "Getting a visit from the Tinsel Fairy."

While we make light of it with this name, it’s no laughing matter.  Simple precautions, such as putting the metal in the pot before heating to evaporate any water, making sure scrap metal doesn’t have any closed chambers, and keeping a heavy cover on the pot during the melt can reduce this risk and protect our delicate skin, eyes, and lungs from molten metal and unpleasant gasses.

Equipment
Depending on the amount of casting we’re planning to do, the equipment needed can be fairly minimal. To get started, all you need are:
  • Propane or white gas camp stove
  • Small cast iron pot
  • Slotted spoon
  • Ladle
  • Ingot molds
For those who go on to casting in larger quantities, a table with a propane weed burner for heat and a cut-down propane tank for a pot can work quite well.

The author's original and upgraded rendering setups

Much of this equipment can be sourced from thrift shops and yard sales. For ingot molds we can use muffin tins, so long as they’re steel or cast iron. Avoid aluminum, as the lead can melt its way through with disastrous results. There are of course purpose-made ingot molds, but they’re generally more expensive.

A yard sale ingot mold.
The author uses this one for pewter.


Process

The first step involves melting the lead to a liquid state. This usually occurs between 700 and 750 degrees Fahrenheit depending on the alloy. A high temperature thermometer is useful here.

At this point, we need to get our alloy casting clean. Remove any dirt or debris such as wheel weight clips, range dirt, and bullet jackets. This one’s easy, as all these things are lighter than molten lead and float to the top to be skimmed off with our slotted spoon. 

Then we need to make sure any oxidized lead on the surface is reduced back into the alloy. Some people use a small amount of candle wax for this, but let’s wait on that.

Next is fluxing which removes any dissolved metals we don’t want (aluminum, cadmium, etc) while retaining the tin, antimony, copper, silver, etc. that’s in there. According to some researchers, one of the best materials which can perform all these actions is good old sawdust. Avoid sawdust made from pressure treated lumber or plywood, as it has some nasty chemicals we don’t want.A layer of sawdust sprinkled on top of the molten alloy, allowed to char, stirred through and then skimmed off, can result in nice, clean, well balanced, alloy.  

Once we’ve done this once or twice, we can ladle the molten lead into our ingot molds. Eventually, we should have a nice collection of lead alloy appropriate for bullet casting and formed into ingots.

A batch of pewter ingots, fresh from the mold. 

I’ll go over bullet casting equipment and the casting process in a future article. In the meantime, browse the
Cast Boolits online forum
for more information.

Saturday, February 17, 2018

Friday, February 9, 2018

Banging the Pillow: .38 Special


In this video I shoot the pillow one last time. (Maybe.) However, it is with the biggest pocket gun to date: my Charter Arms Off Duty .38 Special shooting a Cor-bon 110 grain all-copper DPX load.

I apologize for the video problems. Our usual camera ran out of battery midway through filming this series and we had to move to a backup camera, which is why the sound and quality for later videos haven't been as good.


Friday, February 2, 2018

Banging the Pillow: .32 ACP, Part 2


This week we revisit the Kel-Tec P-32 by propping up the pillow in the same manner as I did with the .22 Magnum to see if that produces a different result.

Friday, January 26, 2018

Banging the Pillow: .22 Magnum

This week we look at the penetrative ability of the  North American Arms .22 Magnum shooting a CCI 40gr TMJ Maxi Mag round.

The results were quite awe inspiring, though not unexpected. It is, after all, a rifle round.

Friday, January 19, 2018

Banging the Pillow: .32 ACP


This week we continue our ballistic testing with one of my favorite pocket guns, the Kel-Tec P-32, and my favorite round for .32 ACP pocket guns, the Winchester white box 71gr flat point FMJ.

Next week I’ll cover the .22 Magnum out of everyone’s favorite pocket revolver!


Friday, January 12, 2018

Banging the Pillow: .380 ACP


First up: the AMT Backup DAO (the same gun as the negligent discharge mentioned here), comparing the penetration between a Winchester Super-X 85gr Silvertip JHP and a Winchester 95gr  flat nose FMJ.


Friday, January 5, 2018

A Little Pillow Talk about Safety and Penetration


Happy New Year!

This video is the first in a series where I demonstrate the penetrative value of various handgun calibers versus my neighbor's pillow (previously killed here).


Tuesday, August 29, 2017

Alternative AR Calibers

After discussing gas system options, Erin's other big AR question dealt with alternative calibers. Being as the AR is the Barbie of the gun world, there's a monstrously large list of chamberings for the platform, and swapping between them can be as simple as pushing two pins and changing uppers. At worst, you may also have to change a buffer as well. All in all, the changeover takes about 30 seconds.

With so many options available, it would be a Herculean task to list and break them all down. And while I may be mighty, Hercules I am not, so I'll stick to some of the more common and available calibers that the AR can run.

.22 Long Rifle
.22LR is cheap, very quiet, and has virtually no recoil in the AR-15 platform. It makes an excellent practice and teaching caliber, allowing the same trigger and control setup used in a centerfire rifle to be employed on a trainer.

6.5 Grendel
The Grendel was a fairly early entry into alternate AR calibers. It is designed as a precision long-range cartridge, and was an early standout in competition shooting. Unfortunately, it is less widely available than the other calibers on this list.

7.62 x 39
Delivering performance similar to the legendary 30-30 Winchester, the 7.62x39 adapts fairly well to the AR platform, turning a basic AR-15 into a very functional big game hunting rifle. It does however have some quirks, such as feeding from non-standard magazines, and difficulty with setting off the hard primers used in cheap imported ammunition.

.300 AAC Blackout
Designed by Advanced Armament Corporation, the Blackout is a 5.56 case necked up to .30 caliber, which means it feeds and functions using standard AR bolts and magazines. AAC is a suppressor manufacturer, so the Blackout comes in two loadings: the 125gr supersonic load performs very similarly to a 7.62x39 with none of the drawbacks, while the 220gr load runs at subsonic speeds and is specifically designed to run with a suppressor. If you have the means to acquire a suppressor, this is an excellent load at shorter ranges.

.458 SOCOM
If no other caliber on this list has enough power, the .458 SOCOM does. Using standard AR magazines at reduced capacity, this round was developed as a short range, very hard-hitting round for soldiers performing missions outside the performance characteristics of the 5.56. It also has both supersonic and subsonic loads, with the subsonic load delivering roughly twice the energy of the .300 Blackout. The supersonic loads also make a dandy short and medium range hunting round, suitable for almost all game in North America.

9mm Luger
Yes, the same 9mm Luger that runs in untold numbers of police and private citizen handguns also functions wonderfully in carbines. The added barrel length gives a substantial velocity increase, and the longer sight radius and stability of a shoulder stock contribute to greatly improved accuracy. In a carbine, it's even easier shooting and lighter recoiling than in a pistol. Unfortunately, it requires very different magazines and a block inserted into the magazine well to make the magazines fit and feed properly.


Selecting an alternate chambering for an AR allows you to tune your weapon for a specific purpose or to meet a particular need. The modular nature of the AR makes this a fairly straightforward proposition, and one very worth investigating.

Lokidude

The Fine Print


This work is licensed under a Creative Commons Attribution- Noncommercial- No Derivative Works 3.0 License.

Creative Commons License


Erin Palette is a participant in the Amazon Services LLC Associates Program, an affiliate advertising program designed to provide a means for sites to earn advertising fees by advertising and linking to amazon.com.