Showing posts with label Fuel. Show all posts

Thursday, November 11, 2021

Charcoal, Part 1: Fuel

Erin wrote several articles about activated carbon for filtering and medicinal uses a few months back. This is good information, but there are more uses for basic carbon in the form of charcoal.

Most of us have used, or at least, seen charcoal grills for cooking. Charcoal is made from wood by heating it in the absence or lack of oxygen to drive out the water and volatile chemicals, leaving fairly pure carbon. Charcoal has several advantages over wood as a fuel for cooking and heating:
  • Easier storage. Wood has to be kept off the ground, covered from the elements, and neatly stacked to provide airflow for drying. You'll only bring in what you need to burn for a day in order to cut down on the pests and debris inside. Charcoal can be stored in a box, bag, or bin about anywhere until you need it. You'll have black dust instead of bits of bark, splinters, dirt, bugs, and other debris once you empty a storage space.
  • Longer storage life. Wood rots. Insects and vermin love woodpiles, as they provide shelter and food for them until they get a chance to move into your living quarters. Unless you are very careful with your storage, raw wood will only last a few years before it has degraded to a state where it's not usable as fuel. Charcoal, however, is close to coal in shelf-life, and without the water and volatile elements of wood, insects and vermin have no resources to exploit so it won't degrade as quickly. It is a bit more fragile than wood, so repeated handling will result in smaller pieces, but they'll still burn at the same rate.
  • Higher burning temperature. Pure carbon like coal or charcoal can burn at a higher temp because of the lack of water. Water takes a lot of heat to turn into vapor, and that heat is then not available for cooking or heating. Charcoal doesn't burn quite as hot as coal so it's safer to use in woodstoves.
  • More efficient. During the production of charcoal, the voids or empty spaces created by the removal of water and volatile elements form channels for combustion. This makes for a more uniform burn in a smaller space, which makes it easy to have a more efficient fire.
  • Cleaner burning. If you're smoking or drying meat for preservation, wood will impart a taste or flavor to the meat. Sometimes that is the desired effect; the use of hickory, mesquite, apple, etc. wood to impart a flavor is common, but if all you have available are cedar, pine, or some other wood with a disagreeable taste, you'll end up making dried food that not even the dogs will eat. The process of making charcoal removes all of the volatile compounds that will provide flavor, so the source wood isn't a factor. You'll end up with about the same amount of ashes as wood, but without the clinkers that coal will produce.
  • More uniform heat generation. Wood is never uniform, so you're going to have differing heat coming from different spots at different time as it burns. Look at the end of a log and you'll see the variations in quality of fuel: bark, soft outer layers, harder inner layers, knots, rot, etc. Charcoal production takes away most of the variations, leaving a more uniform fuel for a more uniform fire.
  • Higher energy density. Since charcoal doesn't have the impurities found in wood, you can get about three times the heat out of a pound of charcoal versus a pound of wood. While less dense than wood, the higher energy content per pound of charcoal makes transportation more efficient as well. For a scholarly explanation of the numbers, here's a report out of Africa comparing the two. Reading through examples from areas that lack our infrastructure is a good source of ideas for how to deal with the failure (or lack of) said infrastructure.
There are some downsides to charcoal, though, especially if used for cooking. The main detriment to using charcoal for cooking is the same benefit it has as a filter or medicine: its adsorption capacity. Storing charcoal near a source of strong odors will allow those odors to permeate it, and those concentrated odors will be released when you burn it. I've seen some very good steaks ruined by being cooked on a charcoal grill because the charcoal was stored for a long time near petroleum products. Nobody wants a T-bone that tastes like diesel fuel. 

Charcoal has many uses, so don't get stuck on just the fuel or filtration aspects. I'll describe a few other uses in my next post.

Friday, February 19, 2021

Bad Gas

A friend of mine on Facebook has a dilemma in relation to fuel storage: it seems he has about five gallons of gasoline that has been in a container for a year or two. He's been burning a bit of it at a time in his backyard fire pit, but unless you're aiming for a raging bonfire, that's real slow going. When he asked if there were any ways to consume it faster, it led to a great conversation.

Why is old gas a problem?
As petroleum fuels age, they begin to break down. Diesel fuel stays good for about a year, while gasoline starts to come apart at about six months. As they break down, their ability to burn degrades significantly, and they leave nasty deposits in engines. This can be prevented by using stabilizers and rotating fuel, as covered by Chaplain Tim here. Sticking to his advice means you'll always have fresh fuel to provide maximum power and efficiency in your engines.

What if your gas does go bad?
If your fuel does go bad, all is not lost; there are a couple things you can do to salvage it. If the fuel is in a tank already, the Seafoam product Tim mentioned does a wonderful job of "recovering" bad gas. I use it in my track car, because I ended up with half a tank of old gas that I thought had been drained. So far, it still makes good power and starts every time I hit the key.

If your fuel is in a gas can, the fix is even simpler: just dilute it with good gas. A ratio of 10:1 or better will burn just fine, and shouldn't harm an engine in good repair. Running a higher ratio like 15:1 will burn your bad fuel slower, but will burn easier in your engine, if you're worried. For clarification, that means 10 or 15 gallons of good gas to every 1 gallon of old fuel.

You can also run old fuel in gasoline yard tools, diluted with good fuel. The ratio can be a bit shorter in gasoline tools, as low as 5:1, since their engines are simpler with fewer places that can get gummed up and minimal electronics to be affected.


Prevention is always the best course. Rotate your fuel stocks and use fuel stabilizers whenever possible. If all else fails and you find yourself with some old gas, you haven't lost that money or that resource; hit it with fuel conditioner or dilute it with good fuel and carry on.

Lokidude

Thursday, December 17, 2020

Diesel Treatment for Cold Weather

Cold weather is finally here. When the temperatures drop to freezing or below, I start to see a lot of customers buying various treatments for their diesel vehicles and storage tanks. I took care of the company vehicles and storage tanks back in October -- it's easier to prepare than to repair -- but some folks just have to put things off until it's an emergency so they have a reason to complain and panic.

Cold Weather Diesel Problems
Once it gets cold enough, diesel fuel will "gel", meaning that the components of the fuel will solidify and fall out of suspension. Normal #2 diesel has a fair percentage of paraffin wax as a component which solidifies easily. Solid wax doesn't flow, so fuel lines and filters tend to get blocked and fuel pumps have a hard time moving it through the injectors. This means that a cold diesel engine won't start or won't stay running once the fuel starts to gel.

The exact temperature of "cold enough" will vary with the grade of fuel, so in the winter most sellers will either switch to the more expensive, wax-free, #1 diesel (kerosene), or they will blend their #2 diesel about 60/40 with #1 diesel to keep the price down while still being able to pump it.*

Lets look at a few of the problem points of #2 diesel.

Cloud Point
At about 32°F, diesel fuel starts to get cloudy due to the wax starting to form solid crystals. Cloudy fuel will flow through pumps and pipes, but will start to plug filters unless those filters are kept warm. Engine efficiency will suffer and fuel mileage will drop because the fuel system is struggling to move enough fuel.

Cold Filter Plug Point
Since a fuel filter is designed to trap particles, once the wax starts to solidify it will get trapped in and blind off the filter. #2 diesel hits this point at about 15°F and engines start to stall... if they'll start at all.

Pour Point
Once the temperature drops down to 0°F, the wax will have gelled to a point that the fuel will no longer flow (or pour). No fuel means an engine will not run.

Fuel Treatment
This is what we have on the shelf at work and can be found in most truck stops.

The white bottles on the left are Power Service diesel supplement. It provides good anti-gelling and stabilizes the fuel for storage, and a one-quart bottle will treat up to 100 gallons of fuel. This is my choice for my diesel truck with a 50 gallon fuel tank.

The red bottles are Power Service 911, and that is used to fix already gelled fuel. The normal method is to remove the fuel filter and pour the 911 into the canister, where it can dissolve the congealed wax and allow fuel flow. The rest of the container, or another one, is dumped into the fuel tank and left to sit for an hour or two so it can do the same to the fuel there.

The clear bottles of brown liquid are Howes Diesel Treat, our best seller. Howes does everything that the Power Serve does, but backs it up with a guarantee that if you run six bottles of it through your equipment and it still gels, they will pay for the tow to get you fixed up. The two-quart bottles shown will treat up to 320 gallons of fuel, which is easier to use in storage tanks and commercial vehicles with large fuel tanks.


If you have a diesel generator or vehicle, winter can make life more difficult. Keep them warm if you can and treat your fuel so they will start when you need them.


* As a point of interest, home heating oil is basically #3 diesel and has even more wax content. This provides more heat per gallon, but gels up faster if unheated.

Friday, February 8, 2019

Old School Gas Can Hack


Here's a handy little modification for old school gas cans along with some thoughts on my current preps, future demands, and what I’m going to do about it.

Friday, October 20, 2017

Bugging In: Fuels and Storage


If you're going to heat your house in the winter, you'll need fuel. And if you have fuel, you'll need to store it.

Here are the different ways I store my different fuels.


Thursday, April 13, 2017

Pump It Up

Last week, I mentioned pumps that could be used to empty an underground storage tank (UST) and how I was having a hard time finding a suitable pump for emergency use. There are several issues that I ran into, but in order to explain them I need to make sure our readers have a basic understanding of pumps, pump mechanics, and the limitations of each type of pump. My knowledge of pumps comes from a few decades of working with (and on) various types of pumps and not from any formal schooling, so I may get a few details wrong, but the basic knowledge is from personal experience.

What Is a Pump?
 A pump is a mechanism for moving a fluid (gas or liquid state) from one area to another. Both a trash pump and your heart are liquid pumps, but they work by different methods and are examples of the two main types of pumps.
Centrifugal pumps
Centrifugal pumps work by using a spinning disk, usually one with vanes on its face, to throw the fluid against a casing that directs the flow in the desired direction. Normally the intake is in the center of the disk (called an impeller) and the discharge is rotated 90° from the intake. Here's a simple example :

Image #1

If you have a well, you probably have a submersible centrifugal pump at the bottom. Your water-cooled vehicle has a centrifugal water pump that moves the coolant through the engine and radiator. The fuel pump in newer (fuel injected) cars is a centrifugal pump. Centrifugal pumps are very common in industry.

Pros
  • Easy to work on: as long as you have the correct seals on the drive shaft, the pump will run for years and parts are not built with excruciatingly tight tolerances. 
  • Long life: because the impeller and volute are not actually touching each other, there is very little wear between the two. 
  • Variable rates: by changing the speed of the drive shaft, you can easily change the rate of flow (within reason). There is a minimum speed below which the pump won't move anything, and a maximum speed where the spinning parts will fail, but there is a range of flow rates from a single pump.
  • Tolerant of variable feed: properly designed, they can handle a limited amount of solids mixed in with the fluid feed. Liquid pumps will handle a limited amount of gasses in the feed.
  • Good for pushing fluids long distances and up high vertical distances (AKA "head").
  • Dead-head resilient: If the discharge is blocked, the pump will not build up much pressure. This is handy if you can't, or don't, want to deal with high pressure lines.
  • High flow rates at lower pressures: I used to work with pumps that had up to 18,000 gallons per minute flow rates, but they were only working against about 6 feet of vertical head -- about 3 PSI.
Cons
  • No dry start: the volute must be full before the pump will work. So-called "self priming" pumps simply have a method of filling the volute before starting the pump, or they have a volute that is designed to hold fluid after power is shut down.
  • Poor suction: while they are capable of generating moderate discharge pressures, they won't suck up anything below the inlet port.
  • Lower efficiency: only about 60% of the energy put into the pump is transferred to the fluid. There is a method of figuring out peak efficiency, but I don't want to get into how to read a pump curve in this post.
  • Works best with thin fluids: oils and greases are too viscous to be moved through a centrifugal pump.

Positive Displacement Pumps
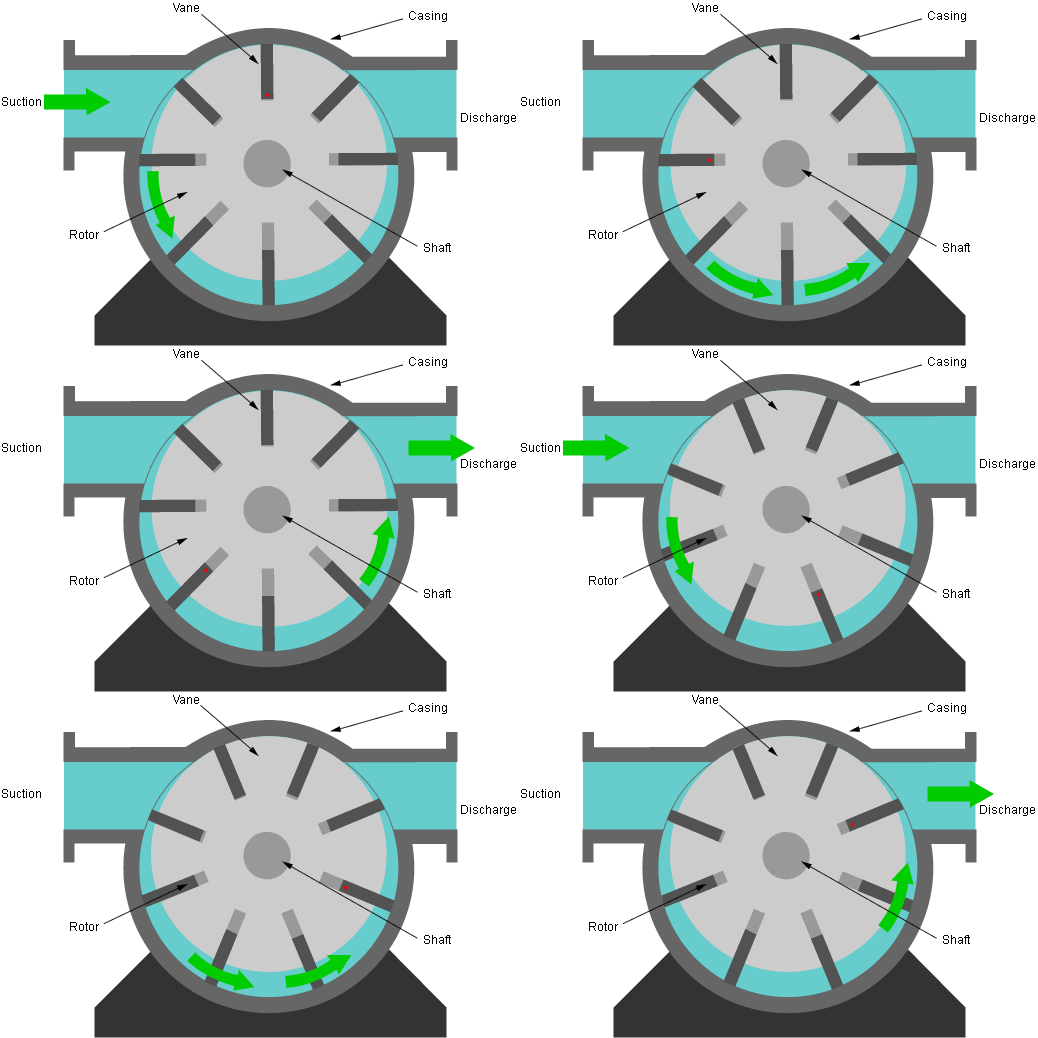
Unlike centrifugal pumps, positive displacement (PD) pumps use a wide variety of methods of moving fluids. They all have two things in common: check valves, and a chamber that changes in volume. The check valves may not be separate pieces, or they may be an integral part of the mechanism, but there has to be some way to prevent back-flow for a PD pump to work.


image #2
Here's a common pitcher pump, which is a good example of a piston pump. The volume of the space between the pump base and the piston is changed by the action of the handle. The check valves are at the base and on the piston. Deep, old wells may not have a valve on the "foot" of the pump and will rely on the leather seals on the piston to do all of the work.


Image #3


This is a peristaltic pump, commonly used as a "metering" pump because the volume of fluid is set by the size of the tubing. By changing the speed of the drive, you can easily meter out exact amounts of fluid. The changing volume is in the tubing, and the check valves are formed by the rollers as they pinch the tubing against the housing. They're easy to work on since the great majority of any wear is in the tubing, which is easily replaced.


Image #4
This is a vane pump. The centrifugal force of the spinning rotor throws the vanes out against the casing, creating a sealed volume that it then moves around the bottom of the casing to the discharge. We use this type of pump to move anhydrous ammonia because the materials are selected to withstand the temperature extremes. They don't last long if you run them dry, though; the fluid acts as the only lubricant available to the vanes as they slide along the inside of the casing.

There are other types of PD pumps that use diaphragms or some other way to create a changing volume, but I think you get the idea. PD pumps have many uses.

Pros
  • Often self-priming:  they are designed to move gasses as well as liquids, so they can prime themselves from a dry start. A pitcher pump may need a cup of water dumped down the casing to wet the leather piston to form a good seal, which is why you'll sometimes find a full water jar next to the hand pump. 
  • Good for thicker fluids: high viscosity liquids like oil and grease are no problem for a PD pump. I've seen specialty PD pumps that will move wet concrete through a hose to the building site. 
  • High pressure: the common pressure washer that you use to clean your sidewalk or power-wash your siding uses a piston pump. Pressures in the thousands of PSI are easy to achieve with a PD pump.
Cons
  • High pressure: if the discharge gets blocked, most PD pumps will create dangerous levels of pressure in a matter of seconds. I've seen someone close the wrong valve and have to clean up after a 6" diameter pipe blew out. 
  • Touchy to work on: much tighter tolerances in the manufacture means that PD pumps tend to be harder to work on, especially in the field. Special "clean rooms" are normally set aside for working on PD pumps to keep dust and dirt out of the internal parts.
  • Lower flow rates than centrifugal pumps.
  • Shorter life-span than a centrifugal pump: the tighter tolerances and constant motion of parts against each other lead to increased wear.


So picking a pump is not as easy as it seems. Like most of life, there are compromises and trade-offs in deciding which pump to choose if you're trying to empty a UST. I'm still doing some research and will update last week's article soon. Unfortunately I haven't been able to find a gas station that will let me field test any of my possible solutions; for some reason they're not fond of anyone spreading information that could help thieves...


Gif credits

  1. https://blogger.googleusercontent.com/img/b/R29vZ2xl/AVvXsEj4ejOGvbeD7cILWxqg7X8R_efrKQ4Jlq0Rts5BW2fQccMA1MYXwxqAGwIve6HYuopk3Vh0DKQ43fKAEaBcjpIekHJMVBZ8f37KQ5TYAgFfiw8ro8agY1QeXPdzOm7bVkZ4aNaEEcV32Hyt/s1600/animatedcentrifugalpump.gif
  2. https://upload.wikimedia.org/wikipedia/commons/thumb/6/69/Hand_Pump_-_Animation.gif/220px-Hand_Pump_-_Animation.gif
  3. http://www.ipumps.biz/i-Pumps2.gif
  4. http://www.gmpumpsa.com/wp-content/uploads/2014/01/Proc201_010100_G08.gif

Thursday, April 6, 2017

Got Gas?

About a year and a half ago, I wrote a short post about lockpicking. In the first paragraph I stated “I don't condone and can't recommend breaking laws for petty reasons, but at the same time I believe that tools and skills are neither good nor evil by themselves, and that applies to today's article as well.

Gasoline and diesel are common fuels that we pump into our vehicles on a regular basis, and some of us store back-up fuel. We've already covered fuel storage, but what if you're away from your stored fuel when TSHTF? Where are you going to find enough fuel to get you home if the pumps aren't working due to a sustained power outage?

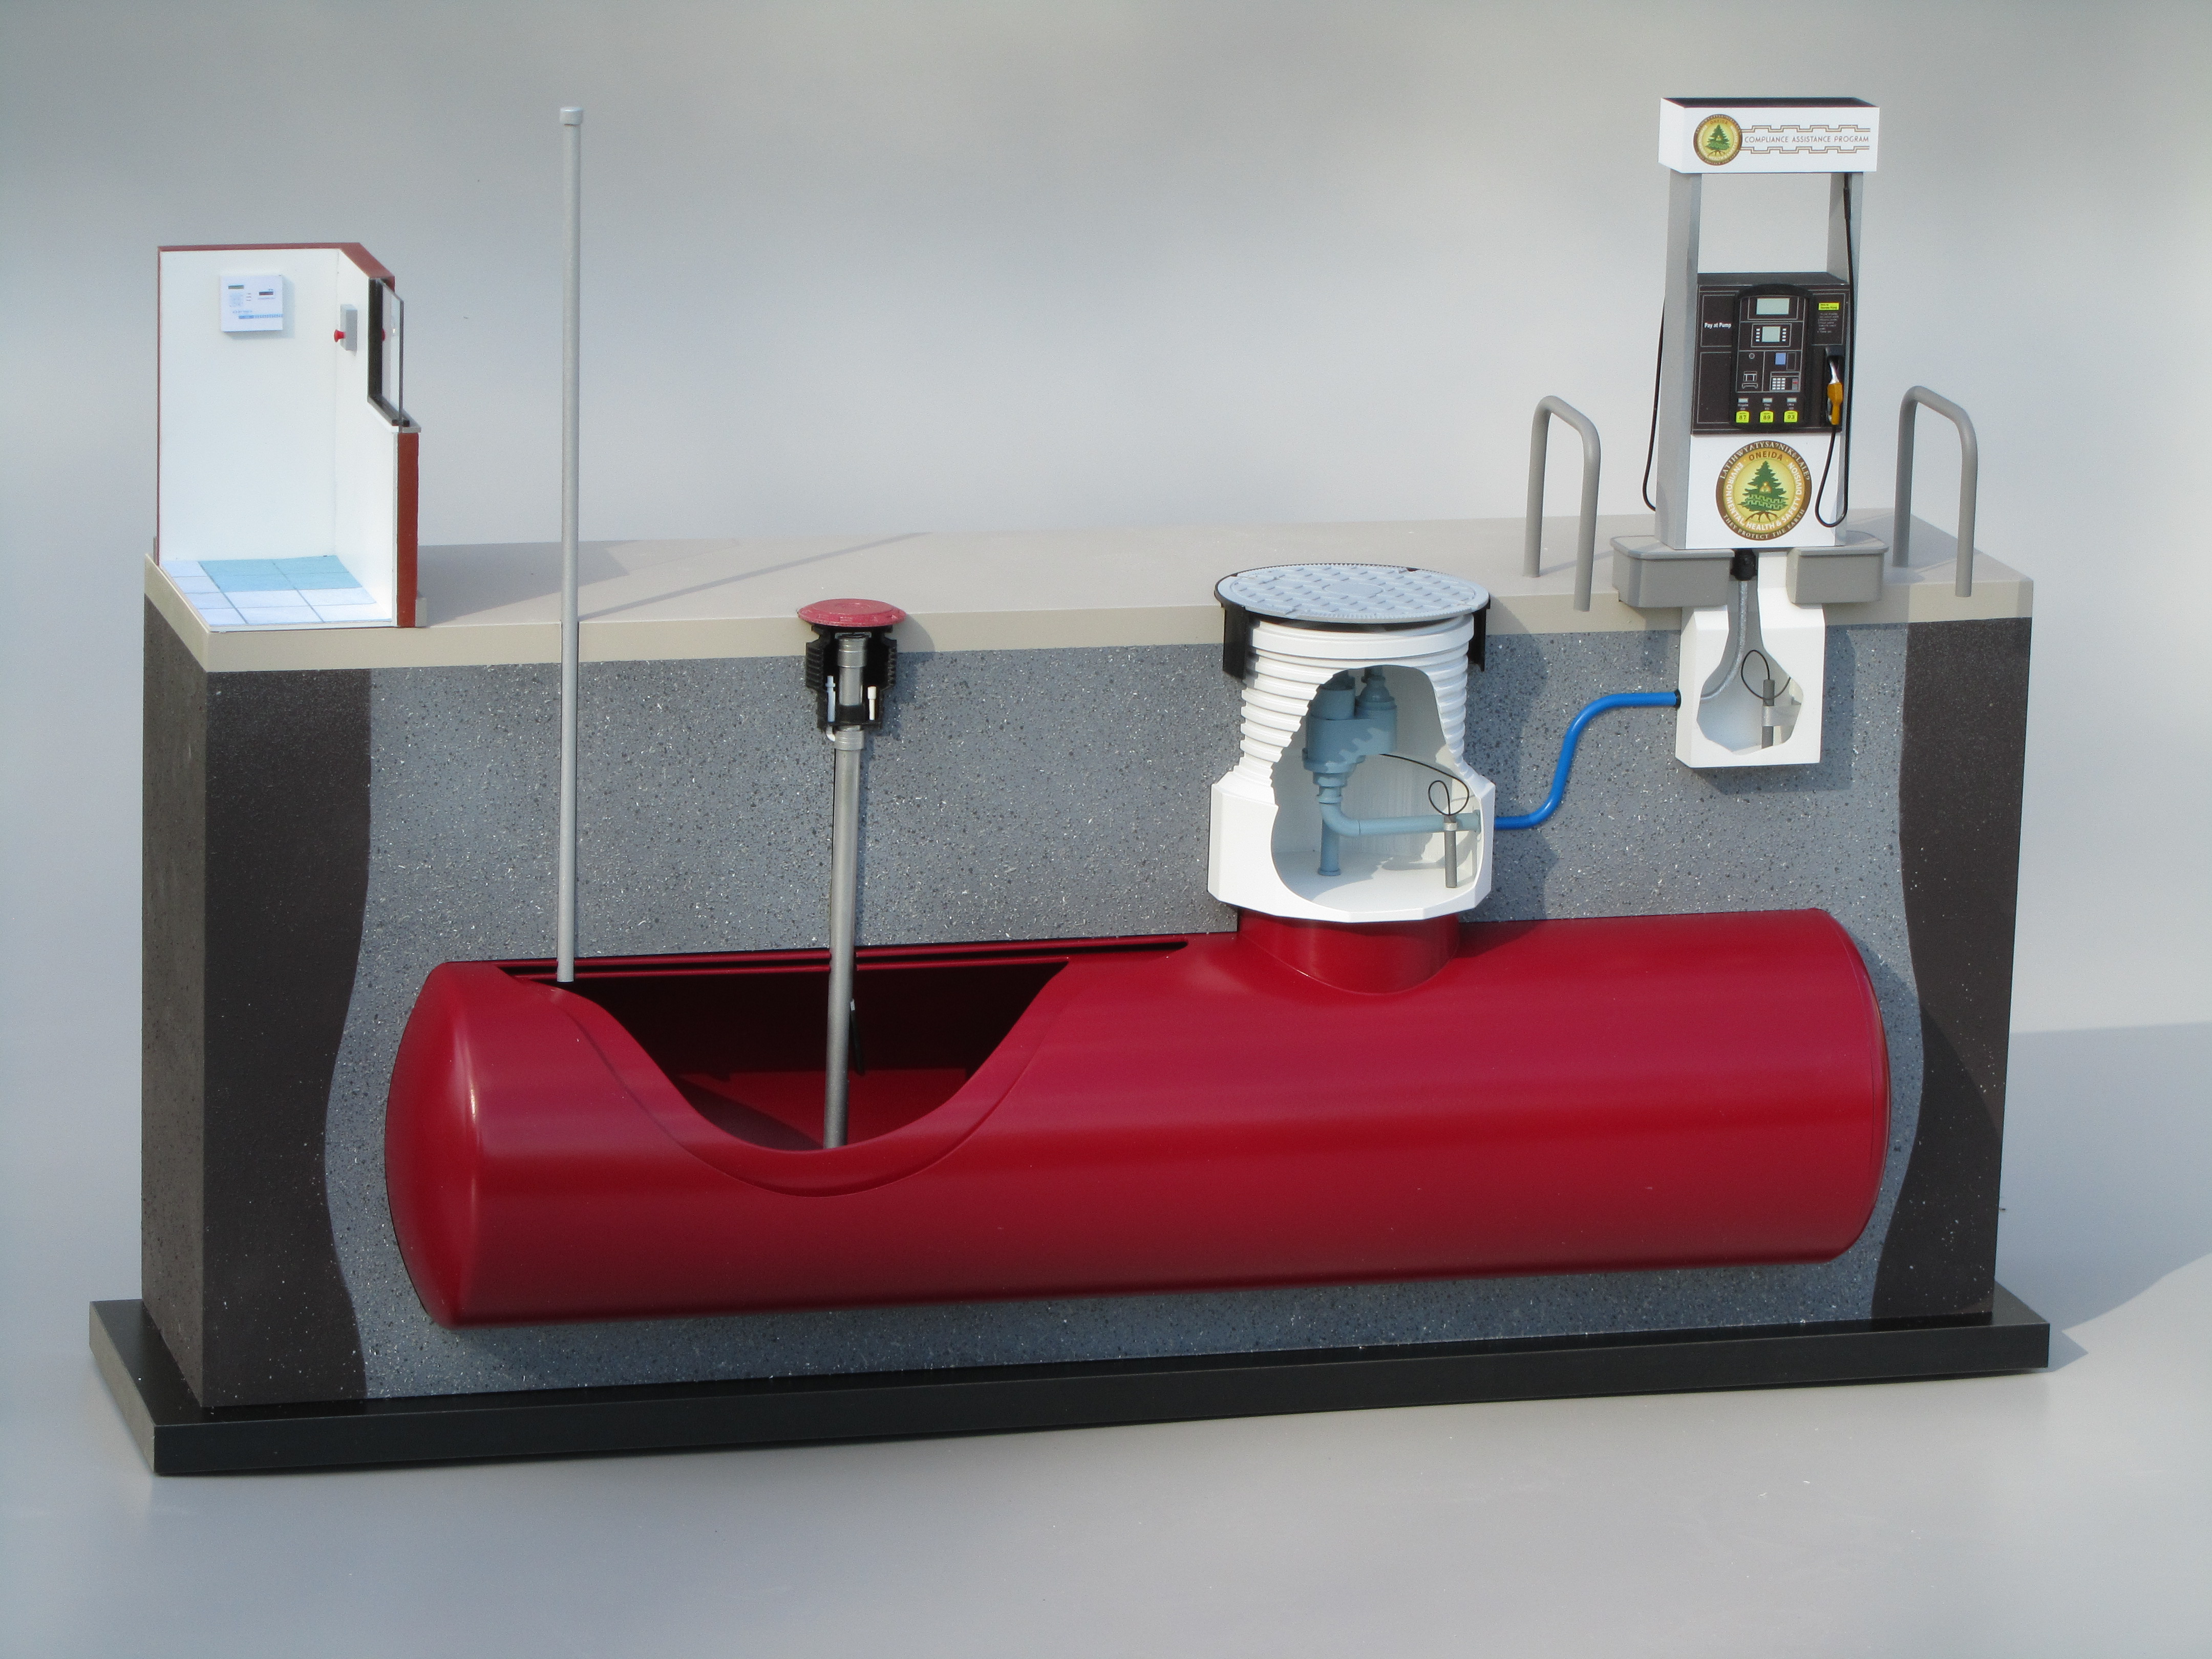
Gas stations don't normally have back-up generators, but they do have underground storage tanks full of fuel.

Anatomy of a UST

http://www.kiwimill.com/wp-content/uploads/2013/11/IMG_4537.jpg

This is a generic model of an underground storage tank (UST). The American EPA made drastic changes to the laws covering USTs back in 1988, requiring that existing tanks meet new standards or be replaced with new tanks that met the standards. Most of the tanks you'll find in the US will be laid out similar to the picture, so I'll use it to point out how to access the fuel in the tank if the pumps are dead.

From left to right in the picture, the tank has several connections:
  • Vent pipe
  • Fill pipe
  • Fuel pump
  • Meter (AKA gas pump or island)
Without electricity to power the pump, it and the meter are dead and not much use. If you have a generator handy, you may be able to get them to run, but any island that takes a credit card will also need a phone line or internet connection before they will dispense fuel. Good luck with that in a grid-down situation! Additionally, the circuitry inside the meter/island will have anti-tamper hardware or firmware to prevent bypassing the electronics.

The vent pipe ties into the top of the UST and allows vapor flow to and from the tank as it is filled and emptied. The vent pipe will normally be run to a building or other structure near the tanks, and extends at least 10 feet in the air so that any vapors pushed out of the tank while filling it are routed away from any possible ignition source. Vent pipes are usually capped with a mesh screen to keep debris and insects out, and can be as long as needed. 

Last, and most important, is the fill pipe. You've probably driven over the fill pipe connections dozens of time without even noticing them -- they're the bumps in the driveway near the islands. Here's a picture of a common fill point.

Photo credit: Chaplain Tim

They are about 10 inches in diameter and normally raised an inch or two above the surface to keep rain water out. The lid will be heavy so it will stay in place with cars driving over it.

Photo credit: Chaplain Tim
Once you take the lid off, here's what the inside of the hole looks like.

A simple lock is all that secures the cap, but remember that you're working on a fuel tank, so don't use anything that will create a spark to remove the lock! 

Bolt cutters should fit into the hole and still open enough to get around the shackle of the lock; picks could be a challenge due to working in a hole and at a weird angle; and I doubt you could get a pry bar into position within the limits of the hole. 

Grinders and cut-off wheels are a bad choice.

After the lock is off, simply lifting up on the ring, or ears of the latch, unlatches the cap and it lifts off with ease. The ring is supplied to make it easier to remove the cap while wearing heavy rubber gloves, a safety measure for the guys who handle fuel for a living.

Once you have the cap off, you'll have a three-inch or better pipe running straight down to the fuel. Getting the fuel out will require a pump and some hose or pipe.

Pump
Diesel is a lot safer to work with (it has a higher flash point than gasoline), so pumps rated for diesel are easier to make and thus cheaper. Finding a pump rated to transfer gasoline is neither simple nor cheap, and finding one that can lift liquids more than a few feet makes the search even harder.

Since you're trying to lift a liquid up out of a tank, a siphon isn't going to work. Centrifugal pumps require a full pump before they will work, so unless you have a way to “prime” your pump they are a poor choice; what you are going to need is a “positive displacement” pump of some sort. For shallow tanks that are mostly full, any of the pumps rated for gasoline with a suction “head” rating of at least 8 feet will work.

Getting the last few feet out of a UST will take a submersible pump dropped into the tank, and that is a DIY project that I could piece together from a spare automotive fuel pump and some extra wire. The fuel pump in your car is likely inside the gas tank, so they're designed to be submerged, the hard part would be sealing the wiring up to avoid any possibility of sparks.

This is a subject that requires more research, I will be coming back to it and posting an update.

Pipe/Hose
The small station I help take care of has three 5,000 gallon tanks underground that get topped off about once a week. Larger stations that do a lot more business will have more and larger tanks, and get resupplied more often.

We have to measure the tank levels on occasion, and use a 14 foot long “stick” with graduations every quarter-inch dropped down the fill pipe to do so. This means that the bottom of our tanks is not more than 14 feet below ground (actually closer to 10 feet), so 15 or 20 feet of hose or pipe would be plenty to get to the fuel. 

Just about any metal pipe would work as long as you make sure it is grounded to the tank before moving fuel through it -- flowing petroleum products create static electricity and can cause a spark. Keep the pipe in contact with the fill pipe, or actually clamp a grounding wire between the two. 

Plastic tubing is easier to work with, being more flexible than metal pipe, but is harder to ground to the tank. Pump slowly and minimize the creation of vapors to reduce your risks. Check the type of plastic you are using to make sure it is safe to use with your fuel. Gasoline will dissolve some common plastics and diesel can make them swell up.


I don't want anyone to see this post as an invitation to steal fuel or a “how-to” rip off a gas station, but I can imagine situations where knowing how to access the contents of a UST would be ethical, legal, and useful. If there is any doubt, the standard disclaimer applies:
This information is provided for informational and educational purposes only. The author assumes no liability in how you use this information and cannot be held responsible for your actions.

Sunday, December 4, 2016

Gun Blog Variety Podcast #120 - Your Life is a Kitchen

So bake as many pies as you want with the GunBlog VarietyCast!
  • Beth brings her husband Sean (not GBVC Sean, a different Sean) back on to talk about being a couple who shoot competitively.
  • A 32-year-old woman is accused of stabbing her 61-year-old former roommate to death. Sean takes a closer look.
  • Barron is on assignment and will return soon.
  • In the Main Topic, Sean and Erin answer a pair of questions from a liberal gun-owning listener: "What do you hear when a liberal says 'We need to have a conversation', and what do you hear when a liberal says 'We need to compromise' ?"
  • In a late night/early morning segment, Tiffany discusses the First Amendment concept of "fighting words" and how that relates to your Second Amendment right to armed self-defense. 
  • When the oil from the hurricane lamps you've got stored in the garage leaks all over the floor, how can you get it cleaned up? Erin gives you some tips.
  • Massachusetts Attorney General Maura Healey is back, this time in a Vice News interview. You know what that means: it's time for another patented Weer'd Audio Fisk™!
  • Our plug of the week is for Roll20.
Thank you for downloading, listening, and subscribing. You are subscribed, right? We are available on iTunes, Stitcher Radio, and now on Google Play Music!

Listen to the podcast here.

Read the show notes here

Thanks also to Firearms Policy Coalition for their support. 

Blue Collar Prepping Transcript:
Lamp Oil Cleanup on Aisle Five!

Now that my family has unpacked the Christmas decorations and strung them up across the house, it’s time for the annual cleaning up of the garage in the hopes that maybe this is the year we’ll get it all organized. I say “hopes” because invariably something goes wrong, and this year is no exception.

We maintain several hurricane lamps in the house for, not surprisingly, if we lose electricity from a hurricane. And we’ve had these lamps for a long time -- at least 30 years now.

Now despite these lamps being old they haven’t received a lot of use, because storms rarely knock out electricity for more than a few hours and because (with my help) my family has moved on to battery-powered means of long term light.

But batteries can wear down, and it’s always good to have backups, so we’ve kept these lamps around. However, the drawback to owning one is that you also need to stay well-stocked with lamp oil.

Now I don’t know if our listeners know this -- I certainly didn’t until this past week -- but apparently the plastic bottles that store lamp oil can become brittle after, oh, a decade of storage in a garage, and past that point bumping them, or even moving them, will cause them to crack (or in our case, shatter) and leak all over the place.

So this past week has involved me asking the collective wisdom of the Blue Collar Prepping Facebook Group -- if you aren’t a member, you’re wrong, join today -- how to clean up the stinky stain in my garage and if there’s any hazard associated with it.

So first of all, lamp oil is just highly refined kerosene, with a flash point -- that means “the temperature at which it ignites” -- of 363 degrees F. This is not to be confused with the auto ignition point, which means “the temperature at which it spontaneously ignites without needing a spark”, and is a much higher 428 degrees F.

These are all good things to know, because it means that the spill won’t catch fire in a hot garage!

So, onto the cleanup, and the techniques I outline here can be used for other forms of fuel, like gasoline.

The first thing I need to do it absorb as much of the oil as possible. This is best done with clay-type non-clumping cat litter, although dry sand will also work. Cover the stain with it, wait until it’s saturated, then dispose of the litter or sand and replace it. I need to keep doing this until there’s no more oil to be absorbed, and if I really want to get aggressive I can scrub the litter into the floor with my shoe or a broom.

After that, I’m going to spray the stain with carburetor cleaner. This is supposed to “lift” any remaining oil out of the concrete and allow it to be absorbed as disposed of.

I need to spray the stain until it’s covered -- not a thick coat, just wetted down -- let it stand about 5-10 minutes, then put more kitty litter onto it. I’m told that I should repeat this about 3 more times. This will probably get out everything it’s possible to get out.

After THAT, I need to use Dawn dishwashing soap to break down whatever oil is left and cause it float to the top. More kitty litter!

After that’s done, it’s just a simple matter of washing off the rest of the Dawn with water and a mop.

Of course, all of this trouble could have been avoided if I’d prevented the lamp oil from spilling in the first place. What I’m going to do to keep this from happening in the future is to keep our remaining bottles of oil in a big plastic storage tub. That way, even if the bottles break, the only mess will be inside the tub instead of all over the floor!

Monday, September 19, 2016

Fuel Storage

With the recent Colonial Pipeline spill causing problems with fuel supply in several states, a member of our Facebook page asked about storing fuel. To our surprise, this is a topic that we hadn't covered yet.

Most of the “experts” recommend storing enough fuel for your vehicles to make it to your BOL plus 50%, and enough for your generators to run for at least 24 hours. I rarely ever let my vehicles get below a half tank of fuel (that's three round trips to the BOL), and what I have on hand will run my generator a lot longer than 24 hours. Use your own judgment on how much you need to store.

Storing fuel for your vehicles and generators breaks down into two parts: safety and treatment.

Safety
  • Never store gasoline inside an inhabited building! Gasoline is more volatile than diesel, and the vapors are heavier than air so they can travel along a floor to an ignition source. A fan motor starting, a pilot light on a water heater, or a light switch being flipped can cause a huge explosion.
  • Keeping air away from the fuel is the first step to storage. Containers must be airtight, preferably without a separate vent hole to reduce the chances of air getting inside and vapors getting out.
  • Fuel containers are color-coded: Red for gasoline, yellow for diesel, blue for kerosene. Don't mix them up unless you want to destroy an engine or two.
  • Metal containers are better than plastic. Metal seals better and is more durable than plastic, but it costs more.
  • Have fire extinguishers close to anywhere you are storing fuel. You're not likely to be able to put out a fuel fire, but you might be able to prevent a small fire from reaching your supply.
  • Keeping the fuel cool and at a constant temperature is the best way to store it. You're not going to be able to store gasoline below its vapor (or flash) point (-77° F), but you'll reduce the condensation inside the containers. Diesel,with a flash point around 105° F, is a lot easier to store. 
  • Minimizing vapors means less of a chance of accidental fires and explosions.
  • Large containers (over 5 gallons) are easier to deal with safely than small ones. Having a 55 gallon drum or 100 gallon transfer tank leads to fewer vents and spills. It is also easier to keep track of when it is time to rotate your fuel when it is all in one place.
  • Transfer tanks and pumps are designed to be carried in the back of a pickup and have stringent DOT and other government regulations. Be careful if the rule of law is still operating, and do your research; I have a CDL with a Haz-Mat endorsement so I can get away with a bit more than most people, but it comes at a cost.

Treatment
There are several products on the market for treating fuel for storage, and even more anecdotal evidence about which of them is the best. Improving the thermal stability of the fuel seems to be the main goal, meaning that the treatments are trying to keep the fuel from breaking down when warm. Avoiding ethanol blends seems to be a common starting point, due to the alcohol's affinity for water. I have researched a few and come to these conclusions.
  • Sta-Bil is the most common, and will work for a gasoline stored for up to a year. Re-treating every year seems to maintain the stability of the fuel for several (up to an indeterminate number of) years. I've used Sta-Bil in my lawnmower gas for years and have never had it go bad over a winter, so I can testify to at least 8 months of effectiveness.
  • Sea-Foam is more of a cleaner than a stabilizer, but it will help refresh old gasoline that wasn't treated and provides some protection for stored gasoline. The marine grade gets better reviews than the standard grade.
  • Several 2-stroke oils have stabilizers added. From what I've found, they seem to work as well as Sta-Bil.
  • PRI makes PRI-D for diesel and PRI-G for gasoline. They are industrial suppliers that specialize in fuel treatment for marine and heavy industrial customers, so their retail footprint is small. Their products are in use in large ocean-going vessels and fuel tanks for back-up generators at nuclear power plants, something I consider a good endorsement of their efficiency. The bottles are more expensive but treat a lot more fuel, so compare unit prices before buying.
  • There are several “enzyme” treatments that claim to be able to revitalize stale gasoline, but the jury is still out on how effective they are. Anecdotal evidence becomes “He said, she said” before the truth is ever known. Several of these products haven't been on the market long enough to back the claims they make, which tends to raise the reading on my BS meter.

Long-Term Storage
Gasoline and diesel are not designed to be stored long-term.

Freshness
  • As sold at the pump, gas is going to stay “fresh” for about six months and diesel for about a year. 
  • Both will slowly oxidize from contact with the air and lose their combustibility. 
  • Both will absorb moisture from the air if they are exposed to it. Ethanol-blend gasoline is worse in this regard.
Moisture
  • Water is denser than diesel or gasoline and will settle to the bottom of any container. 
  • Water in diesel leads to biological growth of bacteria that will foul filters and block lines.
Fouling
  • Diesel tends to form gummy deposits that will plug filters and injectors.
  • Gasoline will also form gums and varnish that will plug a carburetor and injectors after storage.
  • Both will cause carbon (soot) build-up inside an engine after sitting for a long time, which reduces an engine's power and makes it run rough.

My Setup
I heat my house with an oil-burning furnace. Fuel oil is nothing more than low-grade diesel fuel, so I have dealt with storing up to 500 gallons of it at a time for the last 20 years. My tank gets refilled at least once a year, so I have had no reason to add a stabilizer to it, although I have started adding an antibacterial treatment to keep the sludge growth down, as filters are a mess to change and I hate having to prime the fuel pump on the furnace to get the air out of the line. 

Since the engine in my M35A2 truck is a multi-fuel diesel, it will burn fuel oil just fine. The diesel tractor runs on #2 diesel already, so using fuel oil won't be a problem with it. My furnace fuel tank is my back-up truck fuel tank, although the DOT will get pissy if they catch me using dyed fuel in a vehicle on the road. (The dye is added to indicate that no road taxes were charged when the fuel was sold.)

I keep a few 5 gallon cans of gas on hand for emergencies and rotate them through the lawnmower and chainsaws. I have used Sta-Bil for years and never had a problem, but it rarely sits for more than a year. It seems like I'm always running into someone who has run out of gas, or some other need pops up, and the stored gasoline gets used and replaced before the year is up.


Use common sense and the best information you can find when trying to store fuel for an emergency, and you should be fine. Never forget that you're working with something that is designed to burn or explode, and give it the respect that it is due.

Thursday, August 11, 2016

Unconventional Chainsaw Oils

Fall is coming, with winter close behind. That means cutting firewood is on the schedule again -- whenever the weather gives me a break from the temperatures in the high 90s and humidity of 60% or more, that is.

I got to spend last Sunday cutting firewood and clearing some unwanted cedar trees, and it was nice to get out in the woods again. Since I'm always looking for a back-up plan or just another way to do something, I did some digging into the oils a chainsaw uses.

2-Stroke Oil
Most chainsaws are powered by a 2-stroke engine that requires a fuel/oil mix. 2-stroke engines don't have an oil pan or internal lubrication system; the moving parts are lubricated by the fuel/oil mix passing over them on the way to the piston. Common mix ratios of gasoline:oil vary from 32:1 to 50:1, and there are many commercially available, petroleum-based oils to choose from. 

Using more oil is always preferable to using too little. If you normally mix your fuel at 40:1, don't be afraid of using 32:1; it may smoke a bit more, but won't harm the engine. Going overboard on the oil will thicken the mix up to a point where modern carburetors won't pump it, but it won't harm anything. 

My personal choice is OPTI-2, because I like the added fuel stabilizer and the simple packaging. Each pack makes one gallon and they fit in my saw case better than bottles... and there's less to carry back out as trash, too.

What happens if I can't find any 2-stroke oil and I really need to use a chainsaw? The only substitute for modern engines I have been able to find is castor oil. Pressed from castor beans and sold as a massage oil and beauty aid, castor oil is at least as expensive as petroleum-based oils. Castor oil will work in chainsaws for extended periods, but it may leave behind a layer of varnish on internal parts.

Older engines (pre-1970) were designed to run at lower speeds and used common motor oil (non-detergent 30W) in the fuel/oil blend at ratios of 20:1 or more. While motor oil might work on newer engines, it will likely cause excessive wear and shorten the life of the engine. Vegetable oils are the same: they will work for a short time but are not going to give the lubrication that the engine needs.

2-stroke engines are used in such a wide variety of applications that it is hard to get useful information on oils and substitutes:
  • RC (radio controlled) airplanes use tiny 2-stroke engines with a high-energy fuel. 
  • Chainsaws and weedeaters use slightly larger engines and common gasoline. 
  • Certain racing motorcycles use large 2-strokes, as do snowmobiles and personal watercraft. 
Each has a different range of speeds and loads on the engine, as well as differing levels of maintenance. Anecdotal evidence and personal biases tend to degrade any internet discussion into a “9mm vs. 45ACP” or “Ford vs. Chevy” type of argument.

Bar/Chain Oil
Chainsaws use a cutting chain that rides on a grooved bar. Since that is metal sliding over metal at high speeds, they need to be lubricated to ensure a useful lifespan. Commercial bar oil runs about $10-20 a gallon around here and is a thick, sticky oil designed to adhere to the chain and bar. Believe it or not, common rapeseed (canola) oil that you can buy in the grocery store has been tested and found to be a good substitute for petroleum-based bar oil. (Environmentalists got this research started by noticing that all of the oil being carried into the woods with chainsaws was being left in the woods; 2-stroke engines are “full-loss” lubricated, which means the oil used on the bar and in the engine was being “dumped” in the forests and that was just not acceptable to them.)

Europe being the mess it is, petroleum-based bar oils are now outlawed in Austria, and canola oils are the preferred substitute. Commercial blends here in the USA are more expensive than either grocery store canola oil or petroleum-based bar oil, but they are available. The US Forest Service published a Tech Tip article back in 1998 that covers the subject quite well. 

Another benefit of using canola oil as a bar/chain lube is that it doesn't stain the wood, so if you are using a chainsaw to make lumber or furniture you won't have the problem of oil stains. It also washes out of clothing easier, and doesn't irritate the skin like petroleum-based oils can.

Pre-Mixed Fuel
I have seen quart cans of premixed 2-stroke fuel on the store shelves, but the cost was always higher than what it would cost to mix my own. $10.00 per quart equals $40.00 a gallon, whereas I can buy a gallon of non-ethanol gasoline for less than $3.00 and add a $3.00 package of oil to it. The only advantage the premix has is that they don't use gas station gasoline, and their high-octane base doesn't break down like normal gasoline and they claim a shelf-life of several years. One quart of fuel will run my saw for about an hour of moderate cutting, so I may have to invest in a few just to put aside for emergencies. Paying ten bucks for something that normally cost about a buck and a half is going to be hard, though.


Having a back-up plan for as much of my life as I can is the main part of prepping for me. I don't like to rely on single point of failure systems, redundancy is a lot more comfortable.

Thursday, May 5, 2016

Propane

Propane (C3H8) is a common fuel for heating and cooking in rural areas. Most urban folks know it as the fuel for their outdoor grill and an alternative fuel for vehicles, and might use it in a hand-held torch for soldering copper pipe or other small jobs. Often known as LP (Liquid Propane, Low Pressure gas, or Liquefied Petroleum gas), it is a by-product of Natural Gas (CH4) production and oil refining. Portable cooking and heat equipment often runs off of disposable 14 oz cylinders or 20 lb refillable tanks. More permanent equipment is often fed from 100 lb cylinders or 300-700 gallon tanks.

Utility
If you watch the news and documentaries as much as I do, you'll notice that the common white 20 lb refillable tanks are found all over the world, and are often a primary fuel source in third world countries that don't have a developed infrastructure. Even in areas involved in war, someone will smuggle in fuel, and propane is easier to transport than gasoline. Since it has no shelf-life limitations, is in easy-to-handle containers, is fairly safe to use, and is moderately inexpensive, it is a good choice for use when natural gas pipelines are unavailable or inoperative. Having a few spare tanks for your grill is a good idea if you expect short-term power outages -- you can use the grill as an oven, and most of the newer ones have a burner on the side for warming up side dishes. 

You can also run a grill set up for a 20 lb cylinder from a 16 oz cylinder if you have the right fittings.

Safety
Propane is a gas at normal temperatures, but can be easily compressed into liquid form easily. It boils at -44° F, so it must be handled with care to prevent frost-bite. Unlike natural gas (methane), propane is heavier than air and it will settle into low areas of a structure if there is a leak. Since water heaters and furnaces tend to have their igniters near the floor, this can cause explosions capable of lifting a house -- if not destroying it completely.

Ventilation and checking for leaks is the key to preventing fires and explosions. Do I really need to explain that propane is flammable and you shouldn't smoke around it? No open flame or fire within 50 feet of open propane source, please. We don't need to hear about you on the nightly news.

Refilling Disposables
Did you know that you can refill disposable 14-16 oz cylinders? There are fittings available to let you refill them from a 20 lb cylinder as often as you need. (Read the instructions and follow them.  And wear good gloves, preferably insulated rubber gloves; getting bare skin sprayed with liquid propane at -44° means instant frostbite.)

A few years ago, the industry switched to a new style of valve that has a built-in overfill protection device (OPD) to prevent filling cylinders over 80% full. This was done to ensure that there is a vapor space in the cylinder, since liquid propane is not good for regulators and burners. When they changed the valves, they changed the connectors as well to make it easy for the person refilling the cylinder to tell if it was a new tank. The new valves use “Acme” threads, which are more widely spaced than normal pipe threads and have a flat top surface. OPD valves also have to be connected to a fitting before they will allow gas to flow, so just opening the valve may not tell you if there is anything left in the tank.

Refilling From a Tank
With a few fittings and some good hose, you can refill the 20 lb cylinders from a larger tank. You'll need a female Acme fitting to connect to the supply tank discharge valve and either a POL (fine threads inside the valve body) or Acme (coarse threads on outside of valve body) style fitting on the empty tank end. Here's what Acme threads look like:
http://www.ncagr.gov/standard/LP/LPgasConcerns/cylindervalves.htm

Do you see the little screw right above the threads that go into the tank itself? That is the fixed level gauge, a vent that will spit liquid once the tank is 80% (max safe fill level) full. That is how you fill tanks if you don't have a scale to do it by weight.

A simple method of refilling a 20 lb cylinder from a large tank:
  1. Put on your gloves. 
  2. Connect hose to tank discharge valve, usually Acme threads. 
  3. Connect hose to cylinder valve. 
  4. Open cylinder valve and slightly open cylinder vent (fixed level gauge). 
  5. Slowly open tank discharge valve. 
  6. Step back and wait. 
  7. Once liquid starts coming out of cylinder vent, close valves and vent and disconnect hose.

    If I can find better photos or prices, I may have to edit this post. I need to check a few places and take some pictures when I get some free time. Be careful, and respect the things that can kill you.

    Thursday, April 21, 2016

    Chemistry for Preppers: Distillation

    One of the most common and useful chemical processes for preppers is distillation. Everyone has seen the water purification systems that boil the source water, cool the steam, and produce pure (distilled) water. The simple “solar still” method of collecting water uses the same principle at a much lower production rate and without an extra energy source.

    How It Works
    Distillation is a method of separating mixed chemicals based upon their boiling points (BP). If the difference in boiling points is more than roughly 25° C a simple still will work, but if the difference is less than 25° C you'll need to look into fractional distillation. The boiling points for various chemicals can be found in most chemistry reference books as well as the ubiquitous Material Safety Data Sheets (MSDS or SDS) that producers are required to make available for every product they handle.

    For most survival situations, specific chemical composition is not going to be known and resources are going to be scarce, so a simple still will be the best choice. For production of fuel or other trade goods, a fractional still will make a more pure product but requires more time and materials. Running your product through a still more than once will usually give a more pure product; before the introduction of reverse osmosis we used “triple distilled” water as pure water for general chemistry lab work.

    There are mixtures that cannot be separated by use of a still. If the boiling points are too close to each other, or if they form an azeotrope (a mixture where the BP of the mixture is higher or lower than either of the constituents), you will not be able to get complete separation from a still. Be careful if dealing with petrochemicals or explosive compounds as they may decompose (violently) when heated, long before they reach boiling point.

    If you are distilling anything for consumption, use only food-safe material in the construction of your still. Galvanized metal and lead-based solder will impart toxic levels of metals into your product. Stick with glass, copper, or stainless steel if at all possible.

    Definitions

    Bottoms: The material left over after you have distilled out what you want.

    Condenser: A pipe or passage that acts as a heat exchanger to cool the vapors back into liquid phase. The common moonshiner's term for a condenser is “worm”, since they use coiled copper tubing that looks like a snake or worm. For cooling fuel-grade alcohol an old car radiator would work, but the metals present would make the distillate unsafe to drink. Running cold water over the exchanger will make it more efficient, but simply moving air past it will also work.

    Distillate: The product that comes out of the still.

    Fractioning Column: A vertical column rising above the pot, fitted with trays or packing. (Explanation below) Fractioning columns will often have more than one outlet, to allow the collection of parts of complex mixtures like crude oil.

    Pot or Still-pot: The container that holds the raw or mixed beginning solution. It must be capable of being sealed to the condenser and withstand the heat need to boil the mixture.

    Receiver: The container that catches your distillate.

    Reflux: Recycling a portion of the distillate to pass it through the still again. Often used in continuous distillation processes instead of running batches through multiple times to increase the purity of the distillate.

    Thump Tub: An intermediate cooling stage commonly found in moonshine stills. Vapor from the top of the pot is passed over a container of water on its way to the condenser. This allows for the removal of some of the chemicals that can impart bad flavors to drinking alcohol.

    Simple Distillation
    http://tinyurl.com/jprdu47
    Purifying water or alcohol can be accomplished in a simple still. Here is a picture of a simple copper batch still, where the pot and condenser coil are easy to pick out. The pot is filled and placed on a heat source and the “worm” is placed in a tub of cold water (if available). There are electric and stove-top versions of this simple still on sale for purifying water, but as you can see they aren't that hard to cobble together. This one is almost a hundred years old and could probably still be used today.


    Fractional Distillation
    http://tinyurl.com/zu284p6
    Here's a good diagram of a fractional distillation tower for separating crude oil into useful parts.

    It is common practice to use the waste gas coming off the top to fuel the furnace that heats the incoming crude oil. Waste not, want not.

    The trays are designed to allow the heated vapors to rise through the column, but the “caps” on the holes in the trays cause some of them to condense at the temperature present at that height. The condensed liquid helps maintain the temperature at that height and is drawn off in a continuous stream.

    Fractional distillation would be useful for long-term situations as a way to recycle used motor oil or production of fuel from local supplies of crude oil (which is more common that you may believe, I've seen oil wells in Iowa and Nebraska). By using a taller tower with more trays, it would be possible to sort out the constituent parts of the gasses produced by roasting coal or wood to produce fuels and solvents such as methanol (wood alcohol) and acetone.

    There is also a lot of research going on right now into the recycling of waste tires and various biological wastes into crude oil through pyrolysis. If we ever get to the Mad Max stage of survival, knowing how to produce lubricating oils and fuel could be a valuable skill.

    Other Uses
    This has been an extremely simple overview of distillation. There are so many uses for this method of separating compounds that it is difficult to keep things prepper-related. Distilling out essential oils for medicinal uses, concentrating the flavors of certain spices to make them easier to transport, making useful chemicals, and so many more all use the same basic mechanisms -- with special attention being paid to the details like temperature and pressures. If you need more specific information, please comment on our Facebook page and I will try to help as best I can.

    Thursday, August 27, 2015

    Trade Goods: Alcohol

    David mentioned precious metal in yesterday's post, and that set off some discussion on our Facebook page about trade goods. As far as precious metals go, I believe that silver is better than gold for the simple fact that most transactions that take place face-to-face are worth less than an ounce of gold. Having a Krugerrand on a chain around your neck might be enough to get you a plane ticket home, but what if all you need is a hot meal and a place to sleep? Making change is easier with silver.

    One of the topics that got brought up was trade goods. Food, medicine, clothing, tobacco, and ammunition were all mentioned, but I got a few questions about alcohol. Useful as a fuel, antiseptic, for recreational use, or just as a way to store value, alcohol can be a handy thing to have around. It can be even more handy to know how to make it.

    First things first: Fuel alcohol is not and cannot be made safe to drink. Drinking alcohol may be usable as fuel, but it doesn't go the other direction. Fuel alcohol is made using materials and methods that can contaminate it with poisonous chemicals, and by law it then has to be denatured by adding a poisonous substance. Laws like this are written to make sure the “proper” amount of tax is paid on the alcohol, depending on how it is to be used. Fuel alcohol is taxed at a much lower rate than the fun kind.

    Drinking Alcohol
    Unless you're a moonshiner with a still hidden in the woods, it's cheaper and easier to buy your drinking goods and store them. I don't drink hard liquor, but I keep a few bottles on hand for guests and as potential trade goods. Small bottles fit my needs best, since they take up little space and, like silver, make for good “small denominations” when making change. Even a few of the airline-sized bottles would come in handy for cleaning a wound or trading for small items. This is obviously a “bugging in” or cache item. Every once of weight in a backpack will make itself known once you start to carry it.

    Making safe-to-drink alcoholic beverages is an old art that predates science and agriculture and isn't hard -- if bread, water, and fruit can be turned into contraband wine in prisons, how hard can it be? -- but it takes time, equipment, and money. Since 1978, the Federal Government has allowed people the privilege of producing up to 100 gallons of beer or wine per adult per year for personal consumption without paying taxes on it. State laws vary, but at least you don't have to worry about the BATFE as long as you stay under their limits. Drinking alcohol comes in two types, fermented and distilled.

    Fermented Alcohol
    Beer, wine, cider, and mead are the main fermented forms of alcohol.

    Beer is the result of fermentation of cereal grains followed by the addition of hops, which act as a preservative.
    • Since the sugar content of grains is fairly low, and the “malting” process of converting starches to sugars is dependent on the enzymes available, most beer yeasts produce 4-6% alcohol. This is not quite enough alcohol to kill off other microbes, so hops are added as a preservative. 
    • Barley, oats, rice and wheat are the main grains used in making beer around the world. 
    • Simple beer is nothing more than barley, water, yeast and hops. 
    • Beer doesn't store well, and should be consumed within a few months of being made.
    Wine is the result of fermentation of fruits.
    • Since the sugar content of fruit is higher than that of grains, it is possible to get a higher alcohol content in wine (generally around 10%), which is high enough to be self-preserving as long as the container stays sealed. 
    • Wine, if properly stored, can last for centuries. 
    • I helped put up 60 gallons of Elderberry wine in recycled liquor bottles (free from a bar) about 40 years ago. As long as the lid sealed tight, the wine is still fit to drink and may have actually improved a bit with age. The ones that didn't seal are pretty nasty.
    Cider, or Hard Cider, is fermented apple juice, and usually has an alcohol content around 7%.
    • Often made using wild or native yeast, the taste and quality can vary from batch to batch.
    • Like beer, it doesn't store well.
    Mead is fermented honey.
    • Since honey has strong anti-microbial properties, making mead involves a few more steps than making beer or wine. Normally, the addition of nutrients and water is required to allow the activity of the yeast. 
    • Meads run from 8-20% alcohol, and should store at least as well as wine.

    Distilled Alcohol
    Distillation is the process of removing water from a fermented liquid in order to raise the alcohol content. The main difference between distilling drinking alcohol vs. fuel alcohol is the equipment construction: you cannot use any lead, zinc, or other heavy metals in the construction of a still that is going to produce drinking alcohol, as the metals will leach out into the alcohol and poison the person drinking it. Dead customers don't come back, so save car radiators and galvanized pipe for the fuel still. If you use copper, use only lead-free solder or welds on joints.
    • Distilled drinks include whiskeys, brandies, vodka, schnapps, and other “hard” liquors. 
    • You can take a wine at 10-12 % alcohol and convert it into a brandy at 35% alcohol by distillation. Instructions for home distilling can be found here
    • Hard liquor is useful as as disinfectant, and if the alcohol content is over 60%, it can be used as a fuel in engines and lamps. 
    • At roughly 50% it will hold a flame, which is how moon-shiners tested, or “proofed”, their batches: if it would hold a flame, it was 100 Proof. That's how we got the silly “80 Proof” on the labels of our rum, which is 40% alcohol. (Sorry, the chemist in me detests arbitrary measuring systems, and alcohol production is so old that it is full of arbitrary measuring systems.)

    Fuel Alcohol (Ethanol)
    In order to make alcohol that will run an internal combustion engine, you'll need to be able to get the alcohol content above 80% and you'll have to make some modifications to the fuel system in order to allow more ethanol into the cylinder. Ethanol (grain alcohol) has about 65% of the energy that gasoline does, so it takes more of it to get the same amount of work out of an engine. On a carbureted engine, increasing the fuel jet size by 30-40% will do it. If you have a newer engine that is fuel injected, you will have to either replace the injectors with ones that will allow more flow or reprogram your cars computer to hold the injectors open longer. The new “Flex Fuel” cars have their computers programmed to run on either gas or ethanol (or any blend of the two).

    I've worked on small engines for years, and lawnmowers, chainsaws, motorcycles, etc. don't like ethanol. Ethanol tends to degrade some of the synthetic rubber compounds used in small engine fuel systems, and can also corrode the really cheap alloys used in older carburetor bodies. Two-strokes are a bit more forgiving, due to the oil mixed with the fuel, but you may still have problems feeding them ethanol. Make sure you have parts on hand to repair your small engines if you plan on running a generator or pump on ethanol!

    Most of my reference books were written in the 70s and 80s. Back then there was serious concern about “peak oil” and the environmental damage being caused by burning petroleum. Peak oil has been shown to be a myth, and auto makers have made great strides in reducing the pollutants coming out of their cars. The alternative energy push back then laid the groundwork for the ethanol industry we have today, and the research and experimentation is still valid. My main source of information is a loose-bound book printed by the old Mother Earth News (MEN) as a handout for a seminar on home production of fuel ethanol. The book cost $25 in 1980, and I can't find it on their website, so I have to say it is out of print. MEN has gone through several management changes over the years, and they keep coming back to simple, do-it-yourself projects. The late 70s and early 80s were the “prime time” for the magazine; self-sufficiency was a big, new phenomenon that had an eager audience. Most of the information from that era is now available on their website, and I suggest you go there for details and actual plans for building a small-scale ethanol production plant, since I cannot do it justice in a blog post.

    Fuel alcohol is taxed and controlled by the federal government, but they have created a “small-scale producer” permit that is fairly easy to obtain. It will allow you to produce up to 5000 gallons of pure alcohol per year, which should be enough for your daily driving.

    How To Make It
    Making fuel ethanol is fairly simple:
    1. Find a source of sugars or starches, be it grain, fruit, or whatever you have at hand that can contribute sugars. There are special tools that will tell you how much sugar is in a solution (measured in Brix).
    2. Find the enzymes you'll need to break the starches into sugars.“Malting” is simply wetting the grain to allow it to sprout. This releases enzymes that break down the starches for the plant to use. Heating the malted grain stops the sprouting and gets it ready for the yeast. 
    3. Add yeast to start the fermentation. Brewers yeast is best, since it has been bred to be efficient at producing alcohol, but any yeast (even wild yeast floating through the air) will work. 
    4. Keep the yeast happy (manage nutrients, temperature, etc.). This is where you get to control the heat and air. Fermentation is an anaerobic process and must be done in an environment free of oxygen. 
    5. Once the yeast are done converting the sugars to alcohol, run the liquid through a distillation column. Done-ness is normally indicated by the reduction of CO2 being produced by the yeast. Testing the density (specific gravity) of the liquid will tell you how much of it is alcohol. Design of columns is a science, and there are many kits and plans available. A good column will result in 90-95% alcohol, which is good enough to use as fuel. Plans for a 6 inch column can be found here, and it is rated at 6-8 gallons of alcohol per hour. 
    6. Separate the solids for use as high-protein animal feed. You don't lose the grain, just the sugars and starches. It is common to rinse the solids and use the rinsate for the next batch, thereby reusing some of the nutrients. Contrary to claims on the internet, alcohol production does not take grain out of the mouths of children and animals. The Distillers Dry Grain Solids (DDGS) is a great animal feed, and is actually sold to feed-lots and feed producers. Cows, pigs, and chickens love it. 

    I didn't give you complete instructions on how to build your own still, nor did I tell you what you need to stock in your larder. That's not my place. I am here to point you towards information and help explain things that some folks may not understand. As always, I welcome questions and comments here and on our Facebook page.

    The Fine Print


    This work is licensed under a Creative Commons Attribution- Noncommercial- No Derivative Works 3.0 License.

    Creative Commons License


    Erin Palette is a participant in the Amazon Services LLC Associates Program, an affiliate advertising program designed to provide a means for sites to earn advertising fees by advertising and linking to amazon.com.