Showing posts with label Skills- Not Stuff. Show all posts

Tuesday, October 13, 2020

Passing It On

A friend of mine recently was telling me about going camping with his girlfriend and her children. They mentioned that since he knew "all about compasses and stuff," maybe he could teach them a bit about navigation. He couldn't pass up such an opportunity, and gleefully passed along knowledge to another generation. Three inexpensive compasses, a map, and some satellite photos later, three youths are better suited to face life.

In the past six and a half years, we've spent a whole lot of time and bits imparting useful skills and knowledge to all of you, our dear readers/watchers/followers. I know the staff enjoys it, and we intend to continue that mission for as long as we are able. It's what Dad did, it's what America does, and it's worked out pretty well so far.

How about all of you, though? Now that you have some knowledge of your own, what are you doing with it? Have you discovered anything you had in your skillset that didn't seem applicable, but maybe now it is? Have you started sharing your knowledge with others?

There are a huge number of ways to spread the knowledge you have. My byline picture spoils my favorite way to pass on what I know; I volunteer as a BSA merit badge instructor, and just got asked to lead a group of young boys again. While Scouting provides a great opportunity to volunteer and teach, it is far from the only option. Girl Scouts, your local YMCA/YWCA, or community center all have teaching opportunities.

If you think you have nothing to teach, remember that you're probably a functional adult. This means you have to have some useful skills that a younger person or someone with a different background may not have. At the very least, you may have a different approach to a problem, which can definitely help others.

If teaching in person isn't for you, especially in this time of social distancing and restricted gatherings, you can share your knowledge here. We're always interested in guest posts expanding our point of view. Write out what you'd like to share, and get in touch with Erin or any of the staff. The beauty of a community like ours is that we all learn from each other, and we love when you're part of that.

Lokidude

Thursday, February 6, 2020

Shelter Essentials

Lately we've been discussing skills and the need to practice them, and one of the most important skills that I can think of is providing some form of shelter in an emergency. I'm going to take a generalist approach to my methods and ideas on shelter in order to cover as many variables as possible, as this is one of those times where knowing "why" helps take care of the "how".

These are general ideas work for improvised shelters, portable shelters, and impromptu or expedient shelters. You're going to want the same basics in any tent, debris hut, basement, or bunker. If you're looking at a damaged or abandoned structure, these are the things to give extra scrutiny.

Parts of any shelter, in my order of importance:

Roof
  • Most of what we'll need shelter from is going to come from above. Rain, snow, fallout, and sunlight are all things to take shelter from, so having a proper roof over our heads is important. 
  • A proper roof should stop most of what you're trying to get out of. Nothing is perfect, so look for ways to improve what you've found with what you have.
  • Of slightly less importance is heat; heat rises, and a good roof will trap it closer to you and therefore shrink the amount of heat you'll need to generate to stay comfortable. 
  • For the most basic shelter, a flat roof leaned against a solid structure or another section of roof (to form a tent-like shelter) is quick to build and simple enough to throw together from debris and scraps. Additional heat is usually provided by an open fire outside the shelter, near the opening, for safety. 
  • More advanced shelters should include some method of allowing smoke and excess heat out through an opening in the roof, so include that in any planning.

Floor
  • Heat may rise, but it is also carried away by conduction. Placing a floor between your body and the ground will break the physical connection between the two and reduce heat loss from conduction through the earth.
  • Anything placed on the bare ground will be better than nothing. Packed earth is a building option, but should be on the bottom of the list.
  • If you're going to be using an open fire inside as a source of heat, you'll want to make sure the floor is not going to catch fire. 
  • You'll want your floor to be above ground level to prevent water from entering. If you can't get that, make sure the floor is sloped enough to allow water to leave. The standard for water drainage is at least one-eighth of an inch of drop for every foot of length.

Walls
  • A simple debris hut or lean-to won't have actual walls, but anything more complicated than those will have them. 
  • Walls have to support the roof and block weather, and are normally built before the roof. Plan ahead and make sure you have some way to get the roof pieces up on top of the walls, or you'll have an animal pen instead of a shelter.
  • They also should be constructed in a manner that will let you control air-flow through the shelter, especially if you are using an open flame as a source of heat.
  • Walls will give you more room to move around inside, but will also increase the amount of air you'll have to heat or cool, so plan your shelter according to your fuel supply.

Openings
  • Opening don't have to be doors and windows, but those are the most common. Chimneys, ventilation holes, and loose construction methods also count as openings. Openings should have some method of closing when they're not in use.
  • Doors and shutters are a great way to add a layer of security to your shelter while they help keep out the weather. The tighter they fit, the better they will keep out dust, snow, and vermin.
  • Windows don't have to be made of glass. Early pioneer cabins and houses didn't have access to glass, so they used oilcloth or greased paper to keep the bugs and dust out while letting some light in. 

Materials
  • Modern plastics are common enough to be useful in emergency shelter construction. Clear plastics make passable windows, but add layers if it's very thin. Opaque plastics make good waterproofing for roofs and walls.
  • Wood comes in many forms, from sticks, logs, and branches to mill-cut lumber. Easy to work with and easy to find anywhere outside of a desert or arctic plain, wood is the most common material in the US.
  • Masonry like brick and stone is common in many areas, but requires a binder of some sort (like mortar) to hold them together, unless you're lucky enough to find flat stones that will stack securely. A good source of clay and a fire will provide you with masonry bricks.
  • Dirt makes a fair construction material, but takes a lot of time and manpower to use correctly. Sod cabins were common 150 years ago around my area; adobe is more common is the Southwest; and baked mud bricks were used for centuries in other parts of the world. Google "rammed earth construction" if you want more information on a rather rare method of building.

This isn't an exhaustive list, but rather more of a way to spark your imagination and powers of observation. I've got a fair amount of experience building and repairing things, so I can look closely at a structure and get a good idea of how sturdy it is, but some of you may not have much experience and will have to learn as you go. Just remember that practice makes permanent, so if you practice something wrong, you'll always get it wrong. I'll be practicing a couple of methods of making emergency shelters this spring and summer, so watch for updates with pictures.

Friday, January 31, 2020

Practice in Both Practice and Theory

As I was taking a look at recent posts by my fellow authors, and reading comments on the Facebook group from some of the members concerning those posts, it struck me that I am facing a somewhat serious crises of conscience right now.

We talk a lot about skill sets, and making sure we have the proper tools on hand to meet whatever types of emergency that life and Mother Nature happen to throw in our direction.  Whether those proper tools happen to be an in-car emergency kit with reflectors and a pair of jumper cables and maybe a few tools to change a hose or belt in a hurry, or a water filter straw, emergency blanket, and fire tab emergency stove in a GHB that happens to live in the trunk next to the jumper cables, its not always about what we have, so much as it is how we use what we have.

During a recent discussion concerning manual can openers prompted by Chaplin Tim's post, many of us were jokingly about whether, what type, and how many manual openers we happened to have on hand in various locations.  I've got... a lot of them.  Let's leave it at that.

I realized something important, though: out of the plethora of styles that I happen to have easy access to in my home, my car, and my camping equipment, there are only 4 or 5 out of the dozen or so that I've actively used more than once or twice.  My first reaction to this realization was to tell myself "No big deal, we don't stock much in the way of canned stuff in this house anyway -- it's all fresh, or shelf-stable non-canned, or home canned!" 

Then I started thinking about it further, and realized that the deficiency extends further than to just my multitude of can openers in various styles. I maintain 6 or 7 different non-bic lighter methods of starting a fire in my BoB/GHB, as well as always carrying at least one or 2 lighters in my pockets (I'm a smoker, what can I say - I'm never without fire!)  But I've done very little work with most of those methods.  I used them just enough to assure myself that with some work, I could use them.  I did not, however, use any of them sufficiently to actually become proficient with them, or for any of them to become second nature.

Skills deteriorate over time if left unused, and it's been a couple of years since I even made an attempt with some of my various methods of lighting a fire.  I honestly don't know, as I'm sitting here writing this blog post, whether I can still accomplish the task with most of the tools available to me.  And while its not such a big deal today - right this minute, right this second, or even probably tomorrow or next week - it could be, because you can never be sure during an Oklahoma winter whether Ma Nature is gonna toss a rather nasty ice storm in your direction that takes down the power lines and causes massive problems.

So I need to start making myself practice with all of my gear more regularly, instead of smugly allowing it to simply sit in its bag in the car.  And so do you!  Make sure that you actually practice with the tools at your disposal, instead of blindly assuring yourself that you're in good shape simply because you have access to them!

Monday, October 23, 2017

Woven Glory

Two years ago, I started an extended series on Fiber Arts, but never finished it due to health problems. Now that I'm no longer over my head, I intend to finish that series. I've managed to cover the types of fiber, processing it, spinning, and dying it, and today I talk about weaving it into usable form.

Weaving is an art form that is almost as old as civilization itself, and has been practiced since the very beginnings of agriculture (and possibly before that). Every known society throughout history has had some form of woven textile goods that were produced from a variety of source fibers.

As societies grew and gained technological advances (either through study and innovation, or via trade with their near neighbors) the looms they used to produce cloth became more complex, allowing for a much wider range of patterning in the finished product.

In its most basic form, a loom is simply something to hold long threads in place and under tension (called the warp) while other, usually much shorter, threads are passed over and under them in succession (called the weft.)

These days, looms come in a huge variety of sizes and shapes, from lap-held looms that can produce both simple and elaborate trims or strips of fabric, all the way up to looms that require their own rooms for making extensive rolls of fabric, large rugs and carpets, or hanging wall tapestries*. When talking about home or artisan use, there are three different types of  basic looms, which is what I'll describe today, along with a fourth which is mainly a historical curiosity.

None of these looms require power to operate, and all can be made by hand with proper woodworking tools and knowledge, meaning that they are a good investment for a prepper interested in making woven fabric.

*Yes, tapestries are still a thing, though they aren't specifically used for keeping out drafts these days. They're very labor intensive, ornate, and time consuming to produce, sometimes taking upwards of two years to manufacture and costing thousands of dollars. Weaving specialists work hand in hand with draft artists and painters and can turn practically any piece of flat visual art into a one-of-a-kind tapestry to hang for viewing!

Style One: The Inkle Loom
Rhi's inkle
Inkle looms are small, portable, typically lap-held looms that weave very narrow strips of cloth. The width one can handle is determined by the length of the bars that make up most of its form, and is seldom over 3 1/2 inches in total width. The warp threads are wound individually, with every other thread passing through a loop of string which is tied off separately and is referred to as a heddle. The heddle is what allows a weaver to move alternating sets of threads into place (up/down or back/forwards, depending on the type of loom) before a pass is made with the weft (crossing) thread.

Inkle looms are fantastic for beginning weavers. They're inexpensive, easy to learn, and very forgiving of potential mistakes. With the addition of cards (also called tablets), some seriously intricate pattern work can be performed on an inkle loom, giving it a huge amount of versatility for its size and price.

I've seen inkles run between $45 and $150, depending on the quality of the woodworking done during manufacture. My inkle cost about $80, and is made of scrap hardwood from other projects. It will weave 2 1/2 inch wide pieces of fabric, which I primarily use for things like belts, trim on costuming, straps for purses, strips of it sewn together side by side and then into a shoulder bag or pouch, etc. It also doubles as a warping stand for my floor loom, where I use it to measure the lengths of thread to be warped onto the Big Boy (see below).

These are great for kids, beginning weavers, those who don't intend to invest a lot of time and money, and those who are wanting to see whether its a hobby they actually enjoy before making the larger time and money investment required with a tabletop or floor loom. They're also well loved by experienced weavers who make complex ribbons of trim via tablet (or card) weaving on an inkle.

Style 2: The Box or Tabletop Loom
Tabletop loom by
Tumbleweed Woodworks
Offering lightweight portability that still allows for significantly larger pieces of cloth than an inkle, the box or table loom is a good choice for those who don't want the expense (both monetary and floorspace) of a traditional floor loom. 

These guys are little work horses, reliable and easy to learn how to use. Though they're less forgiving of mistakes than an inkle, they're also a lot more versatile in the types of patterns available to the weaver. 

Most of the box or tabletop looms that you'll find are rigid heddle looms. Instead of a piece of string tied around every other thread like the inkle loom, a rigid heddle loom has rows of very thin metal bars with eyelets in them to pass the thread through. In the photo above, you can see the three sets of rigid heddles in the raised areas featured in the center of the "box" frame.

Each thread gets its own heddle instead of only half the threads getting held in position this way. The more heddles a loom (tabletop or floor) has available, the more complex and ornate the pattern can become. Since each thread gets its own means of moving up and down, the shed (current weaving area) is determined by which heddles are up.

These looms are good for slightly more advanced beginners, intermediate weavers, advanced weavers who want something small and portable to relax with while out of the studio, and those who want to dabble and are willing to spend more than what an inkle generally costs. Plan on spending between $250 and $600 if you decide to purchase a good tabletop loom.

Style 3: The Floor Loom
Modern LeClerc Floor Loom
This is the "Big Boy" category of looms; the largest available outside of the strictly commercial cloth production market. Floor looms come in a variety of sizes, measured by the width of the cloth they can produce. They are very large, often larger than a good sized desk and requiring a chair or bench to sit at while working the loom itself.

As you can see from the photo above, this particular style of loom requires a great deal of space to set up and use properly. They are also a significant investment financially, often costing anywhere from $1,500 to $8,000 depending on brand, weaving width, number of heddles (which partly determines how complex a pattern you can produce) and number of sheds available.

I own a 48" weaving width standing jack loom with six heddles and four sheds. It currently resides at Knight's Rest in storage, because I haven't had the space to set it up. Floor looms are not for dabblers, nor are they a good choice for those on a serious budget; I only managed to acquire one because an acquaintance in my RenFaire group had too man, and needed the space, so she gave one away. I was the lucky winner of the "First to say something gets it" lottery.

Style 4: The Warp Weighted Loom
https://en.wikipedia.org/wiki/Warp-weighted_loom#/media/File:WarpWeightedLoomCTMLodzPoland.jpg

Seldom used by any except the most dedicated historical re-enactors, a warp weighted loom doesn't look much like what people think of when they hear the term "loom." These are usually very tall (in excess of six feet) with a weaving area that ranges from three to eight feet wide. Tension is maintained on the warp threads by the expediency of tying bundles of warp thread to clay weights, which can then be adjusted to allow more thread as the weaving progresses. 

These are easy to build, but can take years of practice to become expert in its use. Due to their size, and how they are warped, some seriously fancy pattern work can be achieved by someone who knows what they're doing on one of these. Sadly, I am not one of those people!

A Final Word
Weaving is both a skill and an art form, much like many of the other obscure skills I've been known to discuss. True proficiency requires a time investment, and definitely has a learning curve involved. I'm far from being an expert in weaving, though I am a devoted hobbyist. Thankfully, I have friends who are truly experts in the field, and I highly recommend the advice of those well versed while learning.

Tuesday, June 6, 2017

How I Know What I Know


I don't have money... but what I do have are a very particular set of skills. Skills I have acquired over a very long career. -- Bryan Mills (Liam Neeson), Taken, 2008

I fix a lot of things for people, both professionally and in my personal life. Very frequently, folks are amazed that I have these skills and want to know how I learned them. Honestly, acquiring skills is a skill itself, and is one well worth focusing some time on.

There are three basic routes to learning and developing skills:

Find a Mentor
Mentors are the traditional method of passing along skills from generation to generation. Much of this comes in the form of parents teaching children, but other mentors can greatly open your skill set.

My dad taught me most of what I know about fixing things, general construction, camping and fishing. My scout leaders greatly expanded on my camping and bushcraft skills. My friend Kevin taught me how to hunt and track, and our own Firehand has taught me a lot about metalworking.

Finding a mentor can be a bit intimidating, especially as an adult, but joining a club or hobbyist organization for the skills you want to learn makes finding mentors much easier. You can also reach out to friends who have the skills you seek.

Take a Class
Formal classes are an easy way to learn new skills. These classes can range from professional and trade instruction to basic skill overviews. Community colleges, gear and equipment retailers, and enthusiast groups all are known to offer classes in useful skills.

The downside of class work is that it often has an associated price tag. It also cannot provide the one-on-1 focused instruction of a mentor.

Learn Through Independent Study
The third way I've acquired skills is through independent learning. This is also known as Reading The Freakin' Manual (RTFM). Books, schematic diagrams, and videos are great for teaching very specific, niche skills. When I need to take the door panel off my truck or something similar, YouTube has step-by-step videos so that I don't destroy things in the process. When I'm working on a device I've never disassembled before, a schematic drawing makes sure all the parts go back where they belong. Reference books are available for almost any topic, and can teach new methods and techniques even for skills you already have. All of the BCP crew are library types, because there is a wealth of knowledge in books.

Learning something is a skill. Practice it!

Lokidude

Thursday, May 12, 2016

Practice, Practice, Practice

Skills take time to learn, and if you don't keep using them they can deteriorate over time. Building a fire, pitching a tent, cooking over an open fire, accurately using any weapon, and first aid all come to mind when thinking about prepping, and they're all skills that need to be practiced.

How does a prepper get needed practice without attracting unwanted attention? Good Operational Security (OPSEC) means not letting the neighbors know what you have and can do, which minimizes the problem of how to deal with the unprepared people who may want your stuff when TSHTF.

Woodscraft
Primitive camping and traveling through natural areas are often a part of a prepper's list of skills. Getting a chance to use those skills can be a challenge if you live in an urban area; most HOAs frown upon people building a debris hut in their backyard. Day trips to local/state/federal parks can offer a chance to practice hiking (as well as help you test and break in new gear) and overnight stays are possible in some of them. Follow the rules as best you can: no open fires if they're not allowed, pack out your trash, etc. Living out of your Bug-out Bag for a day will show you flaws and shortcomings in your choices of gear, as well as let you get used to using the stuff that works. Remember to clean and restock your gear when you get back home (I usually watch the expiration dates on things and use the oldest stuff for practice).

If you're getting off the beaten path, you can practice map and compass or GPS skills. Geocaching groups are another way to get in some practice with land navigation skills.

First Aid
You need to get proper training and supplies, but once you have them you also need to practice using them. I volunteer as medical aide at just about any gathering I attend; my trauma bag is about the size of a day pack and travels with me in my truck, so I usually have it close anyway. I can toss it under the table at a convention or keep it in a back room at a temporary job. When I was a Cub Scout leader, it went with me to every meeting and campout.

Most of the things I deal with are the minor injuries that occur in everyday life, but I have rendered aid at a couple of serious accidents. Know your limits and offer to help; you'd be amazed at the reception you'll get from an event organizer for offering to be an extra part of the medical aid staff (which is always short-handed).

Weapons
Firearms are fairly simple to practice with: you'll need to find a range or site that will let you shoot, which can be a problem in gun-unfriendly areas. If you're using a public range, try to pick a time when it is less likely to be full of people. Most gunnies are good people, but there are plenty of law enforcement types that use public ranges and will take note of who is there and what they're shooting. I prefer to limit myself to three or four guns max if I'm at a public range, partly out of paranoia and partly out of a desire to focus on those specific guns.

If you live in an area devoid of shooting ranges, or the local laws are so prohibitive that you don't want to be seen (or caught) with a gun in public, you may want to look into air-powered guns. From the lowly BB gun to the high-end Airsoft replicas of common firearms, you can safely set up your own shooting range in a basement or hallway. Sight picture and trigger control are essential to accuracy, and practice with an air-powered gun will transfer to the real thing. Recoil and noise are missing, but you'll get to practice something useful. Simunitions and similar sub-caliber training aids are available if you have the money for them.

Edged weapons are a bit trickier to practice with: unless you are involved with a martial arts groups that trains with swords and knives, the only way to get useful practice is by joining a LARP (Live Action Role Playing) or SCA (Society of Creative Anachronism) group. Both of these groups deal with re-enacting or re-creating a period of time from the past, with as much detail as possible. Mock battles are often staged and are about the only way I can think of to get close to “live fire” practice with blades. SCA groups are also a good way to learn new skills from those who have been doing it for a long time.

Power Outages
This is the easiest to practice: just shut everything off for a weekend. If you live in your own house, find the fuse/breaker box and pull/trip the main one (usually located at the top of the box). For apartment dwellers, you'll have to go through and turn everything off individually if you don't have a fuse/breaker box. It's usually a good idea to warn everyone in the house before killing the power, but that's up to you.

If you plan on using a generator for electricity, this will give you a chance to experience how much fuel it will consume under load (usually a lot more than just idling when you fire it up for the monthly check) and may help you further refine your plans.

Practice Makes Permanent
Contrary to the old adage, practice does not make perfect; instead, practice makes permanent. If you learn and practice something poorly (or wrong), that is the way you will use that skill when you need it. Practice your skills where and when you have back-up resources. If the generator won't run all night, or the tent isn't fully rain-proofed, it's nice to find these things out in a situation where you can abort the practice run and go back to “normal” conditions.

Thursday, April 14, 2016

Swamp Coolers

A few years ago, a young friend of mine moved to Southern California with her husband and new baby. The housing they were living in was fair, but when the air conditioner died in July, the landlord struggled to find someone to fix or replace it. Having been around babies in the Summer, I know how uncomfortable they are in the heat and how miserable that makes parents; she needed a way to cool at least one small room so her daughter could have a place to sleep comfortably.

I did some research and found several sets of plans for a home-made swamp cooler that she could afford to put together for less than $50 and were enough to cool a small room. It worked well enough and long enough to get them through until the AC got fixed, and her husband ended up making a few for neighbors with the same problem. While this wasn't a true “emergency”, it's still an example of how a bit of knowledge and some simple skills can make rough times easier to get through.

What is a Swamp Cooler? 
It's a way to cool air using the evaporation of water and a fan. They're simple, easy to make, and quite energy efficient, but they don't work everywhere, especially in areas of high humidity.

Swamp coolers work by passing air through a mesh or media that is kept wet. Using the same principle that your body uses to cool itself by sweating, the water evaporates and carries excess heat with it. In the time of the Pharaohs they used slaves with fans to move air past containers of water or wetted blankets hung over doorways, so it's not new technology. 

Water is an odd chemical from a lot of standpoints, but the one aspect that makes swamp coolers work is its high latent heat of  evaporation (enthalpy of vaporization). Put into layman's terms, water requires a lot more energy to convert from liquid to vapor than most other common chemicals -- on the order of three times more energy than ethyl (grain) alcohol and six times more than a lot of hydrocarbons. This means that if we can get water to evaporate, it will carry away a lot of heat.

The sticky point is getting that water to evaporate, which brings us to another term: Dew Point. If you get your weather forecast from the radio or TV you probably don't see the dew point listed, but it will be in all aviation forecasts and most of the internet weather sites. Dew point is the temperature at which the humidity already in the air will start to condense (100% relative humidity), creating fog and dew. Aviators need this information to avoid flying into fog, which is why it is part of a METAR (Meteorological Aerodrome Report).

Swamp coolers can cool air down to almost the dew point, but never below it. That means that if you live in an area like mine where the relative humidity runs 50-80% in the Summer, causing dew points of 75-80° F, the best output from a swamp cooler (or cooling tower) is going to be 80-85° F. That's not much help for staying comfortable, but usable in industrial settings. Those of you who live in more arid climates, where relative humidity tends to stay under 20% will see more cooling since the dew point will be under 50 ° F. Sorry Florida, swamp coolers don't work well in actual swamps. Don't I know it! -- Erin)

Here's a chart of dew points at various temperatures and humidity levels:
https://en.wikipedia.org/wiki/File:Dewpoint-RH.svg 
How Do You Make One?
The simple DIY version I found for my friend was a 5 gallon bucket with a foam pad for the wetted media, a 12V DC fan from a dead computer case, and a small solar water fountain pump from Harbor freight. Full instructions are found here, but the concept is simple:
  1. Mount a fan or two in the lid of the bucket, blowing air into the bucket. 
  2. Cut vent holes in the sides of the bucket, as many as you want. 
  3. Line the bucket with a fibrous mesh (humidifier filters work best).
  4. Place a pump in the bottom of the bucket and connect a hose to the top of the mesh 
  5. Add water, usually 2 but no more than 3 gallons. 
  6. Turn on the power.
The pump moves water over the fiber mesh while the fan is blowing air through it. As the water evaporates, it cools the air coming out of the vent holes. Expect to go through a few gallons of water every day. so make sure you've got the extra water available. It doesn't have to be potable water, but the cleaner it is, the longer your filter mesh will last and the fewer problems you'll have with impurities getting volatilized and spread around your living areas.

Use your imagination to replace parts you may not have. 
  • Wood chips or shavings (think pet bedding) or loose straw will hold water while allowing air flow, so long as you don't pack them too tight. 
  • A towel or piece of blanket held up with bent coat hangers will hold water. 
  • 12V DC fans are easy to find; if you don't have a computer cooling fan around, look for an automobile blower fan in a junkyard or check out one of the larger truck stops for a 12V DC fan. 
  • Plastic trash cans can replace the bucket, 
  • Solar power is a good option because you'll need the cooler most when the sun is shining.

Knowing how something works is the first step to making it work.

Tuesday, March 22, 2016

Tracking, part 2: Scat

Does a bear crap in the woods? Well yes, actually, and so do a whole lot of other animals. As a hunter, I use droppings to find game; as a hiker, scat can tell you if the animal crossing your path is a bear or a bunny.

Scat
Scat is any digestive leavings from an animal. In most cases, that's feces. It also includes "pellets" coughed up by certain birds of prey; these pellets contain all the parts of a meal that the bird couldn't digest.

Before you get too involved in investigating scat, be aware that animal waste can contain bacteria, parasites, or viruses. Some of these diseases, such as hantavirus, can even be transmitted by merely breathing air contaminated by waste. Latex gloves are called for in any feces handling, and a surgical-style mask is not out of line in confined areas such as caves and outbuildings.

The form that scat takes depends on the diet of the animal. Animals that eat a lot of plant matter (rabbits, deer, etc.) tend to have droppings that are small and spherical or oblong, and range from the size of small raisins to roughly half an inch in diameter. Animals that consume lots of protein have longer, corded droppings; if you have a dog or a cat, then you have a perfect example of carnivore waste.

Deer pellets (from icwdm.org)
Bear scat. Note the size. (icwdm.org)

Birds and lizards have very similar leavings, and those are different from any other animals. They have a tendency to be smooth and ropy, and are frequently entirely white, or have a white portion on one end. As with tracks, larger droppings or larger piles of droppings indicate a larger animal.

In many species, bird stools are loose to the point of being runny. Think about how pigeon droppings look on your windshield in the morning, and you get an idea of the consistency of some of these leavings.

An owl pellet. (tvja.org)
Next week, we'll look at the other signs animals leave behind and what they can tell us.

Lokidude

Tuesday, March 15, 2016

Tracking, part 1: Animal Tracks

We're teaching my Boy Scouts about animal tracks and signs this week, and I realized I've never talked about that here. Since there's so much to talk about how to track and the critical elements of it, I've broken it into multiple parts.

This week, we're going to talk about what tracking is, and what kind of tracks to look for and what they mean.

What It Is
Tracking is a very underrated skill among folks who don't hunt. The obvious use of tracking is following game that you'd like to turn into tasty meat; the less-obvious, but probably more useful employment of this skill, is being able to determine what animals are in the area that may want to turn you into tasty meat. Whether you use your skills as a predator or to avoid becoming prey, the same basic elements apply.

At its core, tracking is the art and discipline of identifying and interpreting signs left behind by animals as they go about their regular routines.The most commonly thought of sign is a footprint, but other common signs such as scat or disturbed or damaged environmental bits. All of these parts combine to tell the story of what went where, and when.

What to Look For
Animal signs fit into three main categories: tracks or prints; scat; and disturbed environment. Signs are unique to various types of animals, and when taken as a whole, they will tell a great deal about the fauna around you.

The particular signs, and animals you find, will depend on the area you're in, and a  good guidebook will give a comprehensive breakdown of the types of signs a particular animal leaves. My favorite guides are James Halfpenny's Scats and Tracks series. Scats and Tracks of the Desert Southwest happens to be the one that applies to my home are and favorite vacation spots, but there are guides for the whole country.

While a guide will give you great detail about the animals in your area, there are some universal constants in tracking that apply to the entire country.

Tracks
In general, a deeper track comes from a heavier animal.

A new track will have sharp, clean edges and more defined details. As a track ages, edges crumble and details wash out. After just a couple days, the detail can be almost entirely gone.

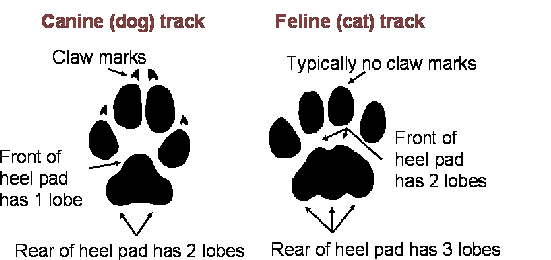
Different animal genera and species will make distinctly different tracks. For example, cat and dog tracks are very similar, but the differences between them are easily seen.

Picture from Michigan DNR.

Deer and other wild herbivores have a split hoof. As with predators, a larger, deeper track means a larger animal. Herbivores are generally harmless, but if they feel threatened, they can be even more dangerous than a predatory animal: for instance, a fully grown moose weighs upwards of 1200 pounds, with massive antlers and sharp hooves. Such an animal rampaging through camp would be like having a car drive through it.

Image from wildawareutah.org

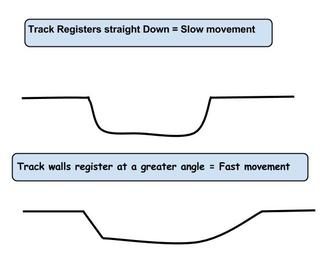
Tracks can also tell how fast an animal was moving. A slower-moving animal leaves tracks that have even, vertical sides; faster movement leaves a track with sloping edges as the foot rolls out of the track.  Faster movement also means that tracks are spaced further apart. 
http://wildfound.weebly.com/tracking/basics-of-tracking-part-2-reading-prints
For more information about animal tracks, including lots of examples and photographs, check out The Basics of Tracking part 2: Reading Prints on WildFound.

Next week, we'll shoot the poop as we talk about scat.

Lokidude

Friday, December 11, 2015

When Things Go a-Fowl

This is the second installment of Rhi and Evie's Adventures at Knights Rest, where we take a bird in hand and discover it's worth more than two in the bush.

While out at KR, Evelyn and I had to deal with livestock of various sorts. Knights Rest is a working farm, after all, and there are horses, sheep, dairy cows, chickens, ducks, and the attendant working dogs.

One of the things that we did, both as an exercise in off-grid grocery skills and because Evelyn had never had any, was to acquire a duck for our dinner one night.

Most wild birds which aren't raptors (i.e. falcons, hawks, eagles, owls) or straight-up carrion eaters (vultures) can be consumed by humans. Varieties of songbird and game birds -- including several species that we modern Westerners wouldn't even consider putting on our dinner plates, such as peacocks -- have been part of the dinner menu in the past. Ducks, geese, guinea fowl, and chickens have all been kept as farm livestock for several thousand years for their meat and eggs, as well as their feathers being useful for clothing and bedding once the bird is headed for the cook fire.

Unless you live on a farm and routinely harvest your own animals, though, its rather easy to forget just what goes into getting a bird ready for human consumption. As a society, we've been conditioned to consider it "no big deal" to run down to the grocery store, grab a ready-to-cook bird from the frozen foods section, take it home, and deal with simply cooking it.

Our duck dinner started with figuring out which members of the flock (a mixed flock of domestic and originally wild ducks who've chosen to stick around at KR for the abundant food and safety) were "excess" males, and therefore prime candidates for harvesting. Fortunately, with so many previously wild ducks now making their home at KR, there was an over-abundance of brightly plumed semi-wild drakes that were easy to identify.

Of the available ducks ready for harvest, we picked out one that could be easily identified by his markings, and proceeded with the task of capturing our dinner. This meant getting him out of the pond, into the pen, and then cornered so he could be collected. While we "could" have simply shot him, neither of us has done much in the way of hunting in several years, and the chances of spooking the flock and scattering them, ending up empty-handed, was higher than either of us cared to risk.
Don't ever believe that chickens, geese, and ducks won't bite. They will and they do. I got nipped (fortunately very lightly) in the process of cornering our duck in the pen. Then came the Messy Part.
Why yes, ducks DO bite - those are serrated edges on that beak!
A log with a pair of nails forming a somewhat open V was used to stretch out our bird so we could slit his throat and chop off his head. Make sure your knife, axe, machete, etc is sharp when you do so, preferably sharp enough to take off the head in a single stroke rather than having to whack at it several times. We didn't pause to sharpen the blade being used, and it took us 3 tries to finish severing the neck all the way through.

Once the head is removed, holding the body by the feet so it drains of blood is both straightforward and a relatively rapid process. By the time we'd walked from the butchering block at the main house back to where we were camped, the bird was ready for plucking.
If you aren't planning on saving and using the feathers, then skinning the bird in the same manner you would skin other small game is a simple task and works to remove the offending plumage so you can get on with the task of cooking the bird. 
But if, like us, you are thinking, "Hey, these feathers will be great for stuffing a pillow, fletching arrows and darts, making quill pens for writing, and let's not even start with the 1001 decorative uses for them", then you'll want to pluck the bird.
That day taught me a rather valuable lesson that doesn't get stressed often enough: Understanding the theory of how to do something, even when you have the proper tools for the task, is a lot different than having actual hands-on experience! And having hands-on experience once or twice during your life is a far cry from actually KNOWING what you're doing. Practice the skills you have and will need in an actual SHTF, folks, or you will find yourself saying, "But I know how to do this! So why isn't it happening?"

Evelyn had never plucked a bird. I had only done so once prior to this point. In theory, we knew what to do.

In Theory. In fact, Evelyn had never taken part in taking dinner from field to table through all the steps. 

We both had the necessary knowledge base, the book learning, for the task. We had the proper tools ready: our hands, a bag to hold the feathers (we wanted them for other projects, after all) and a pot to put the bird in a boiling water bath for a few seconds once most of the feathers were gone, to get the final few.

What we did not have, collectively, was any comprehension of just how labor-intensive getting a bird ready for the pot truly is. We (mistakenly) estimated that it would take 10 to 15 minutes to divest our duck of his colorful coat of fanciful feathers. We were off in our estimates by more than an hour.
Pulling the feathers, while not a particularly difficult task, is time-consuming. It also caused our hands to cramp after a while, so we traded back and forth as to who was working on pulling plumage from Monsieur Canard. But Evelyn, true to form, insisted that she was going to do the majority of the work on plucking that bird, simply because it was her first time and a serious learning experience for her!
MaggieDog was just SURE I would drop that bird for her!


Finally ready for a quick scalding bath to loosen those final feathers
Nearly ready for his hot bath
Once we'd managed to remove the majority of the feathers from our bird, we gave it a 15 to 20 second dip into water which had 3 to 5 drops of dish soap added and had been brought to a low boil.

Why dish soap? It helps to cut the oils that coat the feathers, making them just a tad easier to pull. It doesn't take long, and you don't want your bird to soak; just a fast in and out, no more than 30 seconds tops, and then those last few feathers (while wet and pretty much useless for any "projects" you might have in mind) will slide out much easier.

At the point where the feathers are removed, fluffy stuff and all, gutting it is just like you would with any small game, as is removing the feet. When dealing with fowl, feet can actually be stewed and eaten, though it is an acquired taste.
Daffy in all his tasty glory!
We wrapped him up in aluminum foil, along with a bit of salt and pepper and sliced garlic, dried mission figs, and onion, then tossed him on the grill over our camp fire. He'd been feeding on acorns for a while, so he was incredibly tasty - his diet left a wonderfully rich sweetness to the meat. Of course, taking a bite out of something that tried to bite me might have had as much to do with it!

Practice your skills, folks. I can't stress that enough. When you're facing a situation where you can't simply run down to the neighborhood grocery or the fast food place around the corner is not the time to realize that you're clueless about feeding yourself and your tribe.

Thursday, December 3, 2015

Thermo-Electric Generators

One of the regulars on our Facebook page posted a short video from the BBC showing a way to charge your cell phone or other small electronic device from a home-made device added to a clay firebox or stove. There was some interest in how this device worked, so I took a closer look at the video to try to figure out which method they were using.

For those who can't or haven't seen the video:
  • The generator is two metal plates, about 4 inches square, bolted together, with three pieces of rebar welded to one of the plates (the fire side) and a square metal box (about 2x2x6 inches) filled with water welded to the other plate.
  • The generator is inserted into a hole in the side of a fired clay cook stove that is burning wood.
  • The captions on the video mention that the fire creates a heat differential in the metal rods sticking into the fire to “create” electricity. This is incorrect. The metal rods are there to provide more surface area in the flames.
  • There is a pair of twisted wires coming from the middle of the metal plates, indicating that some part of it came from a factory.
  • There is a white substance between the two plates, probably conductive paste as is used on computer heat-sinks.
  • The wires are run directly to a cell phone and an LED flashlight, which means it is putting out around 5 volts of DC power.
  • Since there are commercial versions of this on sale in America (Powerpot and similar), this was something designed for use by people with little to no money.
All of these points lead me to believe that they are using a Seebeck junction (sometimes called a Peltier junction) placed between two locally-fabricated pieces of steel.

Thermo-Electric Junctions
A Seebeck junction is a sandwich of dissimilar materials that will generate electricity when placed between a hot surface and a relatively cold surface. As the heat moves from the hot area to the cold area, electrons are knocked off of the material, creating an electrical flow. If you reverse the conditions and push electricity into the junction, one side will get hot and the other side will get cold.

Solid-state coolers are normally called Peltier junctions, while the thermoelectric generators are called Seebeck junctions even through they are the same thing.

Seebeck thermoelectric generators are not terribly effective -- about 5% efficiency -- but they are perfect for use in waste heat reclamation when placed in the exhaust or combustion chamber of wood-fired heaters.

Seebeck generators are fairly easy and cheap to buy. Since the main uses involve the Peltier (cooling) function, it can be hard to get (and understand) good data on the amount of energy you'd be able to get out of a given module, but I'll give it a try.

In Practice
Amazon has a cheap one if you want to try making electricity from fire. A bit over 1.5 inches square, it weighs less than an ounce and costs less than $10.00,  making it perfect for experimenting.
  • Power output will vary with the difference in temperature between the two sides. The higher the difference in temperature (not the higher of actual temperatures), the higher the voltage and amperage that will be produced. This one has a maximum temperature of 150° C (302° F), so it would work with small wood fires or placed on the surface of a metal wood stove. 
  • The cold side on the generator shown in the BBC video used a container of water to keep the temperature at 100° C (212° F). The hot side was the metal rods inserted into the flames, which in a wood fire is about 150° C (302° F). The difference is 150-100= 50° C. This is a small difference when looking at Seebeck generators. 
  • Unfortunately, the seller doesn't give enough information to be able to estimate the power output. One of the buyers, however, mentioned getting around 7 volts DC by placing the hot side on a stove and the cold side on a ice pack.

A more expensive version can be found here.

  • These modules can handle up to 350° C (662° F). 
  • Wiring a few of these modules together to get the voltage you desire (around 5V for cell phones) would be the best route.
  • Looking at the charts for a module the same size as the one from Amazon, a 50 degree differential would put out about 2.5V at a little more than 0.5A. Not bad for something the size of a pack of matches. 
  • Wire two of them in series (connect positive of one to the negative of the other and draw power from the unused connections) and you'd have 5.0V at 0.5A. 
  • To put those numbers in perspective, most older cell phone chargers (and USB 2.0 ports) are rated at 5V and 0.5A while the newer chargers are still 5V but 2.0A.
If you don't want to buy a module, you can find them in the common 12V coolers sold at Walmart, and most truck stops, and in high-end desktop computers (active cooling for the CPU-mounted between the chip and the cooling fins). Salvaging one and using it to make a generator would require a bit of knowledge of electricity and a way to determine which wire is positive and which is negative. Voltage output will vary according to the temperature difference between the hot and cold sides, so a cheap voltmeter would come in handy.


Thermo-electric junctions are interesting ways to generate small amounts of power from fire, something you'll probably already need in an emergency. Since there are no moving parts, maintenance is minimal and they're pretty fool-proof once assembled. I hope I was able to answer a few questions, but if you have more I will do my best to answer them. Feel free to leave comments here or on the Facebook page.

Tuesday, November 10, 2015

Why We Practice Skills

It's not by chance that I end my articles advocating that you practice the skills that you're shown. It's one thing to have the "book learning" to do something. It is another thing entirely to test yourself and your gear, and find the weak links and things you need to work on.

This is also why I'm not a huge advocate of survival manuals in your BOB or other gear: books and manuals are great ahead of time, but they're no substitute for practice. Sadly, that's how people tend to use them, and that just doesn't work. The video below drives that home.


Even with instructions and tools, he had difficulty starting a fire. We won't even get into the spearfishing attempt. He learned from his mistakes, but it's far better to learn those lessons when the stakes are minimal.

This is why we practice skills.

Lokidude

Thursday, November 5, 2015

Communication Skills


Transmitting & receiving information is the main purpose of communication.

Interpersonal communication is a basic part of our daily lives. During and after a crisis or disaster, it will become an important part of your daily life and could impact your ability to survive. Living and dealing with others makes survival a lot easier, and good communications make it easier to live and deal with them.

There are various theories and category sets for communication styles, which will vary by whichever teacher you listen to. If you research these styles, most of their emphasis is on how to deal with people based on their personalities (passive, aggressive, controlling, supportive, submissive, etc). and how they interact with yours. However, this places the emphasis on the personality and not the communication itself. This may work in a business setting when things are normal, but once the SHTF, most of us aren't really going to care about getting a poor performance review because we hurt someone's feelings. Warning someone that a bridge is washed out shouldn't require a minor in psychology; any method will work as long as the information gets passed on.

My System
I don't recall where I learned the system that I trust, I don't even have a name for it. It is different because it avoids most pop psychology drivel and focuses on HOW we talk to one another instead of WHY we talk that way. This fits into a post-SHTF scenario better in my eyes, because the emphasis is on the communication instead of the personalities involved. No system is perfect, though, and this is just one of many out there. Be aware that there are people who are stuck in one method of communication and will reject any attempts to move them into any other!

In a conversation (usually an exchange of information) there are two “roles” in play. I've seen them described as adult/child, superior/inferior, or teacher/student, but there are only two roles. I will use the adult/child description, but the others work the same way and mean the same thing. The size of the two parties is irrelevant; either side can be one person or a group of people.

Communication can take place between two adults, between an adult and a child (information flowing either way), or between two children. How we talk varies by our role in each of the four scenarios. Roles are fluid, and while someone may be an adult in one conversation, she may not fit that role in another. In complicated or long conversations, roles may change from topic to topic. Dealing with the concept of flexible roles tends to give people who demand rigid categories for everything nightmares, but that's a bonus for this system.
Adult to Adult
Peer to peer communication with societal limits. This is the rarest, yet most efficient form of communication: conversation between equals, with no one person dominating it. Disagreement is allowed, as long as respect is maintained. Treating the other person as an equal takes the power dynamics out of play, and works well unless you have someone who refuses to treat others as equals (arrogant or domineering) or to be treated as an equal (professional victim).

Examples:
  • a couple working out a budget
  • two co-workers deciding how to cover a shift
  • bloggers writing informative articles
  • experts consulting each other over something new

Adult to Child
Information is presented in such a way that disagreement is not encouraged and may not be allowed. Good for passing on information, this form is not good for discussions. Without discussion, the quality of the information may suffer.

Most government communications are of this type: information tends to flow from the adult to the child, as do requests and demands. Commonly seen between bosses and workers, teachers and students, and news media to consumers.

Telling stories and recounting adventures is an ancient method of passing on information that predates written language, and also falls into this category.

Child to Adult
Information flowing in response to a request or demand as well as requesting information, assistance, or clarification. Disagreement may be allowed, as long as respect is maintained. Talking to your doctor about symptoms, or just about any dealings with the police, fall into this category.

Child to Child
Peer to peer, but with fewer societal limits. Respect is optional, information is not the main goal of the conversation (the conversation itself is the goal), and there is a very good possibility that humor, sarcasm, intentionally painful statements, and honesty will be present. I would guess that a majority of social media communications fall into this category.

This category is good for blowing off steam and relaxing, but not very good for directly passing on information.

Problems arise when one party to the conversation assumes they are in a role that the other party doesn't accept:
  • Having your 12-year-old child think he is the adult in a conversation can and should create a problem (reminders both gentle and otherwise of who pays the bills can help correct this thinking). 
  • Having a roommate that will not get out of the child/child mode when it comes time to pay the bills will be a problem. 
  • Having a public servant of any type automatically assume they are in the parent role in any conversation should cause problems.

I prefer to treat others as equals until they prove me wrong. My ego is not so large that I can't accept the fact that there are people in the world that know more than I do about some things, so I can easily take on the “child” role in a conversation if I need to. I have lived a full and varied life, so I have information that some may find useful -- that's the main reason I write these articles every week. In doing so, I am in an “adult” role. The role that you choose is entirely up to you.

I also know that there are a lot of people in the world who don't want to have conversations that would challenge their beliefs and opinions. I choose to ignore those people when possible, and confront when inevitable. Confrontation is not conversation, however, and is conducted under a completely different set of rules.

Tuesday, November 3, 2015

Knots Redux


I've previously demonstrated some basic, foundational knots. They are pretty much the building block of all rope work. However, on their own, they don't get much done. Today, I want to show you some knots that really do the work.

Bowline
A bowline is a great knot for lifting or pulling a load. I use them almost daily at work. It makes a strong loop, which will not slip under load or when tension is loosened.

1) Start with your rope in this position, with whatever you're lifting in the bottom of the bend.

2) Make a loop like this.

3) Pass your rope under, around, and back through as per the next two pictures.


4) Pull tight, and you're done.

Bowline-on-a-Bight
A bight is simply a piece of rope or cord that has been doubled back on itself. The bowline-on-a-bight is used to provide a second loop in your bowline. It can be used to lift a person, for example, with one loop under the arms and around the back, and the second loop under the thighs.

The process for tying on a bight is the same as a normal bowline, just doubled, as shown below.


Two loops shown.

Clove Hitch
Hitches are used to attach a rope to a bar, post, or other fixed item that doesn't have a hole or eyelet. The Clove hitch is probably my favorite of these. It is simple, easy to tie, and easy to remove when work is done. If you ever watch a western movie and see the cowboy tie his horse to the rail, the knot he's using is almost always a Clove. It is also commonly used to secure boats, canoes, and the like.

1) Pass your rope over the bar you're tying to.

2) Cross back over, making an X.

3) Make a third pass, under the X.

4) Pull tight.

Lashing
A lashing is not a knot, per se, but is one of the most useful things that a rope can do. There is an unending list of reasons why you may want to secure two poles together at an angle, and lashing is how that happens.

1) Start with a Clove hitch.

2) Pass your rope under the bottom bar and over the top bar as shown, pulling each pass tight. 4-6 wraps are commonly used. 2 are shown, simply for demonstration.

3) Double back against your lashing, over the bottom bar and below the upper, pulling tight. This locks in the lashing, pulling everything tight.

4) Again, use 4-6 wraps, if possible. More wraps mean a more secure lashing.

5) Finish with a second Clove hitch and pull tight.


Practice these knots, and you'll soon become an expert at holding it all together.


Lokidude

The Fine Print


This work is licensed under a Creative Commons Attribution- Noncommercial- No Derivative Works 3.0 License.

Creative Commons License


Erin Palette is a participant in the Amazon Services LLC Associates Program, an affiliate advertising program designed to provide a means for sites to earn advertising fees by advertising and linking to amazon.com.