
Scott Bascom is a member of our Facebook Group and has written for us before.
 It is a dark and stormy night....
Ever since the storm started, the power went out. Soon, roving gangs of teenagers are complaining about how their cell phones don’t work, and your neighbors have resorted to talking to each other for entertainment.
You live in an apartment, so you don’t have anywhere to store fuel for a generator. You don’t have space for a solar panel array, and you don’t yet have a bicycle generator. The lights have gone out, so it is hard to get around, and in a couple minutes, your tablet is going to run out of power to play irritated avians...
Thankfully, you have a power module.
A power module is a battery. You just leave it plugged in until you need it. It does not generate power, but you can recharge it.
The power module I will walk through in this article is a small one, designed to give enough emergency power to keep a few cell phones, a fan, and a CPAP going for perhaps a day. Fewer items will keep it going longer, more will drain it sooner, and some items will not even run on it at all.
I have provided links for finding each of these items at stores that most people can find. Even though I link to specific items, please understand that you can make substitutions from other sources. I specifically used Walmart because most people have one within walking or bus distance, and can afford the item linked.
What you will need
There are a lot of variations on the basic recipe, but most of them come down to this (in order of importance):
1. The Battery
The core of the module. The Battery just has to be a 12 Volt battery of any sort. The really fancy power modules use lithium ion batteries, and other sorts of fancy things. For now, though, just use a lead acid battery.
Ever since the storm started, the power went out. Soon, roving gangs of teenagers are complaining about how their cell phones don’t work, and your neighbors have resorted to talking to each other for entertainment.
You live in an apartment, so you don’t have anywhere to store fuel for a generator. You don’t have space for a solar panel array, and you don’t yet have a bicycle generator. The lights have gone out, so it is hard to get around, and in a couple minutes, your tablet is going to run out of power to play irritated avians...
Thankfully, you have a power module.
A power module is a battery. You just leave it plugged in until you need it. It does not generate power, but you can recharge it.
The power module I will walk through in this article is a small one, designed to give enough emergency power to keep a few cell phones, a fan, and a CPAP going for perhaps a day. Fewer items will keep it going longer, more will drain it sooner, and some items will not even run on it at all.
I have provided links for finding each of these items at stores that most people can find. Even though I link to specific items, please understand that you can make substitutions from other sources. I specifically used Walmart because most people have one within walking or bus distance, and can afford the item linked.
What you will need
There are a lot of variations on the basic recipe, but most of them come down to this (in order of importance):
- The Battery
- The Inverter
- The Charger
- The Box
- Spare Cords
1. The Battery
The core of the module. The Battery just has to be a 12 Volt battery of any sort. The really fancy power modules use lithium ion batteries, and other sorts of fancy things. For now, though, just use a lead acid battery.

The bigger the battery the more expensive it is, but also the more energy it stores. I tend to use a marine battery, like this one, but you can use just about anything with 12 volts as long as it's rechargeable.
Anything that is “Deep Cycle” is good for a lot of use, any anything that is “Absorbed Glass Mat” or “Gel” is good for use in rugged environments (Back of rescue vehicles, rock crawling, etc.). These things are nice to have, but make the battery more expensive. Bigger batteries are nice, but unless you have a LOT of battery, you are just going to be powering small items, like tablets and maybe a router. There will be a later article on this subject that will include information on battery selection, but for now just use some sort of car battery or marine battery.
2. The Inverter

This turns the power in the battery into something you can use. An inverter for this module should have battery clamps, so that you can connect it to the battery directly, instead of wiring in a cigarette lighter so that you can use it. This inverter only has enough juice for a few items at once, and trying to plug in too much will cause it to fail. I prefer an inverter that has USB ports on it directly, so that I can easily charge cell phones and tablets.
If it comes to it, just having an inverter and a battery will work as a power module. The other items make things much easier, but the inverter can be rigged if you have to.
In a later article, I will discuss how to size an inverter. For now, just remember that you don’t want to plug in to much, and that anything with lot of moving parts, or that generates heat, will generally take too much power for this.
When you store the power module, disconnect the inverter, since it can cause a drain on the battery even when not in use. When you need to use it, connect the battery clamps to the battery terminals (the metal bits at the top of the battery), and then turn the inverter on. Red is positive (on the + terminal), black is negative (on the - terminal). So long as you don't mix up the red and the black and don't lick the terminals, you should be fine.
NOTE: If you DO mix up the red and the black, don’t panic.Turn off the inverter, and connect the cables to the correct battery terminals. Turn the inverter back on. If it works, everything is fine. If it does not, there is a standard automotive fuse in the back of the inverter. It will probably be blown. Those fuses are color coded, and most inverters come with at least one spare. If it does not, make sure to purchase one before you use the inverter. In an emergency, you may be able to scavenge a fuse from a car.
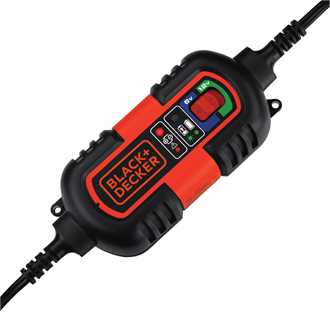 3. The Charger
 The part that charges the battery for use. In an emergency, you can do without one of these by using jumper cables and a car, and hooking it up as if you were going to jump another vehicle. This will charge the battery slowly, but it takes some time, and requires you to have a car running.
An ideal charger will have a maintenance mode, a charging mode and an automatic stop or switch to maintenance mode when it is done charging. That last one is the most important, since overcharging a battery can damage it, or (in a very unlikely but horrible situation) even cause it to explode or catch fire.
To charge a battery, once again make sure to put the red clamp on the positive terminal, and the black clamp on the negative one. Make sure all settings on the charger are correct, and then plug it in.
I like this battery charger because it is inexpensive, reliable, and comes with several options -- you can even keep a car battery topped off via cigarette lighter.
 4. The Box
All the box is for is to keep everything together. Something sturdy, but light, is nice. You just need something to hold everything together. A cardboard box will do, but the best option is a rugged plastic one.

5. Spare Cords
These are just nice to have. An extension cord has all sorts of uses, including running power to another room so someone can run a CPAP while you charge a cell phone in your room.
A final note
Most of your issues will come from your inverter or battery charger. I recommend that you read all manuals involved with any of these items. Always remember to check that things have a good metal to metal connection, and that they are turned on. Don’t lick the wires, and remember that this thing is heavy, so don’t get hurt.

No comments:
Post a Comment