Showing posts with label Heat. Show all posts

Wednesday, February 5, 2025

Portable Propane Heaters

Winter camping can be miserable, and I’ve winter camped in Washington State in the snow and the wet and the cold as a Boy Scout. Now I’m camping in Georgia year-round with my son’s Trail Life Troop, and “below freezing in Georgia” is just as miserable as “below freezing in Washington.”

There are two schools of thought among the adults who provide some level of safety for our troop. One is “I need to be able to carry all my kit long distance,” and the other is “What the heck, I own a truck, and I’ll carry my gear from the truck to the campsite.” The first group doesn’t use any artificial heat sources, and the second group does. At the last campout, the second group was more comfortable than the first group because they had bigger, roomier tents. In two of those tents were Mr. Heater Portable Buddy Heaters, and I got to enjoy them simply by being there.

https://amzn.to/4hJdxY7

In Use
First observation: even the smallest Mr. Heater product is plenty for a tent that a single person can pack. The advertisement says “up to 225 square feet” which I think is a bit generous for most tents, but in a well-insulated room or small cabin it would make sense.

Second: plan to use one 1lb bottle of propane per night, or six hours of burn time. You can get an adapter to use any size of propane bottle you want if you need more than six hours of heat production. 

Note: while commercial locations won’t refill most 1lb propane bottles, you can buy adapters to refill them yourself.  This is obviously discouraged by single-use propane vendors, but there are  refillable bottles on the market.

Pros and Cons
A Mr. Heater is a bit of a luxury item for camping in Georgia or Washington, even in the winter time. But as a survival/resiliency prep it has a few things going for it. 
  1. If you have a gas grill and adapter hose, or a few 1lb propane bottles on hand, you have a safe indoor heating in a pinch. 
  2. A heat source can be used to heat food. One YouTuber I watch routinely opens canned food and gently heats it using his Mr. Heater in the depth of Canadian winter, and toasting frankfurters or marshmallows is very similar to using a campfire.
Is it perfect? No, not really.
  1. It takes up space when not in use. Not much, but some.
  2. Unlike a rocket stove or Solo Stove or Kelly Kettle, it uses a fossil fuel that may or may not be easy to get in an emergency. If you live in an apartment where wood or twigs aren’t plentiful, that might be a positive rather than a negative.
  3. It’s big enough that I wouldn’t bother keeping one in a full size van unless the van had been converted into a small camper. In a large camper, a Mr. Heater makes quite a bit of sense.
Should You Get One?
I’m not in a hurry to go out and buy a Mr. Heater of my own, but if I see a good sale I’ll probably snag one. They run very quietly, and in an elevated deer stand in the winter where I sit still for hours on end, it might be really nice to not feel the cold so deep in my bones.

Also, don’t underestimate the value of the “nice to haves” in a situation where you have to rely on your preps and not public infrastructure. The little luxuries can make all the difference between a miserable experience and a merely inconvenient experience.

Saturday, November 16, 2024

Immersion Heaters

Not actually Erin.
Used with permission.
There are times when you lose hot water but still have some kind of electricity: when your water heater breaks; after a disaster like a hurricane where utilities are down but battery backups powered by solar panels provide you with power; or you're car camping and want a hot cup of coffee, but don't have the time or energy to make a fire to boil water. 

Regardless of the specifics, it's not an improbable, edge-case situation to need hot water and still have power, and in those cases the immersion heater shines. Invented in 1924, an immersion heater is little more than a shielded metal coil that quickly heats up from the electricity running through it from a conventional wall socket, and just as quickly cools to the touch when unplugged. It is fast, efficient, and far more portable and convenient than heating water in a kettle or over a fire. 

I bought this 300W immersion heater for $16.50 on Amazon, and I use it to heat a cup of water for rinsing my teeth after brushing (my teeth are sensitive to cold water) rather than wasting water by letting the faucet run until hot water arrives from the other side of the house. 

https://amzn.to/3CzsFIf

I don't need the water to be very hot, so a minute is all it takes for it to go from 70° at the tap to 100° in my 12 oz. (1.5 cups) mug.* This is less time than it takes me to brush my teeth, so when the water is hot enough (through practice I can determine this based on the amount of bubbles on the heating element and confirmed with touching the water with a finger) I unplug the heater to allow it to cool. When I'm finished brushing and ready to rinse, the heater is cool to the touch and can  safely be removed and placed on a towel to dry. 

* I haven't needed to boil water with it yet, but I can tell you that after 2.5 minutes the water is 125° and that's hotter than anything I'd like to drink. 

It's essential that you always immerse the heater in water before plugging it in, and submerge as much of the heating element as possible. If you hear the sound of something boiling over, too much of the element is uncovered, so add more water or push the heater deeper if possible. 

It's also essential to always unplug the immersion heater and let it cool off in the water, even if that water is boiling, for 30 seconds before it is safe to remove. Doing otherwise could result in burns to yourself or heat damage to objects. 

I would only use an immersion heater in glass, Pyrex, or similar materials. A metal container could result in burns from touching it if the water reaches boiling, and I would be concerned about the heating element melting a plastic cup. 

https://amzn.to/3CzsFIf


If you are a car camper, long haul trucker, or just want to warm your coffee during a long commute, there is also a 12V DC version (currently $11 on Amazon) which uses a standard automobile power port. Again, be mindful to prevent burns or scalds. 

https://amzn.to/3ANu4uf


Larger immersion heaters also exist, suitable for heating up buckets or even bathtubs full of water. After being very happy with my cup-size heater, I bought this larger heater for $25 on Amazon.

https://amzn.to/48QEVQL


I haven't tested this one yet because I haven't needed to use it; my planned use case is if I need a lot of hot water post-hurricane, and I will use a battery bank to power it. Given its efficiency, and that I very much doubt I'll need to boil gallons of water at a time, using this heater shouldn't drain my battery too much and I ought to be able to recharge whatever is lost via solar panels. 

https://amzn.to/48QEVQL


As with the smaller unit above, observe the safety protocol of fully immersing the heater before plugging it in, only use it in a safe container, and always unplug it and allow it to cool before removing it. 

Despite being 100 year old technology and a niche product, an immersion heater deserves a place in any prepper's supplies to provide fast, efficient, convenient, and smokeless hot water practically on demand. 

Thursday, August 19, 2021

Heat and the Buddy System

It's always a good idea to have a helper. They often go by different names (teammate, co-worker, significant other, partner, crew member, or friend), but they're there to watch out for you and share the work. The first part, watching out for you, is the most important one.

I work alone most of the time. Having a shortage of employees is not unique to my job, but for a year now we've had a couple of open positions. Corporate has restructured and consolidated operations to try to keep things moving, but the reality is that we have fewer people to get the same amount of work done, and this can lead to problems, especially in extreme weather.

Last week was a good example of why it's important to have someone keeping an eye on you:
  • Air temperatures were in the high 90s, with humidity that started the day at 100% and never dropped below 60%. 
  • Heat index, the opposite of wind chill, was well over 100° for most of the afternoon, most days. 
  • No wind or clouds made it even more miserable outside, which is where I was working. 
  • To make things just perfectly wrong, the location I was working at didn't have a working air conditioner. The building doesn't have central air conditioning, just a window unit that decided to stop cooling this year. Management doesn't want to put any money into that building because we no longer have staff there full-time.
  • The work I was doing involved hazardous chemicals, so on top of my standard boots and jeans I was wearing a long-sleeved shirt and heavy neoprene gloves that go almost to my elbow. 
  • The chemicals I was dealing with have an affinity for water, so the common tricks to cool off that involve wetted cloth around the neck aren't an option.
  • Add in the unvented, splash-proof goggles that cover a third of my face and trap the sweat and it was not a fun week.

I've been doing this for several years so staying hydrated is not a worry; I have plenty of sport drinks and cool water on hand and I force myself to drink enough that I have to urinate. Electrolytes in the sport drinks keep my salt levels safe, but I supplement them with extra table salt on my food and Potassium tablets if I start to have cramping. This is not new to me; I know how to minimize the effects of the heat. 

It wasn't enough. As the week progressed, my normal schedule of come home, shower to cool off and get clean, eat dinner, and take care of normal chores before going to bed slowly morphed into come home and go to bed. The chores were the first to be dropped, then dinner, and finally the cooling shower. I just didn't have the energy to do it all. I try to write these articles on Tuesday and Wednesday and have them ready for editing before Thursday, but that was one of the normal “chores” that got dropped. By the time I cooled off after getting home Thursday, I finally got a chance to put the clues together:

  • Headache
  • Nausea
  • Mild confusion
  • Periods of short, shallow breathing
  • Hot, sweaty skin
  • Lack of energy

Yes, I was dealing with heat exhaustion every day. 

We've covered heat injury before, and heat exhaustion is the middle ground between heat stress and heat stroke. The combination of high temps, high humidity (which prevents sweat from evaporating to cool you), no wind, and full sun were just too much for my aging body. When your body can no longer cool itself, is starts to take damage which can be lethal. 

I took a few days off work to recover, with lots of water and rest, and only went outside during daylight once in four days. As much as I hate to admit it, there are things I can no longer do as well as I could when I was in my 30s and 40s, and handling the heat just got added to that list. 

Working alone is not the best option, but it's not much worse than working with someone who doesn't know what to watch out for. Part of the week I had a helper, a 21 year-old kid who hasn't been trained very well (or he wasn't paying attention during training) and he just doesn't know what to watch for. He's scared of working around the chemicals, but I'm trying to train him on how to do it safely. 

I've since modified my work schedule: things are moving a lot slower, and I'm taking more breaks. The air conditioner at that location is still dead, but I've switched trucks to one that has a good AC and I will be taking my breaks in it. The boss isn't happy about the slower pace, but I really don't care about his happiness as much as I do about my health. I'm also keeping an eye on the other two guys who are close to my age for signs of heat injury when I see them, but most of their work is out of the sun and doesn't require the heat-trapping protective gear. They work together and keep an eye on each other pretty well.

Take care of yourselves, and watch out for those around you.

Wednesday, January 13, 2021

Heating and Eating When the Lights Go Out

A fascinating question was posed in the BCP Facebook group. At the least, it was fascinating to me, and based on the conversation there, it got the attention of a whole lot of other people as well. Paraphrasing, the question was "I have an all-electric house. How do I cook food and heat my home in the event of a power outage?" There are a lot of ways to handle these tasks, so lets break them down.

The first way to address a lack of electrical power is with electricity. I know that sounds trite, but it's true. I've talked about backup generators in the past, and they're the quick and easy way to power your house in an emergency. Another option is a solar array with a battery bank. Properly sized, either of these will keep you running when the grid goes down.

If you're not capable of generating your own power, you'll have to look at other means of heating. Lets start with cooking, because why not? If your home has a wood burning stove or a fireplace, congratulations, you can cook like your grandparents or great grandparents, and heat your home at the same time. This is winning all around. Simply heat food on the hearth of your fireplace or the top of your stove. It won't be gourmet, but it will be hot. Make sure that you keep your chimney or flue properly cleaned and that you have adequate fresh air, otherwise you can succumb to carbon monoxide poisoning with no real warning.

If you don't have wood burning heat available to you, then things get a bit more involved. A propane barbecue grill can be pressed into service to cook most things. Charcoal will also work for many things, but it's not as convenient or easy. If you live in a place where a full-size grill is not feasible, tabletop models that run on small 1 pound propane cylinders are available and affordable. They're designed for camping, and they excel at it, but riding out emergencies looks a lot like camping at home. I've personally used the model linked for decades, cooking everything from burgers and hot dogs to soup and breakfasts.

That covers cooking. Now lets look at heating your living space. If you're stocking propane bottles to run a tabletop grill, why not use the same bottles to run your heater? Mr Heater makes a unit that will heat a medium-sized room off the same 1 pound cylinders. It won't heat your whole home, so you'll have to gather in a single room to stay warm, but it will keep that room comfortable.

Burning any kind of combustible material inside requires that you have plenty of fresh air moving through, otherwise you have the same carbon monoxide issue that I mentioned above. Make sure any heater you buy specifies that it is safe for indoor use. In addition, you should have a carbon monoxide detector in your home as a matter of general safety, and make sure that it is in good working order and has fresh batteries, just like a smoke detector.

It's cold outside. It doesn't have to be cold inside.

Lokidude

Thursday, September 10, 2020

Canned Heat

While helping a friend with some camping gear, I was asked to explain the difference between the various “canned” gasses used in camp lanterns and stoves. This friend didn't want to deal with a liquid fuel like diesel fuel, kerosene, or gasoline (which is my first choice) and was looking at the butane and propane options on the market. 

Pressurized cans of fuel gas are fairly easy to find and store well in a cool, dry location for decades, so they make a good choice for emergency supplies. I've used several types of propane canisters for heating over the years and have seen the butane models, so I did some digging and here are the results.

Propane
Often called LP gas, sometimes defined as Liquid Propane and other times Low Pressure or Liquefied Petroleum gas, propane has been in use for a little over a hundred years and is commonly found just about anywhere in the world. A popular cooking fuel, it is cheap and easy to transport in steel cylinders that vary in size from less than a pound to several hundred gallons. You'll find a Propane cylinder attached to every gas grill in almost every garage in the US, so it is very common.

Propane has a chemical structure of C3H8, with a boiling point of -42° F. It produces around 2.22 MJ/mol (don't sweat the units, just make sure to use the same ones when comparing) of heat when it burns. Explosive limits are between 2.3 and 9.5% in air. Above or below that range, the mixture is either too lean or too rich to ignite.

Butane
Commonly used as a cooking fuel in Asia and in disposable lighters around the world, Butane is another liquefied gas that is easy to store. There are several brands of camping stoves and lighters that use Butane cylinders for fuel and the cylinders are fairly easy to find.

Butane has a chemical structure of C4H10 and a boiling point of 30° F. It has the capacity to produce about 2.88 MJ/mol of heat. Explosive limits are 1.8 to 8.4% in air.

Compare and Contrast
Both Propane and Butane are naturally odorless, colorless gasses that will have a chemical added to make it easy to detect leaks. Methyl Mercaptan is the most common odorant, and it's the same chemical that they add to natural gas to identify leaks. I'd bet that everyone has smelled either a propane or natural gas stove before the flame is lit, as it's a very distinct odor. Both are also a gas at normal room temperature and pressure, and are easily compressed into a liquid and stored under pressure.

Comparing the two, they produce about the same amount of heat and have similar (narrow) explosive limits, so either one will work well as a fuel source for back-up heat or light. The major deciding factor is the temperature that you will be expecting to use it at. 
  • Propane will continue to “boil” inside the cylinder and, in my experience, produce usable amounts of gas down to about -5° F. Below that, you have to warm the cylinder to get it to work. 
  • Butane shuts down at about 40° F, as anyone who has tried to use a disposable lighter in the winter will attest. 
If you live where the temperature drops below freezing, Propane is the better option for large containers. Butane in small containers like a lighter can be kept close to your body to keep it warm, but as soon as you remove it and start to use it in cold weather it will shut down.
Butane cylinders for a camp stove are selling for about $2.00/8 oz ($4.00/pound) can right now, and Propane in small canisters is selling for around $8.00/16 oz. By buying an adapter and a larger, refillable Propane tank you can cut the price drastically, but your local supplier prices are not something I can check; around here a 17 pound refillable canister costs about $35.00 empty and takes another $2.00/ pound to fill.

My Recommendation
My choice is Propane, due to the climate I live in and the ease of storing large quantities of it. I have a grill-sized cylinder that I had filled over 20 years ago which is still full (it came out of a camper when it got scrapped).

However, if you're looking for something to put into a pack or GHB and you live in a more temperate climate, then either one will work.

Tuesday, November 19, 2019

White Gas and You

Most folks are familiar with propane as an inexpensive, effective fuel for camping stoves and lanterns; however, it is also stored under pressure and requires special containers that are either heavy and bulky or not reusable. White gas is an alternative that generates less waste and isn't stored in a pressurized form.

White gas, commonly known as Coleman Fuel, is a liquid fuel that bears very many similarities to unleaded gasoline. Its two key difference are that it is a lower-octane fuel than gasoline, meaning it burns a bit more readily, and that it has none of the detergent additives that gasoline contains.

White gas is sold in gallon cans with a screw on lid, and is easily stored in a shed or garage. It's at least as safe to store and transport as propane, if not safer; if a white gas container leaks, it evaporates as quickly as gasoline, but if a propane container leaks, it will vent propane until it is empty, creating a potentially hazardous situation especially in enclosed areas. Coleman fuel can also be transferred to smaller containers, which is very useful for backpackers and other folks concerned about space and weight.

Propane burning appliances have the advantage of supreme simplicity: you simply attach the propane source, open the valve, and light the burner. It takes more time to type or read that sentence than it does to be generating light or heat. The liquid nature of white gas, though, requires the appliance tank to be pumped up to pressure as well as preheating to vaporize the fuel. These added steps take a bit more time and practice, but quickly become second nature.

White gas stoves are available in a smaller form factor than most propane stoves. Due to the preheating of the fuel, they also work great in cold environments. As an example of the small form factor, consider the MSR Whisperlite International. While the Whisperlite can run on unleaded gasoline or kerosene, white gas is by far the superior option as the other fuels burn dirtier and have an odor that white gas does not. Also, white gas requires far less maintenance and upkeep than the alternative fuels.

Propane isn't the only fuel out there, and in many ways it is beaten by the competition.

Lokidude

Thursday, July 18, 2019

Hot Dogs?

It's that time of year again. Whether you believe in Global Warming or not, summer is the hottest time of the year and this one is shaping up to be a warm one. When it hits 90° F in Alaska, you know it's going to be a miserable summer.

I know, I know; Arizona and the southwestern US gets hotter, and the southeast has humidity that you can almost swim through. Here in the upper Midwest, though, the temperatures are pushing 100° F and the humidity is >50%. With the exception of a few mountainous areas and the far north, we all have to put up with heat, which means we all need to know how to recognize and avoid heat injury. David did a good job last month of covering how to avoid heat injury to yourself, but how many of us have animals? Pets and livestock are just as susceptible to heat illness as we are, more in some breeds and areas.

Dogs and Cats
Dogs and cats don't sweat the way we do. We have sweat glands all over our bodies; they have a few on the pads of their feet and around their noses.Sweat glands cool the body by pumping out water that carries away excess heat as it evaporates. Without enough sweat glands, dogs and cats rely on panting and external cooling to regulate their body temperatures. Working dogs need to be watched carefully since their activity can keep them from cooling off. Long-coated breeds will overheat faster, of course, but they all need to be provided with the same protection as humans:
  • Plenty of cool water to drink. Cool water will absorb heat from the inside and carry it away when they urinate.
  • Shade. Get them out of the sun. If it's uncomfortable for you, it's probably the same for your pets. Dogs and cats can get sunburn, especially if they have thin or white fur.
  • Rest or at least reduced activity. Unless it's an emergency, try to avoid using your working animals during the heat of the day.
  • Cool places to rest. Cats will find a cool place on their own usually, and the smarter breeds of dogs are pretty good about it as well. The knotheads that some of us have as pets may need to be shown a cool, shady spot in which to lie down. 
  • Never leave an animal in a closed up vehicle. That's cruel, criminal in most states, and an invitation to a busted window in most areas.

Exotic Pets 
These will have to be cared for as your veterinarian suggests. Cold-blooded pets like snakes and lizards are very tolerant of the heat, but birds and small mammals may need some extra care.

Livestock
If you're raising animals for food or sale, the loss of even one of them can be a significant blow to your pantry or budget. Most of the signs of heat injury in animals is the same as for humans; lethargy, stumbling, loss of appetite, etc. Prevention is much cheaper (and easier) than treatment, so provide the same water, rest, and shade as you would a person. One of the farm insurance companies has a good list of symptoms and preventative measures on their website. Scroll down towards the bottom of the page and you'll see a table of the water needs for some common livestock. Make sure you plan for a way to provide fairly clean water for your animals when you're considering raising your own food.


Stay hydrated and as cool as you can this summer and think about what you can do in a SHTF situation to prevent heat injury. Use the search box in the upper left-hand corner for some of our earlier articles; we've covered a few ideas over the years.

Wednesday, June 12, 2019

Prudent Prepping: Summer Has Arrived

The dust has settled and the First 72 Hours have passed. Follow along as I build a long term plan via Prudent Prepping.

If the saying goes 'Spring has sprung', then this year I'd have to say that Summer crashed the party. It's been over 95° for the last 4 days, and over 100° yesterday and today; on Monday we had two short power outages just far enough apart that all the digital readouts weren't reset when the second one hit. After that, it was decided to just wait it out.

Beating The Heat 
Honest, low humidity
I know that the San Francisco area is supposedly known for mild weather, but that's only close to the water. I'm over a set of hills on the hot, inland part of the Bay Area, and we have to plan and deal with the weather differently than those close to water. Fortunately for us, our humidity really is very low, so all that 'well, it's dry heat' really is true compared to most of the country. (I'm not talking about you, Nevada, New Mexico and Arizona!) Today, even though it's 104, the humidity is 9%. This is much lower than normal, with 40% being closer to average.

First, stay out of the sun. As stupid as it sounds, don't go out if you don't have to.

If you do need to be out, wear a hat with a wide enough brim to shade your whole head.

Wearing light colors will help keep you cooler than dark shades.

Most importantly...

Drink Lots of Water
From the CDC:

Drinking water before, during, and after physical activity is one way to keep your body’s air conditioner working. Keep these tips in mind to help your body stay cool:
  • Top off your tank a few hours before you hit the court, the field, or your own backyard by drinking about two cups of cold water.
  • Keep a water bottle handy to guzzle during water breaks, halftime, or time outs. Try to drink about 10 ounces — that’s about 10 large gulps from your water bottle — every 15-20 minutes.

Our very own Lokidude wrote about make-your-own sports drink in this post, so you can save money and flavor the mix however you want.

In The Heat Of The Night 
Running the air conditioning can be expensive. Last year at my old place, the jerk roommate cranked the thermostat down to 68 during the day one month. This practice stopped  when the electricity bill came and it was $500!

There are plenty of alternatives for keeping things cool, such as fans, closing off windows in south-facing rooms with heavy drapes, or making a makeshift swamp cooler, like this:


Even with this using electricity, compared to your air conditioner you're saving money!

Recap And Takeaway
  • If it seems like it's too hot to be out in the sun, it is.
  • Nothing was purchased this week, other than 2 cases of water to take with me to work.

* * *

Just a reminder: if you plan on buying anything through Amazon, please consider using our referral link. When you do, a portion of the sale comes back here to help keep this site running!

If you have comments, suggestions or corrections, please post them so we all can learn. And remember, Some Is Always Better Than None!

NOTE: All items tested were purchased by me. No products have been loaned in exchange for a favorable review. Any items sent to me for T&E will be listed as such. Suck it Feds.

Friday, December 1, 2017

Keeping the Ladies Warm


I'm heating my house this winter, but I also have a henhouse to keep warm. After all, I want those ladies spending energy on making eggs, not staying warm!

Sunday, October 1, 2017

GunBlog VarietyCast #163 - Magic Carpet Ride

On a cloud of sound we drift in the night
Any place it goes is right
  • What happens when more than 350 gun-toting ladies get together? Beth travels to Utah to attend a conference by The Well-Armed Woman to find out! 
  • Man Shot By Police After Holding Pregnant Woman Hostage. Sean and Erin love a happy ending. 
  • Barron is on assignment and will return soon. 
  • Miguel is NOT on assignment this week! He wants everyone to know that he’s “playing Mad Scientist with things nature never intended to be played with.”[Evil Laugh] 
  • We look deeper in the SHARE Act for our Main Topic. 
  • Tiffany is on assignment and will return soon. 
  • Florida is hot. And not "Swedish Bikini Team" hot; it's "Dropped into pan of boiling water inside an oven" hot. So how do you keep cool when the power is out and the AC is off? Erin has some tips. 
  • Weer'd finishes his Audio Fisk sendoff of former Brady Campaign president, Dan Gross. 
  • And our Plug of the Week is for Magic Carpet Cruise Control, AKA Toyota Dynamic Radar Cruise Control. 
Thank you for downloading, listening, and subscribing. You are subscribed, right? We are available on iTunes, Stitcher Radio, and Google Play Music!

Listen to the podcast here.

Read the show notes here.

Thanks to LuckyGunner and Remington for their sponsorship, and a special thanks to Firearms Policy Coalition for their support.

Blue Collar Prepping Transcript -

Beating the Heat 
Without Power
As you know, most of Florida was without power for up to a week after Irma. While it does indeed suck to be away from the internet and entertainment, the biggest complaint I’ve seen has been from people who lost their air conditioning.

And this makes sense: Florida is a hot, humid place, and it suuuuuucks to be without AC. As Miguel said some weeks ago, during most of the year we Floridians essentially live in bubbles of air conditioning. But sometimes the power goes out and we’re forced to find unplugged ways to cool off. Here are some tips and tricks that ought to help.

Use water to cool off. If you have water pressure, then cool showers will rinse off the sticky sweat and lower your skin temperature. Wet hair is also the gift that keeps giving, because the longer it stays damp, the longer your head feels.

You can also sleep under a damp sheet. Don’t go overboard with this; just get a spare cotton sheet and run it under the faucet, then wring it out and spread it over you before you sleep. If you end up feeling too cold, or don’t like the feeling of wet cotton on top of you, put a towel between you and the sheet.

If you live in a multi-story building, sleep as close to the ground as possible. This is because hot air rises but cool air sinks. Now’s a great time to break out those air mattresses!

Speaking of sleeping, nap during the hottest parts of the day. If you’re hot you won’t feel like doing anything, and sleep is an excellent way to escape discomfort, so endure the afternoon heat by sleeping through it. The siesta, or post-lunch nap, is popular in Spain and Latin America for this very reason.

If you’re having difficulty sleeping during the day because of the amount of light in your room, invest in some blackout curtains for the house. These are great for a variety of reasons: not only do they block the light so you can sleep, they also prevent the house from warming up through the windows. What’s more, if you have a generator in your house and you don’t want the neighborhood to know that you have power, these curtains prevent light from leaking out at night.

I have found that I can endure higher temperatures and humidity if I can just get some air blowing on my face. Portable fans and a supply of batteries will go a long way towards personal comfort. Turn one on when you feel hot and carry it with you when you change rooms, because you don’t need to cool off the whole room, just a few feet around you. I recommend the O2COOL 5-inch portable fan - it requires two D cell batteries and only costs five dollars with free shipping on Amazon.

Finally, don’t forget about your pets. Cats and dogs get hot, too! My mother bought a pair of pressure-activated cooling gel pads for our dogs, and let me tell you, they work really well. I know this because one of our dogs refused to lie on her cooling pad -- I don’t know WHY, she’s just silly -- and so mom put that pad on her own bed and slept on it, which made her life more comfortable. When I came back home, mom gave that cooling pad to me, because I’m always hot in this house, and it’s on the back of my chair in the living room. Mm-mm, comfy!

Monday, February 1, 2016

Guest Post: BioLite CampStove and KettlePot review

by Gun Monkey

My initial impression of the BioLite wood burning camp stove was “This is some overpriced, gimmicky piece of junk.” The stove sells for around $130 and the kettle for $50. That seemed a little much for some plastic and metal that is going to spend most of its life in a backpack in my closet, but I decided to take a chance with something that might not live up to the hype. I bought the stove first, played with it, and found that I liked it before investing in the pot. I figured I could sell it or trade it for something if it was junk.

As it turns out, it's actually a good little stove.


So what is this thing?
There are two parts to the BioLite camp stove: the stove itself and the thermo-electric generator. One will not work without the other. They come apart and nest inside each other for easy storage and transport. Together the assembly weighs in at a little over two pounds.

How does it work?
It's very simple. First you assemble the stove. Next, you pick up sticks, break or cut them into small enough pieces to fit inside the stove. You then light the stove, turn on the thermo-electric generator, and feed the fire.


Lighting the stove can be tricky. The best method for that involves putting a nest of pine straw in the bottom, followed by some small sticks. To light the fire, a grill or fire place lighter works best while holding the stove on its side. You can also use a ferro rod, matches, paper, and any other starting method to get the fire started.

Surely there's more to it?
Yes, there is. The thermo-electric generator contains a battery and two speed fan; the battery initially supplies the fan with power. After the fire generates enough heat, the heat is converted into power that powers the fan and recharges the battery through the black thermocouple that sticks out into the flames.

The stove is built in layers so there is space between the layers. There are openings in the inner layer that allows air to circulate around the fire. Because the fire is being fed a steady stream of oxygen as it burns, the fire burn very hot and very clean. There is almost no smoke once the fire gets burning.

The fan has a low and high setting. More air means a hotter burn, more fuel consumed, and more energy produced.

Is that a USB port on the front? What's that all about?
The USB port is attached to the thermo-electric generator’s battery, and can be used to recharge your electronic devices once the fire is generating enough heat. The way it works is once you get the fire going, you have to turn on the fan -- the fire won't get enough oxygen to burn unless the fan is on. It takes a few minutes for the fan's internal battery to recharge from use and natural decay. 

Once the internal battery is recharged, you can use the excess power to charge your device. The fan changes pitch and a light below the power button turns from orange to green. With the internal battery charged, the fan on low, and a constant source of fuel you get 2 watts at 5 volts. Once the light turns green after about 5 minutes of burning, you have the option to turn the fan on high and get 4 watts at 5 volts. I haven't measured it for myself, but that is what the literature included in the packaging says.

According to Biolite’s website, “20 minutes of charging provides 60 minutes of talk time.” I decided to put this to the test, so I plugged my iPhone 6 into the USB slot. After 20 minutes of feeding the fire, my battery only went up 2 percent -- which is only about 10 minutes of talk time. (Yes, it was on airplane mode, and the screen was locked.)

It’s not great --if you plan on completely charging your phone’s battery, you'd better have plenty of wood and time -- but it's something.

Tell me about the kettle pot.
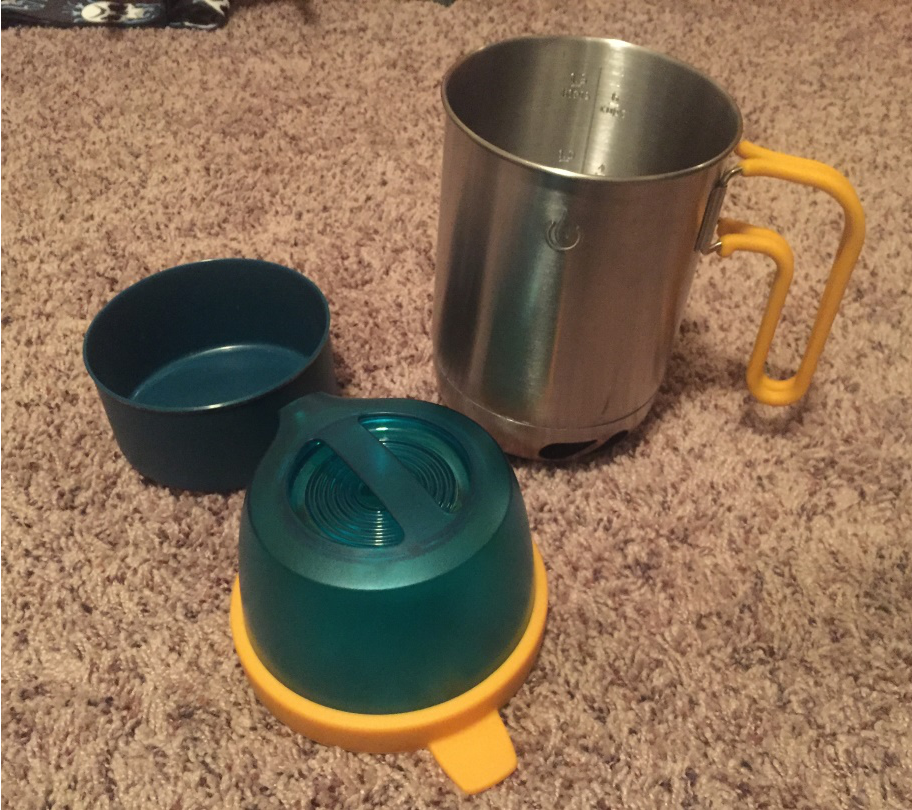
The kettle pot sits directly on top of the stove. The handles are covered in a silicone material so you don’t have to carry a pot holder or worry about burning yourself.

The pot holds 1.5 liters of water. According to the Biolite website, it takes 4.5 minutes to boil a liter of water. In my tests, it took about 10 minutes to boil a liter of water with the fan on high. How fast the water boils depends on the type of fuel you find, fan speed, and how fast you feed the stove.


The kettle also comes with an easy-pour lid and a small bowl.


One of the cool features of the pot is it functions as a case for the stove. The stove fits perfectly inside the pot and the kettle handles fold to the sides, which saves room in your backpack.

What about the grill attachment?
Sorry, I can’t help you with that because I don’t have the grill yet. I plan on getting it before my spring camping trip, though.

Overall Impression
It’s a little expensive for what it does, but it works. If you need a camp stove to cook food and boil water without carrying fuel around or worrying about running out of fuel, then I would recommend saving your lunch money to pick up a BioLite stove and kettle pot. Be warned, though, that any cooking apparatus you use with the BioLite is going to collect some soot, so if you get one of these and decide to test it out, DO NOT use good pans.

If you are buying this to provide you a steady source of energy to recharge gadgets, though, then you are probably going to be disappointed. The power output is not nearly enough to provide a full change to most modern electronic devices. It also takes a tremendous amount of fuel and time to charge any device.

Where the BioLite stove excels is at its primary purpose: burning wood, boiling water, and cooking food. The stove will not cook anything on its own, though: you will need the optional kettle pot, grill, or some other cooking apparatus like a pan.


(Editor's Note: The BioLite stove costs $130 on its own website but $150 on Amazon. The kettle and grill are priced identically on both sites. You can get all three in a combo pack for $200 only from BioLite.)

Tuesday, July 7, 2015

Heat Illness Awareness

It's hot out there, y'all. Across the country and around the world, record high temperatures have been recently recorded. Firehand posted a great recipe for a roll-your-own hydration beverage without the sugar of commercial products, which I'm looking forward to testing. While prevention is always best, even the best of us sometimes makes mistakes in the heat. That's when it's critical that you can recognize and treat the various stages of heat illnesses.

Heat Stress/Heat Cramps
Characterized by flushed, moist or clammy skin and painful cramps in the extremities, this is the beginning stage of heat illness. If you can catch heat illness at this point, treatment is simple and fairly easy:
  • Move the victim to a cool, shady area where they can rest.
  • Remove any excess clothing, modesty permitting. 
  • Put cool, wet rags on exposed skin, especially wrists, inside elbows, and the back of the neck/head.
  • Get the person drinking a sports or electrolyte drink.
  • Stretch and massage out any cramps (if you like the person a lot, you can massage them; otherwise, have them do it themselves). 

Heat Exhaustion
The next illness in this progression, and far more serious, is heat exhaustion. The previous muscle cramps continue, accompanied by pale, moist or clammy skin, and frequently a fever. The patient may also exhibit vomiting, diarrhea, nausea, fatigue, weakness, and headache. Rapid treatment is critical at this point to keep the victim from getting far worse.
  • Move the victim to a cool, shady place and have them rest.
  • Remove any excess clothing, down to the underwear. Health is more important than modesty at this point. 
  • Put cool, wet rags on exposed skin, especially wrists, inside elbows, and the back of the neck/head.
  • Get the person drinking a sports or electrolyte drink.
  • If the person does not respond to this treatment, call 911 or your local emergency number and summon EMS. 

Heat Stroke
Heat stroke is a life-threatening condition requiring immediate and rapid professional treatment. Symptoms include all of the same as heat exhaustion, with the addition of a rapid heart rate, confusion, lethargy, stupor, agitation, and possibly seizures and coma. The skin is also dry and warm.
  • Immediately call 911 (or your local emergency number) and summon EMS.
  • Move the victim to a cool, shady place and have them rest.
  • Remove any excess clothing, and drench exposed skin with cool water. Again, health is more important than modesty. 
  • Place ice packs on the person's groin and armpit areas.
  • If the person is alert and able, have them drink cool fluids.
Be aware of yourself, as well as those around you, and be on the lookout for heat illnesses as the thermometer climbs.

Lokidude

Sunday, July 5, 2015

Gun Blog Variety Podcast #46

It's time for Episode 46!
  • Adam is back from his terrifying eye surgery. Well, it would terrify most of you. 
  • Erin Palette tells us how to stay hydrated in the summer heat.
  • Nicki Kenyon discusses the Greek default.
  • Special Guest Bob Owens of Bearing Arms gives some "Tips for Terrorists."
  • Barron B (Who is currently in Facebook Jail because they don't believe him that Barron is his real name) talks about that viral "OMG THERE'S AN ANTENNA ON MY CELL PHONE BATTERY!" video. 
  • And Weer'd talks about how Bloomberg, sensing victory over Uber, has started gunning for room sharing website Airbnb.
Thanks for downloading, listening, and subscribing.
Listen to the podcast here.
Show notes may be found here
Special thanks to our sponsor, Law of Self Defense. Use discount code "Variety" at checkout for 10% off books, hats, and legal self defense seminars.

And if you like the show, tell a friend!

Thursday, April 30, 2015

Wood Heat, Part 2

Last week I went over the basics of wood heat and I got a few questions and requests for clarification, so I'll try to expand on the areas that I didn't cover in detail. It was kind of hard to sort the questions into groups, so there is no logical flow to the answers.

Curing Firewood
Fire wood is “cured” by letting it sit in a place with good air flow and protected from precipitation. The actual curing is letting the wood dry out and letting some of the “lighter” chemicals (mostly alcohols and ketones) evaporate off, which promotes a more efficient burn. The water content of wood varies from 40% to 75% when it is green, and green wood tossed into an established fire will burn very slowly, because most of the heat of the fire is being used to boil off the water to allow the wood will burn. Water takes a lot of heat to convert to steam, so burning green wood makes for a very inefficient fire that will provide very little heat output and a lot of smoke.

Stoking (feeding) a Fire
Fireplaces are like campfires: feeding them consists of shoving a piece of wood into the existing fire and hoping it catches. Wood stoves have a few more steps.
  1. Open the air intake to get the embers as hot as you can. This will also help move any ashes away from the air intakes.
  2. Open the damper to allow the smoke out of the firebox. On windy days, or if your chimney isn't tall enough, smoke will come back down the chimney and can quickly fill a room. Trying to stuff a 16 inch long piece of wood through a 20 inch opening while your eyes are tearing up due to smoke is no fun. 
  3. Open the firebox door and use your poker to level out the embers and ashes. Having a level bed gives you a more stable place to stack your fuel. Unstable stacks tend to burn unevenly and it's disquieting to hear loud bangs coming from your heater, even if it is nothing more than the wood falling against the side as it burns and shifts. 
  4. Start placing firewood into the stove. If the fire has burned down to just embers, you'll want to start with thinner splits or smaller pieces and add the larger pieces on top of them. This give the embers more surface area to ignite the new fuel, just like building a campfire from twigs and increasing the size of the firewood as you build it up. 
  5. Close the door and reset the damper and air intakes to positions that will provide the heat you want.
Banking a Fire
When you're getting ready for bed, or going to be leaving the heated space for a while, it makes sense to “bank” the fire. Banking a fire means consolidating the hot embers into a pile in the stove and cover them with ashes. This insulates the embers and cuts down on the air that can get to them, slowing the fire. Cutting back on the air going in and closing the damper creates an environment where the fire can barely burn, which will give you a better chance of having a bed of embers to start your next fire. Banking also gives wood a chance to cook off the volatile chemicals and turn into charcoal, which burns clean and evenly.

Overnight Fires
When I cut firewood, I always leave 10% of the pieces unsplit. These pieces, between 10 and 15 inches in diameter, are my “night logs”, and are the last piece of wood fed into the wood stove before I go to bed. Large pieces burn slower (less surface area), and provide more fuel per unit of volume, than splits. This is  another way of ensuring that I have a bed of hot embers in the morning to use for starting a fire that would heat the house. Lifting a heavy piece of wood to burn overnight beats having to wake up during the night to make sure the fire is still burning, or waking up in the morning to a freezing cold house.

Cleaning a Wood Stove or Fireplace
There are two ways to clean a wood-burner: hot cleaning and cold cleaning. A hot cleaning is when you let the fire burn down to embers and ashes and use a shovel or rake to separate the two, removing the ashes but leaving the hot embers or coals to use as a starting point for the next fire. You can also run a brush through the chimney with a banked or low fire.

Cold cleaning is letting the fire burn out completely and emptying the firebox. Cold cleaning is better at clearing room for more fuel (important if your stove is small), but requires starting a fire from scratch every time.

Chimney Sweeping
Whether you have a chimney or stove pipe, you will need to clean it. Burning green, uncured wood will create more soot and residue than burning dry, cured wood will, and the soot (carbon residue) and creosote (tars and gums that condense on the cooler chimney walls)  will be deposited on the inner surface of your flue. Keeping the chimney clean serves two purposes:
  1. A clean chimney allows better air flow or draft to carry the smoke away from the fire box, leading to a more efficient fire. As the chimney fills in with deposits, you'll have to open the damper more to get the same draft, so be careful with the first fire after a cleaning.
  2. A chimney full of soot and creosote is an invitation to a chimney fire. 
If the built-up crap in your chimney catches fire, you'll hear a roar like a jet engine as it sucks heated air through the firebox and you'll see flames and sparks shooting out of the top of the chimney. A chimney fire is a poorly contained blast furnace and can generate the same levels of heat. Chimney fires are dangerous because they can get hot enough to melt metal stove pipes and ignite nearby wood, destroy the mortar holding a brick chimney together (leading to leaks and collapse), and spew sparks all over your roof. I've seen quarter inch steel glow red, and several houses destroyed, from chimney fires. In case of a chimney fire, shut down all sources of air to the fire and close the damper to try and smother the fire. 

For fireplaces, there are extinguishing blocks that you can toss into the fire. They work by burning rapidly and consuming the oxygen before it gets to the fuel on the walls of the chimney. Don't relight the fire until after everything has cooled off and you have inspected the flue for damage.

Tools to Use
  • All of your tools for working with fires and hot materials should be made of metal, preferably steel. Aluminum and thin pot metal (mostly zinc) have a much lower melting temperature than steel and may not last long in daily use. 
  • Chimney brush. Get a brush of the proper shape and size for your chimney. 8 inch round brushes are common, but you can get square ones for masonry chimneys. Your brush should have handles that can be added onto each other to extend the length, allowing you to store and carry them with less hassle. Flexible twisted-steel and sectional fiberglass handles are cheap and last a long time with minimal care. 
  • Ash bucket. Find a metal bucket or coal scuttle for carrying ashes from the firebox to wherever you are disposing of them. Plastic buckets will only last until you get one hot coal mixed in with the ashes, which will happen. 
  • Metal scoop. A coal shovel or small metal shovel will allow you to dig out the ashes and dump them into your bucket. 
  • Rake or poker. A metal rake will help separate the ashes from the embers, while a poker will help rearrange burning wood to get a better burn or make room for more fuel.

Tools to NEVER Use
  • Never use anything plastic. Plastics just become more fuel when working around fires. 
  • All metal, solid handles. If you're working with a fire for a while, a solid handle will allow heat to travel up the handle and burn your hand. Look for tools with insulated or ventilated handles.
  • Painted tools. Paint will burn off and the fumes released may not be healthy to breathe. Burning paint may also spook a user into dropping the tool, creating a fire hazard. 

Disposal of Ashes 
Ashes have a variety of uses, so they're not just a waste material. If you refrain from burning trash, the ashes produced by a fireplace or wood stove can be used as a base for making lye (for home-made soap) and as a preservative for meat (more in a later article). Even if your ashes get contaminated with minor bits of metals, inks, plastics, or other trash, you can still use them as a fertilizer for gardens and lawns. Ashes are all of the minerals left over once you remove the water and carbon from plant matter, so it makes sense that they would be usable as a source of those minerals for other plant growth. Use them sparingly, since the addition of water will create lye, a very strong base that will raise the pH of your soil.

If you're not going to re-use your ashes, make sure they are disposed of in a manner that will not allow any run-off or leachate to damage plants or structures downhill from them. Dumping them into a deep pit or on a gravel lane are two safe ways to dispose of them, and they'll keep weeds from growing in gravel if you get the ashes thick enough.


Tips for a more efficient fire

Flame Height
The flames you see rising from a fire are actually the combustion of gasses released from the wood as it heats up. Flames are pretty, but anything over 6 or 8 inches high is a sign that you're burning the fuel too fast. Flames generate light but not much heat, you get more heat from the dark red glowing coals of a fire.

Fuel Size
Fire is a chemical reaction, and therefore takes place mainly on the surface of the fuel. Small twigs or sawdust have a lot of surface area and will burn much faster than a solid piece of wood of the same weight. You'll need some small pieces of wood for kindling when you start a fire, but if you use the hot clean method of removing ashes, you'll rarely have to start from scratch. Use wood cut to a length that will fit through the opening of your firebox and as big around as you can keep burning. A slow, deep fire will put out more heat and be more efficient than a roaring bonfire in a box.

Air Control
Balancing the air going in through the intakes, and the smoke going out through the damper, takes a bit of experience. You want to keep enough air moving through to remove the smoke, but you want the fire to burn as low and slow as you can to stretch your wood supply.

Circulation Fans
Fans move air; that's what they're for. Wood heat is generally good for heating only the room that the heater is in, and maybe the room above it. Having fans to move the air around will make a multi-room dwelling more comfortable. There are some neat heat powered fans on the market that use the heat of the stove to run a small fan -- no electricity needed. Ceiling fans are low-powered and an excellent way to move air near a wood-burner. Having air movement allows a smaller fire to heat a larger space more evenly.

Construction Tips

Chimney vs Stovepipe
Depending on if you are moving into a house with an existing wood-burner, or are adding one to an existing home, you may have a choice between a metal stove pipe and a masonry chimney. Pipe is much cheaper and easy to replace, but a masonry chimney will last for decades if not centuries. The house I grew up in had a metal stove pipe and it has been replaced twice in about 40 years, while the house I live in now has a lined brick chimney that has been in use for more than 100 years with little to no maintenance.

Wall/Roof Penetrations
Anywhere the stove pipe or chimney goes through a wall or roof, special construction methods are required to keep the hot flue from igniting the wood framework of the house. Stove pipe building codes vary slightly, but most require a double- or triple-wall section of pipe for any penetration. Triple-wall pipe is quite expensive (~$50 per foot) but is cheap fire insurance.

You will also have to pay attention to the flashing around the pipe or chimney that ties in with the shingles or other roofing material. Cheap flashing will allow rain and snow melt to run down the pipe and cause water damage to your roof and ceilings.

Hearth
The hearth is a non-flammable material placed under and in front of a wood-burner. Its main purpose is to catch any hot bits that may fall or fly out of a fire without catching fire, but it also does a good job of making cleaning around the heater easier.

Spark Screen
As I explain below, a spark screen is a must for fireplaces and stoves designed to run with the door open. Made of fairly coarse metal mesh, chain mail, or miniature chain-link fence, they provide a physical barrier to sparks and embers flying out of an open fire.

Clean-outs
Most chimneys are built with a door on the side below the firebox as a reservoir for ashes. Opening the door provides a convenient way to clean out ashes, but also provides a large opening for air to enter the firebox.

If your wood stove has a horizontal exhaust pipe, there may be a "T" in the pipe where it goes vertical. This serves as a handy drain for debris when you clean the pipe with a brush.

Flue Height for Proper Draft
There is a requirement for how high the top of the chimney/pipe must be above the peak of your roof for proper air flow (draft) and safety. Read the linked article for a good explanation of all of the factors involved.

Rain Caps
Simple rain caps are just a metal plate suspended above the top of the chimney/pipe, but they are usually not enough to satisfy insurance agents and fire marshals. You need to look for one with a spark arrestor screen around the openings, but be aware that the screen will plug with soot and tar fast. You'll be cleaning it several times a season, so make sure you can get to it even with ice on the roof.


Downsides to Wood Heat
Having control of your fuel supply and being able to keep your house as warm as you like (provided you have the wood for it) are nice benefits, but there are some disadvantages to wood heat.
  • Your insurance company will want to inspect the installation. Expect an increase in your rates (or cancellation of the policy) just for having a wood burner. If you have a wood (shake shingle) roof, you may have to treat the roof with fire retardant in order to get coverage.
  • Fire/burn hazard. This is especially true of fireplaces, but some wood stoves can also be a hazard to young children and clumsy adults. Single-walled wood stoves get hot on all sides; the top will be the hottest, but the sides can get hot enough to cause serious burns. Double-wall stoves and masonry stoves are a better choice if you expect this to be a possibility. 
  • Fireplaces without a spark screen are stupid. I don't use that word often, but it is warranted in this case. I equate lighting a fireplace without a spark screen to changing targets on a rifle range while people are still using it. Wood with any knots or burls in it will trap pockets of moisture inside the wood. When that moisture heats up and expands, it literally explodes that portion of the wood and sends hot embers flying. Even with a proper hearth, having hot coals spit out of the fire is never a good idea. Children and animals like to lie next to fires and can be seriously injured by the flying bits of fire. 
  • They're dirty. Wood fires create ashes, which tend to be considered “dirty” even though they have many uses. Any smoke that escapes from the flue will stain fabric and walls/ceilings. It's a slow staining (sometimes takes years to see), but it's there. I've seen an OCD sufferer wipe a child's hand print off a wall and end up cleaning every wall in the room because the clean spot was too obvious. 
  • Our wonderful EPA doesn't like wood stoves and is trying to place so many restrictions on them that they will be too expensive to buy. Local municipalities have also placed restrictions or outright bans on them in some areas due to the smoke and fine particulates they create. Even though wood heat is carbon-neutral (trees grow back using the CO2 released by burning wood), some environmental groups lobby against their use. 
  • Wood smoke has a distinct odor and can travel a long way. From an OPSEC standpoint, a wood-burner is a waving flag that someone has heat and fuel. 
Finally
Everything considered, I like having wood heat available. It works even if the electricity goes out. It is a pleasant heat with the advantage of giving a room a temperature gradient from hot near the stove to cool near the far wall -- this means people can always find a place in the room that is the “right” temperature.

Thursday, April 23, 2015

Wood Heating Primer

A question came up about wood heat and the pros/cons of the different types, so I thought it was time for a refresher. Wood heat is mostly radiant heat rather than convective heat, so it will feel different than what most people are used to feeling from a furnace.

Wood heat has two components: the wood and the heater.

The Wood

Measurements
As a fuel, wood is probably our oldest source of stored energy. Almost any wood will burn, but some types are better suited to use for heating than others.

Wood is measured in old, odd terms. A rick of wood is a stack* 16” wide, 4 feet tall and 8 feet long. Three ricks equals one cord, or a stack 4'x4'x8'.
*Notice I said “stack” and not “pile”. Wood is kept stacked for reasons I'll cover later, but piles are hard to judge for volume. Rectangular stacks are easier to measure to ensure you're getting what you pay for. Unless you have access to a scale and are paying by the ton, avoid buying wood in piles- there won't be as much there as you think.
A cord of wood is the standard unit of measure, and that's what most references will use. For those of you who have never worked with firewood, a full-sized (8 foot box) pickup will hold 2 ricks (2/3 of a cord) if filled to the top of the box. A common (6 foot box) pickup will hold about ½ of a cord.

Hard vs. soft
Hard woods are more dense and contain more “heat” than the softer woods, but they are more difficult to cut and weigh more per cord. For a comparison of some common species, here's a chart of the density and heat content. For more specifics like fragrance and ease of splitting, this chart has more species listed.

If you look at the charts, you'll see that there is a large difference in the heat content between a hardwood like Oak (~30 million BTU/cord) and softwoods like Pine (~15-20 million BTU/cord). Put simply, it will take you 1.5 to 2 times as much Pine to get the same amount of heat as you will from Oak.

Cutting and curing
Cutting wood is a chore, no two ways about it. The standard saying is that wood heat will warm you at least three times; once when you cut it, again when you split and stack it, and finally when you burn it.

Felling a tree is not something I can teach with words; it has to be shown. There is a bit of an art to being able to read a tree as it stands and putting it on the ground where you want it, so I'll assume that most of us will be dealing with trees or branches that are already down.

Once a tree is on the ground and has lost its leaves, it becomes a bit harder to determine what kind of tree it was. Looking at the bark, structure (how the branches grew), and the rings inside the wood will give you clues and if you have a good field guide you should be able to narrow it down. For use as firewood, all you really need to worry about is the density since that is a good indicator of the heat content. Dense, tough wood is better but you may need to burn whatever you can find. Avoid wood that is rotted through or spongy, as it will have very little heat content left in it.

Firewood is normally cut into 16” lengths. That's why a rick is 16” wide: it's one piece stacked on another with none going end-to-end. 16” is a good length for carrying and it will fit into most any wood stove or fireplace. If your stove or fireplace has a larger opening you can cut your wood to size and save a few trip when carrying wood.

Firewood is split into chunks that are manageable. This will vary from person to person, but most people can't comfortably carry a piece of wood larger than about 8” diameter and 16” long. Thicker pieces will need to be split into wedge-shaped chunks, and the splitting will actually help the wood cure and dry faster. Splitting round logs also makes them easier to stack, since they are less likely to roll if they have at least one flat side. Split wood also increases the surface area available for flame propagation, which is a fancy way of saying it makes it burn faster. Splitting is done with a hydraulic ram if you're lucky, or an axe/maul if your' not so lucky. If you're being punished for something you did in a past life, you'll get stuck with a sledgehammer and some steel wedges. Different types of wood split differently, and variables like how dry the wood is, the temperature of the wood, knots and crotches in the piece of wood can make this either a breeze or a nightmare. I've learned that the best time to split wood is after is has been cut, but before it has dried or cured, and then waiting for a day where the temperature drops well below freezing. The residual moisture in the wood will freeze and when you hit it with an axe or maul, it just “pops” apart.

All firewood should be cured for at least two years before being burned. If you're cutting your own wood, look for dead trees that have already lost their bark for fuel for the first year or two and cut enough to store greener wood for the third and fourth years. You'll need to plan ahead for your fuel needs and it is always better to have some wood left over in the Spring than to have to go out and cut wood in the snow. The smaller the pieces you split the wood into, the faster it will dry, but it will also burn faster once it's on the fire.

Storage
Wood stores best outside in stacks with space for air to flow through. A tarp or roof over the stack to keep the rain and snow off is important if you're going to store it for more than a few months. Rain will accelerate the decay processes and snow will cement the wood together. Trust me, it's no fun having to break firewood out of a block of ice, just so you can carry it into a nice warm house where the ice melts before you can burn the wood.

Most people who burn wood will keep a day's worth inside near the stove and restock as the weather allows. Old houses that relied on wood heat often had a wood bin that penetrated the outside wall, with doors on both the inside and outside. You could fill the bin from the outside and empty it from the inside.

Stacked wood will attract vermin. The air passages make good burrows for mice and rats and I've heard of badgers and woodchucks taking up residence in wood sheds. For this reason you don't want to stack wood directly against your house, leave a good break between the wood and the house to discourage vermin from moving in with you. Cats seem to like wood piles since they provide them with a good place to get above their prey and it also gives them a good place to lie in the sun.

A lot of trees have insects living in them. Ants, termites, and roaches are the most common and when winter hits they tend to go dormant right up until the time you bring the piece of wood into the house to have on hand to feed the fire. That's when they thaw out and start looking around for a nicer place to live, namely with you. Check your firewood before you bring it in and if it's full of crawly things, chuck into the fire before they wake up.

Pellets and other types of wood-like fuel
  • Pellet stoves are a fairly new type of wood stove that uses extruded pellets of sawdust (a waste material) held together with a binder (usually starch or some other natural glue) as a fuel source.
  • Compressed sawdust logs are a novelty item, for when you want a pretty fire in the fireplace and aren't worried about the heat output. They burn for a long time, but don't put out much heat.
  • There are machines that can recycle newspaper and other scrap paper into a burnable form, but I have no experience with them. Most newspaper should be safe to burn since the inks are now predominantly made from soybean oil instead of petroleum.

Emergency Supplies
  • Pallets are generally made of cheap wood, but can be found anywhere. Beware of “fatwood”, a greasy, fatty wood found in the South that is often sold as a fire starter. I have seen pallets made of this stuff and it is messy. Fatwood burns very hot and very fast, and can overheat a stove.
  • Furniture. Real furniture is made of hardwoods like oak, walnut, teak, and hard maple. Even cheaper sofas and chairs will have a real wood frame buried inside them, and while not as good in quality, they're easy to find.
  • Corn. Believe it or not, we grow enough corn in the USA to be able to burn food for heat. Many of the pellet stoves come with an attachment or adapter plate to allow you to switch over to corn (maize) if it is cheaper than pellets. I have also seen corn mixed into the coal being fed to industrial boilers. When the price of corn is low (like it is right now) or if you find yourself with several thousand bushels of corn and nowhere to sell it, this may be an option for those who live in fly-over country.
  • In the Plains, where trees were scarce, early settlers and Native Americans burned well-dried buffalo dung. Other areas of the world with similar lack of firewood have done the same.

What Not to Burn
  • Pressure treated. Creosote pressure treating isn't very common any more with the EPA stomping on petroleum products that can leach into soil and water, but there's still a lot of black, tarry wood out there. Railroad ties and bridge planks are common in a lot of places and should never be burned where you breathe. One of the newer methods of treating wood (CCA or green-treated) to prevent insects and microbes from destroying it is based on arsenic (not good to breathe). The other method (CQA or brown-treated) is based on copper oxide and a fungicide -- not as bad as arsenic, but still not good to breathe.
  • Adhesives and particle board. The crap furniture that you get from Wally-world is made of sawdust held together with adhesives. The sawdust will burn just fine, but the adhesives can produce toxic fumes when burnt. Watch the flames when you light a piece of suspect wood- any color other than the normal yellow means you're burning something other than the wood.

The Heater

Air-tight Wood Stoves
All new wood stoves are built as “air-tight” stoves and most have an option for drawing outside air in for the firebox. Air-tight is a bit of a misnomer, since they do leak a bit, but they are a lot tighter around the seams and joints than an old cast iron stove. Every airtight stove I've seen is either of welded construction or made of a mass of stone, making the stove a large, heavy piece of gear. The major advantage to having a stove airtight is to allow better control of the air that enters the combustion chamber, allowing you to better control the burn rate and heat output. Airtight stoves are also more efficient at getting the most heat out of a quantity of wood.

Non-airtight Wood Stoves
A lot of old stoves were made of cast iron pieces that are bolted together. There is usually an asbestos rope gasket placed at the joints to fill the gaps and slow down the air leaking into the firebox. Advantages include the ability to break the stove down into pieces for transport (important if you're setting up in a remote location) and generally lower prices. Disadvantages include much lower efficiency, they're “dirtier” to run due to the fact that they will leak around any seam and smoke tends to get out,

External (HAHSU)
Some wood-burners are actually set up with the fire box placed outside, near the house, with either hot air or heated liquid piped into the house. These Heat and Heat Storage Units (HAHSU) have the advantage of larger fireboxes, capable of taking larger pieces of wood and burning for longer and thus requiring fewer feedings. Since the firebox is outside, it doesn't draw air for combustion from the living area of the house, making them more efficient than most fireplaces and regular wood stoves.

Pellet Stoves
Most pellet stoves have a hopper that you'll fill with fuel and an auger that delivers it to the combustion chamber at a steady rate. Depending on the size of the hopper, a pellet stove can run unattended for up to a day. Pellets can be purchased in bags or by the ton and provide a “cleaner” form of heat. Pellets don't attract insects or provide shelter for vermin the way a stack of firewood can, and they're easier to handle. Availability and price of the pellets can vary greatly by the season and vendor, with some vendors only keeping them in stock during the heating season or not carrying them at all if there isn't enough demand.

Wood Burning Furnaces
Often sold as multi-fuel furnaces, they will have more than one combustion chamber with each set up for a different fuel. Wood/oil and wood/gas models are available and they install and operate much like a standard oil or gas furnace. Having flexibility in your fuel is nice, but they will require electricity to run the blower and move the air through the normal duct work. One disadvantage of a wood-burning furnace is the fact that most of them are placed in a basement and that can make it hard to get wood to it and remove the ashes from it without making a mess.

Fireplaces
A fireplace is common enough that I shouldn't have to describe it. The main problems with a standard fireplace are:
  • They use the air that they are heating for combustion. 
  • Since heat rises and the fire is at the base of a vertical chimney, fireplaces can actually suck more air out of a room than they can heat. This is known as negative efficiency.
  • Without a proper screen, burning knotty wood (which pops a lot), can put you at risk of setting your floor on fire.

Campfire/ Open fire
For cooking, a well-tended open fire is actually more efficient than either gas or electricity. Since wood heat is radiant heat, an open fire heats in all directions. Sitting around a campfire everyone gets warmed (even if the smoke follows you where ever you move). The Native Americans had figured it out with a tipi and a fire in the center: Everybody got a fair share of the heat produced, and since there is a hole at the peak for a chimney, the door controlled the temperature by letting in fresh air.

Final Thoughts
Trying to distill over 40 years of experience burning wood as primary and secondary heat hasn't been easy. I've had to delete or leave out a lot of information in the interest of keeping this article to a reasonable length and it still grew to twice my normal. Given the time to develop a lesson plan and a classroom, I could easily turn this into a three-day class and still wouldn't be able to cover everything.

If you're thinking about installing wood heat or have “inherited” a wood-burner with the purchase of a house, look around for a local contractor to get recommendation. Local types of wood, normal heating seasons, and proper cleaning of chimneys are best dealt with using experience from your 
locale.

The Fine Print


This work is licensed under a Creative Commons Attribution- Noncommercial- No Derivative Works 3.0 License.

Creative Commons License


Erin Palette is a participant in the Amazon Services LLC Associates Program, an affiliate advertising program designed to provide a means for sites to earn advertising fees by advertising and linking to amazon.com.