Wednesday, November 23, 2022

Prepper's Pantry: Preserving Herbs and Spices

Now that harvests are pretty much complete in most of the country, it's time to start preserving our harvests. In previous posts I've talked about the equipment and process of canning, pickling, and a brief overview on spices.

Dealing with herbs and spices is fairly simple, or at least it can be. As with any food preservation process, making sure the produce is of best quality is the most important first step. Once they've been examined, sorted, and rinsed, we can move on to preservation, with different options available depending on the type of vegetation we're dealing with. Dehydrating and freezing are the two most common options, so I'll focus on those processes here.

Dehydration
Dehydration can be handled in an oven, an air fryer, or a dedicated dehydrator. If using a dehydrator, it's recommended to get one with a fan as that will considerably reduce the time required.

As with any other form of dehydration, the trick is to get as much moisture out as possible without burning or singing the product. This is one of the benefits of a dedicated dehydrator, as they generally operate at a relatively low temperature.

Before dehydrating the checked and cleaned vegetation, the next step will depend on the herb or spice in question. Those with smaller leaves, such as oregano or rosemary, get processed on the branches, while those with larger leaves, such as basil or bay, are separated from them. Parsley simply has its stems trimmed.

Once sufficiently dried (and if appropriate, the leaves removed from their branches) the next step is storage. Depending on intended use, they can be left relatively whole, crumbled by hand, or run though a spice grinder or spice mill to get more of a powder-like product.

Regardless, they need to be properly stored, since oxidation is the enemy. For ready use, spices and herbs can be placed in small, airtight jars and stored in a cool, dark place. Adding an oxygen absorber to each container can help preserve freshness. Longer term storage should be in vacuum sealed bags, also containing oxygen absorbers, and still placed in a cool, dark place.

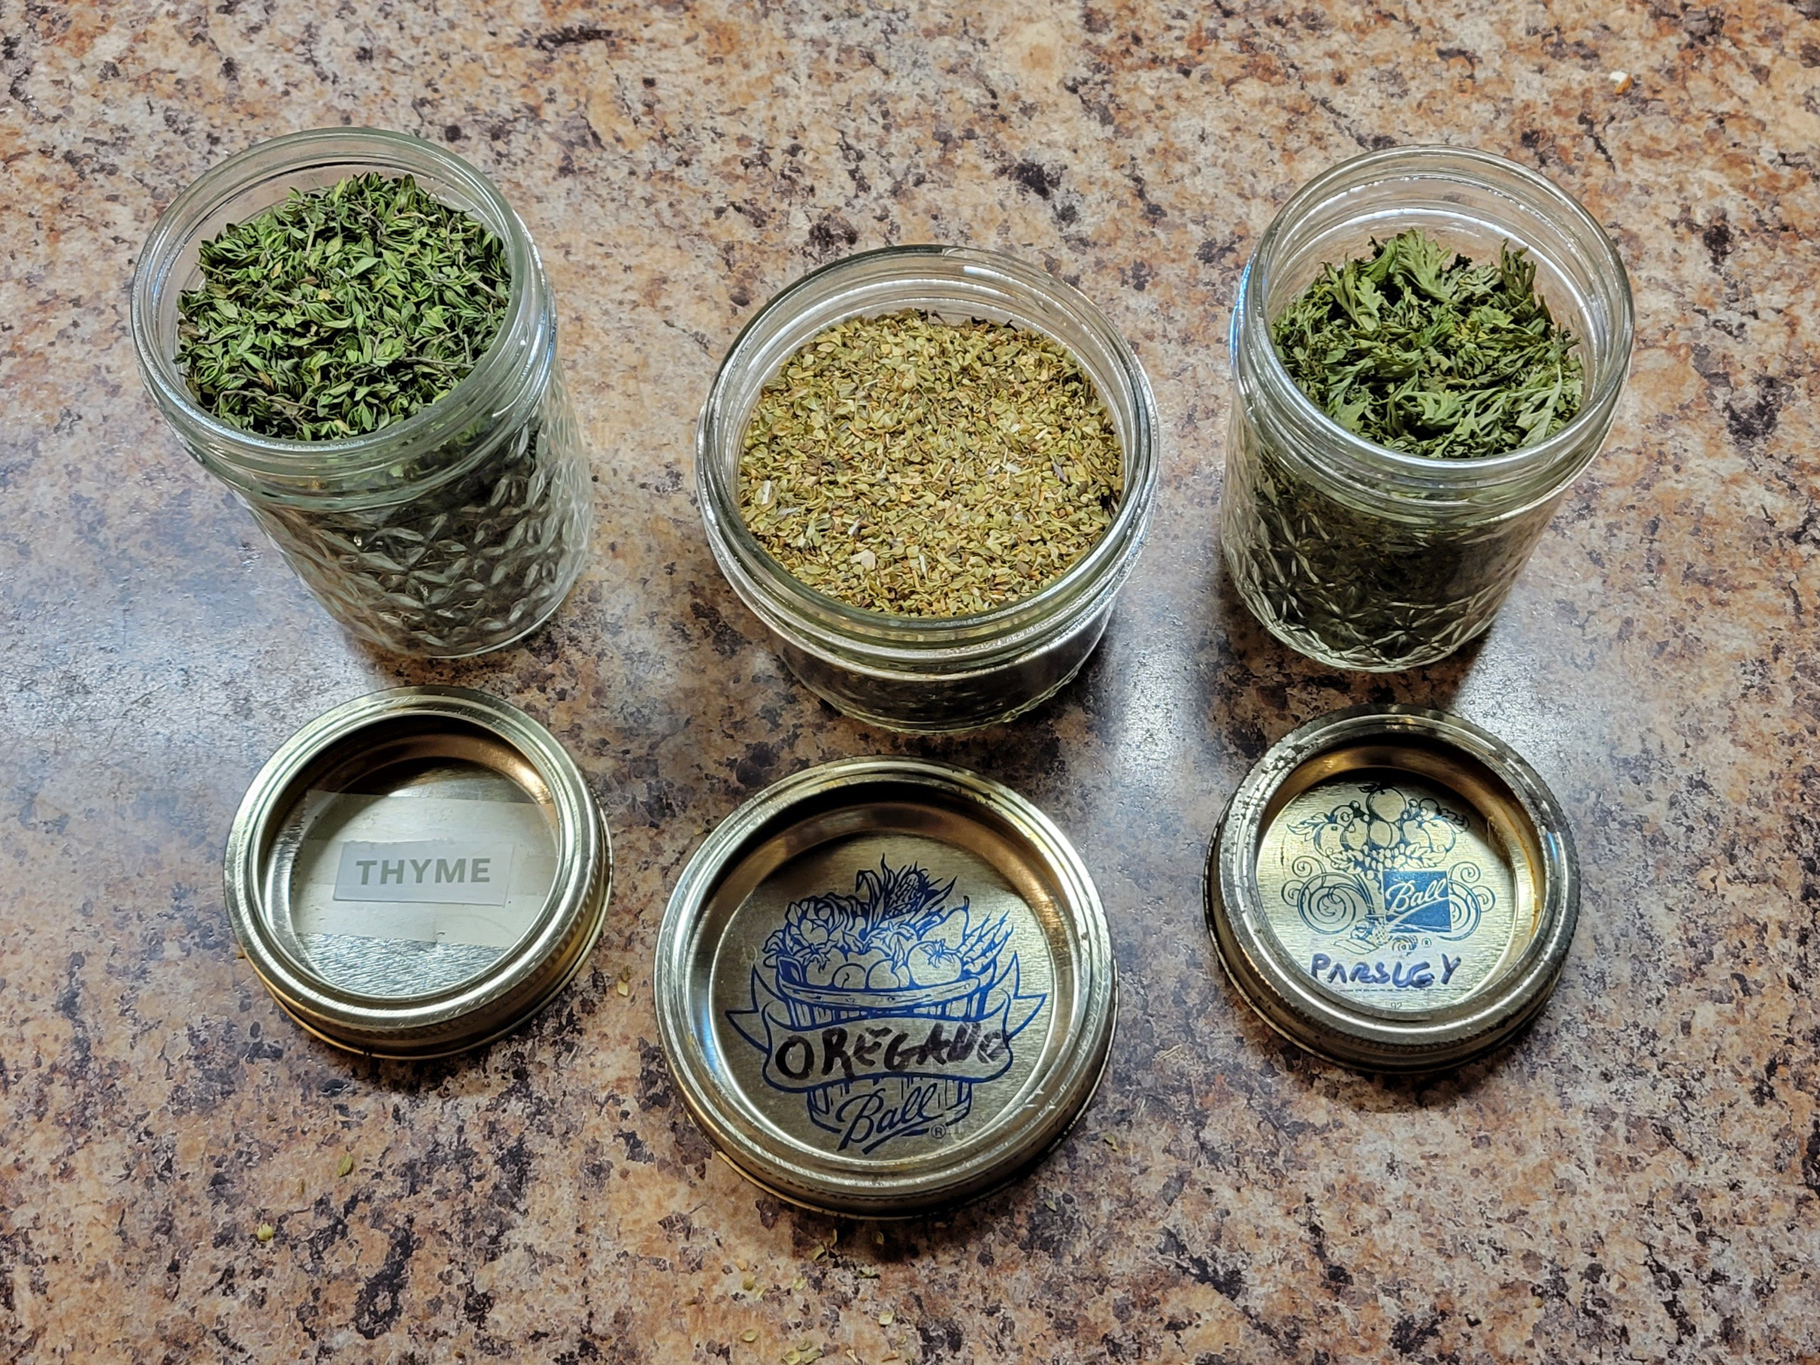
A selection of dehydrated herbs from the author's pantry

Freezing
Another option for some leafy herbs is freezing. The leaves are separated from the stems, rinsed, and then layered in slightly damp paper towels, before being packed in Ziploc or vacuum sealed bags. These get labeled with the date and put in the freezer. Since no moisture is being removed (in fact, more is being added), herbs stored this way should be used within a few months at most; otherwise, too much flavor will be lost to freezer burn.

There's no point to growing our own herbs and spices if we lose them to spoilage. Hopefully, these tips will keep them fresh through the long winter months to come.

Tuesday, November 15, 2022

Cold Frames

Now that our gardens are at rest for the winter, we have time for additional garden-related projects, such as building some cold frames. These are transparent-topped, low enclosures that are used to protect plants from cold and wet conditions, like miniature greenhouses. The sides reduce the effects of cooling from wind, the top lets in light, and the whole thing limits heat loss through convection, especially at night.

Cold frames were traditionally built out from the walls of full greenhouses, and were used as part of the acclimatization of plants from the protected environment of the greenhouse to being fully outdoors. Seeds would be started in the greenhouse, and when big enough they would be moved to the cold frames, then finally to the garden. This gradual change improved survival rates considerably.

In addition to transitioning young plants in spring, cold boxes can also protect plants from early frosts or other weather conditions throughout the growing season.

Construction of these handy structures can be fairly simple. Although kits that only need basic assembly are available, cold frames sit at the lower end of complexity as DIY projects. They can even be made entirely out of recovered materials, such as pallets and plastic sheeting.

The sides are slanted and joined to a higher back and a lower front,  ensuring the top is angled to help with water runoff. Any clear or translucent panel can be used as a lid, making this a great way to repurpose old windows, or glass doors for larger frames. The top can be hinged for easy opening, or simply latched in place. 

A cold frame can even be converted into a hot frame with the addition of a heat source, such as an outdoor rated heating blanket or heating coil.

A variety of crops respond well to containment in a cold frame, including lettuce, parsley, onions, spinach, radishes, turnips, and so forth. Depending on the size of the cold frame, one type of crop can fill the entire space, or multiple plants can be grown so they produce in sequence to ensure a more constant flow of vegetables.

When placing a cold frame, make sure the top is facing south to get as much sun as possible. If high winds are a concern, having a way to stake the frame to the ground is helpful; a few large U-Nails set into each side allow a plant stake to be run through them and into the ground.

Whether starting young plants or protecting mature ones, cold frames are a cool project for the home gardener.

Sunday, November 13, 2022

CPAP Battery Solutions 2

Not actually Erin.
& is used with permission.
In my previous post on this topic I stated that I was looking for a battery bank that could run my CPAP for as many nights as possible and the ability to recharge via solar panel. In the time since then and now I was able to procure such a unit, but I can't give you much of a review because as I reported elsewhere, Hurricane Nicole was a big nothing where I live; the power didn't even flicker, much less go out. 

Is it strange that I was disappointed the big, dangerous storm didn't disrupt my life more so that I could test my preps? It feels strange. Regardless, I can tell you why I picked the unit I did, and how easy it was to set up in advance of the storm. 

Rockpals Freeman 600
Like the name suggests, the Rockpals Freeman 600 banks 600W (technically 614.4 Watt-Hours) of power using a Lithium Iron Phosphate (LiFePO4) battery. Its dimensions are 13" L x 8" W x 7" high, and it weighs 20 pounds. 

https://amzn.to/3O5ygrf


It can be charged three ways:
  • Anderson solar charging port (120W)
  • DC, either from car outlet or wall socket with AC adapter, at 12V/8A, 96W max
  • Bi-directional USB-C port at 60W, which can also be combined with one of the other charge methods to increase the wattage. 
For output it has the following: 
  • Three pure sine wave 110V AC outlets (600W rated, 1000W max), 
  • One car port DC output (12V/10A, 120W max)
  • Two DC barrel ports (12V/5A, 60W max)
  • Two USB 3.1A ports
  • One USB-A 3.0 Quick Charge port (18W max)
  • One bi-directional USB-C port (20V/3A, 60W max) 
  • Note: the DC and USB outputs will provide power while the Freeman 600 is being charged, but the AC outlets will not. 
If you want more information, this video by Hobotech will give you all the details. 

Setting Up For the Storm
Setup was very simple, since I keep the battery next to my CPAP unit for quick use. 
  1. I plugged the AC adapter in to keep the unit topped up.
  2. I inserted the 12V CPAP power cord into the DC output socket.
  3. I swapped the 12V cord for the AC adapter on my CPAP. 
  4. I turned on the Freeman 600. 
  5. I turned on my CPAP. 
Because I was using the 12V output, the AC inverter didn't need to turn on, so there was no fan noise. If you are sensitive to light, please note that while the LCD display will turn off if you hold down the Display button, there is a small green light on the 12V button that is illuminated so long as it is providing power, and there is a larger green light on the 12V power cord. Judicious use of electrical tape, however, solves this problem. 

Performance
Because we didn't lose power, the battery still read 100% when I woke up in the morning. This is in line with the Freeman 600's claim of pass-through charging, which means I can use this as an Uninterruptible Power Supply for my CPAP if necessary.

I performed this test again with the battery unplugged from the wall just to see what the power drain would be. I slept for 7.5 hours, which is actually pretty generous for how I would sleep without air conditioning after a hurricane. When I woke up, the battery was down to 79% charge, which recharged via wall plug in about 90 minutes. 

This performance gives me roughly five nights of sleep with my humidifier running at level 4, and this is without any solar recharging or further power reduction using a Heat/Moisture Exchanger to further reduce power demand. I am very happy with this result, as I figure I can easily get 7+ nights from this by using HME and solar recharging, which ought to get me through any power loss that doesn't result in the destruction of my home or complete social breakdown.

If there is interest, I could do a series of tests with these permutations:
  • How many battery nights I can get running the humidifier
  • How many battery nights I can get using an HME
  • How many hours to recharge from near-zero with wall current
  • How many hours to recharge from near-zero with solar panel
I say "near zero" because it's never good to completely discharge your battery;  I believe it reduces its lifespan.

Cost
Come, let me conceal nothing from you: the real reason I bought the Freeman 600 as opposed to a different unit is because it costs much less than others. Jackery brand is the standard in this field, and with their products you can expect to pay about a dollar for every Watt; the Freeman 600 retails for $500, and I bought mine with a $100 off coupon plus an extra 10% "Extra Savings" click which dropped the price down to $350. 


However, that has changed; now there is a $140 off coupon. You might want to wait until Black Friday or Cyber Monday to see if there are better deals then, but if you don't this is still a great price. 

Speaking of solar panels, I bought one of those, too. 

Rockpals SP003 100W Portable Solar Panel 
I haven't tested this at all; the weather was dark and overcast the morning after Nicole hit, and in the time it took for the coffee to bring me to my senses, the plugged-in battery had fully recharged. When I perform my not-plugged-in test I'll test these, too. 


These are also on sale; normally $200, they have a $35 off coupon. That drops the price to $165, or $525 if you get them with the Freeman 600. 

For the curious, a new Glock 19 retails for about $500, so when I said this would be "new gun expensive", this is what I was talking about. I'd been saving my COVID stimulus money since 2020 for something big, so I was able to afford this. If money is tight, then you can buy a 300W unit for $150 (no coupon) and a 60W solar panel that is normally $146 but has a $40 off coupon, and if you buy both then use the code P2VYV6RU at checkout for an additional 5% off of the Freeman 300 for a total of $248.50.  


I'll let you know what I think of the panels after I've tested them, but they have a good rating (4.5 stars and 2,611 reviews). Based on the research I've done and the results I've seen, I'm happy with my purchase. 

Wednesday, November 9, 2022

Prepper's Pantry: Tea

I recently talked about chocolates, and in my post on nuts I shared a recipe for scones. A regular companion to both of these treats is tea

History
Coming in second place to clean water, tea is the most commonly drunk beverage in the world. Served both hot and cold, tea is an infusion made from the leaves of Camellia sinensis (an evergreen shrub native to East Asia) soaked in hot or boiling water. While there's evidence of people imbibing tea in China for many thousands of years, for much of that time tea leaves were eaten, either raw or added to other dishes. Drinking tea as we know it today dates back to at least the Han Dynasty in China, 2500 years ago.

The vast majority of tea comes from one of two types of plants, small-leaf (C. sinensis var. sinensis) and Assam-type (C. sinensis var. assamica). According to some theories, small-leaf tea plants are thought to have diverged from Assam-type tea plants around 22,000 years ago, while Chinese and Indian Assam tea plants are estimated to have diverged 2,800 years ago.

There are also herbal teas, which are not made from Camellia sinensis and are instead infusions of fruits, leaves, or other plants such as chamomile. To help distinguish them from teas made from the tea plants, herbals are often referred to as tisanes or herbal infusions.

Tea Types
In addition to plant origin, tea is divided into categories based on processing. There are at least six different types, some of them less commonly known in the United States:

  • White: wilted and unoxidized
  • Yellow: unwilted and unoxidized but allowed to yellow
  • Green: unwilted and unoxidized
  • Oolong: wilted, bruised, and partially oxidized
  • Black: wilted, sometimes crushed, and fully oxidized
  • Post-fermented (Dark): green tea that has been allowed to ferment/compost

Wilted vs Unwilted: Wilting, or withering, is used to remove excess moisture from the leaves. This process promotes the breakdown of leaf proteins and increases the availability of caffeine, changing the flavor of the tea.

Oxidized vs Unoxidized: The leaves are put in a climate-controlled room where they are allowed to darken. This oxidation helps form taste and aroma compounds, which effect the color, strength, and briskness.

Aging / Curing: Some teas benefit from additional aging, fermentation, or baking to reach their optimal flavor. For example, prior to aging a tea may be bitter or harsh in flavor, but becomes sweeter and more mellow after sufficient aging.

There are also an almost infinite variety of tea blends available. My personal favorites are the Assam-based breakfast teas, including English, Irish, Scottish, and Ceylon styles. Each has their own distinct flavor profile and I enjoy them all.

A selection of the author's teas

Preparation
Tea can be procured both loose or in pre-measured bags, and is prepared in a variety of ways. Traditional tea is steeped in hot or near boiling water for a variable amount of time depending on the flavor and strength desired. Many people, myself included, add a small amount of sweetener to help cut the bitterness common to many teas; sugar (both white and brown), honey, maple syrup, and artificial sweeteners are all used.

(For those who enjoy it, I'm not going to get into the argument about whether milk should be added to the cup before or, in proper British style, after the tea. Instead, I'll leave that for Jonathan Ferguson to discuss.)


Sun tea is brewed by placing tea and water in a clear glass container which is left to sit in sunlight, and has what many consider to be a softer flavor.

Iced tea is usually brewed in hot water, cooled as a separate step, then served over ice. In the south, several teaspoons of this is added to a cup of sugar. This beverage is colloquially known as sweet tea.

Storage
As with so many other items, storage conditions and type determine the shelf life of teas. In general, the lighter the tea, the shorter the storage time, however herbal teas have a broad shelf life due to their wide variety of ingredients.

The best way to preserve freshness is to store the tea, as usual, away from heat, light, air, and moisture. If kept properly, black tea may last two years before starting to lose flavor, while the lightest tea will start to deteriorate in less than a year. 

Something discussed in many of our other articles is using oxygen-absorbers, vacuum sealing, and refrigeration in air-tight containers, all of which can extend storage times.

Benefits
Over the years, there have been a number of discussions on the healthful benefits of drinking teas. For the most part, they were dismissed as unsubstantiated; however, a recent study may revise that perception.

So pour yourself a cuppa, get an appropriate snack, sit back with a good book, and relax.

Book here: https://amzn.to/3NUlkon

Friday, November 4, 2022

Tool Substitutions

Not actually Erin.
& is used with permission.
One of the "joys" of middle age is a loss of flexibility, strength and resilience, and a corresponding increase in aches, pains, and susceptibility to injury. One of the many ways this affects me is that I must carefully consider how much weight I can carry in a Bug Out or Get Home Bag without hurting myself.

Some heavy objects, like food, are a self-correcting problem in that my pack will get lighter as I consume them. Other items, like water and shelter, are too necessary for survival to remove from my pack. The real issue for me is when I get to the "Nice to have, but are they needed?" items, typically tools like a shovel, a saw, and an axe/hatchet.

The following is not so much This is how I solved my problem and more like These are my thoughts and I'd like to know what you think.

Cutting Wood
I don't foresee the need to cut down trees as part of my Bug Out or Get Home preps, just a need to harvest and process firewood. This means I can leave the axe at home. But what about a hatchet?

https://amzn.to/3fzsWj8

Unfortunately, at this point I can't justify the weight of a hatchet, especially since it's a tool where weight is needed to do the job properly. Instead I have decided to make do with my Cold Steel Kukri Machete, which has served me well for over a decade of hard use and which I've used to chop down saplings and limb larger trees for my mother's backyard garden. I know it will chop most anything I need it to chop, and it does a better job as a hatchet then a hatchet will as a machete when clearing brush -- which is a real need for me in this dense Florida undergrowth. 

In case there's something I can't chop, I have a Corona Tools folding 10-inch saw which is sharp, lightweight (less than a pound), and quite compact. It will easily cut branches up to six inches thick, which is far more than I need it to do. 

https://amzn.to/3UmmmeC


I think that between these two tools I have a solution for cutting anything which I will reasonably need cut during an emergency which doesn't involve me staying at home. 

Moving Earth
This dilemma is a lot harder to solve than the previous one, and it has occupied my mind for a while now. The problem with camp shovels, aka entrenching tools, is that their decreased weight comes with a concurrent decrease in size in both length and width, meaning that I will be hunched over a lot and digging harder than I would with a longer, and heavier, but proper earth-moving tool. 

In other words, my back is going to be killing me regardless; I just get to choose if I want it to hurt while traveling or while digging. 

However, after an embarrassingly long time, I eventually came to this conclusion: I don't need a shovel at all. Much like with my wood cutters above, my earth moving needs will be minimal. I can't foresee myself needing to dig a pit; at most, I'll only need to dig small holes between six inches to a foot in depth (such as a cathole). I already have a tool designed for just such a purpose: a Hori Hori, which is also known as a gardening trowel. 

https://amzn.to/3U7SYsW

This is a full-tang "knife" designed for digging, with a serrated edge good for sawing through roots. I can use it to dig fire pits and latrines, cover hot coals and ash with dirt, even forage for roots and tubers with it. I gave these out as gifts for Christmas 2017, and Lokidude reviewed it in this post


While none of these will properly replace a shovel, an axe/hatchet, and a saw, the point of this post is that they don't need to replace anything. Instead, I just needed to re-frame my tool needs for my anticipated situations, and find something which addresses those needs while also sparing my aching back. If you find yourself in a similar dilemma, I recommend you do the same thing: stop asking yourself "How can I make X thing lighter/smaller" and start asking "Do I really need an X thing at all, or can I get by with reduced capability?"

Let me know how this turns out for you. 

Wednesday, November 2, 2022

Prepper's Pantry: Chocolate

Everyone knows about chocolate, one of the most popular edibles in the world. Most people like it, many love it, some can't eat it for health reasons, and a few simply don't enjoy the flavor. As a bonus, by the time this post is published Halloween will have just ended, which means all sorts of chocolate will be on sale.

History
The origin of chocolate comes from the region known as Mesoamerica, an area that ranges from central Mexico down to northern Costa Rica, where the cacao tree is native. It was harvested and processed primarily for use as a beverage by native tribes, possibly fermented in some manner.

The first European to encounter cacao was most likely Christopher Columbus, though it didn't make much impact on his return. It wasn't until Spanish interaction with the Aztecs by Hernan Cortez that chocolate became more known in Europe, though at first only as a medical treatment of abdominal and digestive issues, most likely due to its extreme bitterness.

It took a few hundred years to develop industrial processes to make chocolate both palatable and inexpensive enough for mass marketing. Today, of course, chocolate is available in a bewildering array of flavors and mixes, usually at a fairly reasonable price. It has many types including bakingdarkmilk, and modeling, with these types coming in both solid and powdered forms for different uses. (There's also white chocolate, but as that's just sugar lying about being chocolate, so we won't discuss it here.)
 
A selection of the author's chocolate stash

Chocolate can pack a lot of energy in a fairly small package, especially if mixed with nuts, seeds and dried fruits as in trail mix. This makes it an excellent choice for outdoor activities such as hiking. During World War II the United States Government, in cooperation with various American chocolate companies, developed the D-Ration, a moderately palatable 4oz bar designed for use in emergencies. These came in packages of three bars of roughly 600 calories each to make a soldier's, marine's, or airman's daily ration in extreme situations.

Storage
There are three major concerns when it comes to chocolate for emergency use: melting, going rancid, and eating it all before an emergency occurs. Proper packaging and storage can help with the first two, no power in the universe has been found to prevent the third.

Chocolate is best stored in a cool, dry, dark place, ideally between 65 and 70 degrees Fahrenheit, and should be kept in an airtight container or packaging, because chocolate can easily pick up the odors of surrounding foods. When stored in this manner, it can last quite a while: milk chocolate can stay fresh for over a year, dark chocolate for nearly two years, and filled chocolates (i.e. chocolates with a non-chocolate filling) for around three to four months. If stored in the freezer, this duration can be increased, perhaps even doubled. Of course, this assumes the chocolates don't get eaten before then. 

There are two things to keep in mind as chocolate gets old: texture and bloom
  • Texture: As chocolate ages, some of the more liquid volatiles will escape, causing the chocolate to have a more crumbly or grainy texture. This has little to no effect on the nutritive or energy value, just the mouthfeel
  • Bloom is a white coating that may appear on the surface of chocolate following prolonged storage. This is due to either fat or sugar migrating to the surface as the chocolate ages.
Neither of these issues are anything to be concerned about, but should be considered as part of the storage and rotation of supplies.


Chocolate can be enjoyed in many ways: as an ingredient in baked goods, in beverages, confectionary of various types, as an element of trail mix, and, of course, as a simple chocolate bar for a treat... but I think we can all agree that the best chocolate is the type you get for free  on Halloween and Valentine's Day, or on sale afterwards. 

Sunday, October 30, 2022

Prepping Lessons from John Titor

Not actually Erin.
& is used with permission.
Some of you may have never heard the name "John Titor"; for others, it's a blast from the past. Regardless of your familiarity with the name, I'd like to beg your indulgence as I talk about this fascinating character. His story is fantastical, but given that we are approaching Halloween, I think a little fantasy can be forgiven in the name of seasonal spookiness. 

In late 2000 and early 2001, a man going by the name "John Titor" on internet message boards claimed to be a time traveler from 2036. According to him, the United States would have a second civil war in 2004, followed by a brief nuclear World War 3 with Russia, and eventually the fragmented USA would re-form in a much more decentralized manner. 

If you don't mind spending 30 minutes watching a video, a very detailed breakdown of the John Titor story can be found here.
     
 
As someone who not only lived through that time period but was also online throughout it all, and therefore aware of the Titor Phenomenon, let me say the following:
  • While I didn't believe his story, I found it plausible enough. I guess you could say that, like Fox Mulder, I "wanted to believe". 
  • The events of 9/11/2001 gained an especially eerie quality when viewed through the lens of Titor's predictions. For a while there it seemed like his claims of "a Waco-level event each month" might come true. 
  • Despite the fact that this seems like a well-crafted internet hoax, there is still some wisdom to be gained from the fictional Titor's advice. 

In one of his final posts, Titor gave the following advice to people on how to survive his future:
  1. Do not eat or use products from any animal that is fed and eats parts of its own dead.
  2. Do not kiss or have intimate relations with anyone you do not know.
  3. Learn basic sanitation and water purification.
  4. Be comfortable around firearms. Learn to shoot and clean a gun.
  5. Get a good first aid kit and learn to use it.
  6. Find 5 people within 100 miles that you trust with your life and stay in contact with them.
  7. Get a copy of the U.S. Constitution and read it.
  8. Eat less.
  9. Get a bicycle and two sets of spare tires. Ride it 10 miles a week.
  10. Consider what you would bring with you if you had to leave your home in 10 minutes and never return.

My thoughts on these:
  1. This is a reference to Bovine Spongiform Encephalopathy (BSE), aka "Mad Cow Disease", which is caused by a prion. Explaining what that means is a deep rabbit hole that I leave to the curious reader; for the less curious, let me just say that there's a very good reason why humans generally regard cannibalism as a dangerous and unhealthy thing, and so eating cannibalistic animals is likewise a bad thing.  
  2. If you don't know someone, you don't know what diseases they have. Yes, HIV and syphilis are awful, but in a long-term grid-down disaster, even the flu could prove fatal. 
  3. Poor sanitation and impure water lead to disease and possibly death. 
  4. Guns are useful for hunting and for self-defense. 
  5. You are your own first responder in the best of situations. At the worst, you are your only responder. 
  6. We have talked about the importance of having a Tribe in many articles. 
  7. In my opinion this is 50% "be aware of your rights" and 50% "if you have to rebuild society, this is a good blueprint for that". 
  8. "Stop eating junk and lose weight."
  9. "Get in shape, too. Also, a bicycle is transportation that doesn't need gasoline or electricity to operate."
  10. This is why preppers have Bug Out plans and bags. 

Even if they're from a fictional person crafted for an internet hoax, these are still good rules for survival. 

The Fine Print


This work is licensed under a Creative Commons Attribution- Noncommercial- No Derivative Works 3.0 License.

Creative Commons License


Erin Palette is a participant in the Amazon Services LLC Associates Program, an affiliate advertising program designed to provide a means for sites to earn advertising fees by advertising and linking to amazon.com.