Showing posts sorted by relevance for query solar. Sort by date Show all posts

Wednesday, November 19, 2014

Getting Started in Solar Cooking

Guest post by Paul T. Martin
Paul writes at The Suburban Dad Survivalist.

Are you looking for an easy and inexpensive way to prepare foods in a grid-down environment? Depending on where you live, solar cooking may provide you with great options beyond meal preparation.

As the name implies, solar cooking utilizes energy from the sun to prepare foods. As with any solar energy application, there are limitations to how well this works. The biggest downside to utilizing solar cooking as part of your preparedness plan is that it requires adequate exposure to the sun. Depending on where you live in the United States, solar energy options can have varying degrees of utility.

That’s not to say that people of the preparedness community should shun solar cooking if they live at high latitudes, where limited wintertime sun exposure and extensive cloud cover make solar energy applications impractical. The upside to living in high latitude areas is that in the summertime, residents have tremendous access to solar energy. For these residents, the tool may be limited to seasonal use, but given the benefits and inexpensive cost, it can broaden the options preppers have for cooking and heating water.


Why solar cooking?

Using the sun’s energy to prepare your meals has a number of advantages. First and foremost, the fuel source is free and renewable. There’s no need to store energy for your solar cooking devices. As long as you have good access to the sun, you will have the ability to prepare a wide variety of meals that you would normally prepare and modern kitchen with full utilities.

Solar cooking comes with another advantage over traditional cooking methods, in that it does not require the chef to be exposed to tremendous amounts of heat. Unlike cooking on an open fire or on a grill, solar cooking generates very little additional heat, limiting the energy transfer just to those cooking utensils being utilized in the preparation of the meal.

Many in the preparedness community are rightfully concerned about operational security and maintaining “smell discipline” during grid down operations. These people worry that the smell of smoke or charcoal may give away their activities or location. With solar cooking, there is no byproduct: no smoke and no charred remains of burnt wood. Depending on the type of solar cooking device are using, it is possible for the smell of cooked food to waft outside of your yard or property; however, that risk can be managed in large part by placing your cooking device in such a place where people are unlikely to be downwind from it.

In addition to preparing food, solar cooking devices have other applications as well. They can be used to pasteurize water (although they cannot remove non-pathogenic materials such as dirt and chemicals). Recent medical research shows that solar ovens can be used to safely sterilize medical instruments, making them ideal for use in third world applications as well as in grid down conditions. In addition, solar cookers can be used to start fires. Often when I am demonstrating my solar cooker at field day events and to neighbors, I will take a 2x4 or log and set it on the spot where you would normally place a pot. Assuming that you have the mirror angle correctly and in full sun conditions, it takes but a matter of seconds before the log or 2x4 will burst into flames.

Some people say that solar cooked foods taste better; many of the same people go on to say that it is impossible to burn food in a solar oven. While I cannot attest to taste differences between foods cooked using solar energy versus conventional means, I can certainly dispel the myth that it is impossible to burn foods using solar cooking techniques: you absolutely can burn food in a solar oven or on a solar cooker.

When many people think of solar cooking, they think of science or scout projects they made using an old box with the interior covered in aluminum foil. While it is certainly possible to make solar cooking devices, the two that I use are commercially made. Unless you are a tinkerer or are very handy at building things, I suspect most people’s success with solar cooking will depend largely upon their decision to purchase commercially made (and thus better engineered) solar cooking devices.


What kind of solar cooking devices are there?

Most solar cooking devices can be placed in one of two categories – solar ovens and solar cookers.

Solar ovens are just like the name implies: these box-like devices replace the conventional ovens you have in your home. Most of these devices consist of a box with a glass door on the front of it. Reflective panels surround the glass door, effectively reflecting the sun’s rays into the box through the glass door. The interior of the box is painted black to help absorb and retain heat. These devices are used just as you would use the oven in your kitchen.


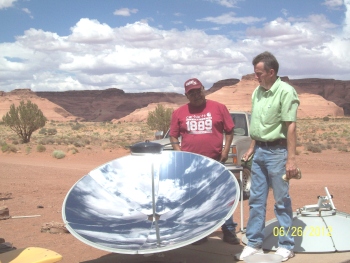
Solar cookers look a bit more exotic. These devices usually consist of a large reflective dish, called a parabola, which aims the sun’s light at an area roughly 40 to 50 square inches. Pots and pans sit on top of this area of intense energy, which is capable of boiling water, frying bacon and even setting logs on fire. The solar cooker replaces the conventional stovetop in your kitchen.

These devices vary in price, depending on manufacturing quality. You will likely pay somewhere in the neighborhood of $200 - $300 for commercially made solar cooking device.


How well do these devices work in cloudy or cold conditions?

Clouds definitely present a problem for solar cooking devices. Overcast skies generally do not bode well for solar cooking, while partly cloudy skies – when the sun is blocked intermittently – can still yield positive conditions for solar cooking. Cold weather, interestingly, has little to no bearing on the effectiveness of solar cooking. In fact, I generally find that temperatures in my solar oven are generally higher in the winter than in the summer, due to the lack of humidity in the wintertime.


What are some tips on getting started and solar cooking?

First and foremost, you’ll have to decide what sort of cooking device to build or purchase. If I were starting out, I would want a solar oven. It has more utility than a solar cooker and is easier to store. Keep in mind that when you have a solar cooker with a five foot parabola, you will need a place to store a five foot parabola. Mine hangs upside down on the ceiling of my tool shed.

Your choice of cooking containers will be as important as your choice of cooking device. For solar ovens, pots and pans that have thin walls and are dark in color work best. The thin walls allow for easier transfer of heat to the food, and the dark color aids in heat retention. You will quickly learn – as I did – that you do not want to use your solar oven pots and pans with your solar cooker. The solar cooker's energy concentration is simply too great for thin-walled cooking utensils.

For my solar cooker, I generally use either a cast-iron skillet or clear Pyrex. When you’re using a solar cooker, find the most indestructible utensils in your kitchen. I damaged a number of my wife’s various conventional oven trays and my solar oven utensils by using them with my solar cooker. Don’t make that mistake!

Solar cooking does require a bit more planning than conventional cooking. Not only must you allow the solar oven time to heat up (which can take longer than conventional ovens), but due to the fact the sun is always moving, you will constantly be making adjustments to both your oven and solar cooker throughout the day. My advice is to budget ample time to get your solar cooking device set up and oriented to the sun. Allow additional time to move the cooking device every so often to track the sun’s movement across the sky.

“Making hay while the sun shines” isn't just a folksy saying for farmers; it’s very applicable to solar chefs as well. If you see that there’s an increased chance of clouds or rain in the forecast, you may want to do as much solar cooking as you can while the sun is expected to be out.

The learning curve for solar cooking is not steep, but it does exist. The best way to learn how to solar cook is to simply practice. Whenever I obtain a new solar cooking device, the first test I always do is to see how long it will take to heat a gallon of water to its maximum temperature. Knowing this piece of data will teach you a lot about how to operate the cooking device as well as its capabilities and limitations.

There is no substitute for actually using your solar cooking devices now, when the stakes are low. Practice heating up your lunch leftovers in the solar oven. Practice brewing tea with your solar cooker. Then you can branch into making soups, baking loaves of bread, cooking a pot roast, and even frying bacon.

Solar cooking will not be the only cooking method you will want to have in your preparedness inventory, but it does provide you with a tremendous amount of flexibility without the need of collecting or storing fuel. Give it a try!

Monday, February 5, 2018

Basics of Solar Panels: Limitations

This is the first in a series of articles about solar panels, so please understand that all topics will not be covered in this one article. 

Solar Panels (specifically Photovoltaic Panels, or PV panels) are a very popular prep right now. They provide power when things go out; they have very little maintenance; they are sold as being "very green"; and they can even be used to make money from the grid in the right circumstances. While these are attractive qualities, any prepper who is considering an investment in solar power must first determine if solar panels are right for them because as awesome as PV panels are, they have some fairly severe limitations to them, and they may not be what you want.

First Major Limitation: Size
(Power Density)
I am fond of using real world measures to show people what something actually does. An iPhone X battery -- which is a fairly good benchmark for a number of things, just because so many people are familiar with it -- is rated at 4000 milliamp hours (mAh). For an average user, you will want to charge it about once per day.

To charge that iPhone, you need 3-4 square feet of solar panels.

If you have a perfectly clear day and live in a high sun area (for example, Southern California or Arizona) and it is summer and you have a high-efficiency panel, you can get your minimum needed square footage down to about a one-quarter square foot. This isn't terrible, if that really is all you need, but if you need more than that, you will have to up the square footage. Charging an appliance, such as a window air conditioner, requires 40x or more that surface area of solar panels.

If you live where I do (in a mountainous area with moderate cloud cover most of the year), you may need to double or quadruple your solar panel area just for that. Is it winter? You have fewer hours of sun, so you need to increase your solar panel footage to compensate.

Second Major Limitation: Fragility
Solar panels are basically glass-coated electronics. The ones used for mobile applications are usually very tough, and cost more, but they still break if something goes wrong. The glass also gets scuffed over time, which can cause a decrease in effectiveness along with a chance of total failure.

They can be wonderful for long term stationary applications, and even for things like RV’s, but be aware of what they are, and what inherent problems they have.

Third Major Limitation: Cost
Solar panels are quite expensive. Because they have no fuel source, they may be able to recoup their cost in time, but the up-front cost is high.

Generally speaking, you will not find small batches of solar panels (less than a pallet load) of a reliable brand for less than $1-$2 per watt. That iPhone X solar charger mentioned earlier? The panels for that cost anywhere from about five dollars and up -- sometimes as high up as the $30-40 range just for something like that small panel, due to durability increases.

Remember that you also require infrastructure for those panels: batteries to store power, charge controllers, inverters (to tie into the grid or to use for yourself) and similar. These things add up, and even if you are buying a pallet load of panels at once, it can cost quite a bit.

All That Said...
If this doesn’t scare you off, there are some amazing things you can do with solar power. I will have follow-up articles for the next several weeks explaining some of those amazing things you can do.

Monday, February 19, 2018

Basics of Solar Panels: Sizing Your Array

So you have decided that you want to install solar panels. Now you need to determine how many panels to get, and which kind.

To figure out the sizing of the components of your power system, you will need to answer a few questions first.

What Will You Be Running?

What appliances will you be running off your panels? 
The first thing you will want to do is make a list of each of your appliances that you want to use when using solar/battery power, which will form the foundation of what you will need.

As you make this list, list the power use (in watts) of each item next to it. Every appliance has a wattage rating, which tells you the amount it should consume as you use it.

For example, I have a light fixture that uses fluorescent tubes. Each tube in this fixture consumes 17 watts of power.

How many of them?

In the case of my light fixture, I can run it with 1-4 bulbs in it. Make sure to mark this on your list.

How many of them at once?
Look at your list of appliances, find which ones you plan on running at the same time, and mark them. You might (for example) mark each appliance on the list with a M for Morning, D for Day, E for Evening, and N for Night.

Add up each the wattage of each appliance used during each of these times separately, and find the highest total out of them. Take that number and multiply it by 1.1 (this gives you a little extra room so that if there is a problem, you are not stuck) and this will give you your minimum peak wattage. Go ahead and round to the nearest ten watts.

In my example, I have a light that uses 34 watts (2x 17 watt bulbs) and a laptop that uses 12 watts. You will probably want more, but this is just to show you an example.
  • 34 + 12 = 46 watts. 
  • 46 * 1.1 = 50.6 watts
I need at least 50 watts for this example. This lets me know how much wattage I will need for the inverter, to get AC (household) power from the battery bank, or directly from the panels. This will also let me know how many watts of charge controller to use, if I decide to charge batteries and use those for power.

Remember that many items will pull slightly more power as they start up than when they are in use!

Most real world systems will use much more power. I use a 2000 watt inverter at home and a 400 watt inverter when I am out doing extended camping trips. I keep a 100 watt inverter (with two USB charge ports built in) in my car most of the time, just to use for charging electronics on the go. It is better to have more than you need than not enough!

When Will You Be Using It?


During the day?
If it's only the middle of the day, you shouldn't need a lot of extra solar panels, and only a minimum amount of battery backup. 

If you are running something directly off of solar power, you will want to multiply the minimum peak wattage by 1.2, in order to make sure that you have enough continual power output. Having your equipment shut off and on because a cloud passed overhead, or a butterfly landed on the panels, and caused just enough power drop is both maddening and often damaging to the equipment. The extra power also makes up for inefficiency in the inverter itself.

In the example with the 50 watt inverter, you want at least 60 watts of solar power (50 watts *1.2= 60 watts) if you want to run the inverter directly off of the panels.

At night?
If you are using your power setup at night, you will have to have a large battery bank and a sufficiently large solar panel array to charge them during the day.

There will be a later article in this series on sizing your battery bank

In the summer? 
Days are longer in the summer, giving you more time that the solar panels can be used to power devices or to charge batteries. You will not need as large a solar panel array if you are using it to charge batteries at night.

In the winter?

Days are shorter in the winter, and panels can become obstructed by things like snow or fallen leaves. Bad weather, such as clouds, will reduce effectiveness of the panels, meaning that you must have a larger panel array in order to get the same amount of power.

If you plan on using the solar panels on a cloudy day, assume that you need between 30% and 50% more panels to get the same amount of power. Less sunlight means less power; I multiply my normal solar power needs by 1.5 in order to get a reliable cloudy day power amount.

In my example, if I need 50 watts of inverter power, and I am running the inverter directly off of the panels, I want to calculate the normal operating amount of solar power (in this case 60 watts) and multiply it by 1.5 (60 watts * 1.5 = 90 watts), giving me a minimum of 90 watts of solar power in order to generate 50 watts of power on a day with light cloud cover.

What Other Power Sources Do You Want to Use?
Will you have access to grid power on a bad day, or is this totally off grid? Will you have a gas or propane generator on hand for hard days, or perhaps a wind power generator?

Remember that if your plan is to occasionally “plug in”, either into a generator or grid power, you don’t have to worry about the worst weather and other situations. There are a number of RV users that use this method, as well as people who have off grid cabins.

In addition, if you are planning on using a generator to supplement your solar panels, you can use it to charge batteries on bad days.

Having supplemental power allows you to size your array for the majority of your use time, without having to size it large enough to deal with the extreme situations.

A Note on Batteries
I strongly prefer charging my battery bank from the solar array and using that to power my appliances and electronics. Having a battery bank means that if I have slight cloud cover it is not an issue, and if I want to watch a movie on my tablet after dark it is not an issue.

While it is possible to run things off of the solar panels directly, I strongly recommend that you also have at least a small battery backup from which to charge.

Monday, February 12, 2018

Basics of Solar Panels: Terminology

For part 2 of my series on solar panels, I give definitions of basic terminology.

Power

AC/DC

Aside from being an excellent Australian rock band, AC (Alternating Current) and DC (Direct current) are methods of delivering electrical current.

AC (Alternating Current) means that the current switches direction back and forth.

DC (Direct Current) means that it flows in one direction between the positive (+) and negative (-) poles.

Electrical power is often expressed as (Voltage) (Current type). For example, household power is usually 120 volts AC, whereas automotive systems are usually 12 volts DC.

As a useful note, Amps x Volts = Watts.

Amperage
The ampere, or amp, is a unit of electrical current.

Amp Hours are an Amp of Power (unit) over an Hour (time) at a specific voltage. If I have 10 amp hours at 12 volts, I can draw 1 amp for 10 hours, or I can draw 20 amps for ½ hour.

If you need to convert amp hours, remember that Amps x Volts = Watts, so 10 Amps at 12 volts = 120 watts, and 1 Amp at 120 volts is also equal to 120 watts.

Because of this, I prefer to convert things to amp hours.

Voltage
A measurement of electrical force. The most common voltages for solar panels are 12 volt (most automotive systems) and 120 volt (United states wall voltage). Mostly needed (for this) in order to convert other units

Wattage
Wattage is a measurement for electrical power. It is often the easiest way to establish a constant electrical draw amount, even when discussing radically different voltage amounts.

Watt hours are a watt of power over an hour of time. This can be useful as a measure of power draw. If you have 100 watt hours of storage, you have 100 watts of power for 1 hour, or 50 watts of power for 2 hours, or 10 watts of power for 10 hours, etc.

Hertz (Hz)
Cycles per second. Usually used to refer to AC power, which in the US runs at 60 back/forth cycles a second. When talking about solar power, this is mostly used when dealing with inverters (see below).

Ohm
A measure of electrical resistance. The higher the ohms, the harder it is to get power through to something else. A device with high resistance will typically cause inefficiency.

Parts

Mono/Poly Crystalline

A type of solar cell.

Solar panels made up of Monocrystalline cells are more expensive, but more efficient. They tend to have a black color.

Polycrystalline are less expensive, but less efficient. They tend to have a blue color.

Solar Cell
A single Photo Voltaic cell. Several of these together form a panel.

PV (Photovoltaic)
The most common type of solar cells. They generate electrical energy from sunshine.

Charge Controller
A device that interfaces between a charge source (in this case a solar panel) and a battery, allowing the battery to charge. These come in several styles, such as Pulse Width Modulation, On/Off, and Maximum Power Point Tracking.

Charge controllers are not usually 100% efficient, so looking at the efficiency rating can make a big difference.

Some charge controllers include something called a DC-DC converter. This is used to change the DC voltage to another voltage.

Accessories

Battery

A battery is a device to store electrical energy. They come in several chemistries, such as:
  • Lead Acid, the most common. This is the type of battery that cars use.
  • Lithium Ion aka Li-ion. These are usually laptop and cell phone batteries. 
  • Nickel Cadmium aka NiCad. Mainly used in older power tools. 
There are also several types of battery, such as:
  • Deep Cycle, meant to be used when you will frequently discharge the battery, such as during off-grid living. 
  • Absorbed Glass Mat aka AGM, aka Gel Type. A type of battery designed to be a good mix of power density and durability, it will not spill if it is tipped over making it a good choice for a vehicle.
Several extensive articles can be written just about batteries, and I recommend that anyone serious about solar power do more research into them.

Battery Cell
The smallest individual part of a battery. When one of them goes bad, the entire battery dies.

It can also be important to know the number of cells and voltage per cell in a battery, in order to determine the total voltage.

Inverter
An inverter converts electricity from DC power to AC power. The most common inverters convert 12 volts DC to 120 volts AC.

Inverters come in several types, such as
  • Pure sine wave: The most expensive, but the least harsh on electronics and other equipment.
  • Modified sine wave: Most inverters are like this.
  • Square sine wave: Only a few very, very inexpensive inverters are like this. They typically have trouble running anything electronic, or with complex electronic circuits.
Inverters are rated in watts, in order to provide a constant measure between voltages. They are rated in continuous power (you can draw this much power constantly, and it should not cause any problems) and peak power (you can go up to this amount briefly, but if you keep drawing this, it can cause damage to the inverter).

If an inverter is rated at 120 watts, that means that it can convert 10 Amps at 12 volts DC (a car battery) to 1 Amp at 120 volts AC.

Off-Grid
This is a general term for being self reliant in power production. For example, if I own an off-grid cabin, then it is probably not hooked up to city power, and I may have a solar panel array or a generator.

Off-grid can also be used to refer to things like having your own heating, sewer, or other utilities. It may also be used to refer to producing your own food and/or fuel.

Saturday, November 28, 2020

Bug Out Batteries

Not actually Erin.
& is used with permission.
I had hoped to write my annual "Cool Black Friday/Cyber Monday Deals!" post this weekend, but either I'm out of the loop these days or manufacturers just aren't having any specials on interesting products any more. Sure, you can find some great price cuts out there, but I just can't find anything which is so exciting that I have to share it with you. I know that this isn't the first time I've said this, but I think it will be the last; consider it yet another institution that 2020 has killed. 

That said, I'm going to continue with Part 2 of my "Alkaline or Rechargeable?" series, this time focusing on how I plan to recharge my electronics in the field. 

While you can always bring along Goal Zero solar panels such as the Nomad 7, I find them to be just a little too large and a little too fragile for me to be comfortable with putting them inside a backpack that may see rough treatment. I'm still getting a lot of use out of my (now sadly discontinued) Brunton Explorer, which folds up into a handy 9.5" x 5" x 1.25" package -- about the same length and height as most road maps. 


The Explorer has two drawbacks, which to me are quite minor:
  1. It doesn't charge Apple products very well.
  2. It only has a single USB output. 
I've solved the problems of both by pairing it with a Panergy Solar Charger & Battery Bank. Now, I will be the first to say that the Panergy takes a long time to charge; even the manufacturer states that it will take between 6 to 8 hours to charge it to 5-10%... but I didn't buy it for its solar panels. No, I bought it for its 10,000 mAh battery pack and its dual USB outputs. 

https://amzn.to/2KGZPus

In case it isn't obvious, I charge the battery bank with the much larger Brunton solar panels, and then I use the battery to charge my electronics. What's more, while I am not certain that the bank can be recharged by both solar and USB input, I note that the solar indicator lights up in sunlight even when attached to house current via the input plug. I haven't tested this, mainly because the bank holds onto power for a long time (I bought it in March, and it arrived with what seemed a full charge, and 6 months later it still indicated a nearly full charge), and I just haven't been reminded to drain the battery, time how long it takes to charge with the Brunton, then drain it and time how long it takes to charge with the Brunton and its own solar panels. Hopefully I can remember to test it on a bright, clear day and if I can I'll post the results here. 

However, solar isn't my only method of recharging! I also have in both my Bug Out Bag and my Get Home Bag an Eton FRX2, a great piece of kit which I recommend to everyone. Not only is it a hand cranked generator for those days when you can't recharge via solar power, it's also a flashlight and an AM/FM/NOAA Weatherband radio. Everyone needs something like this in all their preps, and I cannot say enough good things about this brand. It's currently a steal at $22 on Amazon. 

Finally, let's talk batteries themselves. I've given you ways to recharge internal batteries, but what about external ones? 

For AA and AAA batteries, I recommend the Guide 10 Plus recharger from Goal Zero. Not only is it a recharger in itself, but it can also serve as a battery bank for anything which recharges with a USB cord.

However, there are some things you need to know about this charger:
  1. The input is Mini USB, not Micro. This is critically important!
  2. You must have 4 batteries in the Guide 10 before it will charge. They don't all have to have the same charge, but you need 4 or it won't work. 
  3. You cannot mix AA and AAA batteries. The AAAs have an interior adapter sleeve that cannot accommodate AA batteries. 
  4. While you cannot recharge alkaline batteries with this (nor should you try), you can still put them in the Guide 10 to serve as a battery bank. Yes, this means you can use AA batteries to charge your cell phone if necessary. 
If you looking to recharge a Lithium-Ion battery in the field, then I suggest the Nitecore UM20 charger. Unlike the Guide 10, the UM20 can charge just 1 battery, or two batteries of different size, and its input is Mini USB. Like the Guide 10, however, it can also be used as a battery bank, which increases its usefulness. 


Finally, there are AAA to AA converters. These are plastic sheaths into which you stick a AAA battery so that it will fit inside a case designed for the larger AA. I keep about 4 in my BOB, just in case I need them, and they're so lightweight that I don't even notice them. I'm told they're also great for reducing the weight of an electronic device, although I imagine you'd have the change the batteries more frequently. 

Those are all my tips and tricks for recharging batteries in the field. Do you know of a technique that I missed? If so, please tell us about it in the comments below. 


Monday, April 27, 2015

A Thorough Look at Solar Power

Today we have a guest article from someone who has spent 25 years in the solar power industry. This is going to be a fairly technical article, so get ready for some math. The prices involved may be more white collar than blue collar, for which the editor apologizes.

This article is an entrant in the 2nd Annual BCP Writing Contest.


Electric Power: Steps Toward Self Sufficiency
by Craig Wiles,  Renewable Energy Consultant


If you've ever thought "I want to be energy independent, but I don’t have the money to do it all at once," you'll need to answer a few questions.

Question 1: “How much energy do I need?”
The monthly utility bill we get right now has on it somewhere a number of Kilowatt Hours Used. These may well be expressed as KWH’s.

This is the amount of energy we use now, and what we would like to have available. We may be able to get by with less, but we don't, because we would be doing it now if we could Besides, our goal is to be able to live the way we live now.

Question 2: “What are the steps I should take to get to my goal?”
The easiest power backup is a generator, but it burns fossil fuel and you have to run it even if you want to power just one light bulb.

Adding an inverter/charger and a battery bank lets us charge the battery for four hours a day from the generator, and then run off batteries the other 20 hours of the day.

Every time we add a solar panel to the system we reduce generator run time.

Question 3: “How do I do this right the first time?"
The answer to this question will unfold as we detail each of these steps.


Step 1: Generator
This is what I call “The search of Goldilocks”as most people buy a generator that is too big, and then they end up burning more fuel than necessary because they aren't using all the power that generator provides.

Which Fuel? 
  1. Propane is the best fuel for long term storage. A buried propane tank will always be my first choice. 
  2. Diesel fuel is my second choice. With the right additives, diesel will last ten years. 
  3. Gasoline is my last choice, although many people will start here because of the lower cost generator.
What else?
  • Water-cooled engines tend to live longer than air-cooled ones, but the liquid-cooled models tend to be too big for the average homestead. 
  • Electric start is a nice option because we can tie it to the renewable energy system to start automatically if the batteries get low. 
  • The waveform, or how clean the output is, can be important if you are grid inter-tied and want to sell back to the grid.

Recommendation
My first place choice for best generator is the Honda EU7000.

Step 2: Batteries
Batteries are one area where it might be okay to plan on replacing them as we go along. Almost everyone kills a set of batteries as they learn about living with solar power; better to kill a cheap set and get your learning done with them, than to learn the same lessons from a very expensive set.

Battery Options
  • T-105s, also called Golf Cart batteries ,are very good starter batteries with an expected life of 3-5 years. If you need more capacity you can add a second set of batteries, also known as a "string". Try and avoid more than two parallel strings; electricity is lazy and will take the path of least resistance (which is your best string) and the weaker strings will get neglected. If you have to have more than two strings, be sure and have some switches so that you can force charge any single string. T-105’s are six volt batteries. 
  • L-16 is a battery size which is the same footprint as golf cart batteries but over twice as tall. This is the next step up in size and cost. These are also six volt batteries.
  • L-16 - Two volt cells are another good step up. These will let you have a larger bank without having too many parallel strings. Although these are 2 volt batteries, they are really a conventional L-16 that has been paralleled internally. You really have three strings with these (2 volts times 3 parallels = 6 volts), which is the maximum number of strings you should have. Another down side to these is that you must still water each cell cap even though the plates are paralleled internally.
  • Fork lift batteries are another step up in size, capacity and money. Now we are into taller cells which have a different routine of care than the shorter cells. You will need to charge them harder (they really like to boil) and will take more water as a result. Make sure you have enough power to charge your battery or it will sulfate faster, shortening its life.
  • Top of the line are the big industrial cells like Hup Solar Ones, Surette and several others. These are also two volt cells in series, but are designed for off grid life. You can spend $20,000 on a set of these, but they can last 20 years.
  • Sealed batteries are available, but they cost more and don’t live any longer, and so are not detailed in this discussion. If you are not going to be ACTIVELY involved with your system; get sealed batteries.
  • Avoid used batteries!!!!! I can’t stress this enough. They were being gotten rid of for a reason, and it’s probably not the reason you were told. 
Recommendation
Start with a set of golf cart batteries and expect to replace them in three years with the best ones you can afford.

Step 3: Inverters
We have several dozen choices of utility inter-tie inverters, and almost as many choices in off-grid inverters. If we want the ability to sell electricity back to the power company (that's what "utility inter-tie" means) and the battery backup capability of the off-grid inverters -- and we do -- then we have just a few choices. The other thing we need with our inverter is a built in charger, which these have:
We need an inverter that will run our largest loads. These can all be “stacked” if we ever need to add more inverter power.

Step 4: Adding Solar Electric
Now that we have our generator, battery bank and inverters in place, we are freed from having to run the generator just to turn on a single light bulb. Running the generator from three to four hours per day gives us enough power to live off the batteries (through the inverters) for the rest of the day.

At this stage, every time we add another solar panel we will reduce generator run time. When considering solar panels we are looking for several things.

Price: Always price PV (photovoltaic) panels by the watt. Most “building block size” panels will be between 200 and 300 watts. We don’t worry much anymore about what voltage the panel is, because the Charge Controller will take the high voltage of the array and bring it down to battery voltage through a process utilizing MPPT (Maximum Power Point Tracking). Panels will be wired in series up to 150 volts or even more depending on the charge controller. Watch out for too many small panels, or you could spend more on interconnecting wires than necessary.

I usually try and include shipping in my final cost, i.e. “price per watt delivered on site.”

Reputation/Reliability/Warranty: There are, without exaggerating, hundreds of new solar manufacturing plants that have opened within the last few years. Dozens have gone out of business. Choosing a company that might be around in 25 years will be difficult (I can only name three still in business from 25 years ago.) Because PV panels are so reliable and trouble free, this is not as big a concern as it would be with some products. If it works for the first year, it should work for the rest of your life.

Efficiency: Solar panels are constructed in four different ways.
  1. Mono Crystalline: An ingot of silicone is sliced into thin pieces to make solar cells. (these often appear black) Efficiency: The Best. 
  2. Poly Crystalline: Leftover chips of silicone are compressed into a wafer and made into cells. (these often appear blue) Efficiency: Very good. 
  3. Amorphous silicon or (thin film): Silicone is liquefied and sprayed on in layers. (these often have a reddish tint) Efficiency: Very Low. 
  4. Ribbon string: Molten silicone is “drawn up” on two wires with surface tension forming a ribbon of silicone which can be sliced into cells. Efficiency: Very good.


    Recommendation
    Favorite charge controller: Outback FM80,


    A word about system voltage
    The national electric code has some voltage “breaks” that tend to have designers limited in what voltage is available. With a battery based system we have three usual choices: 12 volt, 24 volt, or 48 volt.

    Higher is better. Unless there is a very good reason, always go with the higher voltage. Here is an example of why:
    • An Outback FM 80 charge controller can handle, 12, 24 or 48 volts.
    • Figuring on using 215 watt panels, we could fit 4 of them on one charge controller at 12 volts.
    • At 24 volts we can fit nine 215 watt panels per charge controller;
    • At 48 volts we can fit eighteen 215 watt panels per controller.
    • At $750 per controller, this can make a bug difference in a large system.

    How many panels?
    At the beginning of this article we figured out how many Kilowatt hours per month we use from our electric bill. Take that number and divide it by 30; this will give you an idea of Kilowatt hours per day. That number is how many panels you are working toward to live like you do now.

    We get between 4 and 5 hours of sun per day on an annual average (This will vary by where you live, but this is a general estimate) and your panels will likely be between 200 and 250 watts each so this is a pretty decent estimate:
    250 watt panel times 4 hours of sun = 1 kilowatt hour.
    200 watt panel times 5 hours of sun = 1 kilowatt hour.
    Most likely you will need to add panels in strings of three.
    Three 250 watt panels times $1 per watt = $750
    This is the size “step” as you add more panels. There will also be racking and wire and a few other items as well, so figure $1000 “steps”. I don’t know of a more stable investment you could make at this time.

    I already have grid-powered electricity. Are my steps the same? 
    Because of some very nice legislation promoting “renewable energy” we may be able to take advantage of what is called “Net Metering” -- which means that the electric company will go back and forth with you at retail level till the end of the billing period. Check your state laws to ensure that this is an option for your location.

    So while you're at work all day and the sun is shining, you can (in essence) run your meter backwards, and at night when you flip on all the lights you would run it forward. Every time you add another solar panel you reduce your electric bill until you are down to the monthly meter charge. With net metering we get to use the grid as if it were our battery at 100% efficiency rate (batteries are 80% at best).

    Thanks to micro inverters we can grow a system like this in very incremental steps.
    1. There will be a one-time installation of a breaker and a disconnect switch.
    2. Each PV panel is $250. 
    3. Each inverter costs $200.
    4. Rack and mounts $100, labor $100. 
    Our steps come out to be $650.

     Caveat: If the grid goes down, you go down. There are no batteries in this system.

    However, there is one inverter, the Sunnyboy TL series, that provides one circuit of power when the grid is down and the sun is shining. It is becoming a very popular string inverter. We can add it to a battery-based system later on (AC Coupling) but there would be some redundancy of steps.

    Expect a grid-tie system with no batteries to run about $3 per watt total cost.

    How good an investment is solar electricity?

    • A 250 watt solar panel costs $250.
    • A 250 watt solar panel will average just over 1 Kilowatt hour per day. (4.3hr ave)
    • At $.10 per KWH, this panel will generate $36.50 per year.
    • $36.50 return on $250 equals a 15% return on investment. This does not factor in inverters and other pieces of equipment, just panels.


    Best wishes in your quest for energy independence!

    Monday, December 18, 2017

    Guest Post: Laptops and Cellphone Post-Disaster

    by George Groot
    George is a member of our Facebook Group and has written for us before.

    In the event of a major but temporary disruption to normal life, keeping things as “normal” as possible for my children is something that I try to do. Several years ago during a tornado warning we spent a few hours in the basement and a laptop with some videos was enough to keep the kids happy.

    But what do you do when a few hours turns into a few days to a few weeks? Assuming that you have some form of alternative energy such as a generator or solar panels, and a battery bank to store electricity, you might be just fine recharging laptops, tablets, or cell phones from that alternative power source. However, if you don’t have a general purpose alternative electricity source, there are a number of portable solar charging options just for portable devices.

    Solar Recharging

    Cellphones
    As a rule of thumb, more surface area for solar panels is better. Anything that is a battery bank with just a single solar panel will be pretty useless as an energy source; battery banks need at least three or four fold-out solar panels in order to get into the “worthwhile” category. For example, this solar battery bank advertises 10,000 milliamps of energy after 20 hours of charging, which is actually useful for a smartphone that uses about 1,800 milliamps of power for a full charge. With 10 hours of daylight, at 100% efficiency and working as advertised, that’s 5,000 milliamps. Even if you drop the efficiency to 50%, that’s still 2,500 milliamps, which is enough to charge up that smartphone or most tablets. 

    Laptops
    An even larger option is made by the popular Anker brand, and it comes with an 18 volt outlet, which is enough to charge most laptops (although many are set to receive an input of 19 to 19.5 volts). Not all laptops are great options for solar charging, though; a very high efficiency “ultrabook” style laptop will be a very good option, while a “desktop replacement workstation” will be much harder to keep charged. For example, the 4th generation Core i7 processor has a 47 watt power draw at full power, where a 4th Generation Core i5 is only 15 watts. The Core i5 has half the processing cores as the i7 of the same generation, but less than a third of the power consumption at max load (although the i7 can handle a much larger max load, we are talking playing kids games or movies to keep them out from underfoot). 

    This shouldn’t discourage you from getting an i7 based system, though, as many ultrabooks use the i7 processor knowing that it has a variable power requirement based on load, so in practice they can often work on battery power for much longer than “business class” laptops using the same generation i5 processors because the entire package is meant to be more efficient. What you should look for is total battery capacity and advertised usable time under battery power; an ultrabook should be good for over 10 hours on battery power with a new battery. As batteries age, that number will go down.


    From Recreation to Communication 

    Apps
    I believe that smart phones are one of the handiest pieces of communications gear that a prepper can have after a natural disaster. While voice telephone calls eat up a lot of bandwidth, SMS messages are tiny and can allow people to communicate in and out of the affected area with reasonable latency. Also, communications apps such as Zello have been used to coordinate local groups of disparate people, such as South American opposition political parties or volunteer search and rescue groups helping in the aftermath of Hurricane Harvey.

    Mesh Networks
    Even if there is a complete failure of the cellular network, smartphones can be used for local communications via “mesh network” solutions like Serval, and Sonnet is an interesting project that I hope becomes a reality.

    If you can find good versions of the Linksys WRT-54G router at thrift stores for a few bucks, you can build mesh net infrastructure. It won’t be as sexy a solution as Sonnet looks like, but as long as you can keep them powered they will keep people connected. Every time I see a version 2 WRT-54G at a Goodwill, I pick it up. They are generally priced in the 5 to 10 dollar range, and even the later version 5 and up models can be useful when loaded with DD-WRT or Open WRT firmware.

    Be aware that using WiFi as a primary communications channel will often suck a smartphone battery dry much quicker than the cellular radio connection. This is because the power management for a cell radio is much more “passive” than the WiFi radio, which was designed for computer networking and which keeps the device registered with the Wireless Access Point (WAP) constantly rather than on an “as needed” basis.


    I hope this has been an interesting and informative look into how to plan for a power budget in the event of a disaster, although you don't need to wait for an emergency to put them into practice; the concepts are exactly the same as if you were going to do some remote camping and wanted to bring your power source with you.

    Wednesday, October 15, 2014

    Prudent Prepping: Goal Zero Guide 10 Plus Solar Recharger test

    The dust has settled and the First 72 Hours have passed. Now we concentrate  on what to do in, and how to plan for, the long term via Prudent Prepping. 

    The Goal Zero Guide 10 Plus is the second solar charger I have been able to test. This model is borrowed from a friend, as his camping trips are over for the year due to his kids being back in school. As several commenters on the blog and Facebook have said, "Why use a short run-time novelty battery (see my previous post here) when a standard rechargeable NiMH AA cell has a longer base run-time and is readily available?"

    Why, indeed?


    Goal Zero has a full line of solar powered devices, from camp lights, reading lights and flashlights to large solar powered chargers that can be used to reliably back up critical medical equipment, small freezers and refrigerators.  The products are well-described and sorted by both type and intended use. The specifications are clearly marked, linked, and very easy to read and understand. I was also impressed with what would have been labeled with the boring 'FAQ' header seen most places on the Internet, with Goal Zero now calling it, simply, 'Learn'.


    This package from Goal Zero has several very good things going for it:
    • Light weight- the solar panel weighs under 13 oz and 4 AA batteries and charger pack add less than 7 oz more.
    • Direct charging to your devices.*
    • Ability to 'chain connect' several panels for faster charging.
    • Multiple output leads for charging a wide variety of devices .

    Pictured is the back of the Nomad 7 solar panel (top) and (L to R) the 12v car adapter, Guide Plus Recharger and four AA batteries, and AAA battery adapter for the Guide Plus Recharger.

    If you look closely, the two output leads can be seen coming out of the distribution block, next to the green 'Zero' on the lower left. These two leads are a mini USB (male) and the line-out from the solar panel to the charging pack. Also on the power block mounted on the panel is a standard USB (female) port, for all other devices that will accept this connection for charging.

    Barely seen is the black mesh flap that zips over all the accessories, making a pouch that easily holds everything with room to spare.


    Front view of the solar panel.


    View of the panels with the magnetic flap holding them closed.


    The Test

    As in the first test, I started with drained cells, which was easy since the AA batteries were dead when I got the kit. In my experience, NiMH batteries are more susceptible to to battery death from being allowed to discharge all the way down than  comparable Li-Ion cells. For best life and results, I recommend charging your batteries on a schedule or as you see that they are running down.

    The 4 AA batteries were installed in the Guide 10 Plus, connected to the panel and placed in the afternoon sun. After approximately 4.5 hours**the cells were charged.

    From Goal Zero's website:
    Recharge times for the Guide 10

    Charging From

    • USB 6-10 hours
    • Nomad 7 solar panel 3-6 hours
    So my recharge time fell right in the mid-range of expected results. The company states that a fully charged Guide 10 (please see link for detailed specs) will charge three MP3/iPods, two smart phones, or one GPS or e-reader, but as always, your mileage may vary.

    Since I only have access to one phone (iPhone 4S), e-reader (Nook) and MP3 player (iPod Nano) there was no chance to see how many of the same small items were actually able to be recharged from the battery pack. I did try to see how far the stored charge would go by charging my iPhone up from 25% to Full, the Nano from Dead to Full, and then try to charge the B&N Nook as much as was left, which wasn't much (10%).

    I would expect run-times to increase every recharge with new cells (it could take 5-10 times to reach the max) but since this kit is 6-9 months old with an unknown number of charges and no idea on my part how often these batteries were allowed to run dead, I would guess this is typical.

    As a bonus, there is a small LED light on the face of the Guide 10 Plus which is rated at 100 mW, about what you get with those keychain fob LED's. I'm not sure of the run time of just the light, but it should be a long time!


    Charging Direct-to-Device

    Goal Zero states that charging is possible directly from the panel to your device, but the time required will be much longer than using the Guide 10 Plus Recharger. I attempted to do this, but failed. The weather has been typical for North California this time of year -- temps in the 70's to high 80's and very clear.  This made the recharge test easy overall, but not so easy when testing charge times with my phone. Even in the shade, the surface of the table was too hot for my iPhone, and the Over Temperature warning came on after about an hour.** In that time the phone did get charged 10% .This is much less than expected for an hour's direct connection to the panel, and I take full responsibility for not getting a good, repeatable test with this system.


    Recap

    Good:
    • Light weight, less than 1.25 lbs, batteries included
    • Small size, 1 1/2" x 6" x 9"
    • Easy on-board storage
    • AAA adapter included 
    • Ability to recharge direct for the panel or from the battery pack

    Not So Good:
    Nothing to speak of, except the price. At the Amazon linked price of $119, it is out of my price range at the moment -- and, I expect, out of the price range of many Blue Collar Preppers.


    Rating

    I have to give the Goal Zero Guide 10 Plus kit 4 1/2 stars!  With more time to play I might have given it 5 stars. If your budget can handle it, this is something worth consideration if you need a solar charger and battery kit.


    Footnotes

    * Check with your device manufacturer's instructions. All items may not be compatible with the output of this panel (direct connection) or battery pack.

    **All charging and fail times listed are approximate to within 15 minutes. I have a life and didn't watch constantly.


    As always, if you have comments, suggestions or corrections, please post them so we all can learn. And remember, Some Is Always Better Than None!


    NOTE: All items tested were purchased be me. No products have been loaned in exchange for a favorable review. Any items sent to me for T&E will be listed as such. Suck it Feds.

    Tuesday, July 25, 2017

    Be (Solar) Still

    It's the height of summer, and it's been a scorcher. If you found yourself stranded where I live, you might not make it 3 days without water.

    Running out of water doesn't have to be a death sentence, though. Using just minimal gear, you can pull water right out of the ground. In addition, the same technique can be used to purify questionable water.

    All of this operates on the principle of distillation, but instead of using a pot and a stove, we'll be using the sun and simple dirt.

    Building a Portable Solar Still
    1. Pick a site that gets full sun for as much of the day as possible. 
    2. Dig a hole 1-2 feet deep and 3-6 feet in diameter. 
    3. Place a wide-mouth vessel on the bottom of your hole near the center to catch water. 
    4. Cover the entire hole with a trash bag or other plastic sheet, anchoring the edges with rocks or dirt. 
    5. Place a small rock or weight on the plastic and over your catch vessel.
    If the dirt in your hole is wet or moist
    Just sit back and let the sun go to work. The plastic sheet traps heat in the hole, causing water to evaporate from the ground. This water condenses on the plastic, then runs down to the low spot created by the weight before dripping into your vessel.

    If the soil is dry or you want to generate more water
    You can give your still a bit of a kick start by adding green vegetation or brackish water to your still to be processed. You can also urinate beside your still and reclaim some of that water.

    The Extreme, Fixed-in-Place, Solar Still
    If you have the time, energy, and materials to make this, you will find it much more efficient than the portable version above. The Extreme Solar Still comes from a March 2012 Survivalblog aricle by Jim B.

    http://photobucket.com/gallery/user/DaExtreme/media/cGF0aDpEIFN0aWxsL2VkN2M4NjUxLmpwZw==/?ref=
     When laying this shell shape out on the ground in the size that you would need, you will have to make sure that the top rounded side of the shell points away from the sun’s tracking through the sky. In North America that would be to the north. 
    The top rounded section, or north side, would function much the same as the conventional still with sloping sides with approximately 25-45 degree angles, to as deep as you need the hole. The slopes would end not in the center, but on the bottom side of the shell shape about three quarters of the way down from the top, on the south side.  
    The bottom of the hole is not one level. At the bottom, the “tail” end of the shell is a raised shelf. This shelf will hold the catch pot.
    http://photobucket.com/gallery/user/DaExtreme/media/cGF0aDpEIFN0aWxsL2VkN2M4NjUxLmpwZw==/?ref=
    The added vegetation makes two things happen. First, it will add more moisture to the distillation process, and second, it will help the bottom of the hole to be a darker color, if you have a light soil. Dark colors absorb more heat. This is also the time to add any other items of moisture. 
    The second thing that you should add is small rocks. Not too small, about fist or palm size or bigger, and flat if possible, any shape is okay if not. The ideal rocks would be very dark river rocks about 4-6 inches around and 1-3 inches thick. [...]The rocks should be placed along the inner sides and bottom of the still. They serve two purposes. The first is that they collect heat, being a darker and a denser material. And second, they hold that heat past the time when the sun drops below a level that hits your solar still. This will change the name of your solar still to the “stored heat radiation still”.
    Not everyone will be carrying a length of tubing long enough to reach comfortably from the top to the bottom of the still and also be secured. Not having to open the still after its closed, however, will help with maintaining continuous heat trapped in the solar still. Any loss of heat will take a period of time to regenerate. 

    While not a long-term solution, a solar still can generate 1.5-2 quarts of water per day if you provide moisture for it to distill. It can keep you alive for quite a while after running out of the water you brought, with minimal effort on your part.

    There's water, water everywhere, so find a way to drink.

    Lokidude

    Thursday, August 1, 2019

    Making a Home-Made Inverter

    I'd love to have the money for a large solar array, something that could gather enough electricity and be able to store it so that I could run most of my house off-grid. Maybe in a few years I'll be able to start building that dream, but for now I'll have to be content with puttering around with small-scale solar power.

    Not that the small-scale stuff is useless; it's a great way to learn more about the individual parts and get some hands-on experience that may translate into good practices if/when I ever get a larger system set up. I have a 50 Watt panel hooked up to two deep-cycle, 100 Amp-hour, batteries at the cabin we built years ago, which is more than enough to keep our cell phones charged and run a few LED lamps when we spend a few days up there. The inverter my friend installed in the system will put out 120V AC for the few things we have that run on standard household power, but it wasn't cheap and it's a small one. I've been looking for a small system that I can play with at home, something to use as a test-bed for projects that I tinker with when I have the time.

    While sorting through my various electronics and electrical toys, I've found a few that run on non-standard voltages and their chargers all use 120V AC:
    • Handy-talkies that require an amateur radio license to use legally (I'm studying for one) have a 7.4V battery.
    • The cordless tools that I buy use a 20V DC battery pack.
    • My laptop computer runs on a 19V DC battery. 
    • There are a few others that fall into the same category of “useful but not available in my standard voltages”*, so I've been looking for a way to keep them running. 
    The ideal method would be a solar panel hooked up to a battery bank with an inverter to output 120V AC so I can use the chargers that came with each device, but those are expensive if bought new. so it's time to scrounge around and see what I can find or modify.
    Like selecting a caliber of firearm, I try to standardize my electrical toys. I've settled on 4 systems that cover most of my needs:
    • 1.5V DC: AA and a few AAA batteries to feed the flashlights and small radios. Common and cheap, with good rechargeable options available.
    • 5.0V DC: Standard USB power for charging cell phones and electronics. Easily converted to by using car chargers and “wall warts”. Rechargeable power packs are cheap and easy to find, we've reviewed a few over the years.
    • 12V DC: Car battery power as well as the standard output for home solar arrays. Deep-cycle batteries aren't cheap, but will last for years if maintained properly. A deep-cycle marine/RV battery will work longer than a car battery due to differences in the internal construction making them more tolerant of deep discharge, but giving them less surge (starting) capacity.
    • 120V AC: Standard household power, not as easy to convert to as the DC choices, but it comes in handy for running the tools and toys that you can find in most stores.
    There are other options that I've chosen to avoid, like the lithium-ion rechargeable batteries for some of the higher-priced flashlights (18650- 3.6V) and the higher voltage AC (208/230V AC and 3 phase power) that I have limited need for and can survive without. I like flashlights but I don't need one that can be seen from the International Space Station, so the simple LED lights that I use are just fine. Likewise, the only things in my house that use 230V AC are the air conditioner and the furnace blower motor. I can live without air conditioning and have back-up heat if the furnace is out. I'm looking into a 120V AC blower for the furnace to be able to run it off of my small generator, but that's a project for the future right now.

    The computer techs at work recently upgraded several of our networked systems and they brought in a complete change of equipment. The PCs were too outdated to be of much use, but they also replaced the Uninteruptable Power Supplies (UPS) that several of them were hooked up to. I managed to snag one out of the dumpster and took it home to play with.

    A simple UPS is a battery charger feeding a battery and an inverter at the same time. As long as 120V AC power is available, the UPS will keep the battery charged and the inverter supplying 120V AC to the outlets. If the main power goes out, the battery will feed the inverter without a pause or interuption. This means we have the basis for a simple home-brew solar power system, just minus the solar panels.

    The battery in the UPS I found was dead and while I could easily replace it for less than $50, it is rather small at only 6 Amp-hours. With a few crimp-on connectors and some longer wires, I can hook it up to a standard car battery or marine/RV battery and get closer to 100 Amp-hours as the UPS will “invert” the 12V DC from the battery into 120V AC for the appliance.

    Even after buying a new batter, I still got a combination battery charger and inverter for free. This inverter is rated at ~250 Watts, so it's not going to run a microwave oven, but is more than enough to keep a ceiling fan going at high speed (about 100 Watts at most). Charging a laptop or portable DVD player to keep the kids entertained after the sun goes down may be close enough to their version of normal to relieve some of the stress and anxiety in a SHTF situation.

    Connecting a solar panel to the battery will charge it, but how fast it charges depends on the size of the panel. There is some electrical balancing involved in adding batteries and panels to a system (stay with all the same size/brand of battery and panel and you'll be fairly safe), but in a pinch I can at least keep some of my odd-ball electronics up and running.

    For a better explanation of solar arrays, we posted a thorough article a few years ago. You can also use search for posts with the "solar" tag by clicking on this link, or this use the search box in the upper left corner to find our posts covering basic electricity.


    Keep your eyes open for chances to repurpose things. Businesses toss out lots of stuff that is outdated but still works, and your local online sales sites or thrift stores may have used UPS units for sale at much lower prices than buying new.

    Tuesday, March 10, 2020

    Real World Solar Charging

    I've said in the past that my camp trailer is a huge part of my emergency plans, and that still holds true. Part of using my trailer as a bug out vehicle is being prepared to be as off-grid as possible, and that means learning to live on limited resources.

    This winter, my parents gifted me a set of RV solar panels that they have no real use for as virtually all of their RV time is spent in parks with full hookups. Most of mine is as well, but there are places that I enjoy camping that do not have utilities at each site. In these places, you're constrained to what you can haul and what you can generate, and these constraints mean I have 58 gallons of water and whatever amperage my batteries are charged to when I leave home. When I reach the ends of that, I need to either be headed home or have a way to resupply.

    Today we'll look at recharging those batteries. Without an electrical outlet to plug into, my charging options are pretty limited:
    1. I can hook my truck electrical system to the trailer, similar to jump starting, but that's very inefficient and doesn't provide a good charge to RV batteries. 
    2. I can hook a generator to my trailer and create 120v power, which works very well with regards to convenience and utility, but it is quite loud, which the neighbors don't appreciate. Generators are also fairly heavy, require regular maintenance, and take up quite a bit of space. 
    3. Use a small solar array.

    We've discussed solar power before in various use cases, but not this particular one. RV solar arrays are easily portable, collapsing into a footprint that fits easily into storage compartments. They're commonly available with up to a 400 watt output, with the majority of them being in the 100-200 watt range. They're not big enough to effectively power home systems, but they provide far more power than the small cell phone type solar chargers.

    The panel I have is a single-pane 40 watt panel with a 7 amp charge controller. This means that I could add a second panel on the same charge controller without any other parts. 40 watts isn't enough to power everything in my trailer, especially not for an extended period, but what it can do is buy me a fair bit more time in the wilderness, especially if I'm careful how much power I use. Also, I don't expect to get full rated output on a solar panel. Weather conditions can reduce output, as overcast skies reduce the amount of sunlight the panel receives. Higher latitudes also cut into your output, as the sunlight is more indirect. How much real-world loss that amounts to has yet to be seen, but once I hook up the panel to my trailer I'll put a meter on it to test. Fortunately, RV style panels are highly mobile, and can be aimed into the sunlight throughout the day to maximize output.

    Once I have actual power generation numbers, I can compare them to my battery storage capacity and consumption numbers to determine exactly how far I can stretch my power budget. If I were buying panels, I'd run the calculations beforehand and buy panels sized to my needs, but since these panels were free, the math gets run backwards to see how far they'll take me.

    Lokidude

    The Fine Print


    This work is licensed under a Creative Commons Attribution- Noncommercial- No Derivative Works 3.0 License.

    Creative Commons License


    Erin Palette is a participant in the Amazon Services LLC Associates Program, an affiliate advertising program designed to provide a means for sites to earn advertising fees by advertising and linking to amazon.com.