Friday, March 31, 2017

Guest Post: Dream Prepper Vehicle

by The Discerning Shootist

Just in time to finish our theme week, we have a guest video from one of our Facebook friends!

If you have a video you'd like to make for Blue Collar Prepping, upload it to YouTube and send the link to Bluecollarprepping@gmail.com.

Thanks!

Thursday, March 30, 2017

Prepper Vehicle Choice?

Since our editrix Erin decided to make this a theme week, and the theme is “What is your choice in vehicles for preppers?”, I get a break from having to come up with a topic.

I tend to agree with David and Lokidude on their selection of a pickup truck as a good vehicle for preppers, because they're versatile and common. I've owned a pickup for all but a few years out of the last 35, so I'm a bit biased toward them (I'm comfortable working on Ford products from experience; GM and Chrysler make good ones as well). My current daily driver is a 1999 Ford F-250 2WD with a standard cab and full-size bed. My work truck is a 2008 Ford F-250 Super Duty, 4WD with a farm hitch, so 20,000+ lb trailers and dirt roads are normal parts of my days.

I also own an M35A2 2.5 ton retired Army truck.

Photo is mine, of my truck

Pros:
  • Multi-fuel: diesel engine that will burn almost anything combustible.
  • 10-wheel drive: if the bumper clear the hill, it will go up it.
  • Bullet-proof drivetrain: the Rockwell axles have been a favorite of custom off-road shops for decades.
  • Twice the bed of a pickup: 8' x 12' on mine but the 5 ton version came with a 8' x 16' bed.
  • Three times the load capacity of a pickup: the 2.5 ton rating is for off-road; on-road they'll carry 5 tons.
  • No electronics (EMP hardened): the turn signals/brake lights and windshield wipers are about the only things electric on mine.
  • 50 gallon fuel tank.
  • Made out of real metal instead of recycled pop cans.

Cons:
  • A royal pain to find parts for, as they stopped being made about 20 years ago.
  • Normal tools are not large enough to work on a lot of parts.
  • The tires are mounted on split-rim wheels, which can be dangerous to work on.
  • It gets 4 MPG on a good day.
  • The top speed is around 50 MPH.
  • It has no heater or air conditioner.
  • The steering column is a piece of steel pipe pointed at your chest.
  • The suspension is stiff as a brick unless you have a serious load in the back.
  • You need a ladder to get into the back if you're over 50 years old.
  • It runs on a 24V system, so lights and accessories are not easy to find.
  • The batteries (it has two 12V batteries in series to make 24V) cost over $200.00 each. Diesels take a lot of battery power to turn over when starting.
  • It stands out enough that I can drive it in parades.

It's a good vehicle for bugging out... but there's more to prepping than just bugging out.

My choice of vehicle for general prepping is influenced by what I am prepping for. My main concerns are natural disasters or weather related, with the serious threats that would require a vehicle being some long-term disruption of society. An EMP attack, Coronal Mass Ejection (CME) event, or some other cause of wide-spread loss of electricity would cripple the nation and lead to societal collapse. Wars we have dealt with; same for epidemics and crop failures. But losing the electrical grid would kick us back about 150 years in technology, so my prepper vehicle choice would look more like this.

Image is in the public domain. http://tinyurl.com/lcesley

I realize that not everyone has the resources to own horses; they take land and a moderate amount of care (the money is about equal to owning an automobile when you compare the two), and they're not as convenient as a car.

Pros:
  • The power source is capable of self-replicating. Let's see your Cat diesel create another diesel engine!
  • The system is modular. If you don't need the cargo capacity of the wagon, you can leave it behind and just ride the horse. Need to drag a log off of the road? Hitch two horses together and they'll move it.
  • Roads are optional. A horse can get you places that not even a dirt bike can get into.
  • There is nothing on the wagon that can't be fixed or replaced with hand tools and simple skills. Wood and steel are easy to find and shape. Lots of old-timers used whatever animal grease they could find to lubricate their wagon wheels -- no special semi-synthetic oils needed.
  • A horse and wagon is a lot quieter than a pickup truck, especially a turbocharged diesel. The noise is also harder to pick up against a natural background of animal noises.
  • No need to buy a diagnostic code reader to figure out which 02 sensor/crank position sensor/throttle position sensor/etc. went bad.
  • Women seem to be drawn to horses, especially young ones. My grand-daughters would love to have a pony or three.
  • Horses can be taught; a pickup truck can't. It will vary by the breed and individual, but horses are fairly intelligent animals.
  • Fuel requires no chemistry to produce. Grass, hay for winter, and some grain (along with plenty of water) will take care of most of their needs. Salt and mineral supplements are simple to find and store.
  • If TSHTF for real and everything is worst case, can you eat your Dodge?

Cons:
  • The narrow wheels don't like soft ground, they cut in. This means going off-road may be mandatory if the road is muddy.
  • Top speed is around 5-10 MPH, so long trips will mean sleeping along the way. Normal traveling speed will be lower, so you'll have to plan your trips more carefully.
  • Suspension is minimal (or missing),  which means rough roads will beat you up physically. The low speed will offset this to some extent.
  • Paved roads require good shoes on the horses. Farriers make good money because they practice a dying art.
  • Vet bills will be scary at first, but are in line with taking a newer car/truck to a dealer to get fixed. That $500 annual visit for vaccinations compares to having a new starter or alternator installed on a car. If you don't want to pay that much for either, learn to do it yourself and save a lot of money.
  • Horses are herd animals and are happier when they have other horses around. Keeping more than one horse gets expensive, but if your wagon is designed for two to begin with, it's something you'll have to deal with.

For long-term prepping, I'd take a couple of horses and a wagon. It would haul as much as a pickup (although not as fast) and be easier to maintain. There are plenty of uses for a horse besides transportation that a car or truck wouldn't be suited for, and working around another living thing feels different than working on metal and plastic.

Wednesday, March 29, 2017

Prudent Prepping: The Ultimate Prepping Vehicle

Follow along as I give my reasons for choosing The Ultimate Prepping Vehicle!

As you have read so far on Blue Collar Prepping, Erin has given us a topic and a few guidelines for selecting our personal choice of Prepping Vehicles.

This is an interesting subject, since we can choose any vehicle with price being no object, but maintenance should be factored into what is our pick. This means I could pick a Range Rover, a Mercedes Benz G550, or other exotic rides. The thought of having one of those as a prepping vehicle is appealing, but not practical for me and how I live. Where I drive for work, something like a G-Wagon might as well have a neon flashing sign saying "Rob Me!" mounted on the roof rack, which is not what I need to happen. This means I need to be a little more practical and plan on the possibility of needing to be stealthy to Get Out of Dodge without drawing too much attention to myself.

My requirements are:
  • Room to seat 4 adults comfortably (or several more uncomfortably)
  • Able to haul gear/equipment/supplies for 4+ adults securely
  • Can blend into traffic in the city or the country
This narrows down what I'm looking at a bit, but there are still a really large number of choices left. The Nissan Pathfinder, Ford Explorer and Expedition, and Toyota/ Chevy/ Dodge SUV's all fit what I might choose... but none are exactly what I need. All those SUV's will seat the required number of adults, but not haul all the things that might be needed. What's left?

A pickup truck. I recently had my truck die and replaced it with a four-door sedan, but for a Prepping Vehicle, it leaves much to be desired.

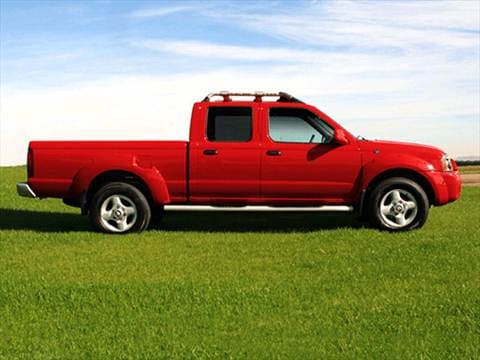
2002 Nissan Frontier Crew Cab XE Short Bed  photo
 2002 Nissan Crew Cab Long Bed
I was planning to replace my old truck with a similar model (left), but the mileage with the V6 is very poor. On the upside, the same engine and running gear was used in models from 1986 to 2004, so parts are very easy to find new or recycled. A cab-high, windowless shell would then protect any gear carried from the weather or prying eyes. Unfortunately, as old as these are getting, wear-and-tear and possible breakdowns makes this a less than wise pick. Sentimentality is not a factor.

 2010 Ford F150 Super Crew Cab
After a little more looking, I found what I think is my perfect Prepping Vehicle: a 4 wheel drive, 4 door F150 Super Crew cab pickup with a cab-high shell.

I was given a 2WD Standard Cab F150 with a camper shell for a previous job, and when I made my sales calls, there was no way to tell who was a sales rep, who was a tradesman and who was an inspector with how popular white F150's with shells are on jobsites! Ford seems to have cornered the Fleet Truck market (at least here in California) with how many are seen in every Big Box store and industrial supply house parking lot, so this is a perfect stealth vehicle.

What made me pick this as my Prepping Vehicle?
  • The ability to carry 4+adults much easier than my Nissan.
  • A bigger payload.
  • A larger motor with more horsepower and better mileage than the Nissan!
  • As a slightly older truck, there is the possibility it will blend in even better in traffic.
  • The 4-wheel drive gives more choices and options in selecting where to drive.  
Parts and maintenance are going to be readily available everywhere, and prices on replacement parts from dismantlers will be reasonable due to the minor changes made to the F150 model line over the years. I wouldn't do much to the standard model shown except mount Mud and Snow tires on a spare set of rims and add a roof rack to a bed cover after internally bracing it for a rack system. Other than that, I think this truck will do everything I want and be a very good choice as a Prepper Vehicle for me -- or for you!


If you plan on buying anything through Amazon, please consider using our referral link. When you do, a portion of the sale comes back here to help keep this site running!
If you have comments, suggestions or corrections, please post them so we all can learn. And remember, Some Is Always Better Than None!

NOTE: All items tested were purchased by me. No products have been loaned in exchange for a favorable review. Any items sent to me for T&E will be listed as such. Suck it Feds.

Tuesday, March 28, 2017

The Ultimate Prepper Vehicle, Redneck Style

Erin asked us to find the ultimate prepper vehicle if money was no object and to justify our decision. As a gearhead, this is all in a day's very fun work. However, as a shadetree mechanic, I also came at this from a bit of a different standpoint: my ultimate prepper vehicle has to be a functional beast, capable of getting work done, but it also has to be easily maintained and repaired, and needs to run on the most readily available fuel possible. If it can operate without attracting attention, that's a happy set of bonus points.

There are a few vehicles that come to mind that rank high in one category or another. The Sherp is an absolute workhorse, but it's incredibly eye-catching and maintenance will be a pain, requiring specialized tools and workspace and parts that are difficult to get. A Baja Bug is about the simplest thing on earth to maintain, and tough as it gets (they quite literally run the Baja 1000 in them), but they aren't much for getting work done, especially if there's a load to haul.

So, here's what I need:
  • A truck for the cargo capacity 
  • 4 wheel drive would be a huge benefit, especially where I am.
  • A diesel engine allows for some home-brewed fuel (more on that later)
  • A common American vehicle gives me lots of aftermarket parts support as well as junkyard parts for repairs.

With that spec sheet in mind, I present to you the 1991-1993 Dodge Ram pickup with the 12 valve Cummins turbodiesel engine.

https://upload.wikimedia.org/wikipedia/commons/a/a5/1991-1993_Dodge_Ram.jpg

It's not much to look at, but it's still on the streets in every farm town and wide spot in the road in the USA. The 12V Cummins is tough as nails , if a little underpowered in factory condition. There are minimal electronic controls, so fewer specialty tools are required for maintenance. They also came with an excellent manual transmission, which further simplifies maintenance.

As they came from the factory, they're really not bad trucks. However, they leave plenty of room for improvement, and can really benefit from a bit of work. My list of modifications is as follows, in order of priority:
  • A larger turbocharger, intercooler, and associated tuning. The factory turbo is small, and provides a limited power boost; a larger system makes more power, dramatically improving performance all around.
  • A Winch. Winches are useful for moving the truck or obstacles in the way of the truck. Warn is pretty much the gold standard in portable winches, but others will do as well.
  • A hard sided bed shell with a locking door. The ability to cover and secure cargo is a must.
  • Good tires and suspension. This is a lower priority item, and can be added during regular maintenance. Quality A/T or All Terrain tires are expensive, but worth every penny, and upgraded shocks, struts, and suspension hardware improve ride, load handling, and performance.
  • Biodiesel engine. I mentioned the benefit of diesel allowing you to make your own fuel, and simple old diesels like this are among the easiest to run biodiesel in. Swap some hoses, and you're good to run fuel made out of a variety of plant oils.
Racers use the word "sleeper" to describe a car that looks entirely bland on the outside, but is a huge performer on the inside. This truck would be the ultimate "prepper sleeper." It would serve well as a bug out vehicle, but on the long road between here and there, it will also haul supplies, move tools, get groceries, and do any other daily task you can ask of it.

It's common, it's bland, and it will work forever.

Lokidude

Monday, March 27, 2017

Theme Week: the Perfect Prepper Vehicle

& is used with permission.
Lokidude, on the BCP chat channel last night: "I lack a muse. Anybody got an article idea?"

Me: "Anyone feel like doing a theme week? Where I pick a topic and you all write a post on it?"

The rest of the channel: [general sounds of interest and approval]

Me: "OK, the topic is 'If you could afford anything, what would your ideal prepper vehicle be?' Note that I did not say bug-out vehicle. That's because maybe you think it makes more sense to have a vehicle that isn't good for bugging out but has other practical prepping uses."
And that's how this theme week came together, dear readers.

The rules:
  1. Pick any ONE vehicle to get for free.
  2. You get the initial tank of gas (or equivalent) for free, but after that you have to supply the fuel. 
  3. You don't get a free place to store it, or people to work on it for you. All storage and maintenance requirements are on you. 
  4. It can't be a fictional vehicle. It has to exist, or be made to exist with modern tools. 
  5. You have to explain why you chose it, and why your choice isn't dumb. 
Erin's Prepper Vehicle
Unlike what other people may end up posting this week, I absolutely chose this vehicle because of its excellent bug-out potential. Living in a state that is prone to both wildfires and hurricanes, the ability to evacuate is of paramount importance to me. Having actually evacuated Florida back in October, I know from experience that it could take an awfully long time to get out of danger due to everyone else having the same idea and the highways becoming congested.

So with that in mind, I went with something that gives flexibility when it comes to evacuation routes: the Gibbs Humdinga, a car that is also a boat.


Many amphibious boats have truly abysmal speeds over water (nothing faster than 10 mph), and if I'm trying to escape a disaster by dipping into the Intercoastal Waterway, I need to move a speed that is faster than what I could manage on a congested highway. With a water speed of 30+ mph I can make good time until the roads clear, and then I can convert back to land travel and drive at interstate speeds. The Humdinga is also 4WD, which is not only useful for entering and exiting the water, but will be valuable if I literally need to go off-road.

As a bonus, I don't need a special place to keep this; I could just park it in my driveway (it's slightly too long for my garage).

Changes I'd Make
Anyone who knows me knows I never keep anything stock.
  • Convert the diesel engine (4.2 Liter V8, 300 horsepower) to run on biofuel, which is useful if all the gas stations are closed or out of fuel due to demand.
  • A hard camper top with a lockable door, so my gear would be secure and I could sleep in it. 
  • A hatch on top (probably over the cabin), so I could get to whatever's on the roof without having to climb up the sides. 
  • Tinted windows, both for privacy and to keep it cool in hot, hot Florida. 
  • Roof-mounted solar panels wired to storage batteries. This would power electronics and other creature comforts when the engine was turned off for the night, preserving the vehicle's battery. 
  • A CB radio or better, used for finding out what conditions ahead are like. 
  • A built-in wifi hotspot. 
  • A portable chemical toilet, because sometimes it's just not possible to go outside to 'go'.
  • I'd love to have RV stuff like a sink, propane oven, etc, but space is already at a premium... sigh. 
    • As an aside, room wouldn't be an issue if I just got a Hydra-Terra bus and converted the seats to living space, but it only goes 7 knots (8 mph) in the water. See "abysmal speeds", above.
  • Lots of gear storage points (tie-downs, cargo nets, etc) because god knows I like my stuff. 
  • Extra fuel cans. It gets only 3.4 miles to the gallon on land and 2.27 mpg at planing speeds on the water, so I'm definitely going to need more fuel in case of an evacuation. 
    • Considering even gas-guzzling SUVs get about 15 mpg, the Humdinga is a serious fuel hog. 
    • This is probably the greatest weakness of the design, which is why I have the option to use biodiesel.
  • Mooring points, in case I need to tie up to a dock or need to tow something. 
  • An anchor. This is mostly to satisfy my inner zombie apocalypse geek who thinks "If necessary, I can park in the middle of a lake or just offshore and no one can get to me!"
http://www.fastamphibians.com/this-truck-can-go-off-road-no-really-off-road/

In short, I'd want it to be a cross between a Humvee, a Coast Guard Defender-class boat, and one of those South African trailers that can transform into a campsite. All told, it would probably cost about a million dollars (Base price of $500K plus all the add-ons.)

So that's my "If I could have any one vehicle" choice. What's yours?

Sunday, March 26, 2017

Gun Blog Variety Podcast #136 - Vault 7 Sorcery, REEEEing Ted Cruz, and Perfidious Senators

"To Wikileak" is apparently a verb now.
  • How can you run afoul of the TSA? Beth counts the ways.
  • Who is so bad that even his Mom turns on him? Sean looks at the crime, and the criminal, to find the answer.
  • Barron is back, and he brought a Sorcerer to talk about the Wikileaked Vault 7.
  • In the Main Topic, Sean and Erin remind people that they don't own the culture. Ted Cruz is allowed to be a geek too.
  • Tiffany screamed herself almost hoarse at the 19th annual Tactical Conference, and she's back to tell us about it.
  • Sure, you have a blowout kit on your belt, but what about for traumatic injury at home? Erin tells you what to put inside your at-home kit.
  • You've heard of the NRA A-rated politician from Florida who turned her back on gun owners? Weer'd puts her interview through a Patented Weer'd Audio Fisk™.
  • And our plug of the week is Mike Leon's book Rated R (The Postmodern Adventures of Kill Team One Book 1)
Thank you for downloading, listening, and subscribing. You are subscribed, right? We are available on iTunes, Stitcher Radio, and Google Play Music!

Listen to the podcast here.
Read the show notes here.

Thanks to LuckyGunner and Remington for their sponsorship, and a special thanks to Firearms Policy Coalition for their support.

Blue Collar Prepping Transcript:
The At-Home Trauma Kit
Last week, Sean talked about the SFD Responder, an ankle holster for carrying a tourniquet, bandage and similar traumatic injury gear... and that’s great as far as a portable solution goes, but if you’re a prepper then you also need to be prepared for traumatic injury at home as well, such as a burn or knife wound from cooking meals, or an injury from power tools or yardwork, or even an animal bite if you have pets. 

Now the good thing about having a prep like this at home is that you have the advantage of being at home. This means you don’t have to worry about portability, because you aren’t carrying it with you; all you need to do is be able to grab your gear from wherever you have it. 

For most people, this will be near the medicine cabinet in the bathroom, next to where they keep their band-aids and pain medication. I call this my booboo kit, and I did a segment on it way back in episode 38. However, the bathroom may not be the best place to keep such things; if you have a large family, there’s a good chance that someone will be in the bathroom when you need to get to the trauma supplies, and the heat and humidity from baths and showers can reduce the life of medicines and supplies. 

Wherever you choose to put it, make sure it’s in an easily-accessed central location and that everyone knows where it is, what’s in it, and how to use it. What’s NOT in it is also important; since this is something I’m going to grab in a life or death emergency, I’m not going to stuff it with bandaids for booboos. If I need one of those, I can get them from the bathroom or first aid kit; this is for serious injuries. 

The three most important things I have in my kit are a tourniquet, and Israeli bandage, and a Trauma Pak from Adventure Medical. I love this pak, as it’s small enough to fit into a cargo pocket but is filled with good things like Quick Clot, nitrile gloves, duct tape, a triangular bandage and a LOT of gauze. With all that, I can handle most any injury. 

Also nearby is something called the iSHWASH Personal Eyewash System, which is an eye rinse unit that can be attached to a bottle of water and then squeezed to produce a shower effect. This is great for preventing blinding in case a harsh chemical gets in someone’s eyes, but also works as a way to wash out painful particles like dust, ash, pollen, etc that may be causing irritation. To make mine more useful, I actually bundled the iSWASH with an unopened bottle of water inside a large ziploc bag for fast access; see the picture in the show notes. 


Other things that would be useful to have in an emergency are bandage shears, in case you need to cut clothing off someone to reach a wound; a pen light with a pupil gauge to check someone’s responsiveness; and a head lamp in case you have to use this when the power’s out and you need both hands to help the injured party

Now I keep all of my stuff inside an airtight, waterproof box with a carry handle. Not only does this protect my supplies from water, pests, dust and the like, but because it has a carry handle I can grab it easily and take it wherever I need it, including out of the house if necessary.  

Now these suggestions are just for making do until the ambulance shows up; in a later episode I’ll talk about what long-term supplies you will need - mainly books - in case paramedics no longer arrive or hospitals no longer exist. 

Friday, March 24, 2017

Using the Fire Brick Forge

A while back, I showed you how to stack some fire brick to make a simple forge, using a propane torch.  I was finally was able to actually set it up for use this week.

There are two types of heads for propane torches:


The one on top gives a 'pencil' flame: thin, focused, very good for some things but not what you want here.  The bottom one gives a much wider flame: uses more fuel, but heats a wider area, and that's what you want.

With the assembly, er, assembled, it looks something like this.


Light the torch, work the head into place (in this case it's pointing a bit down and toward the back), and let things heat up a few minutes. This really ought to be in the shade, but the trees haven't leafed out yet; shade lets you see the inside better.


For instance,  you can see the hot spot formed on the brick opposite the torch.


I stuck a piece of 1/4" diameter round steel in, and by working it back and forth in the hot spot,  I was able to get about 2" of length to a low red heat in a minute or two. This wsa high enough to anneal high-carbon stock, but not really hot enough to forge, so I went to the next step:


Bore a hole in the brick on the off-side, and set in another torch, this one angled up and back. This increases the amount of heat in the chamber, hot enough for light forging, or to harden a small piece like a chisel or punch.


With propane you're limited as to heat, but if you can get hold of an acetylene torch with a large tip, you're really in business. Putting that in place of the left-side torch and leaving the other one out, I was able to get the same size section of rod up to heat much faster. With a larger diameter tip than I currently have, it would've worked better.

http://amzn.to/2n0LmrV

If you can use an oxy-acetylene torch (this is a small one), you're in a whole new class. These use both an oxygen and acetylene bottle, and with with a rosebud tip (think of the 'wide' flame tip on the propane torch, supercharged) you could get real heat going inside the chamber*. Alas, I don't have one.


What I ended up doing was taking this small blade that's previously been forged and ground and worked it in the chamber. It's wider but thinner than the 1/4" stock, 3.5" long, and by working it back and forth in the sweet spot, I had no problem getting it hot enough to harden. This means I could have gotten the stock that it's made from (a broken epee blade) up to forging heat.

That's the basics of using one of these. Depending on the torch(es) you have, you can adjust things for what you need to work on, so don't be afraid to make the chamber narrower or more shallow to suit your needs.


*These are more expensive than a acetylene torch, and you'll have to get both the oxygen and acetylene bottles filled.  They also can be used as a cutting torch and for brazing as well as a general heating tool.

Thursday, March 23, 2017

Doom and Gloom Round-Up


I try to avoid news broadcasts, but I have to stay informed on the current events that may impact me and mine. We don't write about politics on this blog (there are plenty of others that cover that field from whichever side you want to choose from) but the last six months or so have stirred up the “doom and gloom” reporting. It seems that, from the viewpoint of the news media at least, the world is coming to an end and maybe those crazy preppers weren't so crazy after all. Here are a few examples:

Solar Activity
The sun is still quiet.. too quiet. Normally there are “storms” of hot ionized gasses (plasma) rolling across the surface of the sun, belching streams of plasma out into the solar system. The technical term is “Coronal Mass Ejection” or CME, and it is one of the favorite “non-war” causes of societal collapse used in speculative fiction. Once in a while the Earth will be in the way of one of these streams, and we experience effects like malfunctioning satellites (communications and navigation are impacted), radio blackouts, and even power outages.

The sun runs on a roughly 11 year cycle of high and low activity, but the last few decades have been less active than predicted. This is following the trend of solar activity recorded during the “little ice ages” of the 16th and 17th centuries, leading some to predict global cooling in the next 10-20 years. I don't have the background to be able to make predictions from the data available, but I like to know what is possible so I can plan around the rough bits. Personally, I don't see much of a downside to losing the 24-hour news channels for a few months due to satellite failure; maybe people would start paying attention to local events more. Having grown up with paper maps, the loss of GPS wouldn't be much of an inconvenience either.

Cyanide “Trap” Kills Dog
A boy and his dog are taking a walk and come across a device used to kill coyotes and other predators. Reports are unclear (or so strongly biased as to be untrustworthy), but somehow the device was triggered and killed the dog. I've never worked with this particular type of device, but I know how they work: A spring-loaded capsule containing less than a gram of sodium cyanide is wrapped in cloth that has been soaked with something attractive to canines (wolves, coyotes, foxes, and dogs). When the canine pulls up on the cloth with its teeth the spring ejects the poison into their mouth, causing death fairly quickly. Any person or animal near the device is extremely unlikely to be exposed to the poison unless they are the one that sets it off. Sodium cyanide is a very lethal poison that breaks down quickly, so secondary exposure is not much of a problem.

Teach your kids as much as you can, or don't let them out of your sight; this happened within 400 yards of a house and the proper signs weren't posted. (See also my post on unexploded ordinance for tips on how to avoid this kind of hazard.) The animal-rights folks are screaming about the use of such devices to kill coyotes and foxes, but they aren't the ones who lose millions of dollars worth of livestock to such predators every year. This device has been in use for 50 years with very few accidents and good results on predators, so I don't think it's going away.

More Terrorist Attacks on Crowds
“Stay away from crowds” is still good advice. A few months ago it was a Christmas market in Berlin; in January it was in Jerusalem; now we have another car being used to plow through a crowd of pedestrians, this time on a bridge in London. Cars and trucks are easier to get than guns in many places, and can do as much or more damage; two or three tons of metal and plastic moving at moderate speeds will go over or through a crowd before coming to a stop. Don't assume that every car is out to kill you, but remember to keep your eyes open and always leave yourself an escape route. Avoiding crowds is a good way to minimize your risk of being a target, and even 30+ years ago the Army taught me that you don't walk in clusters -- spread out if you have to travel as a group, so you don't make it easy for the idiots that want to hurt you.

Climate or Weather?
Spring is officially here with the spring equinox having arrived March 21st, and that means we are in tornado/hurricane/thunderstorm season again. Since the default setting for TV weather-people is that we're all idiots just born yesterday, expect more breathless warnings about the hazards of bad weather. Weather is just something we have to survive, and some is easier to get through than others, but we're all descendants of people who survived weather with fewer tools and toys than we have available today. Watch for the really bad weather and enjoy the good weather as best you can; check your emergency shelter if you have one, making sure the rodents and insects didn't make a mess of it over the winter; and rotate the stored water and do all of the other spring cleaning chores that it's been too cold to get done this winter.


All in all, the world keeps turning despite the howls and screeching from the television and internet. Doom and gloom seems to sell advertising, so it's not going to disappear until the predictions of global calamity come true. I think most of us will get by -- isn't that why we prepare?

Wednesday, March 22, 2017

Prudent Prepping: One Tool To Do It All...

The dust has settled and the First 72 Hours have passed. Follow along as I build a long term plan via Prudent Prepping.

... well, not exactly all of it, but having tools that will do multiple jobs and do them without compromise is rare. All of my tools were left behind when I moved out of The House I No Longer Own, and replacing them has been a struggle.

So you can imagine my joy when,  with the many things I need (let alone want) on my limited budget, I found another bargain addition to my tool collection!

Milwaukee 11-in-1 Multi-Tip Screwdriver with Square Drive Bits (2 Pack)

http://amzn.to/2n83h1u

From the Home Depot website:
Use the Milwaukee 11-in-1 Multi-Tip Screwdriver for a wide variety of driving needs. This screwdriver offers a 5 in. shaft that holds up to nine bits, so you can carry fewer drivers. Featuring hardened tips ranging in size from #1 to #2, it is designed with a rubber handle for comfort and is also ideal for wire stripping and bending.

http://amzn.to/2n83h1u
  • 5 in. shaft holds up to 9 bits for versatility
  • Contains hardened tips ranging in size from #1 to #2
  • Rubber handle offers comfort
  • Wire stripper strips up to 12-Gauge wire
  • Wire bending hole bends up to 12-Gauge wire
  • 6 bits and three nut drivers included for convenience: PH #2, PH #1, SL 1/4 in., SL 3/16 in., SQ #2 and SQ #1 nut drivers 3/8 in., 5/16 in. and 1/4 in


I have owned a variation of this screwdriver for at least 30 years, and I'm pretty sure I may have an original 4-In-One screwdriver someplace. What makes this such a handy tool is how many jobs it can do in place of up to 11 separate drivers. I never start an electrical job without having one of these in my bags, and even if there is no electrical work being done, a combo screwdriver is always in my bags and tool boxes.

One point: this style of screwdriver is not recommended for any work around 'Hot' wiring; for those jobs, insulated shafts are necessary. If you aren't sure about whether wires are energized, stop and call a professional if you don't know how to check or power down a circuit.

A single 11-in-1 screwdriver is $9.97 from Home Depot. I bought a two-pack, normally $19.99 but on closeout for $3.82! Since this is a closeout item and at this amazing low price, I don't expect them to last.

The Takeaway
  • A combination tool can be a cheap and easy way to save space -- and money! 
The Recap
  • Two-pack of Milwaukee 11-In-1 screwdrivers: $3.82 on Closeout from Home Depot 
  • Milwaukee #48-22-2114F two-pack: $19.99 from Amazon with Prime shipping 

If you plan on buying anything through Amazon, please consider using our referral link. When you do, a portion of the sale comes back here to help keep this site running!
If you have comments, suggestions or corrections, please post them so we all can learn. And remember, Some Is Always Better Than None!

NOTE: All items tested were purchased by me. No products have been loaned in exchange for a favorable review. Any items sent to me for T&E will be listed as such. Suck it Feds.

Tuesday, March 21, 2017

Improvised Tourniquets

Purpose built tourniquets like the C-A-T and SOFTT are great, but they're not always available. Here's how to improvise one.


Lokidude

Sunday, March 19, 2017

Gun Blog Variety Podcast #135 - The Spotlight Effect

I love the thrill
In the white light
  • What's it like to be a woman in the firearms industry? Beth tells us about how she has to prove herself every day. 
  • A fire, a fire extinguisher, and a knife are the what; Sean takes a closer look at the who. 
  • Barron is on assignment and will return soon. 
  • In the Main Topic, Sean and Erin talk about getting over that feeling that EVERYONE is watching you as you learn to carry concealed. 
  • Tiffany is on assignment and will return next week. 
  • We know there's no reason to read them, but Erin says that newspapers actually still have uses. 
  • He's half of the "Armed with Reason" duo, and as Weer'd will show, he's not any more intelligent or reasonable in audio form than he is in print. 
  • And our plug of the week is the Striker Control Device, aka the Glock Gadget. 
Thank you for downloading, listening, and subscribing. You are subscribed, right? We are available on iTunes, Stitcher Radio, and Google Play Music!

Listen to the podcast here.
Read the show notes here.

Thanks to LuckyGunner and Remington for their sponsorship, and a special thanks to Firearms Policy Coalition for their support.

Blue Collar Prepping Transcript:
The Many Uses of Newspaper
Newspapers just aren’t taken as seriously as they once were. Between lack of readers, cost of production, and the 24/7 news cycle which is better suited to online reporting, actual newsprint is going the way of the dodo. But that doesn’t mean newspapers aren’t of use to preppers -- quite the opposite! The prepping value of a newspaper, though, is in its material and not what the rag says. 

There’s an old joke from the middle of last century which says that certain papers are only good for lining birdcages, wrapping fish, and toilet-training dogs -- and these are all good uses for the material. Newspaper is made from wood pulp, which is very absorbent, so depending on the cleanliness of the paper you can use it as an impromptu towel for drying off, or for wiping up spills, or even as field-expedient toilet paper.

But one of the best uses for old newspaper is for drying out wet shoes. Stuff them with crumpled up newspaper and leave them overnight, and in the morning the moisture will have moved from your shoes to the paper. This is a great trick to know if you’ve gotten wet and can’t start a fire.

Speaking of starting a fire, it ought to be obvious to everyone that newspapers make great firestarters. Finely-shredded bits of newspaper can serve as tinder; thin strips can serve as kindling; and rolled-up papers can even serve as fuel, if you have enough of them. Just be aware that newspaper doesn’t have much in the way of energy density; it burns quickly, unlike a log.

But newspaper can keep you warm in other ways. If you crumple it up and stick it under your clothes, it can act as insulation by trapping warm air next to your body. If you’re settling down for the night, you can further protect yourself against the elements by putting a layer underneath you to insulate you against the cold ground and absorb any moisture, and then a layer on top of you like a blanket to trap more heat and protect you from the wind, rain, and snow.  (Side note: If you’re out in the woods, you can achieve the same effect with dry leaves). You can also use newspaper to keep your home warm by wadding it into nooks and crannies and creating insulation, or taping it over windows to prevent drafts.

And finally, you can use newspaper to create a weapon. I know this sounds crazy, but apparently soccer hooligans in the UK were bringing newspapers to games and using them to create improvised clubs called “Millwall Bricks”. Watch the video in the show notes, and you’ll see that with some rolled and folded newspaper, a rock, and some taper, you can transform trash into a tomahawk that is capable of splitting a gallon milk container and denting a 55 gallon drum.

There are many things you can do with newspaper once you realize that it is, essentially, a very thin sheet of wood. While newspapers themselves may soon become obsolete, for as long as newsprint exists, there will be many uses for the material.

Friday, March 17, 2017

Guest Post: Creating .50 Caliber Ammo Can Shelves

by Jonathan S.
Regardless of whether you shoot or not, .50 caliber cans are a great way of storing materials. However, they have a tendency to get a little unstable if you stack them too tall, so I built myself a set of shelves to hold mine.

I am going to start by spelling out exactly what I did, and then tell you what I should have done, so you might want to read all the way through to the end if you are really interested in building one of your own. 

Disclaimer: I offer no guarantee that these instructions are complete, or that following them will not result in disaster. Proceed at your own risk. Measure twice, cut once.

What You Need
  • 1x Power Screwdriver/Drill. I used an older-model Ryobi 18V One+ Power Drill from a combo kit, but there are newer versions too.
  • 1x Power Saw. I used the other half of the above kit. I suppose you could also use a handsaw if you were a real masochist, or a table saw, or have whatever lumber yard you buy this stuff from do the cutting for you (I had Home Depot do a few of the cuts so the wood would fit in my car, for instance).
  • 2x Appropriate Batteries (if your screwdriver/drill is cordless). This is something of a “lesson learned”, but it fits in here – I only had one battery, and thus construction had to happen in fits and starts.
  • 1x Level. Really, any kind could work – I have a 4-footer and 6-incher, and it seems to be a good combination.
  • 1x Tape Measure. Minimum 12′ in length.
  • 1x Pencil. Duh.
  • 1x Pound of 2.5″ wood screws. I am a big fan of Grip-Rite products (their heads do not generally strip, and the coating not only prevents corrosion, but also makes the actual screwing easier), but just about any “wood”-type screw will do.
  • 1x Pound of 3″ wood screws. You can use another pound of 2.5″s if you want.
  • 1x Philips-Head Bit.
  • 1x Flexible Bit. If you build the shelves another way, you may not need this.
  • 4x 2″x4″x12′ boards. Straighter is better. The wood I purchased seemed to be pressure-treated, but you do not need to go for full-bore exterior wood if you do not need to – I paid about $4 a stud.
  • 3x 2″x4″x104″ boards. These are typically called “stud boards” or something similar, and that is exactly what they are, but they work. They are also generally of a lower quality than the above boards, so you might have to hunt and pick a little more carefully. Ran about $2.50 a board for me.
  • 1x Sheet of 0.75″ plywood. I suppose 0.5″ could work too, as could MDF and the like – I just happened to have half a sheet laying in my garage, and I know this stuff would have to be fairly durable. I want to say the whole sheet cost me about $25 (but the other half got absorbed into another project).
  • .50 caliber ammo cans. These are currently $24 apiece with Prime shipping from Amazon
Total cost to me, not including tools, was about $50 in my best estimation. Many preppers probably have most of that laying about already.

What You Do
Well, you build it like this picture (which is definitely not to scale, nor straight, nor anything else):


But more specifically…

1. Take the four 2″x4″x12’s and cut them down to 4’6″ x 4’6″ x 3′ lengths.

2. Cut those 3′ boards you made into four 9″ lengths.

3. Take the three 2″x4″x104″s and cut them exactly in half, giving you two 4’4″ lengths.

4. Go back to the 4’6″ lumber (all eight of them) and cut off 1.5″ from one end, making all eight of them 52.5″ long.

5. Cut the plywood sheet you have exactly in half the long way (giving you two sheets, each 24″x96″), and then cut one of those halves into 12″ lengths (giving you eight 12″x24″ pieces).

You now have six legs (the 4’4″ lumber and the pink on the diagram), eight front/backs of shelves (the 52.5″ lumber – green), 16 sides of shelves (the 9″ lumber marked yellow (faintly)), and eight actual shelves (the 24″x12″ sheets in blue). Oh, and eight 2″x4″x1.5″ things, which do not necessarily have to be waste (more on that later).

6. Lay out your 4’4″ lumber, and mark all of them at 9″, 9.5″, 9.5″, and 9.5″. That will be the bottom of each of your shelves.

7. Take two of those 4’4″ studs, lay them out with their bottoms (the end with the 9″ mark) against wall or other known-flat surface, and get them even with and parallel to each other exactly two inches apart.

8. Take four 9″ boards, lay them flat across the two 4’4″ studs, with their bottom edges even with the lines you drew, and screw (2.5″, this time) those guys into place – I used two screws through the 9″ into each leg board, in a diagonal pattern. The 9″ crossmembers give you an easy way to ensure your leg boards are spaced properly, since the outside edges of the legs should be even with the ends of the 9″ boards. This assembly becomes one of your outside legs.

9. Repeat, to make the other outside legs.

10. Repeat again, but then flip that one over, and put 9″ boards on the other side too – just make sure the screws do not clash. That will be your inside/middle legs.

So you should now have three things looking more-or-less like ladders. Short ones. Without much space for you to put your feet. And this is where I got even more silly.

11. Take one of the outside leg assemblies, and lean it flush against something known to be roughly perpendicular with the floor. Have someone hold it, or temporarily attach it in place (i.e. lean something against it). Situate the middle legs 2 feet away, and set one of the 12″x24″ shelves on the bottom 9″ rungs of both the outside legs and the middle legs. Have someone hold the middle legs in place (or put the top shelf where it belongs, and lean a board against this entire rickety contraption to hold it upright like I did), and situate the bottom shelf such that it has a 1.5 inch overhang on the front and back of both the outside and middle legs. Attach shelf to both 9″ rungs (I used one screw each) – this is where the flexible bit comes in.

12. Repeat the essential elements for the three remaining shelves.

13. Repeat the essential elements for the four shelves that go from the other side of the middle legs to the other outside legs.

You should now have a rickety-assed shelf-looking monstrosity.

14. Gently lay it down on the floor.

15. Take four of the 52.5″ studs, and attach one under each of the twinned shelves – this is where you can use the 3″ screws if you want, and you probably should. No need to attach the shelves to the boards, given that gravity and weight will take care of that. Important: At all three attachment points of both the top and bottom boards (outside legs, middle legs, outside legs), use at least two screws, displaced both horizontally and vertically (read: “diagonally”) – that arrangement will give your shelves the rigidity they need to stay upright. If you have the screws, go ahead and do it for all the boards.

16. Flip the whole assembly over, and do the same thing on the other side.

17. Get the shelves upright again, examine just how far out-of-square/level you are, and realize you do not care, since you are about to drop a few hundred pounds of metal on the shelves and they will settle out.


Thanks to .50 caliber ammo cans being just a hair over 6.5 inches in width, these shelves’ capacity is “only” 30 (including the floor), but something tells me that will be sufficient for the time being, and the extra space on each shelf is convenient for boxes and whatnot else. If you are willing to deal with awkward dimensions and more waste, bumping those shelves to four cans is not hard; I just had half a sheet of plywood left over from another project, and it was easier this way. Alternately, .30 caliber cans will fit nicely in the leftover space on the shelf. 

What I Should Have Done

1. Looking back, I am not sure those 9″ rungs are necessary. They simplified the building process, but since the ammo cans are almost exactly 12 inches deep, they can rest their weight on the front and back boards, and it is not like the 0.75″ plywood is going to care that much, given that only 9″ of it would be unsupported.

2. By the same token, those middle legs may or may not be necessary. Given that a nearly-full can of .45 Long Colt weight just around 50 pounds, though, I was not going to risk putting seven of them on a four foot length without some kind of support in the middle. 

3. .50 caliber ammo cans are, annoyingly, about 6.5″ wide, so you are only going to be able to fit three per shelf. The remaining space can be used for other junk, or you can custom-fit your shelves better. I was just looking to minimize costs (through minimizing waste), and this arrangement did it.

4. Those 2″x4″x1.5″ things from step 4? If you are concerned about the narrow front-to-back footprint of the shelves, once you have them where you want them, just attach those little blocks to the fronts and backs of the legs. However, I will admit that I have not done so with mine, yet – with just the ammo cans I have, those shelves are going nowhere (and I should not have to remind you, but load from the bottom).

5. Pine can split pretty badly, so stay away from the cut ends and proceed slowly when inserting screws.

6. If you are really concerned about rigidity, get some eyehole hooks, screw them into the back corners of the shelves, and run wire tightly between them diagonally. But, really, if just doing the backs of my shelves the way I described them above was enough to make the shelves as stable as they are now, doing both sides should make them rock solid.

Thursday, March 16, 2017

Concern Contraction

Concern contraction is what I call the focusing effect that a crisis can have on your mind. (I don't know what else to call the phenomenon; I couldn't find an existing phrase, so I made one up.) I bring this topic up as a warning to our readers, in the event that any of them have been fortunate enough to have never experienced a truly life-threatening or hazardous situation.

We've previously written about situational awareness, the need to stay aware of your surroundings (and the activity of others) in order to detect or predict threats. Over the years, I have seen concern contraction reducing or eliminating a person's situational awareness. These are often incidents that sometimes make the local news, like a policeman getting hit by a passing car while he's conducting a traffic stop or a witness to an accident getting injured while trying to render aid. Times of stress tend to focus our awareness to an extreme that has to be experienced to be understood, but knowing that it can happen may help you avoid the negative effects.

Levels of stress or crisis come in various intensities and the contraction of concern is tied to the intensity. Since I made up the phrase, I get to make up the levels of intensity and some examples as well. Of course, these levels only apply to those of us who are nominally aware of our surroundings -- the average idiot with his face buried in his cell phone is oblivious to the world and has no situational awareness or level of concern (until the battery on his phone dies).

Level 0
You're sitting on the beach with the sun warming your skin, the water is a few yards in one direction and the buffet is a few yards in the other direction. You literally don't have a care in the world and your mind is free to wander as it may... you might even attempt to care what the Kardashians are doing this week! At level 0, the few concerns you may have are diffuse and spread across a wide field of possibilities. Situational awareness at level 0 can be a problem because you're too relaxed.

Level 1
You're at work on a normal day, the coffee tastes okay and the boss isn't in town. Your concerns are going to be focused on getting your work done so you can get home, but you have time to contemplate the upcoming ball game. You're aware of your surroundings as much as you need to be to get the tasks at hand completed. The policeman getting hit by a passing car falls into level 1, so it is important to stay on your toes and not get complacent.

Level 2
A loved one or pet has a minor injury and you're worried about getting them the proper care. The upcoming ball game has been forgotten and your area of concern is starting to contract a bit, your world getting a bit smaller. The route from your current location to the needed aid is about the extent of your concern at level 2, but you need to pay attention while you're traveling.

Level 3
The power went out during an ice storm or thunderstorm. You know it will be restored within a few hours at most, but you have to figure out how to get by without lights and the distractions that modern life has provided us. It might be getting colder in the house and you need to dig out a coat and some blankets. Your world has shrunk down to the size of your house/apartment and you definitely aren't thinking about how many rhinos are left in Africa.

Level 4
Your car dies or gets stuck in the middle of nowhere. You have no cell phone service, and you were taking a “shortcut” so nobody really knows where you are, so it could be a few days before anybody sees you. Things are starting to get serious -- your concerns are food, water, and shelter, and your world is no larger than what you can see. Nothing beyond your vision matters; your concern has contracted to a small area of space. The two ladies who survived for two weeks in the woods in 2015 come to mind as an example.

Level 5
TSHTF and you are alone, tired, hungry, and lost. Your world has contracted down to the next meal or the next drink of water. You're in trouble and nothing else matters, especially other people. At this level, people start to lose their humanity and act more like animals because survival is the only thing on their minds. Donner party, anyone?

The Last State
Not really a level because it can occur either suddenly or over time is the state known as “shock”. Physical or psychological shock will blow your world apart and you will lose the ability to care about anything. Shock is a medical issue that generally requires the assistance of others to recover from, and can be life-threatening by itself due to the effects it has on your body. It deserves mention because it eliminates all situational awareness and should be watched for in others.

Wednesday, March 15, 2017

Prudent Prepping: Smoke Detectors and Time Changes

The dust has settled and the First 72 Hours have passed. Follow along as I build a long term plan via Prudent Prepping.

With the arrival of Daylight Savings Time, it can be a time to check many things in your preps (assuming you don't keep to another schedule). I have several dates set on calendars, both short and long term, for checking stored food and water.

One thing I check yearly are the smoke detectors in my room and in the hall near my bedroom, because I want to be certain they are working. Mine started chirping Sunday night, which is not a good night to start disturbing my sleep.

When I looked at the battery in the one on my wall, I saw that this unit was 12 years old and had some paint on it. There wasn't enough paint to block ports or any that I could see inside, but better safe than sorry, so I bought this on Monday:


Kidde Worry-Free 10-Year Sealed Lithium-Ion Battery Operated Smoke Alarm with Voice Alert


With all the improvements to electronics and batteries in the past 12 years, buying a new smoke detector for myself seemed like a really smart idea. Besides, not having to replace batteries for at least a decade sounds really attractive. From the Kidde website:

"10-year sealed battery smoke alarms (sometimes called smoke detectors) offer a variety of benefits to the millions of Americans who rely on continuous battery-powered smoke and fire detection in their homes. The alarms are powered by sealed, long-life lithium batteries for 10 years (the life of the alarm), meaning they are always on. The National Fire Protection Association recommends replacing smoke alarms every 10 years."

I bought this from Home Depot since I didn't want to wait for the same model from Amazon to arrive in the mail days later. I really don't like the idea of a fire in my house, or even smoke from a fire; nationwide, smoke inhalation kills more people than fires. I've personally seen how fast smoke can build up in a building and never want to be in a situation like that ever again.

All the batteries in the smoke detectors in my side of the house get changed at the same time, so I'm not sure why the one in my room went off so soon. Looking at the other detectors, all of them seem to be the same model: one of the compact, discount brands you can see at every Big Box store. Since they all look the same, I'm going to bet they all were installed about the same time, which puts them at Detector Death by the calendar. I do not own this house, so the responsibility to replace all the detectors falls on the landlord.

I'm going to see him Thursday and give him the good news.

The Takeaway
  • Safety is not the place to be cheap! As always, buy the best you can afford.
  • The price difference between buying a sealed unit and a less-expensive, replaceable battery unit was small enough that factoring in the PITA multiplier made it a good buy.

The Recap
  • One Kidde Smoke Detector:  $29.97, purchased from Home Depot. Ordered from Amazon, $28.90 with Prime.*
  • *Ordering a combination of detectors can save you more than buying from a brick-and-mortar store. You have to figure in the delivery time to you.

If you plan on buying anything through Amazon, please consider using our referral link. When you do, a portion of the sale comes back here to help keep this site running!
If you have comments, suggestions or corrections, please post them so we all can learn. And remember, Some Is Always Better Than None!

NOTE: All items tested were purchased by me. No products have been loaned in exchange for a favorable review. Any items sent to me for T&E will be listed as such. Suck it Feds.

The Fine Print


This work is licensed under a Creative Commons Attribution- Noncommercial- No Derivative Works 3.0 License.

Creative Commons License


Erin Palette is a participant in the Amazon Services LLC Associates Program, an affiliate advertising program designed to provide a means for sites to earn advertising fees by advertising and linking to amazon.com.