Showing posts with label Survival. Show all posts

Monday, November 25, 2019

DIY Space Blanket Poncho

Doing It Yourself is the best way to do things, especially if you already have the necessary tools and know-how!


Godspeed to you all.

Sunday, March 4, 2018

When Camouflage Is Wrong

Not actually Erin.
& is used with permission.
The entire point of camouflage is to make things which are camouflaged difficult to see.

Well DUH, Erin. We know that.

In that case, look at your preps and tell me how many of them are either camouflage (hard to see in terrain) or tactical black (hard to see in dim light) and whether or not those preps are things which are easy to lose and necessary for survival.

...oh.


You've just dropped your camouflage survival knife here. Where is it?
Sorry, no, that's a copperhead snake

Yes, that's a problem, isn't it? And to be fair, it's not your fault. Sales and marketing techniques use psychology to sell items, and colors have become a form of subtle shorthand to convince people to buy them:
  • This item is White; that means it's clean. 
  • This item is Green; that means it's good for the environment. 
  • This item is Blue; that means it's pure water. 
  • This item is Orange; that means it's for emergencies.
  • This item is Red; that means it's for first aid. 
  • This item is Black; that means it's tough and tactical. 
  • This item is Camouflage; that means it's for the outdoors. 
The problem is that emergency orange, by its deliberate attention-getting shade, is simply not aesthetically pleasing, and in fact can be unpleasant to look at. On the other hand, black goes with everything (plus it's tactical), and camouflage is outdoorsy ("If I need survival gear I'll be outdoors. This is for the outdoors. I'll get this one!"), so it's natural that a lot of survival gear comes in these colors. 

Which is all fine and dandy, until you drop the darn thing. If you're lucky, you'll realize you've dropped it and know where to look and have the time to look for it; but if you're in a hurry, or you don't realize you've dropped it, you may very well have lost your knife / fire starter / water purifier / etc for good. 

The easiest and most effective solution is simply not to purchase critical gear in those colors. However, sometimes that's unavoidable, so here are ways to make your gear more visible:
  • Wrap a portion of the gear in blaze orange tape
  • Paint a section of the gear with the brightest shade of paint (or nail polish) you have -- the less natural the color, the better. 
  • Glow-in-the-dark paint can be used to make dark items visible in dim light. 
  • If paint seems too permanent, purchase glow-in-the-dark stickers or keychains. UV Paqlite makes gear tags which are great for keys or anything with lanyard holes and sticky sheets which can be cut to size for other items.
  • Alternate, buy a box of glow-in-the-dark stars used to decorate children's bedrooms; these are great for gear with lots of flat surfaces that won't see hard use the way a knife or flashlight will. 

The next time you buy gear, get it in a color that makes it easy to find. You aren't a soldier, and the goal of survival is to be seen and be rescued. 

Friday, October 23, 2015

The Universal Edibility Test

Not actually Erin.
& is used with permission.
This originally appeared in my BCP segment on last week's Gun Blog Variety Podcast. I thought the information useful enough that who who listened would enjoy a hardcopy version, and this would also make it available for those who do not listen to podcasts.

The Universal Edibility Test is a procedure whereby you can determine whether or not you are allergic to food. While the UET is designed to work on plants and fruits, I don’t see why it wouldn’t work on other foods as well.

There are more than 700 species of poisonous plants within North America. It is nearly impossible to know them all, and for those of us with severe chronic allergies (like myself), several plants which are listed as "safe to eat" may induce an allergic reaction up to anaphylactic shock. Therefore, in any long-term survival situation where food must be foraged, knowing the Universal Edibility Test and being able to perform it is critical knowledge. 

The UET
I recommend that all preppers print out this chart, laminate it, and keep it with their bags. 
http://www.wilderness-survival.net/figures/fig9-5.gif
The biggest drawback to this test is that it takes time: there are three steps with a waiting period of 8 hours between them. Fortunately, you aren’t going to starve to death while you’re doing this; it takes a healthy adult about 3 weeks to die of starvation, and if you’re in a hurry you can finish this test within 24 hours. 

However, with proper planning you won't need to do it all in one day. This test can be spread out over three days by performing each step first thing in the morning after waking up. Then, after 8 hours have passed (or less, if you have a negative reaction to the food and realize it's no good for you), you can then eat your known good food for lunch and dinner. 

Of course, this requires you to have a source of known safe food already. Don't start this process when you have nothing safe to eat, or you're going to have a miserable time. 

Pre-Screening
Before you start the test there are some things to immediately rule out. These are:
  • Anything with thorns, spines, or irritating hairs. 
  • Plants with shiny leaves. 
  • Plants with umbrella-shaped flowers. 
  • Any plant you know to be an irritant, like poison ivy, oak or sumac. 
  • Any plants with white or yellow berries. Don’t just "not eat the berries"; don’t eat anything on the entire plant. 
  • Any plant with a milky or discolored sap. 
  • Anything that smells like almonds that isn’t an almond tree. That’s usually a sign of cyanide within the plant. 
  • Anything which is moldy, rotten, or infested with parasites. The last thing you need in a survival situation is food poisoning or a parasite infection. 
  • Mushrooms. There’s just too much risk for the small calorie reward of eating a mushroom, so unless you are 100% CERTAIN that it’s not poisonous, just leave it alone. 
It's worth noting that these guidelines are just rules of thumb; there may very well be some plants with these characteristics that are safe to eat. However, there are many more with these characteristics which aren’t safe. These fall under the auspices of "In a survival situation, better safe than sorry.”
 rules.

Implementation

1) Separate
Some parts of a plant may be edible and other parts not, so you need to separate them into the five main components of leaves, roots, stems, buds and flowers. Inspect each piece and looks for some of the characteristics I mentioned earlier, like parasites or an almond smell. 

2) Contact 
(requires 8 hours of not eating prior to testing)
Take one specific plant part, crush it, and rub it against the skin on the inside of your wrist or elbow, or behind your knee. If it has sap, make sure that gets on your skin too. The idea is that you want to test it on tender skin, not something calloused like your fingers. 

Hold it there for 15 minutes, and then wait for 8 hours, drinking only purified water.

You’re looking for an allergic reaction like itching, burning, redness, bumps, hives, etc. If it’s not good for your skin you’ll have a reaction, and it’s better to have a skin reaction in a survival situation than intestinal distress. 

If there’s no reaction after 8 hours, you can go on to the next step. If you’re hungry and have a source of known good food, go ahead and eat what’s safe and perform the next step the following morning.

3) Prepare the Sample
(requires 8 hours of not eating prior to testing)
If you plan on eating the food cooked, then cook it; if you’re going to eat it raw, then do whatever you’d do to it, like peeling the skin. Just make sure that any food which passes this test is only eaten in this manner; there are plenty of plants which can become toxic after being cooked.

Some suggestions:
  • Ripe fruits are best peeled and eaten raw, but unripe fruits are best cooked. 
  • Anything taken from underground (like roots or tubers) ought to be cooked to kill any bacteria or hidden fungus. 
After the food is prepared to your satisfaction, place it to your lips and hold it for 3 minutes. You’re looking for the same kind of reaction as with the contact test.

If there is no reaction, move immediately to the Taste test. 

4) Taste
Put the food sample on your tongue and hold it there for 15 minutes. If it tastes soapy or bitter, spit it out; you're safer not eating it. 

If you experience any unpleasant sensations like itching, stinging or burning, spit it out and rinse your mouth with fresh water until the sensation ceases. 

5) Chew
Chew it well and hold it in your mouth for another 15 minutes. Don’t swallow anything, not even saliva, during this test! Spit instead.

If nothing happens after 15 minutes (you’re looking for the same unpleasant reactions as earlier), move on to the next step

6) Swallow
Swallow that soggy piece of plant you’ve been keeping in your mouth. Yum yum!

After this comes another 8 hours of waiting, where you don’t eat anything else and only drink purified water. If at any time you have feelings of nausea or stomach pains, induce vomiting. and drink as much water as you possibly can to dilute whatever is reacting inside you.

However, if you feel fine after 8 hours, you can move to the final step.

7) Chow Down
(requires 8 hours of not eating prior to testing)
Prepare a small serving, about a quarter of a cup (60 milliliters) in exactly the same way you did before and eat it. Wait 8 more hours, eating nothing else and drinking only purified water. 

If, after these three 8 hour periods, you have no adverse reactions, then that one specific piece of the plant that you tested is safe to eat. You may now move on to testing other parts of the plant.

Helpful Suggestions
  • Only test plants which are in plentiful supply. You’re basically spending a day testing, so don’t waste that time. 
  • Don’t assume that anything which is edible raw is edible cooked, and vice versa. If you plan to eat them both ways, test them both ways. 
  • Don’t assume that just because an animal can eat it that it’s safe for humans! Just like we can eat chocolate but it’s toxic to dogs, there are many plants which wild animals can eat that are poisonous to us. 
  • Of course, if you can recognize the plant -- like a banana tree or a strawberry bush -- then you can skip most of those steps. I recommend the Field Guide to Edible Wild Plants as a good addition to you bug-out bag, and the Wild Edibles app for your smartphone or survival e-reder. 
  • Finally, know that the Universal Edibility Test isn't 100% proof. There are many plants which can pass this test but present health hazards after long-term consumption

Stay safe out there!

Tuesday, July 28, 2015

Edible plants

Last week, Erin talked about plants you should definitely stay away from, and last year Evie talked about a couple plants with interesting uses. Today, we're going to take a look at other plants you should be seeking out, specifically because they're nutritious (and potentially delicious). There are also plants growing wild with various medicinal uses, but I'll leave those to folks who are far better versed in their use.


Asparagus
Wild asparagus grows over a huge portion of the United States, thriving in pretty much any place with sunlight and water. It is prepared exactly like store-bought asparagus; steamed, boiled, roasted, or any other method you like.
http://wholefedhomestead.com/how-to-hunt-and-forage-for-wild-asparagus/
I'll admit to being a gross novice at actually harvesting wild asparagus beyond a bit of blind luck. However, there is a very in-depth article here that covers the topic in wonderful detail.

Prickly Pear Cactus
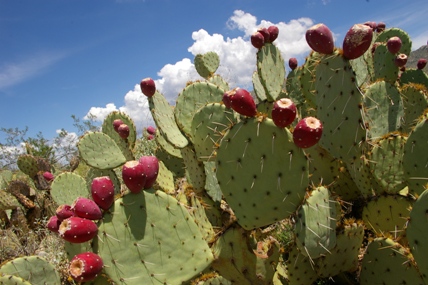
Many species of cacti are edible in some way or another. One of the best, and better-known varieties in the western and southwestern deserts I call home, is the prickly pear. While the stem of the cactus is quite edible when boiled, the real jewel is the red or purple fruit.
http://www.nps.gov/sagu/getinvolved/supportyourpark/images/prickly_pear.JPG
Be sure to skin the fruit before you try to eat it, because being a cactus, it has all of the traditional defensive measures.  Once skinned, the pulpy flesh inside is delightful.  Eat around the seeds, as they are tough and inedible.

Cattails
If the area you're foraging in includes wetlands, cattails are a very real potential food source. Nearly all of the plant is edible, with boiling required on many parts to make it edible. Dig up the roots and boil them. Boil the leaves and stalks. The head of the plant can even be cooked and eaten like corn on the cob.
http://www.fcps.edu/islandcreekes/ecology/Plants/common%20cattail/132s29.jpg

These three common, widespread edibles are high in nutritional content, simple to prepare, and can taste quite good.  While restricted in range, prickly pear fruit are a wonderful source of nutrition, water, and wonderful flavor.  The other two plant species are so widespread as to border on being universal, and can help save your life no matter where you're trying to survive.

Lokidude

Friday, February 13, 2015

The 12 C's of Preparedness

Not actually Erin.
& is used with permission.
(A shorter version of this article appeared on Episode 23 of the Gun Blog Variety Cast. It has been written at the request of readers who desire a written record.)

I have mentioned before that I enjoy watching survival shows. Some of them I legitimately enjoy as a source of quality instruction (I will watch anything with Les Stroud or Mykel Hawke in it); some I watch as a kind of "survival sitcom" to laugh at the scripted scenarios (Bear Grylls might be competent but he's bought into his own hype) or poor choices (Naked and Afraid); and some (like Doomsday Preppers) I watch for reasons I can only call "Prepping Penance" -- or possibly I just have a masochistic streak and enjoy grinding my teeth.

So it should come as no surprise to anyone that I watched Dual Survival back when it was Dave Canterbury and Cody Lundin (I called it "Odd Couple Survival"), and that I preferred Dave's crusty military approach to Cody's hippie-dippy barefoot style.

Dave left/quit/was fired from the show after two seasons due to a disagreement with the producers, and while his claims of badassery in the Army have turned out to be false, I still like the guy and feel he has some good ideas regarding survival. One of those ideas is a mnemonic he calls "The 10 C's of Survival."

The 10 C's, like the name suggests, are 10 things that will keep you alive in the wilderness, and they all start with the letter C to help you remember them. They are:
  1. Cutting Tool
  2. Combustion
  3. Container
  4. Cordage
  5. Cover
  6. Candle
  7. Cotton
  8. Compass
  9. Cargo Tape
  10. Canvas Needle
Many of these are good things for preppers to have in their cars or Get Home Bags, or even for Every Day Carry. However, some are a bit specialized, and so I replaced some and added others to come up with what I call the 12 C's of Preparedness.

1) Cutting Tool: Obviously a knife of some sort, they have various uses form opening packages to self-defense. The best kinds are full-tang knives (where the metal of the knife extends all the way to the back without narrowing), although for lighter use a rat-tail tang is acceptable.
  • For EDC I recommend the Ka-Bar TDI. Designed by a law-enforcement officer and made by a company that sells knives to the Marine Corps, it's a great full-tang, all-around knife that you can get in a variety of sizes, shapes and blade profiles. 
  • For a GHB, the Mora Clipper is a great all-around knife that is inexpensive without being cheap. It's not a full-tang knife, but the tang is reinforced by the very strong plastic of the handle -- I wouldn't put my entire weight on it, but it's strong enough to handle most abuse, including batoning. 
  • For a BOB I endorse the Cold Steel Kukri Machete based on years of experience with it. Its shape gives it amazing chopping power, and it's made from 1055 carbon steel that can take any kind of punishment you care to dish out. 

2) Combustion: The ability to start a fire should never be underestimated. Not only can it keep you alive. you never know when you might need to light a candle or burn off a stray thread.

While there are a variety of options out there, from Fresnel Lenses to Sparkies, to my mind nothing beats a good old disposable Bic lighter. Get them by the package at the grocery store and put one in every bag. 

3) Container:  A fancy way of saying "water bottle". I recommend the following characteristics:
  • As large as you are comfortable using, but at least 24 ounces.
  • A wide mouth -- makes it easier to fill from shallow streams, easier to clean, and easier to add/remove items if you store survival items inside it when not using it.
  • Stainless steel (or titanium) and not aluminum -- stronger, and no worries about chemicals leaching into the water.
  • Unlined, single-wall construction -- so that you can boil water inside the bottle to purify it.
  • Unpainted -- some paints will either catch fire, or insulate against the heat.
A good example of all these characteristics can be found here

4) Cordage:  Paracord has so many uses that I can't list them all. Just get some and carry it with you: wrap it around your water bottle, replace your shoelaces with it, wear a bracelet of it; just have some. 

5) Cover: "Cover" is a bit of a catch-all term, as it encompasses both clothing and improvised shelter. But put simply:
  • Always dress appropriately for the weather.
  • Always have a warm jacket, rain gear and waterproof boots in your vehicle.
  • Always have something like a tarp in your car, so you can make a lean-to.
    • Alternately, have something like an Army poncho with you, and it can serve as both rain gear and shelter.
    • Add a poncho liner (aka "woobie") and you have an excellent way to stay warm and dry. 
  • Always have spare socks in your bag, preferably wool as that material stays warm even when wet.
  • Always have some trash bags with you, as they can be used to make improvised cold/wet weather gear and shelter, along with a variety of other uses.

6) Candle:  Not literally a candle -- although they are great things to have in a BOB or GHB, because the first thing you should light with your match or lighter is something that will burn for a long time, like a candle -- but in this case, anything that will provide light. Since we already have heat from the Combustion source, I interpret this to mean a portable light source like a flashlight. My recommendation is a Cree Ultrafire Mini, as it is small, powerful (over 100 lumens), affordable, variable in strength, and takes a single AA battery.

7) Cotton: The only time I will recommend cotton in a survival situation is in the form of a shemagh;  it can be used as a sling, a filter, a mask, and more besides. Just make sure you don't get one in gang colors, or a pattern associated with a political entity like the PLO; stick to tactical colors like olive drab, coyote brown, foliage, etc. Check out the GBVC show notes for more uses and links on how to tie one.

8) Caliber:  This is where I diverge from Dave Canterbury. I'm not going to tell you what kind of gun to carry, as that's an intensely personal choice based upon finances, hand size, body shape and local laws; I'm just going to suggest that you have the largest pistol you are comfortable carrying and operating. That last bit is most important; if you don't like practicing with it, then you won't, and what you end up with is just an expensive weight on your hip.

9) Cartridges: A gun is useless without ammunition, so carry as much as is comfortable for you. Personally, I never go anywhere without at least 30 rounds of ammo for my pistol.

10) Cell Phone: Not only is it a critical tool for keeping in touch with your family or calling 911 in an emergency, a smartphone can hold a staggering amount of information in PDF or ebook form. Load it up with info on first aid, knot tying, wilderness survival and other goodies, as well as compass and map apps, and you've tripled its usefulness.

11) Charger: A dead phone is like an empty gun, keep your alive with a spare battery pack. The Intocircuit charger has high marks and is very affordable.

12) Compression Bandage: In other words, a trauma kit. As has been pointed out elsewhere, if you carry a gun for self-defense you need to accept the possibility that you or someone else will be shot at some point, so prepare for it. I am fortunate it that I've never needed to use one, so I have no practical experience in this matter, but from what I have read I firmly believe that the Adventure Medical Trauma Pack is the best one to buy, as it is small enough to fit into a cargo pocket and is full of goodies such as:
  • 5x9 trauma pad
  • package of Quick Clot
  • nitrile gloves
  • triangular bandage
  • gauze
  • antiseptic wipes
  • and even some duct tape!
Pair with an Israeli Bandage and you've got an impressive kit that will help keep someone alive until the ambulance arrives. 


These are my 12 C's of Preparedness, and I have them with me wherever I go. How many do you have?

Friday, October 10, 2014

Don't buy a $10 cookie

Not actually Erin.
Picture by KJ Photography
& is used with permission.
Last week I talked a bit about building up a food reserve, and in the upcoming Episode 8 of the Gun Blog Variety Cast I expand on the best ways to do that.

One of the things I mention is that, while MREs and other forms of survival rations have their place, they aren't ideal for building a prepper pantry -- in fact, one of the first things I mention is that you need to store what you're used to eating. 

But that is for the podcast; this article is for the other side of things, where I will, in fact, talk about survival rations. As far as I'm concerned, there are only two uses for them:
  1. Bought in bulk for use if your pantry runs out
  2. Put in your BOB and eaten if you become a refugee
In the former case, you have several options; I actually have two buckets of food from Wise Company that are put back in case of a hurricane that destroys so much infrastructure we run out of food before resupply is possible, but there are many other options out there, such as #10 cans from Emergency Essentials or crates from Augason Farms. Be warned, though, that long-term food storage can get very pricey very quickly.
(As a point of interest, I'd like to mention that earlier this year American Mercenary did a series on his blog where he and his family subsist on one of those aforementioned Augason Farms crates.  The series isn't properly tagged, but you can find the first post here.)
As stated, these are bulky and expensive, not well suited to bugging out unless you possess a vehicle you know, beyond a shadow of a doubt, will work when SHTF.  The rest of us will have to rely upon inexpensive, lightweight, and most importantly nutritious survival rations, and when it comes to that our options are greatly limited.

I'm not an expert on nutrition by any means. However, I've been doing some research and I believe I can trust the views of the Maine Prepper. He says he is/was a professional soldier, a bodybuilder and a marathon runner, and while I obviously cannot verify any of these claims, he has a good reputation online. And regardless of whether or not you agree with his philosophies, it's rather hard to argue about these particular videos, especially when he starts reading the ingredient lists out loud.

Now on one hand, I feel a bit bad about making a post that consists mainly of someone else's videos. But on the other hand, I want to share this information -- which is the entire point of this blog -- and so rather than talk out of my own rear end, I'd rather defer to someone else who has a good reputation for knowledge. If he turns out to be incorrect, well, I expect that my loyal readers will let me know.

Which leads me to the title of this post: I'm going to confess that I did, in fact, buy not one but TWO $10 cookies back in '09 when I had just started on my prepping voyage.  In my defense, all I can say is that I was new at it -- and this video hadn't been released.  Learn from my mistake, watch Maine Prepper's videos on what makes a good portable survival ration (and what you should stay away from), and put good quality survival food into your get home or bug out bags.


Do not buy Datrex rations for your BOB.


I have tasted Datrex rations. They're... not horrible, but not tasty. A dry, crumbly, mostly tasteless cookie that has a bit of a coconut flavor.


LRP freeze-dried rations: Good, but expensive. 


Here's the link to the store that sells them.  I haven't tried these.


Do not buy Mainstay rations for your BOB, either. 


I haven't tried these, either.


Assemble your own "Poor Man's Rations".


Maine Prepper keeps mentioning a good multivitamin as a supplement for your BOB, and I agree. These are the vitamins I use, but really any decent multivitamin ought to serve as a short term supplement/"food multiplier" for getting from Point A to Point B.


Monday, July 14, 2014

Dandelions, Stinging Nettles and Clover, Oh My!

Three weeds of annoying persistence, with secrets hidden within their simple (and in one case painful!) leaves.

Clover

Clover is an incredibly tasty wild green that people in almost every part of the North American continent walk past without much notice. With over 300 species in an incredibly broad range across the world, this simple little plant is most commonly recognized here in the United States as White Clover and Red Clover (named for the color of their blooms). When most people think of clover, they think of hay and food for animals.  The two species of clover I just mentioned above are the most common and are edible!

"Livada" by Snezana Trifunovic - User:Tsnena.
Licensed under Public domain via Wikimedia Commons.
"Trifolium repens" by Forest & Kim Starr. Licensed under Creative Commons Attribution 3.0
via Wikimedia Commons.
Yes, I said the humble clover is downright tasty. Once upon a time, when I still had a cabin in an area that I enjoyed, I used pick fresh clover and young dandelion leaves to help supplement my salad preps. Clover has a slightly sweet taste and the blossoms are edible as well.

Something to note about red clover: it's a source of many valuable nutrients including calcium, chromium, magnesium, niacin, phosphorus, potassium, thiamine, and vitamin C. There is also a slowly growing body of evidence that suggests that red clover can help lower blood pressure (something to note for those of you who may take medicine for such a thing).

Preparation

  • Seeds and dried flowers from clover can be mixed into flour supplies for breads and other grain stocks to add a boost of nutrients as well as extend the amount of food available for use. 
  • Young clover and flowers are eaten raw. 
  • Steamed clover makes a great substitute for spinach, too. Steam until just welted, season to taste, and dig in!

"Brennnessel 1". Licensed under
Creative Commons Attribution-Share Alike
3.0 via Wikimedia Commons.

Stinging Nettle

My apologies for the itch that may have erupted from your memory. If you were anything like me growing up, stinging nettle was your nemesis when adventuring. However, until a few months ago I was not aware that this bastard plant... was edible. Yes, edible.


Preparation

  • Bring the water to a boil and drop them in.  They are tender almost immediately and ready to take your favorite seasonings.  It's a top wild source for Vitamin A and C. HOWEVER, only use plants a foot tall or less.
  • Older Nettle plant stems can be used for fiber making. 
  • Nettles can also be a source of vegetable rennet. Yes, rennet as in cheese-making rennet.  You boil the plant until there starts to be a oily extraction on top of the water.  I've heard numbers from 2/3 a cup to a cup and a half of chopped nettles for roughly a tablespoon and a half.  The amount of cheese that much will render, the numbers are scattered from 1 lb to 8 lbs of cheese.


Dandelions

"DandelionFlower" by Greg Hume.
Licensed under Creative Commons
Attribution-Share Alike 3.0
via Wikimedia Commons.
Now, dandelions are once again being recognized as food and have been cropping up in articles everywhere. So I'm not going to delve into them here; instead, I'll just give you several links to the articles as those folks have broken down the plant better than I could.


All three of these plants will often be found in the same meadows and fields.  Once you brush up on what they look like, they will be a welcome treat in the spring and early summer after a long winter of dried and canned goods.

The Fine Print


This work is licensed under a Creative Commons Attribution- Noncommercial- No Derivative Works 3.0 License.

Creative Commons License


Erin Palette is a participant in the Amazon Services LLC Associates Program, an affiliate advertising program designed to provide a means for sites to earn advertising fees by advertising and linking to amazon.com.