Showing posts sorted by date for query power pot. Sort by relevance Show all posts

Tuesday, November 12, 2024

Prepper's Pantry: Cooking in the Dark

In a previous article, I talked about different choices for power free ingredient prep. However, this does us only so much good unless we are also able to cook without power. Thankfully, there are a number of different options available to us for this process as well. While some of these alternatives are more accessible for those living in a less urban environment, there should be something available for everyone.

WARNING: several of these methods can produce dangerous combustion residue, such as carbon monoxide, and should never be used indoors.

Whether running off propane or natural gas, a traditional non-electric stove can usually still be used during a power outage. Some of the more modern versions of this appliance may be encumbered by computerized controls (such as touch pads) that limit their utility; however, if there are manual knobs to turn on gas to the burners and matches to light them, then cooking can commence.

Traditional Gas Oven


While this process may not work for activating the oven, many meals can be prepared solely on the stovetop. Just make sure the gas is properly turned off when cooking is done.

Grills
Available in sizes from large to small, and fueled by either charcoal or propane, grills are the next option to discuss. While generally not viable for apartment dwellers (unless they have a balcony or access to a park or other common area), there are a wide variety of choices in this area.

Small cast iron charcoal grills, commonly called hibachi, are the most basic example of this category. Don't let their minimal size mislead you; they can certainly be used to prepare full meals.

Classic Hibachi Style Grill


From here, grills move up in size and expense. Next up are the traditional Weber Buoy or Kettle style charcoal grills and similar designs. There are a variety of options, capacities, and accessories to choose from with these grills.


Propane grills have really taken off over the past few decades, and there are a dizzying variety of sizes, styles, options, and accessories available in this area.


Camp Stoves
On a related (but much more portable) note are classic camp stoves. These come in many sizes, from small enough to perch on top of a small fuel canister...


...to large enough for heating two pots at the same time. These days, most run on propane, but there are other options as well, such as butane.


An even more compact version of the camp stove concept is the small, folding Esbit-type pocket stoves, which are designed to be run off fuel tablets. However, they also can use twigs or even small candles in a pinch.


Fire Pits
For those with appropriate space and zoning, another possibility is a fire pit, either as a permanent emplacement or a free-standing unit.

The Author's Backyard Fire Pit


If you plan on going this route, some sort of grate or pot hanger should be purchased to simplify cooking over an open fire.

Folding Cooking Grate


There are even fire pits on the market that come with cooking surfaces included.


These are just some of the available considerations for cooking when electricity isn't available.

Regardless which option is used, it's always a good idea to have some sort of fire suppression system on hand in case of accidents or emergencies. 

Have fun, and cook safely.

Tuesday, November 21, 2023

Prepper's Pantry: Thanksgiving

For our American readers, this Thursday is Thanksgiving and I hope that we all have much for which to be thankful. At our house, among the usual blessings of power, clean water, and plenty of food, the nearby wildfire has been extinguished... again. Yes, after it was put out the first time, it reignited. With that worry gone for now, we can focus on Thanksgiving Dinner Prep.

A major part of the Thanksgiving tradition is lots of food. While many families have their own favorite items, there are certain standards that are more common. The following is a by no means exhaustive list of some of the items that can be found on the Thanksgiving dinner table.

Main Dishes
Turkey is the traditional cornerstone dish for Thanksgiving. When choosing size, a good estimation is approximately half a pound per person as a minimum, depending on how much you like leftovers. Butterball has a nifty turkey and stuffing calculator on their website.


Since turkey is generally sold frozen, it's recommended to start thawing the turkey a day or more ahead of time. While the USDA suggests three ways (refrigerator, cold water, and microwave), other sources only list the first two. The amount of time required for thawing will depend on the method used and the size of the turkey.

Thawing Times


When cooking a turkey, a good rule of thumb is 13 minutes per pound at 350° F for unstuffed (about 3 hours for a 12 to 14 pound turkey), or 15 minutes per pound for a stuffed turkey. We layer bacon across the top of ours, because bacon makes everything better.

Turkey ready to go into the oven


Ham is another traditional Thanksgiving food and can be prepared many ways. Pre-cooked spiral cut hams seem to be the most common these days, and they need only to be heated before serving.

Beef Brisket is a perennial favorite at any time, and has become more popular at Thanksgiving in recent years. There are a near infinite number of ways to prepare this dish.

Sides
As regular readers know, I like to bake. For Thanksgiving, I usually make one of my favorites, potato rolls are one of my favorites. This is the recipe I use.

Potato Rolls

Ingredients

  • 1 cup lukewarm potato water*
  • 1 large egg
  • 2 teaspoons instant yeast
  • 3 to 3 1/4 cups all-purpose Flour
  • 1 1/4 teaspoons salt
  • 3 tablespoons sugar
  • 1/4 cup (4 tablespoons) unsalted butter, very soft
  • 1/4 cup nonfat dry milk

*Water in which you've boiled potatoes. If you don't have potato water, use a scant cup water plus 1/4 cup dried potato flakes.

Directions

  1. Whisk together the yeast, egg and potato water.
  2. Whisk together the remaining dry ingredients, stirring everything together as best you can. Add the soft butter.
  3. Mix and knead everything together until you've made a smooth dough. If you're kneading in a stand mixer, it should take 5 to 7 minutes at second speed, and the dough should barely clean the sides of the bowl, perhaps sticking a bit at the bottom.
  4. Place the dough in a lightly greased bowl. Cover the bowl, and allow the dough to rise, at room temperature, until it's nearly doubled in bulk. This is usually about an hour, but the rise of yeast bread is always an estimation. It may take longer, so be sure to give it enough time to become quite puffy.
  5. While the dough is rising, lightly grease a 9" x 13" pan.
  6. Gently deflate the dough, and transfer it to a lightly greased work surface. Divide it into 16 pieces.
  7. Shape each piece into a rough ball by pulling the dough into a very small knot at the bottom, then rolling it under the palm of your hand into a smooth ball.
  8. Place rolls in the 9" x 13" pan, spacing them evenly; don't worry if they touch one another.
  9. Cover the pan with lightly greased plastic wrap, and allow the rolls to rise till they're very puffy, and have reached out and touched one another, about 1 hour. While the rolls are rising, preheat the oven to 350°F.
  10. Bake the rolls until they're a deep golden brown on top, and lighter on the sides, 20 to 25 minutes.
  11. Remove the rolls from the oven, and after 2 or 3 minutes, carefully transfer them to a rack. They'll be hot and delicate, so be careful.

Potato Rolls

Mashed Potatoes are another staple. While they can be made with potato flakes or another shelf stable option, fresh is better. My Wife makes ours with sour cream instead of milk. We also occasionally add roasted garlic.

Glazed Carrots were a holiday tradition in my family, and I still make them every year. Boil the carrots until they just start to get soft, drain the water and add butter and brown sugar to the still warm pot. Stir until the butter melts and the carrots are evenly coated.

Stuffing and Dressing can cause serious arguments. In general, stuffing is cooked inside the bird, while dressing is cooked on the stovetop or in a casserole. This is another dish with a near-infinite variety.

Dessert

Pumpkin Cheesecake
My Wife made this for the first time shortly after we started dating, and it has been mandatory ever since. This needs to chill overnight, so plan accordingly.

Ingredients

Crust

  • 9 whole graham crackers (about 4 ounces), broken
  • 1/4 cup sugar
  • 1 teaspoon ground cinnamon
  • 1/4 cup (1/2 stick) butter, melted

Filling

  • 4 8-ounce packages cream cheese, room temperature
  • 1 1/2 cups sugar
  • 3 large eggs
  • 1 15-ounce can pure pumpkin
  • 1 cup whipping cream
  • 2 teaspoons vanilla extract
  • 2 teaspoons ground cinnamon
  • 1 teaspoon ground ginger
  • 1/2 teaspoon ground nutmeg
  • 1/2 teaspoon ground allspice
  • 1/4 teaspoon ground cloves

Recipe

For crust:

  1. Position rack in center of oven and preheat to 350° F.
  2. Wrap a double layer of heavy-duty foil around outside of 10-inch diameter springform pan.
  3. Combine graham crackers, sugar, and cinnamon in processor. Blend until graham crackers are very finely ground. Drizzle butter over. Using on/off turns, blend until crumbs begin to stick together. Press crumbs onto bottom (not sides) of springform pan.
  4. Bake until crust is slightly golden, about 10 minutes.
  5. Transfer to rack and cool while preparing filling. Maintain oven temperature.

For filling:

  1. Using electric mixer, beat cream cheese and sugar in large bowl until smooth and fluffy.
  2. Beat in eggs 1 at a time.
  3. Add pumpkin and remaining ingredients.
  4. Beat just until blended.
  5. Pour filling into prepared crust.
  6. Place springform pan in large roasting pan.
  7. Add enough water to come halfway up sides of springform pan.
  8. Bake cheesecake until slightly puffed and softly set and top is golden, about 1.5 hours. Transfer springform pan to rack and cool. Cover and refrigerate cake overnight.
  9. Using knife, cut around sides of pan to loosen cake. Release pan sides. Cut cheesecake into wedges and serve.


There are many other foods that may be found on the Thanksgiving dinner table, such as cranberry sauce, either home-made or canned, creamed onions, and sweet potatoes. Feel free to comment with some of your favorites.

To all our readers, have a safe and happy Thanksgiving.

Thursday, February 2, 2023

Guest Post: MSR Dragonfly Review

by Stephen

Hello intrepid readers! My name is Stephen, and I am a recovering gearhead. My first camping trip was at age six when my family drove 12 hours to the Upper Peninsula and spent a week at various campgrounds there. Between family and Boy Scouts, my memories have only gotten more numerous and there are too many trips of all sorts to count.   

In a 72-hour bug-out scenario, you can survive on cold rations or starve, but what if that situation goes longer? What if you are bugging in without power? Hot food provides morale as well as sustenance.  

Four basic fuel types exist: wood, solid, liquid, and gas. 
  • Wood can be scavenged so you do not have to carry it, but takes longer to get lit, gives inconsistent heat, and requires more effort to collect fuel.  
  • Solid fuel tabs are easy to use, but lack temperature control since they are all-or-nothing. 
  • Liquid fuels work in a wider variety of temperatures and are scavengeable, but lack the quick plug-and-play of a butane or propane canister.  
  • Gas, for all its ease of use, suffers in performance when temperatures are below freezing and may even stop working when it's cold enough. 
So which one did I pick? 

Let me introduce you to the MSR Dragonfly, a multi-liquid fuel backpacking stove.

https://amzn.to/3jowwPg


My dad bought this stove in the 90s as part of his preps for Y2K, and in the early 2000s we dug it out to use on a 50 mile backpacking trip with my best friend and his dad. As an illustration of the usefulness of having a liquid fuel system: we forgot to fill the fuel bottle, but since this will burn anything from gasoline to jet fuel, we were not out of luck, and a gas station sufficed to get us topped off.  

As with any liquid fuel stove, pressurizing the fuel tank -- in this case steel bottles that, other than the red color and warnings all over them, could be mistaken for a water bottle -- takes some elbow grease. Also, as the fuel runs low, you'll have to pump more to get the same pressure. Since you don't want to carry or store the bottle pressurized, this means you will get a workout with each meal.  

The stove folds up fairly compactly, and will store in a pot as MSR advertises. Its three legs provide much more stability than a pocket-rocket style stove (which Erin reviewed back in April 2022) since the footprint is wider than your typical fuel canister.  

One other difference in usage is the pre-heating step where you let out a little fuel, then ignite it with the fuel turned off. This takes some getting used to; I remember the little fireballs we created at first, learning to control how much fuel was released. Once the flame dies, open up the fuel again, ignite, and proceed to cook.

Although it definitely had some adjustability, my dad’s version didn't simmer as the website claims. We burned some pancakes in our 70’s Boy Scout mess kits, though it was probably just as much of a cookware and/or batter technique issue as stove functionality. It served us well on that trip, and when I moved out on my own I purchased one. They've definitely changed the model over the 20 years since then, because my much more recent purchase looks drastically different.  

The MSR Dragonfly is not the lightest stove, weighing 1 lb 3 oz without the fuel bottle, but I want it for it size. As an apartment dweller for the time being, I am at risk of losing cooking capabilities with a loss of electricity, so having a backup is comforting. What's more, it will hold my two liter stove-top pressure cooker, which I bought for the exact purpose of cooking beans and rice in a more fuel-efficient manner. No, I won't carry that pot in a bug-out situation, but bugging in whenever possible is always preferable.

Fuel flexibility is also a huge consideration for my prepping lifestyle. I can burn five different liquid fuels (gasoline, diesel, jet fuel, kerosene, and white gas) with just the change of a nozzle, using only a screwdriver. Even at current prices, gasoline will provide way more burn time than a small cannister of isobutene at the same price: Amazon has butane canisters for $2.14 per oz, versus $0.04 per oz of gasoline (presuming $3.99/gallon). If you stock up diesel or kerosene you also get more than twice the energy efficiency per MSR specs, though kerosene does burn dirtier; I lack experience with diesel to comment.  

https://amzn.to/3wSxLsU


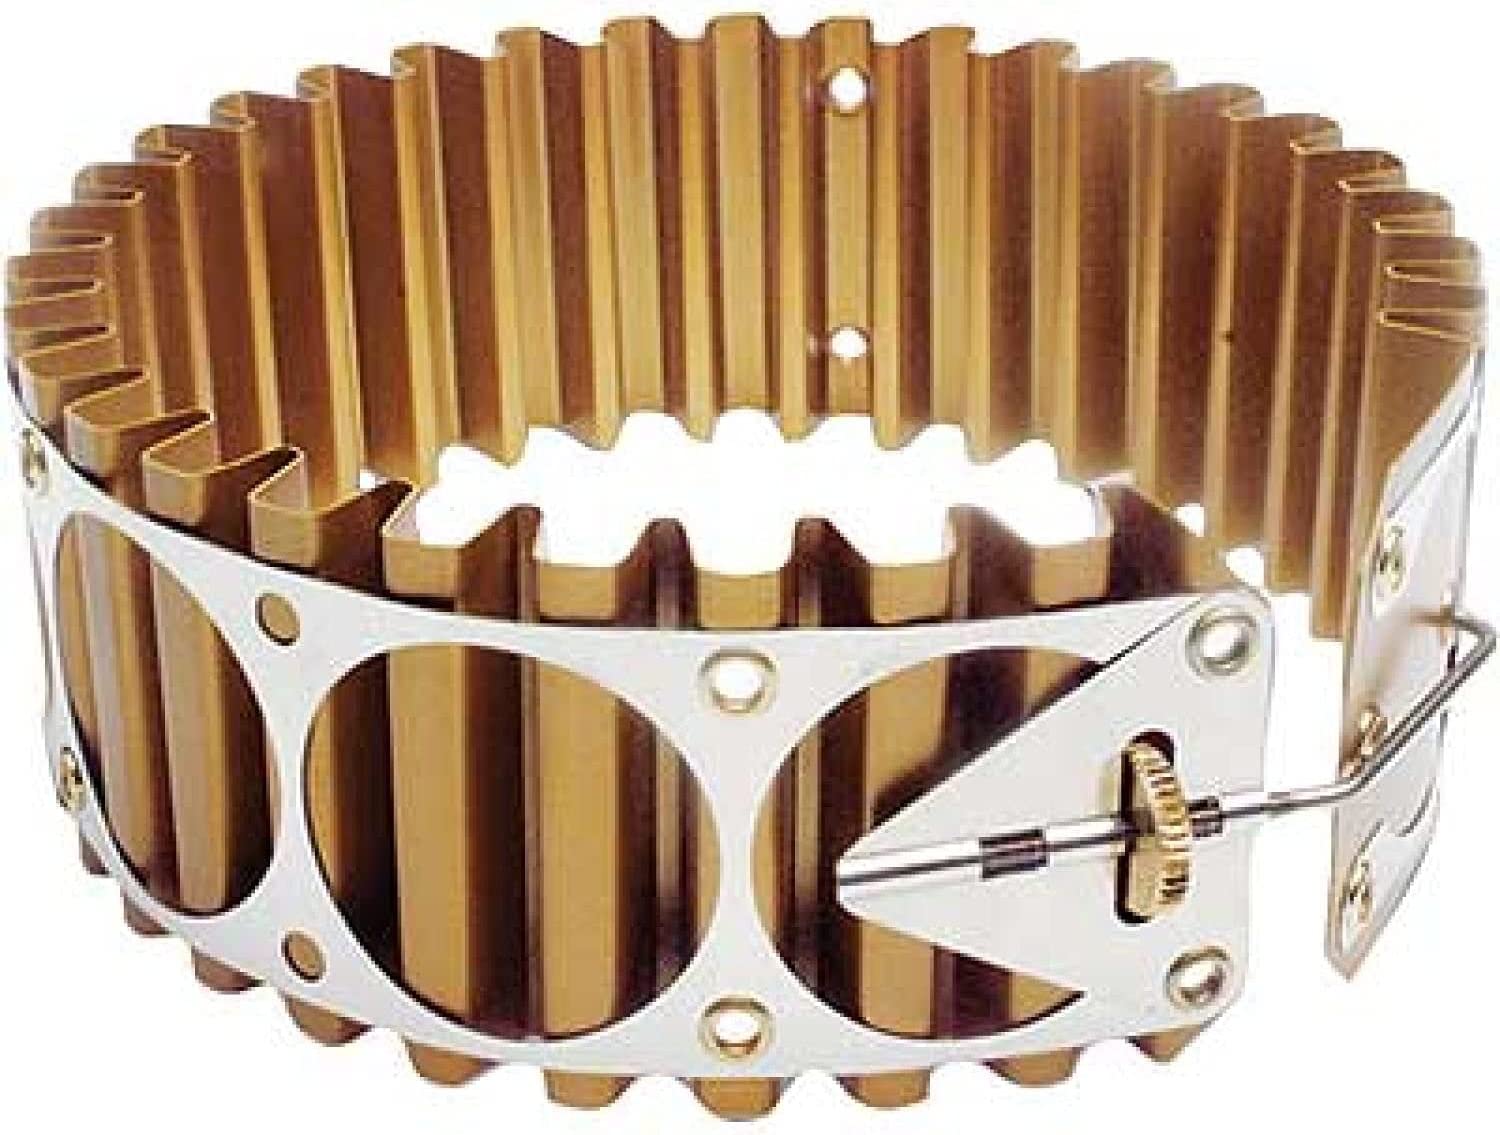
If money and weight are no issue, another way to increase performance is to get the heat exchanger which clamps onto the bottom of a pot. This prevents the heat escape around the edges of the pot that Erin saw in using the pocket rocket at full blast. My dad owned the heat exchanger, and it needed a little monkeying around, but we definitely noticed a difference in performance. 

In theory, the Dragonfly stove will need more maintenance than many stoves, such as the replacement of o-rings. MSR recommends this be done on a yearly basis regardless of use, but my dad’s stove sat at least a decade without use and worked perfectly fine.  

I know of backpackers who only use the MSR Pocket Rocket, and its price, weight, and ease of use are definitely appealing; it's for those reasons that I want to add it to my fiancée’s bag when I have the funds. In my opinion, though, the Dragonfly’s capabilities make it worth its extra weight and complexity. 

Saturday, September 24, 2022

Guest Post: Fire Preparedness Aboard Ship

 by Sean Smock


Sean is a member of our Facebook Group. This is his first post for us.

Let us consider the concern of fire while aboard a ship. We’re going to ignore anything with a professional crew, who have people trained in damage control and fire fighting, as well as boats which are too small to go very far from shore like rowboats, canoes, and daysailers. Instead, we will focus on ships that will be where you will be spending the night, far from shore, with many exciting ways in which they can catch fire. 

Much of what I’m discussing will be familiar to people who are experts at land based firefighting, or at least have some level of familiarity with land firefighting, as smoke detectors, the fire triangle/tetrahedron, extinguishing agents, and fire types are all factors on land as well as on the water. 

Detection 
Detection is first because it is the most important. If you’re not planning on sleeping aboard the craft, and it’s a small enough craft for you to have line of sight on everything that’s liable to catch on fire, you can forgo a maritime smoke/fire detector. However, if you’re going to be sleeping or the vessel is larger, your options are “Set a fire watch” and “get smoke/fire detectors”. This is quite frankly the most important part of fire preparedness: an undetected small fire will become a big fire, and an undetected big fire will pose a major threat to life and limb for everyone on board. All effective action regarding fire requires that the fire be detected, and the earlier the better, because you can't put extinguishing agent on a small fire that you don’t know about. You can easily be trapped by, or overcome by the smoke and gaseous byproducts of, a larger fire that you are unaware of. If you do nothing else, buy a smoke detector. 

The Fire Triangle/Tetrahedron
In order to sustain flame, each fire needs three things:
  1. Heat
  2. Fuel
  3. Oxidizer
This gives you the fire triangle. Add the chemical reaction that is fire, and you have the fire tetrahedron. Remove one leg of this triangle/tetrahedron and the fire goes out.

Basic Extinguishing Agents
All extinguishing agents act to remove one of those legs:
  • Water mostly acts as a cooling agent, absorbing heat (especially when it turns into steam) and removing it from the fire, which makes it very effective at not only putting fires out, but making sure they stay out. Unfortunately, water is only safe to use on solid fuel fires.
  • CO2 acts as a smothering agent, displacing oxygen and removing the oxidizer from the equation. Just be aware that CO2 extinguishers build up static electricity, and thus must be grounded prior to use. 
  • AFFF (Aqueous Film Forming Fluid) and equivalent can be used as a cooling agent like water, or as a smothering agent for liquid fuel fires. In both uses, it works to help keep the fire out, limiting the risk of reflash. 
  • Dry chemical extinguishers interrupt the chemical reaction itself. If you acquire no other extinguishers, a dry chemical one is probably the one to go with, as most of the time dry chemical will be effective. If you own a fire extinguisher, it's probably a dry chemical one; they’re the most common, the cheapest, and work on most fire types. At the prices they sell for on Amazon, even on the high end, everyone should have at least one, even if you don’t have a boat. When using dry chemicals, be aware that they’re very irritating to breathe, and are usually highly corrosive, and electronics will need to be detail cleaned or replaced. Even if you avoid any smoke inhalation, dry chemical will make you wish for breathing protection. 
  • Fire blankets aren’t technically an extinguishing agent, but they’re a very useful and inexpensive tool, and can be used to smother some small fires. 
You should have extinguishers in all spaces where cooking, engines, gasoline, oil, poorly managed extension cords/power strips, and dryers may be found. 

Fire Types
There are four classes of fire to be concerned about, and each of them is fought in somewhat different ways, (mostly) using one of the above listed extinguishers.
  • Class A (Alpha): These are the basic solid fuels: wood, cloth, dried paint, pipe insulation, plastics, etc. Water, AFFF, and dry chemical extinguishers are all effective. 
  • Class B (Bravo): These are liquid and gaseous fuels: propane, gasoline, kerosene, etc. 
  • Class C (Charlie): Electrical fires.
  • Class D (Delta): Metal fires (and not just magnesium, either; even iron can burn under the right conditions).
Fire Alarms
The first thing you do upon discovering a fire, regardless of size or type, is to announce that there is a fire and the rough location of that fire in the loudest voice that you can manage, and using a PA or internal mass communication system if at all possible. Do this even before attempting to fight the fire! Quite frankly, fires aboard a ship are too dangerous for you to take the risk of being overcome by the fire prior to warning others.

Do not attempt to fight large interior fires. If you can’t put a fire out quickly, evacuate and do not attempt to fight it. Becoming a Screaming Alpha is one of the less pleasant ways to leave life, and smoke inhalation isn’t much fun either. If you have any dependents that are unable to evacuate, or whom cannot be trusted to evacuate on their own, that should bias you towards evacuation rather than fighting the fire. Lives are more important than things, so do not risk the lives of others to save your boat. 

Fighting Fires
When it comes to actually fighting the fires, there is some divergence. Most extinguishing agents will work on Class A fires; water, AFFF, dry chemical, and (for smaller fires) fire blankets are all effective. Just follow the directions on the extinguisher for using it and aim at the base of the fire.

Class B fires are a bit trickier, as water and CO2 are not options, and per at least one study from the Netherlands, neither are fire blankets. If the fire is contained in a cooking pot, put the lid on it; otherwise, AFFF and dry chemical should be used. AFFF should be applied not directly to the fire, but rather by bouncing it gently off of something else onto trying the burning liquid; the reason for doing this is to avoid splashing the burning liquid around while still covering the entirety of the flammable liquid with foam. With dry chemical extinguishers, use as you would with a class A fire.

The best way to fight a Class C is to turn off the power so that it becomes a class A fire. This not only makes it easier to fight the fire, it removes the initial source of the fire too, so that it won’t start the fire right back up after you put it out. Know the electrical system of your craft, and what to do to secure power to electrical equipment quickly. If you can’t turn off power, you’re going to be using CO2 or dry chemicals to fight it. 

If you’re unlucky enough to encounter a Class D fire on your ship, be aware that none of the common extinguishing agents are recommended for use on such fires. Jettison the fire if at all possible; if that isn't possible, then abandon ship. 

At the risk of sounding like a broken record, keep in mind that extinguishers are not meant for fighting large conflagrations, and saving people is more important than saving things. If you could reasonably say “the room is on fire” instead of saying “that pile of oil soaked rags is on fire” it’s time to make like Brave Sir Robin and bravely run away. Even if you’ve got a Self-Contained Breathing Apparatus (SCBA) and full Firefighting Ensemble, you probably won’t have a team of trained firefighters helping you -- and if you do, and you’re not a trained firefighter, get out of the way and let them do their job.

If you successfully put the fire out, congratulations! You’re not done yet, though. Now you get to sit there with an extinguisher and make sure it doesn’t reflash until the firefighters arrives. This is especially important with CO2 and dry chemical extinguishers, because once the CO2 or dry chemical clears out, the fire will quickly resume burning if the fuel is still hot enough. Regardless, just because the fire is out does not mean it will stay out, so keep a weather eye on it until the professionals take over. 

The Most Important Thing
In the end, the most important thing is detection, followed closely by preservation of life. Having all the right knowledge and  extinguishers does you no good if you don’t know about the fire. Even if you do have the knowledge, err on the side of caution, and don’t try to fight fires that are beyond your capability. A boat can be replaced; a family cannot.

Friday, February 25, 2022

Product Review: BioLite CampStove

Not actually Erin.
& is used with permission.
At some point in the semi-distant past, likely some time between 2017 and 2019, I took advantage of a Black Friday sale and purchased a BioLite CampStove kit for significantly less than this Amazon price, and then owing to some sort of family drama I promptly forgot about it until now. 

For those who don't know, the BioLite CampStove is a double-walled camp stove in the style of the Solo, except that has a battery-powered fan to drive air into the fire, not only keeping it burning but also supercharging it. While the battery can be charged via USB, the really clever part of the CampStove's engineering is that the fan is also powered by the temperature differential between the fire and a probe that extends into the burn chamber, which means that the simple act of combustion will turn on the fan when it hot enough. The fan feeds air to the fire, which makes it burn hotter, which then charges the onboard battery. Moreover, you can use this battery to charge USB electronics, either directly as the fire burns or by using the battery-fan unit as a power bank. 

As someone who likes fires but has problems getting them started, and who also likes electronics, you can see why this would intrigue me. I truly wanted to like this camp stove, but... well, you'll find out. 

Again, the tests are: 
  1. How easy is it to light and keep fed, using natural materials. 
  2. How quickly it will bring 16 ounces of water to boil in a steel mug. 
  3. How quickly it will bring 24 ounces of water to boil in an uncovered aluminum pot.
  4. How quickly it will cook a single egg on an aluminum skillet. 
All tests were performed on my back porch where wind would not be a factor. I used natural fuels, but since this was not a referendum on my fire-making skills, I used a lighter to start them.

https://amzn.to/3IohxvQ


First Impressions
The BioLite CampStove stores inside the KettlePot in a handy, but rather bulky, 10.2" high by 5.2" across cylinder that weighs 3.1 lbs in total. The stove assembles quickly, and the instructions are pretty idiot-proof; I have full confidence that I will achieve a spectacular burn with this stove. 

I do have concerns, however. First, the burn chamber isn't very large, especially since the fire sensor/charging probe extends a good way into it. 

https://amzn.to/3IohxvQ


Second, this is a tripod design with a fairly heavy battery on one end. Admittedly, the battery is positioned over the strongest leg, but this is not the steadiest of designs, especially with it being so much taller than it is wide; four legs would have been better. 

https://amzn.to/3IohxvQ


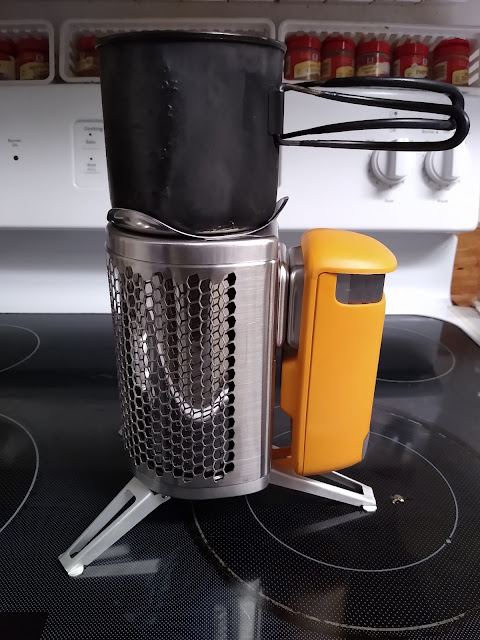
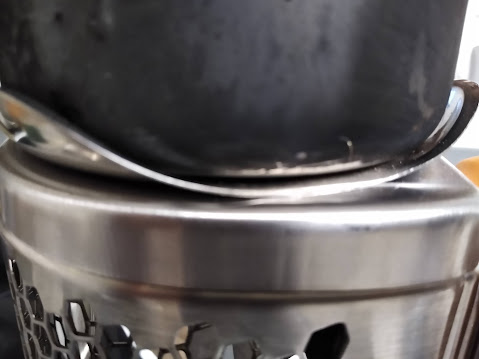
Finally, the mouth of the stove is shaped such that I cannot place my 16 ounce steel mug on it, because doing so will completely cover the combustion chamber. 


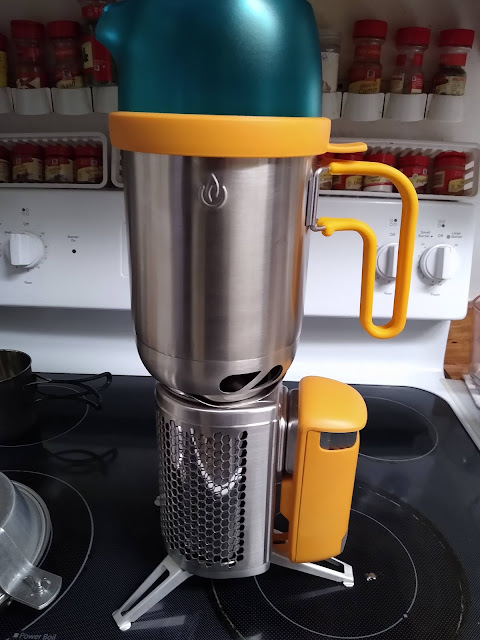
Fortunately, I had the KettlePot, which is designed to sit atop the CampStove. 


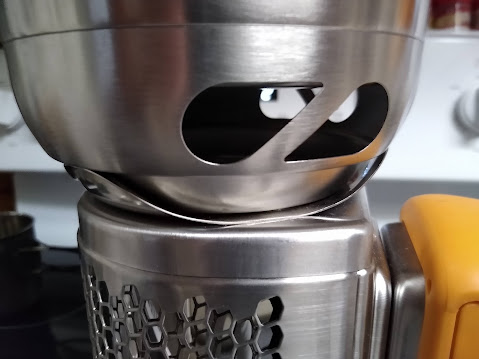
You can see it has a raised bottom with vents cut into it to prevent obstruction of the burn chamber. 


This forced me to change the parameters of some of the tests. 

Test 1: Fire Starting
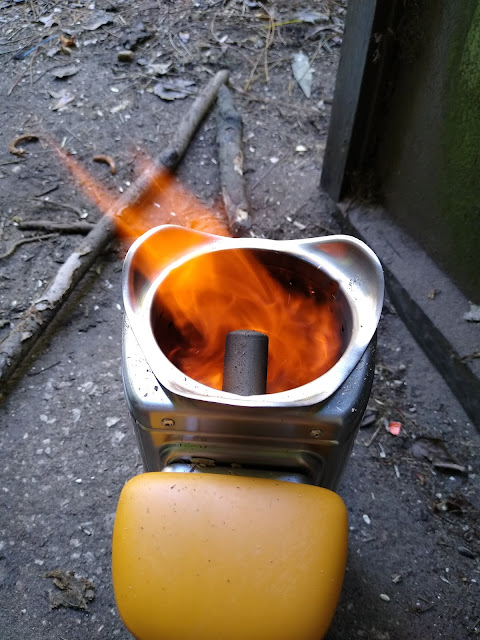
As I predicted, starting a fire inside the CampStove was insanely easy. I filled the burn chamber with locally sourced sticks, set them on fire, and turned on the fan. Within seconds I had a very pleasant whirlwind of flame roiling within the stove. I tried to capture a picture of it, but my phone's camera isn't good enough. Just imagine a tornado of flame and you have the right idea. 


As you might expect, turbo-charging your fire means it goes through fuel at a much faster rate than non-turbo stoves. What's more, I discovered that I needed a long stick to act as a poker to break the burned wood so that I could add more. If you think this will be a problem when trying to boil water, you are absolutely correct. 

I wish to make it clear that I used the highest fan setting for these tests, not only because I was timing them, but also because the instructions for the stove say that when you trying to boil you should have the fan on high. Lower settings are for using the grill accessory or for slower cooking.

From left to right: Fire intensity gauge, fan speed setting, battery charge level.


Test 2: Cup KettlePot Boil
Since I couldn't use my regular cup, I placed 16 oz of cold water into the KettlePot, and because I had to change the testing medium anyway I decided to put the top onto the kettle because that's how the instructions say it's supposed to be done. 
Protip: if you use the KettlePot, instead of firmly affixing the silicone ring around the kettle's lip, just place it gently on top of the kettle. This is because the transparent lid of the kettle becomes covered with condensation pretty much the moment the water starts to bubble, making it impossible to see if the water has reached a rolling boil or not. If the lid is firmly affixed you will need to look through the pour spout, in which case you get a face full of steam. However, if the lid is just resting on the kettle, you can lift it up to see the status of the boil and then put it back down. Just don't forget to put the top firmly in place before pouring!
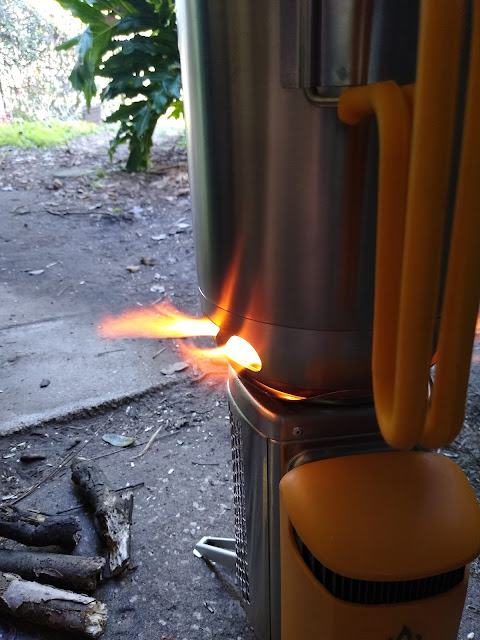
Be careful!


It took 8.5 minutes to get 16 oz of water to boil. At first the fire was blazing along merrily, with jets coming out of the vents -- which means you need to be very careful with people giving it enough space! -- however, the fire dwindled fairly rapidly to the point where I was able to feed small sticks through the vents. Eventually it reached a point where the fan shut down, and I had to take the kettle off to add more fuel and re-start the fire. 

Test 3: Pot Boil
This simply didn't work. While my pot did fit on the stove, there wasn't enough room between it and the burn chamber to feed fuel into the fire, and after 10.5 minutes the fire dwindled. I picked up the pot by the bail, but somehow I didn't lift it just right, and I managed to knock the Campstove Over. 

I'll repeat that: Lifting the pot to add more fuel resulted in a BURNING STOVE falling on its side. Fortunately, neither I nor my porch were burned, but I decided that using anything except the KettlePot wasn't safe. 

I allowed the kettle to cool, filled it with 24 oz of cold water, and restarted the test. It took 14.5 minutes of work just to get it bubbling, and by 17 minutes it was mostly boiling (but not rolling), By this time I was out of fuel and patience and ended the experiment. 

A Realization: Use Wood Pellets!
I was about to give up on this stove when I realized that wood pellet fuel existed, and I could fill the stove pretty full with it. This would give me a longer burn time, and if I needed to refuel it would be easy to do. 

Let me tell you, wood pellets makes all the difference with this stove. I recommend you use this fuel exclusively, as you will see from the performance below. This eliminates the CampStove from consideration as a backpacking or survival stove, but it is still a very convenient tool for use while car camping. 

Test 2.5: 16 oz KettlePot Boil with Wood Pellets
4 minutes to a rolling boil, and I didn't need to add more fuel. Then I extinguished the fire to allow the kettle to cool. 

Test 3.5: 24 oz KettlePot Boil with Wood Pellets
6 minutes to a rolling boil, and still I didn't need to add more fuel. 

Test 4: Egg Cooking
1 minute, and I still had enough fuel to perform a bonus test.

Bonus Test: the Kelly Kettle
If you don't recall my original test of the Kelly Kettle, go here. It's an amazing way to boil water, but it's not good for much else. 

The Kelly Kettle was able to sit on the CampStove fairly well, but at a slight angle. I positioned the pour spout such that it was on the high side, because the last thing I wanted was for boiling water to spill out onto the stove, especially the electronic fan. 

It only took 2.5 minutes to bring 16 oz of water to boil, and though my fire was burning there wasn't much fuel left.

While this combination doubles the bulk, it's pretty much an ideal combination for car camping, although it might be advisable to look for a grate to stabilize the kettle. Picking up a hot Kelly Kettle is a special technique at the best of times, and doubly so when it's sitting unevenly. Still, I managed to do it and not get burned.

My Rating
This is one of those "Well, it depends" situations. If you're going car camping and have a bag of wood pellets with you, its performance is A+. However, given its price and limitations, I can't say that it's a good use of your money. I think you're better off cooking with a gas stove while camping, and a barbecue grill at home. 

For a camping or survival stove, it's a C- at best. The fan is useful, but I can build a fire in the much lighter and much easier to feed Solo Stove that works just fine without a fan. The ability to charge your electronics is nice, but the same can be achieved with any number of solar-powered banks or hand-crank generators. 

I really wanted to like this stove more, and I am disappointed that it didn't live up to my expectations.

Thursday, September 2, 2021

How To Keep Cooking Without Power

The dust has settled and the First 72 Hours have passed. Follow along as I build a long term plan via Prudent Prepping.

A friend asked me for ideas on how to cook in the off chance we have a really long power outage. The follow-up question on how to keep the lights on was a bit more difficult, and I dodged it for reasons I will explain later in this article. 
 
Getting Hot
Stealth Gas Grill in a Condo

"How will I cook if the power is off?" is an easy answer for most people people here in California, as barbecue grills are everywhere. You'll even find them in apartments and condo communities where they aren't allowed! The grills that are most often outright banned are charcoal, but some areas do prohibit all grills. Even so, grills are still in use.

Many homes here are equipped with gas stoves which might be used without power (your gas stove may need electricity to work the valves or generate a spark, which might be a problem), but only so long as there is adequate ventilation when the stove is used! Since there is no electricity to operate exhaust fans, operating anything that burns any fuel indoors should not to be done! I recommend cooking outdoors only, no matter what your cooking source happens to be. 


Another option is one which many people grew up using: The classic Coleman stove! From the Amazon ad:
https://amzn.to/2WHH6VI

  • One 7,500 BTU burner and one 6,500 BTU burner
  • Runs on Coleman Fuel or unleaded gas
  • Boil a quart of water in four minutes
  • 2 Burner, 14,000 BTU Cooking Power
  • Limited Lifetime
There are many different sizes and shapes of Coleman stoves, so this may not be exactly what you own or remember, but it is a good representation of the type. Obviously you need fuel to run this stove, so I'm hoping there is some already stored for emergency use, and per the ad copy this will use either Coleman fuel or the same unleaded gas you use in your car. Chaplain Tim discussed how to retrieve gas in a serious emergency; read all of his post before thinking about, much less trying, his suggestions.

As another word of warning, don't use two cycle gas/oil mixtures in your stove! Certain types of motors don't have valves, and to lubricate them motor oil was mixed in with the gas, which is known as two cycle. If you store gasoline, be sure to label the cans correctly!

A variation of this stove uses the same propane as in your gas barbecue, either in smaller canisters or with an adapter for your full size tank. There are too many models to list, so check your exact stove model number for proper fit. 

Backpacking Stoves
There are many different types of these as well, but there is one in particular that all of us seem to recommend: The Solo Stove!

  • GEAR OF THE YEAR WINNER
  • PATENTED DESIGN - LESS SMOKE. The patented design features a unique double wall that creates ultra-clean gasification and a secondary combustion. This allows fuel to burn more completely and with less smoke.
  • FUEL IS FREE.
  • COMPACT SPACE SAVING DESIGN. The Solo Stove Titan is designed to nest inside the companion Solo Stove Pot 1800 (sold separately) leaving you with more room in your backpack.
  • LIGHTWEIGHT & FAST BOIL TIME. Boils water in 4-6 mins (34 fl oz. water). 5.1" Diameter, 5.6"/7.9” tall (packed/assembled). Weighs only 16.5 oz. Made of premium stainless steel and nichrome wire. Nylon stuff sack included.
I believe all of us here have at least one Solo stove. I am a late convert to this wonderful piece of equipment, but now I own two. One is in my gear and one is being kept for the Purple Pack Lady, as soon as she is convinced it is useful.

What About Electrical Appliances?
There are ways to safely run electric appliances, but first: I am not an Electrician or a licensed contractor, so I will not be giving advice on how to power up your house!

If you care to read posts from our other bloggers on how to do this, I suggest starting with this post by Lokidude, who is a licensed electrician and who speaks from experience. After that, please use the 'Search' box in the upper left corner of the blog and enter, 'Generator' to see everything else.

Recap And Takeaway 
  • Plan ahead for your cooking needs, either with a spare propane tank or the proper fuel for your stove.
  • Remember, No Burning Of Any Type In Enclosed Spaces! There are too many deaths every year from improper use of grills.
  • Nothing was purchased this week but as we get closer to Christmas, keep your eyes open for sales! That's how I scored my nifty Solo Combo kit!
* * *

Just a reminder: if you plan on buying anything through Amazon, please consider using our referral link. When you do, a portion of the sale comes back here to help keep this site running!

If you have comments, suggestions or corrections, please post them so we all can learn. And remember, Some Is Always Better Than None!

NOTE: All items tested were purchased by me. No products have been loaned in exchange for a favorable review. Any items sent to me for T&E will be listed as such. Suck it Feds.

Wednesday, July 8, 2020

Prudent Prepping: Summer Recharge

The dust has settled and the First 72 Hours have passed. Follow along as I build a long term plan via Prudent Prepping. 

It's time for me to check all the smaller things in my car house and gear, starting with my Get Home Bag.

What's Next?
Previously I talked about swapping out winter clothes for lighter weight ones in my GHB; I am also looking at changing out the food I carry and the expiration dates on the OTC medicines. The result of checking all these dates is that, like tipping a domino, I end up checking on everything else in the bag, as well as my Every Day Carry pouch. Today I'll talk about the flashlights I carry.

I carry one in my EDC pouch, since it weighs next to nothing and puts out more than enough light for what is basically a miniature, emergency flashlight. 
From the Amazon ad:

https://amzn.to/3iM4Luu

  • ♥♥Ultra Bright: This mini penlight gives out max 150 lumens. Super bright in a dark or lit room and lasts quite two hours with moderate use(keep on) on just one alkaline battery(not included), sufficient to light your way and light small dark spaces.
  • ♥♥Pocket Size: This flashlight is small and light enough to slip into a pocket, backpack or purse. Super Mini size is lightweight and small enough for EDC and fits in the palm of your hand. Only weighting about 30g.
  • ♥♥Clip on Flashlight: With a clip, the pen light could also be used as cap light for your convenience. Easy to clip to your belt, remove it if you don't need it.
  • ♥♥Skid-Proof Water-Resistant Design: Suitable for cycling, hiking, camping and other outdoor activities. Our flashlight set is made of high quality 6061T aluminum alloy with no worried using in rain, snow or emergency situations.
  • ♥♥Safe and Warranty Guarranteed: High-Efficiency and Great Output LED Chip with over charging protection, short circuit protection and reverse connected protection. All of Hatori Flashlights has 100% SATISFACTION GUARANTEE and NO HASSLE 90-DAY MONEY BACK GUARANTEE.
I changed out the AAA battery in it and rotated the 3 spare AAA's into the give-away pot.

Nitecore P12GT

https://amzn.to/3ejjASd
I originally bought a Nitecore P12 GT almost 2 years ago, and I reviewed it in this post from August 2018! Pictured is the Ultimate Package I purchased later so I could have a dedicated charger and two more batteries. 

From the Amazon ad for the Ultimate Bundle:
  • Longer throwing upgrade to 350 yards from the 254 yard throw of the P12. Utilizes Cree XP-L LED, with 200% more intensity than the Cree XM-L2 in the P12
  • Blasts up to 1000 lumens across four brightness levels. Three special modes of SOS, strobe, and beacon
  • Tactical tail cap switch provides constant or momentary on, while side mode switch toggles through brightnesses
  • Various functional purposes: military, law enforcement, hunting, search and rescue, and emergency preparedness

One sits in the driver door pocket of my car, Velcroed to the inside where I can reach it easily, and the other is on my night stand. 

After using these lights for 2 years, everything that is listed as a Like in my previous post continues to be a Like, and the Like Less items (which are certainly very minor personal quibbles and not a function complaint) are still the same: the light could possibly roll if the angled surface is steep and, like every other "All The Lumens" flashlights, this sucker gets hot fairly quickly. It won't burn your hand after 5 minutes, but it's definitely uncomfortable in your bare hand.

Last, but certainly not least, the CL10 model was a Christmas gift from Erin Palette, our long-suffering and excellent Editrix. I reviewed that lantern in this post, but the gift was from at least two years before this. 

My review stands as written, but Etekcity has upgraded the lantern with some new features while keeping almost the same form factor.

https://amzn.to/2Oa5kjM
From the Amazon Ad:
  • ULTRA BRIGHT: This lantern includes 30 individual low consumption LED bulbs carrying 360° of luminous light while saving energy
  • LONG-LASTING: Light up at least to 30 hours of regular, continuous use with enough battery capacity (batteries pre-installed in the lantern).
  • 4 LEVELS BRIGHTNESS CONTROL: Easily adjust the brightness with dimmer button to fit the environment for camping, reading, power outage, emergency, hiking, backpacking etc.
  • MAGNETIC BASE: Effortlessly stick it to any metal frames for hand-free lighting in any working environment.
  • DURABLE MATERIALS: Constructed with military grade ABS material; FCC Certified, RoHS Compliant.
  • COMPACT & LIGHTWEIGHT: The extremely lightweight build allows you to take lanterns on the go with ease. When not in use collapse the lantern to a smaller size; taking up little space.
  • TACTICAL STORAGE: The top lid of the lantern contains a small room for storing some small things like some change, yours keys, some spare batteries, etc.
  • BUY WITH CONFIDENCE: Feel free to contact our California Support Team. We are always ready help if you have any question about our product.
Just the addition of the magnetic base makes this a very interesting lamp. I'm not necessarily against the dimmer switch; it's just that I haven't seen one in person to compare with the lantern I have now. I guess that may have to change!

Other Battery Devices
The property maintenance company came through this year and replaced all the smoke and CO2 detectors with new models. Unfortunately, they're not the sealed battery, 10 year lifespan models. At least they're new and we won't have to look at batteries until next year!

After buying bulk battery packages at the warehouse clubs, there are plenty of batteries available for the rest of everyone's toys like all the various remote controls. I looked and there are at least 7 different remotes in this house!

Recap And Takeaway
  • As with all things related to prepping, have a plan and work it until it stops working or you have to modify it. 
  • Checking on little used items that may be 'Out of sight, out of mind' by having them on a calendar reminder alert might help. I certainly helps me stay on track. 
  • I purchased two Hatori Super Small Mini LED Flashlights from Amazon: $7.99 with Prime shipping. 
  • Nothing else was purchased, but I think the improved lantern may be on the list. 

* * *


Just a reminder: if you plan on buying anything through Amazon, please consider using our referral link. When you do, a portion of the sale comes back here to help keep this site running!

If you have comments, suggestions or corrections, please post them so we all can learn. And remember, Some Is Always Better Than None!

NOTE: All items tested were purchased by me. No products have been loaned in exchange for a favorable review. Any items sent to me for T&E will be listed as such. Suck it Feds.

The Fine Print


This work is licensed under a Creative Commons Attribution- Noncommercial- No Derivative Works 3.0 License.

Creative Commons License


Erin Palette is a participant in the Amazon Services LLC Associates Program, an affiliate advertising program designed to provide a means for sites to earn advertising fees by advertising and linking to amazon.com.