Wednesday, June 8, 2016

Prudent Prepping: Pantry Check


The dust has settled and the First 72 Hours have passed. Now we concentrate on what to do in, and how to plan for, the long term via Prudent Prepping.

It has been a while since the last check of the items kept in my emergency supplies. Since the transition to freeze dried food is not going very quickly, I need to rotate the conventionally packaged food out more frequently than I'd like. As I find different items, the contents of my storage buckets changes, hopefully for the better.

Coming Out
Three bags of pasta and their matching sauce jars. Their 'Sell By' dates are getting close, and everything needs to go to the local Food Bank before then. The rest of the food is good for another 6 months at a minimum, so I have set a calendar alert for the end of September as the next time to review the contents.

Going In
Three 2 lb bags of Jasmine rice into the buckets that held the pasta and sauce, and five small bottles of Tapatio hot sauce, one per bucket. As this hot sauce does not have an expiration date (!), I don't think there will be a need to keep it on a calendar alert, unless opened. Even then, there are several people I know that have kept open bottles stored at room temperature for several weeks, with no ill effects.

I personally do not recommend this.

Packages of rice this size are more than what would normally be placed on a 72 Hour Supply list, but rice can be used for every meal and as an extender in just about every recipe. Besides, the price was right, and I can rotate them into my regular pantry when I need more rice.

The Takeaway
  • Keep an eye on the regular food items in your pantry. If you don't plan on using them before actual spoilage, donating to a Food Bank or Shelter is a good use.
  • Simple items that are adaptable will be appreciated by the recipients.
  • There is nothing wrong with inexpensive, either.

The Recap
  • Three 2 lb bags of rice from the local Discount grocery: $2.49 ea. $7.47 total.
  • Five bottles of Tapatio hot sauce, Discount grocery: $0.69 ea. $3.45 total.

Just a reminder: if you plan on buying anything through Amazon, please consider using our referral link. When you do, a portion of the sale comes back here to help keep this site running!

If you have comments, suggestions or corrections, please post them so we all can learn. And remember, Some Is Always Better Than None!

NOTE: All items tested were purchased by me. No products have been loaned in exchange for a favorable review. Any items sent to me for T&E will be listed as such. Suck it Feds.

Tuesday, June 7, 2016

Black Powder Riflery


Yesterday, Firehand wrote about forming your own cartridge cases. As a guy who shoots some obscure stuff, that was pretty cool. However, I'm going to go a step further down the DIY shooting hole, and discuss black powder riflery.

Why Black Powder?
Black powder has some benefits from a preparedness standpoint: the rifles are very simple and can be maintained with minimal tools, and the actual consumable components are also fairly basic and can be made at home if you're bold and careful. (Percussion caps are the current exception to this statement, but there have been cap-making tools available at times, and the buzz is that one may soon re-appear on the market. Until then, caps are cheap and stable, and can simply be stocked up.)

How it Works
If you watch cooking shows, the current buzzword seems to be "deconstructed"; common dishes served as component or disassembled parts. Shooting a muzzle-loading rifle is basically deconstructed shooting: powder, primer, and projectile are loose and are loaded separately into the gun, then fired like any other. Due to their explosive nature, caps and powder are quite expensive to ship and therefore are a bit limited online, but are readily available at most local sporting goods stores.

Powder
Powder must be black powder or a specific substitute. Smokeless powder will not work in these guns, and will result in serious injury or death. Also, do not exceed the maximum charge listed for your rifle! In my rifle, this happens to be 100 grains, as measured by volume instead of weight. 

One benefit of a black powder gun is that if you do not need that maximum charge, you can choose to load a lighter charge easily in the field.

Primer
Percussion caps are fairly universal. Some ultra-modern muzzle-loaders use shotgun primers, and a few very old designs use a larger musket cap, but the vast majority of percussion caps used are a standard #11cap. Your instruction manual will confirm which cap or primer you need.

Projectile
These can take one of a number of forms:

Patched Round Ball is the original load, and remains an effective benchmark to measure the rest of the slugs against. It gets its name because it is a simple round lead ball, sized slightly smaller than the bore (e.g. my .50 caliber muzzle-loader uses a .490 diameter ball). A small piece of cloth or other material is used to seal ("patch") the ball in the bore.

Full-bore Lead Bullets are the evolution of patched balls. They are sized to match the bore of the rifle and require no patch; just a bit of lubricating grease to obtain a full seal. They hit harder, expand better, and are in all ways an improvement on the original.

Jacketed Conical Slugs look like giant modern bullets that could be loaded in a cartridge case. They frequently have large hollow points, and use a plastic skirt to get a nearly perfect seal in the bore, giving better velocity and accuracy. They are the best performance available in a full-bore bullet, but cost more than simple lead.

Saboted Bullets are where the best of modern technology meets the old patched ball. Sabots are sized down from full bore, and use a plastic sleeve to get a good seal. They fly much faster than full-bore slugs, but sacrifice a bit of weight to do so.


Actually loading and firing a black powder rifle is kind of a show-me process. The easiest way to do that is through a video, which will be the meat of next week's article. Until then, take care of yourself and keep your powder dry. 

Lokidude

Monday, June 6, 2016

Forming Your Own Cartridge Cases

In this case, forming .300 Blackout cases from .223 Remington/5.56x45mm.

Why form your own cases? Cost, availability, and custom-fitting are all right up there, but the main reason is that it's how a lot of cartridges came to be:
  • After WW2, when lots of troops brought back 8mm Mauser rifles, there was little to nothing in the way of 8mm brass to be found, but you could take .30-06 cases and form them to make usable 8mm cases. 
  • The .270 Winchester: someone* thought "There are some really good 7mm bullets out there, very ballistically-efficient; if you necked-down a .30-06 case, wonder how that would work?" It worked very well, and still does 91 years later. 
  • Another one is the .300 Blackout, also called the .300 AAC Blackout and .300 Whisper. Some people wanted to create a cartridge that would give 7.62x39 ballistics in a cartridge that would work with a standard AR-15 bolt and magazine, and succeeded. It's actually more versatile, as you can use bullets from 110 to 220 grains, both supersonic (in the lighter bullets) to subsonic, and the latter works very well with a suppressor. It's also one of the easiest to form, which is why I'm using it as my example.

.300 Blackout from .223 Remington
The .300 Blackout was originally made by taking .223 or 5.56x45mm military cases, shortening them, and forming a neck to hold a .308-diameter bullet.  A lot of the commercially-available cases are still made by forming them from once-fired military brass, and it's easy to do yourself.

1) Start with some once-fired cases
Clean them up to get rid of any propellant fouling, dirt, and anything else they might have picked up (I've picked up cases at the range and found a spider inside).

2) Cut them off to appropriate length
The maximum length listed for these is 1.368 inches; since the forming process isn't going to stretch or shorten them much, I cut these off right at 1.370". You can use a hacksaw with a very fine-tooth blade (which is a bloody pain), a jeweler's saw(the same), a rotary tool with a cutoff wheel (much better), or -- the best by far, especially if you're going to make a bunch of them -- this cutoff saw from Harbor Freight. This is what I used.

3) Make a jig
Or a block, or something that'll allow you to cut to a consistent length. There are jigs for sale on eBay, but I did the cheap route and made this:


It's nothing more than a piece of 1/16" thick, 1/4" wide steel strap.
  1. Bend one end to a right angle
  2. Mark and cut a case
  3. Use that to adjust the strap in the vise
  4. Mark the spot to bend
  5. Bend that end. I'd suggest using a vise and a hammer, as you want a nice, sharp angle  for the bend. 
  6. Make sure the end will clear the blade; if need be, file or grind it thinner.

  7. Cut a case using the jig and measure it.


  8. If the case is too long (remember, every bit of too-long will have to be trimmed off later) you'll have to straighten the bend and make the long leg a bit shorter.  
  9. If it's a bit too short, that's easier: take a straight- or cross-peen hammer and a flat surface (your vise probably has one) and strike a couple of light blows on the flat of the long leg to stretch it.
  10. Cut another case, measure, and continue until it's the length you choose.

4) Cut your cartridge case


After that you can put the jig in, push in a case, tighten the vise, cut, and repeat.

It won't take long to do a bunch of them.


You're left with these.


5) Clean the cut
Take a deburring tool and clean the burrs from the cutting off of the inside and outside of the case mouth.


Lube the cases, inside and out. If you're using a spray lube, you can make sure some is sprayed into the mouth; otherwise you'll have to use something like a q-tip to put some on the inside.

6) Resize
Adjust your .300 Blackout resizing/de-priming die so that, when the ram is all the way up, the mouth of the die touches just the case holder.

Insert a case, and run it all the way in.  That'll form the case to Blackout dimensions, including forming the shoulder and neck; as you reverse the lever to pull the case out, the expander ball will pull out and make sure the neck has the right inside diameter, which is why you want to make sure you have some lube inside the neck area.
7) Trim the cases to length
Lee makes a simple case trimmer (it works with this universal base and cutter), or you can use a Lyman, or RCBS, or any of the others available; this one's a Lyman I've used for years.


8) De-crimp
If it's a military casing, it's a good idea to take a suitable tool and get rid of any primer crimp; lots of military cases have the primer crimped in to make absolutely certain it can't shift out of position under the stresses of lots of travel, or being rattled around in a magazine or belt while being carried around and fired in automatic weapons. The crimp can make it difficult to near-impossible to seat a new primer, so do it.

You now have a case ready to be loaded

Lots of cases really are that easy to form for another cartridge: take the parent case, trim it to length, run it into the sizer die. Some require more steps, and some you don't want to mess with unless you have to/really want to.  (The worst case I've ever formed was making .30 Nagant from .223 cases.  A real PITA, and I'm very glad you can just buy reloadable cases now.)

Cartridge forming can be involved, but it gives you a way to make less-available cases from something you can easily get.


* One gun writer wrote of forming his own .270 cases from .30-06 because it gave a thicker wall in the neck; he could use a case neck turning tool to get the exact case neck diameter that fit his rifle best.

Sunday, June 5, 2016

Gun Blog Variety Podcast #93 – Goodbye to Ray Carter

Adam and Sean suck at writing intro sentences.
  • Erin Palette discusses preparing for grief.
  • In her first regular segment, Tiffany Johnson shows us how a win isn't always a win, and sometimes being a jerk isn't the way to make your point.
  • Beth Alcazar reminds us that intent matters. Moms know this about children's behavior. They should know this about guns as well.
  • Ray Carter's death left a hole not just in the gun community, but also in the hearts of many people. Barron tells us just a little bit about the man he was.
  • And by now everyone knows that Katie Couric's biased anti-gun hitpiece has been pulled for deceptive editing. Right before everyone found out what a lying liar she is, she went on the Today Show for a softball interview with her old buddy Matt Lauer. So it's time for another patented Weer'd Audio Fisk™.
Thank you for downloading, listening, and subscribing. You are subscribed, right? We are available on iTunes, Stitcher Radio, and now on Google Play Music!
Listen to the podcast here.
Read the show notes here
Thanks also to Firearms Policy Coalition for their support.

And a special thanks to our sponsor, Law of Self Defense. Use discount code "Variety" at checkout for 10% off.

Upcoming Law of Self Defense seminars:
  • August 7 - North Carolina specific - Raleigh, NC
  • August 13 - Oregon and Washington specific - Sherwood, OR
  • August 20 - Tenessee and Kentucky specific - Nashville, TN
  • September 10 - Alabama specific - Talladega, AL
  • October 1 - Pennsylvania and New Jersey specific - Bensalem, PA
  • October 16 - New Mexico and Texas specific - Las Cruces, NM

Saturday, June 4, 2016

What do YOU want from Blue Collar Prepping?

Not actually Erin.
& is used with permission.
I'm taking off my writer hat for this article and replacing it with my editor-in-chief fedora to ask you, the reader, a simple question:

What do you want from this blog?

I realize many of you will say something like "Just keep doing what you're doing!" and that's great to hear, because it means we're doing something right. This little blog has been chugging along for over two years now and we haven't yet run out of ideas, which was honestly a concern of mine back when we first started.

But I am certain that there are some readers whose particular prepping itch hasn't been scratched, and I want to hear from you. What kind of topics interest you? If you aren't comfortable leaving a comment below, email me at the address below.


One of the reasons I'm asking this question is that it's been suggested I port my articles about guns and shooting from my nerd blog over to here, and I'm not sure how I feel about that. On the one hand, guns are of interest to many preppers, and there are quite a few articles on this blog about guns, and accessories, and shooting, and ammunition, and et cetera.

On the other, I'm not certain that my articles would be a good fit here. For one, guns are expensive. I realize that's obvious, and that many preppers own more than one gun despite the cost, but my philosophy regarding BCP has always been informed by my particular brand of thriftiness (read: stinginess) wherein I think that fifty dollars is a lot of money and buying anything more expensive than that requires careful consideration. So if I balk at buying something for $100, what am I doing over here reviewing (for example) a green laser for shotguns that costs three times as much?

For two, a lot of my gun posts have been in the vein of "Hey, I went shooting. Here's my target. See how I've improved? This is what I've learned," and while that might be of some interest to the shooters here I don't think there's anything inherently preparatory about articles like that...  but perhaps you disagree. If so, please let me know.

Am I too stingy? Should I talk about gear which I think is "expensive" so long as the average person could afford it and it's a good value for the money? The problem with this is that I don't have a large amount of experience with really good (read: also really expensive) equipment because I can't afford it, and so I worry that I cannot talk from a position of experience regarding "This is expensive but good value vs. this is expensive but is garbage."

In short, I'm looking for opinions on not only how to make Blue Collar Prepping more useful to its readers, but also to discover if I'm mistaken about what belongs here.

I look forward to reading what you have to say.

Thursday, June 2, 2016

In Memoriam: Lessons from Ray

The reason Chaplain Tim and I swapped days this week is that my good friend Ray Carter passed away over the weekend and I wasn't really in a good mental state to write. Tim also gave me some inspiration for this post, asking if there was anything Ray had taught me that I could share. Ray taught me plenty, but not much by way of prepping. We did have a pretty funny misadventure that drives home some valuable lessons, though.

Every year at Boomershoot, somebody gets a flat tire.
It's been that way for as long as we can remember, and has become something we just expect. A couple years back, it was our turn. Keep in mind that cell signal is virtually non-existent in this area, so AAA and the like are out of the question. 

Normally, a flat tire is nothing big for me; Ray wasn't exactly the macho type, but he had his own skill set that proved useful in other ways. I started poking around his rental Suburban, looking for the tools to change the tire.

When we popped open the obvious compartment that should have held tire tools, it was stone empty. This was disheartening, but another friend in a truck rolled up, and he got his tools out. We jacked up the Suburban and pulled the tire.

At this point, things went sideways. On late-model Suburbans, it's impossible to lower the spare without the jack handle that comes with the truck. After we wrestled around and cursed the Suburban for about 20 minutes, the truck driver's wife asked the question none of us had thought of: "Have you checked the manual?"

Five minutes later, we found the tire tools --  they were tucked in a ludicrous location, but they were in the truck.

Once we got the spare off the truck and on the hub, we were back on our way. It took us about four times as long as it should have, and the old tire was utterly shot, but we got off the hill. We also learned some valuable lessons in the process:
  • Check the rig. Whether it's your own vehicle or a rental, know where your tools are. With modern vehicles, tools are often specific for that manufacturer, and sometimes for that model. When you're going on an extended trip or into questionable territory, check your tires and do the rest of your pre-trip prep.
  • Convoy if you can. Having a second rig and friends handy can be a lifesaver. If the option is available, traveling with someone is always the best idea.
  • Know the communication situation. If you're traveling away from your home area, ask any locals you know if there are cell/data issues. In the Boomershoot location, Verizon is the only cell provider with signal, and even that is pretty spotty. Knowing that ahead of time allows to you make arrangements, such as a prepaid phone on a carrier that works.
  • Check your ego. This is probably the most important thing we learned. I know how to change a tire; after all, I've done it dozens of times. And yet, I let that get in the way of doing something as simple as reading the owner's manual! If I'd swallowed my pride and read the instructions, we'd have been off the hill in about half the time we actually spent.
As it was, things went well, we made it to dinner on time and with minimal ill effects. Had everything happened an hour later, or our friend in the truck not shown up, we would have been in a world of preventable hurt. 

Sometimes we have to learn the hard way, but those lessons get taken to heart.

Lokidude

Wednesday, June 1, 2016

Prudent Prepping: Summer is Here

The dust has settled and the First 72 Hours have passed. Now we concentrate on what to do in, and how to plan for, the long term via Prudent Prepping.

It has topped 80 every day since Friday here, and that means it's time for me to swap out all my cold weather gear for warm and look at any food or other items that might be old.

I'm lucky that my territory is much smaller than before and no bridge crossings are involved, so the food I pack is much less. This reduces the weight involved, which reduces the stress for the distance I might have to travel on foot to one very long day getting home.

Beat the Heat
The consumables in my BOB are affected by heat, and even with 40% of my time spent close to the San Francisco Bay, temperatures in my truck still are too high for me to keep things there for too long.                                      

All of my normal supplies (LifeStraw, flashlight, notebook, pen and pencil, etc.) are staying. What is changing are some of the items shown above.
  • Two cans of chicken are being swapped out for fresh ones.
  • Two packages of pre-cooked brown rice likewise swapped .
  • Batteries (in my new case!) are stored outside the flashlight now.
  • Poncho and the emergency blanket stay. It gets foggy near the coast in the summer, and the blanket can be a nice, bright orange beacon.
  • A tube of hydrocortizone and triple antibiotic were replaced, due to age.
  • My coffee and favorite seasonings stay fresh, due to being rotated into my lunch supplies.


A New Item
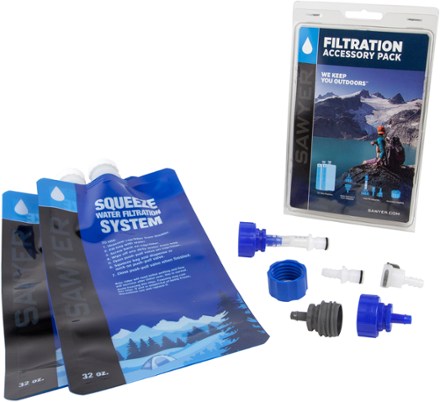
Since all of my friends use a Sawyer Water filter, I purchased this with my REI Member Rebate:
 
Sawyer Filtration Accessory Pack
From the REI page:
  • Includes two 32 oz. reusable squeeze pouches to use as backups or additional reservoirs 
  • Fast Fill Adapters let you fill your hydration pack directly from the Squeeze or Mini Filter 
  • In-Line Adapters turn your Squeeze filter into an in-line system on a hydration pack 
  • The Cleaning Coupling is a new adapter that allows you to backwash your Squeeze Filter with a plastic bottle
The two extra pouches are handy as extra water storage or as replacements for a damaged pouch, and the adapter which allows the Sawyer filter to attach to a Camelback (or similar bladder) is the main reason for my purchase.

The Takeaway
  • Pay attention to what you store in the heat: Food and medicines can go bad fast when stored over 90F 
  • The saying 'two is one and one is none' is very obvious when talking about your way to get, store, and filter your water.
The Recap
  • Sawyer Filter Accessory Pack, $19.95 from REI  (paid from my rebate) Also available from Amazon for $24.99 plus $5.25 shipping.
  • Nothing else was purchased this week.

Just a reminder: if you plan on buying anything through Amazon, please consider using our referral link. When you do, a portion of the sale comes back here to help keep this site running! 

If you have comments, suggestions or corrections, please post them so we all can learn. And remember, Some Is Always Better Than None!

NOTE: All items tested were purchased by me. No products have been loaned in exchange for a favorable review. Any items sent to me for T&E will be listed as such. Suck it Feds.

The Fine Print


This work is licensed under a Creative Commons Attribution- Noncommercial- No Derivative Works 3.0 License.

Creative Commons License


Erin Palette is a participant in the Amazon Services LLC Associates Program, an affiliate advertising program designed to provide a means for sites to earn advertising fees by advertising and linking to amazon.com.