Wednesday, May 11, 2016

Prudent Prepping: First First Aid

The dust has settled and the First 72 Hours have passed. Now we concentrate on what to do in, and how to plan for, the long term via Prudent Prepping.

After mentioning my need for a real First Aid kit in a post on the BCP Facebook page, with a follow-up mention in last week's blog post, a friend (thanks Dave!) posted to Facebook a link to a Woot! deal on a First Aid kit, which I ordered.

Voodoo Tactical Trauma Kit

From the Woot! description:
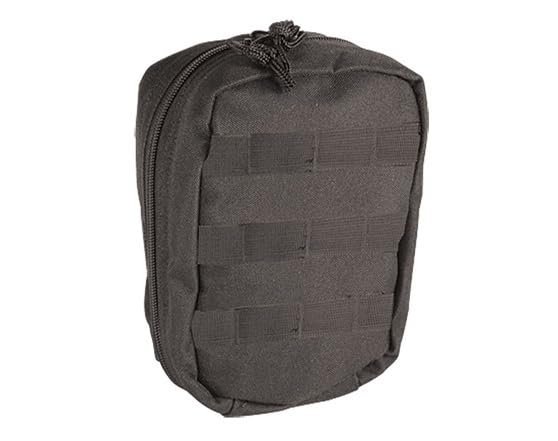
  • Full-zip pouch provides easy access to all essential items. 
  • Pouch has universal straps and can be attached to your vest, pack or belt. 
  • Measures 8" x 6" x 3.5" 


Kit Contents:
http://amzn.to/27fp20G
  • 1 Pressure Bandage 
  • 1 2" Elastic Bandage 
  • 2 Plasti-Pore Tape Rolls 
  • 2 4" x 4" Sterile Sponges 
  • 4 Alcohol Wipes 
  • 4 5" x 9" Abdominal Pads 
  • 1 Pair Latex Gloves 
  • 2 Clean Wipes 
  • 1 Scissors 
  • 1 Eye Pad 
  • 10 Pain Relievers (expires: approx 11/2017) 
  • 1 Triangular Bandage 
  • 4 Burn/First Aid Cream (expires: approx 05/2018) 
  • 1 First Aid Instructions 
  • 2 Benzalkonium Chloride Wipes
    * Expiration dates may vary slightly due to different lots

    What I like about this pouch is that there is room in the pouch to mix and match items, allowing me to swap up to better quality and a different mix of things so suit my needs.

    Already included in this kit are several items that were mentioned in the answers to my Facebook Request For Information (RFI) post, which puts me ahead of the game. But not included are several things mentioned that I do want to add fairly soon:
    • Israeli bandages. I like the idea of stopping bleeding fast 
    • Trauma shears. Also mentioned on Facebook (thank you, Tim). 
    • More gauze, bandage material and tape. 

    What I end up buying to add to this kit will depend on exactly what everything included looks like when I see it.

    Training
    Also missing is training on how to use some of these items in a safe and proper manner. The local Red Cross has classes every other month, and I am going to do the basic First Aid course and get re-certified in CPR. I haven't done any active First Aid training since Boy Scouts.

    I am also signing up to do CERT (Community Emergency Response Team) classes sponsored by the larger town close to me. Here's what is initially covered:
    • Disaster Preparedness and Terrorism 
    • Fire Safety 
    • Disaster Medical Operations 
    • Light Search and Rescue 
    • CERT Organization and Disaster Psychology 
    • Final Simulated Disaster Exercise 

    The expanded classes cover:
    • Animal Response Training 
    • Emergency Communications Training class (FRS Radio) 
    • Neighborhood Team Captain Training 

    All of this is important to me, since I'm in a city and plan on Bugging In if anything happens.

    The Takeaway
    • Friends again point me to good deals and great ideas.
    • As a start on my way to a real First Aid kit, I feel pretty good.
    The Recap
    • One Voodoo First Aid Trauma Kit, from Woot!: $19.99; $27.11 with tax and shipping. Available for purchase on Amazon for $39.95 with free shipping.  
    • A full unpacking and review will occur when the kit arrives.

    EDIT EDIT EDIT!!!
    My buddy just came home and handed me the Woot! box! I'm guessing the delivery company ran up and dropped the box on the porch some time this afternoon and didn't knock to let me know it was there.

    Here is what the kit looks like still in the wrapper:


    Next week's post will be my review of the kit.


    Just a reminder: if you plan on buying anything through Amazon, please consider using our referral link. When you do, a portion of the sale comes back here to help keep this site running! 

    If you have comments, suggestions or corrections, please post them so we all can learn. And remember, Some Is Always Better Than None!

    NOTE: All items tested were purchased by me. No products have been loaned in exchange for a favorable review. Any items sent to me for T&E will be listed as such. Suck it Feds.

    Tuesday, May 10, 2016

    Inventory Management

    A question was posed in the BCP Facebook group regarding how folks manage their supplies and keep track of stock levels. (By the way, keep the questions coming. It's nice to know what people want to learn about.) Oddly enough, this particular question fell right into my background. I answered it briefly on Facebook, but I'd like to expand upon that answer here.

    Done right, proper inventory management saves you time, money, and the embarrassment of being caught without. Many years ago, before I was a professional builder of things, I was a salesman specializing in managing parts supplies for manufacturing facilities and commercial operations. That's a long and fancy way of saying that I made sure folks didn't run out of things. I realized early on that this skill set meshed nicely with my faith's teaching of emergency preparedness. While the products being stocked are different, the techniques used are the same, and can be applied by anyone willing to put forth a little effort and attention.

    Implementation
    Implementing a management system is easiest if you start small.
    1. Pick about a dozen items that you feel you go through frequently. 
    2. Decide a maximum amount that you want on hand at any given time. This can depend on storage space, budget, and how much you can use before an item expires. 
    3. Choose a minimum amount which leaves you enough to prevent running out before your next regular shopping trip. This becomes the point where you restock the item. 
    4. Before you go shopping, note which items are at minimum, and buy enough to bring you back to maximum. 
    5. The quick and dirty way to do this is to put a tag for each item at its storage location, with the minimum and maximum listed. 
    6. As you get used to doing this, begin adding other items and grow your system.

    The system above works great for smaller households like mine. With only two people, communication is easy and things aren't likely to fall through the cracks. However, for larger households, or folks who want to manage lots of items, there is an easier way.

    Kanban
    The Kanban method uses a physical signal to call for restock. Professionally, I've used a variety of signals for this. For household supplies, something as simple as a 3x5 index card works wonders.
    1. Write the name of the item, and the min and max quantities on the card. 
    2. This card goes in front of the minimum quantity on your shelf. 
    3. When you get to each card, put them in an envelope, box, or other location. 
    4. When you go shopping, simply take the cards with you, and you have your shopping list. 
    This system takes a bit of setup at the start, but is dead simple afterward.

    As a simple example, let's use an item from my pantry. We keep boxed macaroni and cheese on hand (hey, it's a comfort food from my childhood, and it's cheap). Our minimum quantity is 2 boxes, because we're not likely to use more than that in a week. Our maximum quantity is 10 boxes, mostly because I can buy in 4 packs sometimes. The kanban card would sit in front of the second to last box on the shelf. As we eat through our supply and reach the card, it goes in an envelope until we restock. We rotate our stock so we use the older product first, and re-insert the card at the second to last box.

    Mac and Cheese Kanban card. It really is that simple. 

    It's a whole lot of words, but it makes for a fairly simple system. All it requires is that you pay attention before you shop. It can be adjusted at any time, and requires no other work to keep running. It also levels out high and low supply points, and you won't be caught unaware.

    Lokidude

    Monday, May 9, 2016

    Knightly Bees and Peckish Perch


    This will be my final entry about the camping trip from back in October 2015 that Evelyn and I took out to Knight's Rest here in Oklahoma.

    Fishing
    The Masseys, who own Knight's Rest, maintain a really nice fishing pond on the property, and it's stocked with perch, bluegill, and various other pan fish and sunfish. This little pond is chronically under-fished, and that's both good and bad:

    It's good because it means that the fish who live in that water will bite on practically any lure you happen to toss out -- which means you'll almost always have a big pile of fish to cook up for dinner when you toss in a line.

    It's bad because some of those fish think they're starving, and will swallow your entire lure rather than simply hooking themselves! I had to put a fresh hook on my line a couple of times due to over-eager perch swallowing the hook sufficiently that it couldn't be retrieved until we started cleaning them for dinner. This isn't a problem if you have spare hooks and lures (we both had plenty) but potentially a problem for someone in a survival situation where they need more than one fish, and taking the time to gut and clean the first in order to retrieve their only hook could be an issue.

    While many of us have fishing gear of various qualities (and quantities!) I was putting the test on a mini rod & reel that I had purchased specifically as part of my survival/prep gear. I wanted something small enough to pack out easily, but sturdy enough I wasn't going to be in constant fear of it breaking at a critical moment, like when I was depending on it for eating vs. going hungry.

    What I settled on was this little gem: the Zebco Dock Demon Spincast Combo
    http://amzn.to/1WlAJ2w
    • Available through Amazon for $16.80, but I picked mine up at Wal-Mart for less than $10.
    • Very light, with less than 11 ounces total weight to worry about carrying. 
    • Small enough to be easily handled by anyone, even a small child, but not so small that full-sized adults can't use it.
    • Sturdy enough that in the several months since I got it, I've managed to land catfish and bass that had a whole lot more fight to them than the perch we were pulling out of the pond.


    If you're looking for a really light weight, easy to pack fishing set, this is definitely one to consider.


    Cooking them up was a bit of trial and error to top off the adventure of extracting eaten lures. Evelyn decided that roasting sounded like a great idea, and set about building a green limb roasting spit arrangement similar to those used in the 1600s and 1700s by various Native tribes.

    It managed to stay together just long enough to finish roasting some of the fish.  The rest went into a stew pot, as being the easier route to take for dinner!

    Seasoning
    Now Evelyn and I are fairly passable cooks, both in the home kitchen and using a grill or campfire set up. One of the reasons that we manage to eat well is because we both maintain a good selection of herbs, spices, and spice blends to use in our camp cooking, even when what we're eating is fresh fish or a duck we took 2 hours to pluck.

    A little bit of seasoning can go a long way towards staving off food boredom, and its resultant lack of desire to eat anything at all. In the field, especially when situations become critical, making sure that you eat enough to keep your strength up -- and that you actually enjoy that food sufficiently that eating doesn't become a chore to be avoided -- is critically important. Good nutrition can mean the difference between seeing tomorrow's sunset and your tribe having to take time out of their survival to bury you.

    There are dozens of easy methods of storing small amounts of spices and seasonings in airtight packaging to stash in your gear. Even a 29 cent packet of Ramen is a lot more palatable with a bit of extra spices tossed into the mix while it's boiling. And that plain beef or chicken broth from a cube and hot water actually becomes a passable soup when you throw in a little bit of something other than salt.

    Bees! BEEEEEEES!
    We were at Knight's Rest just before winter truly set in, and the Bees were busy gathering as much as they could during those final warm days. In the early mornings we could hear the huge wild hive come awake as things began to warm up for the day.

    The ever-productive girls from that wild hive were frequent visitors to our camp. Yes, girls; honeybees are female, except for perhaps 6-10 males produced once a year for the sole purpose of mating with the hive queen. They are also surprisingly docile as long as they don't perceive you as a threat to themselves or their hive. Stinging you isn't on the agenda -- it's a death sentence for them -- so simply leaving them alone to do their thing is the best way to deal with them coming into your camp.

    Bees are just easy-going working girls, wanting nothing more than to go about their job. I keep telling myself this, because even though I know that it's the case, I'm still rather paranoid about getting stung. That paranoia cost me a bit of pain towards the end of our time at KR.

    One poor little bee decided to land and rest. Unfortunately for me, where she wanted to rest was on my face. And then in my hair. And then back to my face. And of course, I made the mistake of trying to brush her away, which knocked her down the back of my shirt - trapping her and agitating her at the same time. The results were not pretty: one dead bee, one panic stricken Rhi, one highly amused Evelyn, and a chuckling Jen Massey, who provided us with a surprisingly effective remedy for the sting.

    While most folks consider it a wives' tale, meat tenderizer actually works to take the pain out of a bee sting. A paste made of meat tenderizer and just enough water to turn it into a slightly sticky clump, when applied directly to the area where the sting happened, will feel like a miracle worker within a couple of minutes.

    While you might not keep meat tenderizer in your kit for cooking, keeping a small sealed jar of it in your first aid kit as a cheap, effective means of dealing with stings isn't a bad idea.

    The Takeaways From Our Adventure
    Personally, I learned a lot during that month we spent in the field. I learned just why we in the community seem to harp so often on actually using and maintaining the various skills you have.

    Keeping a fire going for days or even weeks at a time isn't easy. Keeping a fire going in adverse weather conditions can be a serious trial of patience, but is even more important than keeping it going while the weather is nice and cooperative. If you don't practice starting and maintaining a fire in all sorts of conditions, along with any other potentially critical skills, you might just find that you've forgotten something important when your life is depending on your knowledge base.

    I have a deep-seated appreciation of those who actively choose to raise and grow our food, and I learned that while I "can" live off the land, I like my creature comforts too much to ever actually look forward to a situation where I have no choice but to do so.
    • Plucking a bird is time consuming, frustrating, and messy. I'd rather spend $18 on a bird at my local grocery store, buying one that's ready to cook, than spend $10 (or the time to trap/hunt) on a live bird and then 2 hours getting it ready just to begin the cooking. 
    • Gardening may sound like a fun hobby, but its also time consuming and labor intensive to grow all your own food, and greatly restricts what is available in your diet to things that will grow in your area. 
    Don't ever forget to be thankful for global transportation, groceries that carry produce year round, and the convenience of not having to carefully hoard every spare scrap of food to make it through non growing seasons!

    I learned that sometimes an old remedy (meat tenderizer on bee stings) continues to get passed down for generations because it actually works.The science backs it up, and so does empirical data!.

    I learned that a determined enough animal will find a way into your supplies, even when you think those supplies are secure. Large enough animals can do a considerable amount of damage, even when they're not "predatory" in nature. So never make the assumption that you've covered all the contingencies.

    I learned that a rattlesnake will keep moving after you shoot it, even after its been blown into two pieces. And that I never, ever want to make Evelyn decide that I'm a valid target!

    Practice your skills, folks. Even the minor ones you don't think you'll ever need should be practiced regularly. Its no joke -- we weren't in a life or death situation, and we were camped where we had plenty of backup and leeway close to hand if it was needed, but that won't always be the case.

    Whatever you happen to do... just make sure to bee prepared!

    Sunday, May 8, 2016

    Gun Blog Variety Podcast #90 – Erin’s sick, Sean’s angry, and Adam’s Jeep is in pieces

    It's Episode 90 of The GunBlog VarietyCast - Erin's sick, Sean's angry, and Adam's Jeep is in pieces.
    • Erin Palette is still sick from her trip out to Tennessee, but she dragged herself to her microphone and points us to a really fantastic series of articles she wrote about ionizing radiation.
    • Nicki Kenyon answers my question: Trump or Hillary - who would Russia prefer?
    • Beth Alcazar, fresh off the Concealed Carry Expo talks with Kelly Welke about the new USCCA initiative, Women's Community.
    • Silicon Graybeard wraps up the questions about LED shop lights. Don't miss this one.
    • And Weer'd finds us a very interesting Australian TV show about gun politics in Australia 20 years after the Port Arthur Massacre.
    Thank you for downloading, listening, and subscribing. You are subscribed, right? We are available on iTunes, Stitcher Radio, and now on Google Play Music!
    Listen to the podcast here.
    Read the show notes here
    Thanks also to Firearms Policy Coalition for their support. Go to www.FirearmsPolicy.org and help stop AB2607.

    And a special thanks to our sponsor, Law of Self Defense. Use discount code "Variety" at checkout for 10% off.

    Upcoming Law of Self Defense seminars:
    • August 7 - North Carolina specific - Raleigh, NC
    • August 13 - Oregon and Washington specific - Sherwood, OR
    • August 20 - Tenessee and Kentucky specific - Nashville, TN
    • September 10 - Alabama specific - Talladega, AL
    • October 1 - Pennsylvania and New Jersey specific - Bensalem, PA
    • October 15 - Arizona specific - Glendale, AZ
    • October 16 - New Mexico and Texas specific - Las Cruces, NM

    Saturday, May 7, 2016

    Crocheting a Basic Brim-Up Hat

    "Uh, Evie... you live in Arizona now... a hat pattern? Really?"

    Yes, really. Let me tell you something: when you go from May to October, with days averaging 102 degrees in those six months, and then it drops (quite suddenly sometimes) to fifty something degrees... yeah, it's cold in the desert.

    Materials
    • 1 crochet hook*
    • yarn
    • a cold head
    * You don't need a particular size hook (though I wouldn't recommend anything smaller than an F5 or 3.75 mm hook), but be sure your yarn is a size that works with whatever hook size you do use.  For this particular post, you'll see me using a size G9 (4.00mm) and Caron Super Saver.

    Directions

    Step 1
    Measure the head that this hat is meant for. (Should you wish to use the pattern for for charitable donation or homeless populations, as a general rule of thumb a size small is roughly 22", medium 24", large 26", etc.) For this particular hat we'll go with my head, which is 21 and one-half inches around.
    Yes, I have a small head.  Shush.
    You can chain stitch the foundation row, but I've found that using something called a single crochet foundation (see this how-to video for more information) works really well. Stitch until you get the length you need, then slip stitch join your row. Double check to make sure you haven't twisted it.

    So in crochet speak, row 1 ended up being 85 stitches. Slip stitch to join, do not turn.

    3 inches wide.
    Step 2 (aka Row 2)
    Use a piece of scrap yarn or a stitch marker to mark three stitches to the left of your join. This will make the brim process much easier later in this pattern.

    I want to make my brim about 3" wide, so I will single crochet around until I have this width.

    In crochet speak, this translates to rows 2 through 10.

    Step 3/Row 11
    Step 3/Row 11
    Move your stitch marker to the top of your piece. At this point you are switching to a half double crochet stitch. For this row only, you are doing the stitch in the back loop only of the previous row.
    Step 4/Rows 12- 17
    Go back to crocheting through both loops, half double crochet. Don't slip stitch join when you come around to your stitch marker, just keep cruising on through until you are at the end of row 17.
    Step 5, row 18
    Step 5/Row 18
    At this row, you are going to fold the piece in half, with the row where you crocheted into the back loop only being your seam at the bottom. You move that stitch marker up every row completed now. You're still doing half double crochet, but at this row, you're forming the brim. Crochet through your previous row and the edge, so four loops, two sets of edges. Crochet all around until the end of row 18.

    Step 6
    Try the hat on and pull it down to where you want it to sit on your ears. Measure from the top of what is done so far to the crown (top) of your head. In this particular instance with my head as the example, that's 5 inches.

    Step 7/Rows 19- 24
    These are the rows you do until it's time to start decreasing, which when measured will be 3 inches.

    Start of Row 25, step 7
    Step 8/Row 25
    This is where you start decreasing. At 85 stitches, you are going to be decreasing every 5th stitch.

    Step 9/Row 26
    Decrease every 4th stitch.

    Step 10/Row 27
    Decrease every 3rd stitch.

    Step 11/Row 28
    Decrease every second stitch.

    Step 12/Row 29
    Decrease every third stitch again.

    Step 13/Row 30
    Decrease every second stitch.

    Step 14/Row 31
    Decrease every stitch.

    Step 15, finishing off
    Slip stitch into the next stitch. Chain 2, cut thread, pull tight. Thread a large needle or yarn needle and weave through the stitches. Pull the needle through to the inside of the hat and pull tight. Lace the tail through an inside loop and tie into a square note. Cut the excess.
    Step 15, Finishing off. 

    Step 16 
    Plant hat on head it was made for.

    And yes, I was typing this post up as I made this hat, to make sure I was getting my step counts right.

    Stay toasty, my friends.


    Thursday, May 5, 2016

    Propane

    Propane (C3H8) is a common fuel for heating and cooking in rural areas. Most urban folks know it as the fuel for their outdoor grill and an alternative fuel for vehicles, and might use it in a hand-held torch for soldering copper pipe or other small jobs. Often known as LP (Liquid Propane, Low Pressure gas, or Liquefied Petroleum gas), it is a by-product of Natural Gas (CH4) production and oil refining. Portable cooking and heat equipment often runs off of disposable 14 oz cylinders or 20 lb refillable tanks. More permanent equipment is often fed from 100 lb cylinders or 300-700 gallon tanks.

    Utility
    If you watch the news and documentaries as much as I do, you'll notice that the common white 20 lb refillable tanks are found all over the world, and are often a primary fuel source in third world countries that don't have a developed infrastructure. Even in areas involved in war, someone will smuggle in fuel, and propane is easier to transport than gasoline. Since it has no shelf-life limitations, is in easy-to-handle containers, is fairly safe to use, and is moderately inexpensive, it is a good choice for use when natural gas pipelines are unavailable or inoperative. Having a few spare tanks for your grill is a good idea if you expect short-term power outages -- you can use the grill as an oven, and most of the newer ones have a burner on the side for warming up side dishes. 

    You can also run a grill set up for a 20 lb cylinder from a 16 oz cylinder if you have the right fittings.

    Safety
    Propane is a gas at normal temperatures, but can be easily compressed into liquid form easily. It boils at -44° F, so it must be handled with care to prevent frost-bite. Unlike natural gas (methane), propane is heavier than air and it will settle into low areas of a structure if there is a leak. Since water heaters and furnaces tend to have their igniters near the floor, this can cause explosions capable of lifting a house -- if not destroying it completely.

    Ventilation and checking for leaks is the key to preventing fires and explosions. Do I really need to explain that propane is flammable and you shouldn't smoke around it? No open flame or fire within 50 feet of open propane source, please. We don't need to hear about you on the nightly news.

    Refilling Disposables
    Did you know that you can refill disposable 14-16 oz cylinders? There are fittings available to let you refill them from a 20 lb cylinder as often as you need. (Read the instructions and follow them.  And wear good gloves, preferably insulated rubber gloves; getting bare skin sprayed with liquid propane at -44° means instant frostbite.)

    A few years ago, the industry switched to a new style of valve that has a built-in overfill protection device (OPD) to prevent filling cylinders over 80% full. This was done to ensure that there is a vapor space in the cylinder, since liquid propane is not good for regulators and burners. When they changed the valves, they changed the connectors as well to make it easy for the person refilling the cylinder to tell if it was a new tank. The new valves use “Acme” threads, which are more widely spaced than normal pipe threads and have a flat top surface. OPD valves also have to be connected to a fitting before they will allow gas to flow, so just opening the valve may not tell you if there is anything left in the tank.

    Refilling From a Tank
    With a few fittings and some good hose, you can refill the 20 lb cylinders from a larger tank. You'll need a female Acme fitting to connect to the supply tank discharge valve and either a POL (fine threads inside the valve body) or Acme (coarse threads on outside of valve body) style fitting on the empty tank end. Here's what Acme threads look like:
    http://www.ncagr.gov/standard/LP/LPgasConcerns/cylindervalves.htm

    Do you see the little screw right above the threads that go into the tank itself? That is the fixed level gauge, a vent that will spit liquid once the tank is 80% (max safe fill level) full. That is how you fill tanks if you don't have a scale to do it by weight.

    A simple method of refilling a 20 lb cylinder from a large tank:
    1. Put on your gloves. 
    2. Connect hose to tank discharge valve, usually Acme threads. 
    3. Connect hose to cylinder valve. 
    4. Open cylinder valve and slightly open cylinder vent (fixed level gauge). 
    5. Slowly open tank discharge valve. 
    6. Step back and wait. 
    7. Once liquid starts coming out of cylinder vent, close valves and vent and disconnect hose.

      If I can find better photos or prices, I may have to edit this post. I need to check a few places and take some pictures when I get some free time. Be careful, and respect the things that can kill you.

      Wednesday, May 4, 2016

      Prudent Prepping: Buffet Post

      The dust has settled and the First 72 Hours have passed. Now we concentrate on what to do in, and how to plan for, the long term via Prudent Prepping.

      I have several topics to touch on this week, none that I can make into a complete post, so here is the collected information.

      Shelter
      Last week was the almost-test of the last item on my Large Item Want List, a tent. From here on, things are going to be physically smaller but still very important to my preps.

      Safety
      As I mentioned in a BCP Facebook page post (come join us!), I am now looking to make a real First Aid Kit. Several people responded with different suggestions on what to add next and why, and I'm still looking for even more information, from both experienced preppers and trained first aid folks. Give me as much info as you can.

      Safe Water
      It's the time of year when I start planning for hikes and camping trips. Part of those plans involve having a safe water supply by either filtering or heating.

      Last year I wrote about the heat purification system and mentioned a way to purchase in bulk to reduce the cost of the Water Pasteurization Indicators. I won't repeat everything from previous posts (follow the link instead), but I will say this is an inexpensive and compact tool to make your water safe to drink. Last time I checked, prices were the same as last year.

      If you are interested in this important addition to your water purification system, please leave a comment with how many you want to buy, either here on the blog or on the BCP Facebook page.

      Safe Travel
      I have very wide feet: EE or EEE depending on the brand of shoe. I've been looking for a good hiking boot longer than I've looked for a tent, since the glorified tennis shoes with a hiking sole that I wear to work flatten out in about 3-4 months and hurt my arches. (I also have high arches.) I even tried mail ordering a highly recommended brand that several ex-military folk said were outstanding (and expensive), but they still didn't work.

      My parents were broke during most of my childhood from buying shoes that actually fit me. I've looked at most of the famous brands and off-brand/house labels, and just from my history with shoes I can tell in less than 10 minutes if something will work or not...usually not.

      The only brand that actually fits and works for me are Redwings. I wore Redwings when I did new construction years ago and I was always able to find a boot that fit. Now with their expanded line of Vasque hiking boots and shoes, I think I can find something that fits well. Their closest store does not carry every style in my size/width, but will be able to order what I want when I have the money.

      The Takeaway
      • Please send in your comments and suggestions for additions to my First Aid supplies. 
      • An additional way to treat water is a Good Thing and a WaPI should be on your list. 
      • Hiking requires being on my feet and able to carry the load comfortably, whether a day pack or 60 liter bag packed for a week trip.
      The Recap
      • Nothing was purchased this week but plenty has been placed onto my Wish List. Again

      Just a reminder: if you plan on buying anything through Amazon, please consider using our referral link. When you do, a portion of the sale comes back here to help keep this site running! 

      If you have comments, suggestions or corrections, please post them so we all can learn. And remember, Some Is Always Better Than None!

      NOTE: All items tested were purchased by me. No products have been loaned in exchange for a favorable review. Any items sent to me for T&E will be listed as such. Suck it Feds.

      The Fine Print


      This work is licensed under a Creative Commons Attribution- Noncommercial- No Derivative Works 3.0 License.

      Creative Commons License


      Erin Palette is a participant in the Amazon Services LLC Associates Program, an affiliate advertising program designed to provide a means for sites to earn advertising fees by advertising and linking to amazon.com.