Thursday, September 29, 2016

Got Cache?

I'm not sure if we've covered caching in detail before, it is getting a bit hard to recall every single post over the last two and a half years. If we have and I'm repeating things, you have my apology in advance.

Caching supplies is a bit of a touchy subject. On the one hand you have people who believe that everyone must have a cache buried somewhere with at least a 72 hour kit in it, and on the other hand you have folks who will say that any supplies not under your direct control are as good as lost. Both sides have good points and bad, neither is right or wrong. The ones who are selling something generally make the strongest arguments for having a large cache. Caching is a personal choice that should be decided after careful thought and some study.

What is a cache?
The word cache comes from the French word cacher, which means “to hide”. A cache is a hidden supply of something.

Why would you cache?
If your BOL is more than a day's walk away from your normal area, having a resupply point along the way would minimize the load you'd have to start out with. Having a back-up supply of the bare necessities stored away from your main BOL for emergency use might be nice insurance. If your BOL is damaged or destroyed, you'd still have something to start over with. You may also want to be able to give the location to a friend who wasn't able to stockpile (or lost) what they need to get through a few days. Hiding things from people who wish to take them away from you is a valid reason to cache, with a few exceptions.

What would you cache?
This is one of the really tough ones to answer. There is no “one size fits all” answer because each of us are going to have different needs, resources, and reasons. Look around the internet and you'll find all kinds of lists of what the “experts” think you should have in a cache. None of them are going to be a perfect fit for every situation. Water purification, fire starting, shelter, food, and clothes are understandable things to cache- redundancy in these areas are never a mistake. Fuel, firearms, ammo, and medicine are a bit more controversial. Fuel needs to be rotated to keep it fresh. Firearms and ammo are expensive and may be traced back to an owner. Medicine has both issues- it needs to be rotated to keep it fresh and any prescription information on the bottle would be easy to trace.

How would you cache?
This is another tricky ones to answer. The standard answer is a sealed piece of PVC pipe buried in the ground. Good luck retrieving that in February anywhere the ground freezes. Underwater locations have been discussed in various forums, as have suspension in trees and structures. I'll cover concealment in an separate post. Basically any water-tight container placed in a hidden location is a cache, so use your imagination and think about how to hide a suitable container.

Where would you cache?
The common answer is burial on land not associated with you. The choice to use land not legally associated with you is to provide deniability for anything that may be (or become) illegal if the cache is found by overzealous authorities. The downside to this is that you don't have control of the land and what is done to it. Your cache could easily be discovered or made impossible to recover with a few minute's work of a bulldozer as it reconfigures the landscaping.

My personal favorite is to leave a sealed container at a friend's place with the understanding that if I don't show up within 5 days of an emergency, the contents are his. Obviously this would limit what I could place in the container, since I have no desire to put my friends in legal peril.


Next week I'll try to explain my system for considering a cache. There are many variables to consider and having a system helps prevent any from being missed or skipped.

My posts will be lighter than normal for the next few months, since my job has moved me to 12 hour shifts 6 or 7 days a week for a while. Life gets in the way of blogging, sometimes.

Wednesday, September 28, 2016

Prudent Prepping: Monthly Round-up


The dust has settled and the First 72 Hours have passed. Follow along as I build a long term plan via Prudent Prepping.

This is my latest installment to the blog where the topics can't be made into a stand-alone entry.

First Things
Last weeks post was about building a compact, easy to carry EDC Trauma kit, first built by Jonathan Sullivan and mentioned in his post here. I ordered the parts from Amazon* that I did not already have: The phone case, tourniquet and Quik Clot bandage. I have a local source for face shields (free from an EMT friend) so those were not an issue. Unfortunately, The RATS tourniquet shown is no longer available from that particular seller and I can't find the exact item from anyone else on Amazon. What sold me was the included sleeve to hold the tourniquet in as compact a fashion as possible, since everything is being carried in a belt pouch designed for an iPhone. Buying a separate tourniquet and pouch is the solution to this problem, but at a higher price than finding a ready made set. Since I have a budget for my preps, I'm still looking for a cost-effective answer.
Next
With the mention I received from Jonathan in his re-post of the Blue Collar Prepping post, several of my friends that are not readers of BCP now realize I have been writing on a prepping blog for close to three years now (!!!). This was not something I was hiding or intentionally not passing on to my Facebook friends list, it just happened. It has turned out to be a Good Thing with several people asking questions that I didn't expect and several friends telling me they are interested in learning more. I have to say I did get a joking reference to me being one of those "Nut jobs I see on TV" and another asking what to do about zombies, but even those were followed by actual interest in being prepared for a disaster. Go figure.
More Next
Even as Fall is now officially here, you can't prove it with the weather in (most of) California. The fire season is not over, with another wildfire burning more parts of N. California. Fires cause more damage and cost residents more money every year than earthquakes, but the destruction is usually in sparsely populated, rural areas that aren't photogenic. Since these fires do not affect large numbers of people or large population centers, I was surprised to see A CalFire ad talking about emergency preparedness. The items listed are everything you and I as regular BCP readers should have assembled right now.

From the CalFire webpage:

EMERGENCY SUPPLY KIT CHECKLIST
  • Three-day supply of non-perishable food and three gallons of water per person. 
  • Map marked with at least two evacuation routes 
  • Prescriptions or special medications 
  • Change of clothing 
  • Extra eyeglasses or contact lenses 
  • An extra set of car keys, credit cards, cash or traveler’s checks 
  • First aid kit 
  • Flashlight 
  • Battery-powered radio and extra batteries 
  • Sanitation supplies 
  • Copies of important documents (birth certificates, passports, etc.) 
  • Don’t forget pet food and water! 

Items to take if time allows:
  • Easily carried valuables 
  • Family photos and other irreplaceable items 
  • Personal computer information on hard drives and disks 
  • Chargers for cell phones, laptops, etc.
Always keep a sturdy pair of shoes and a flashlight near your bed and handy in case of a sudden evacuation at night.

There are links to how to keep your rural home safe from a fire by making a defensible space, preparing your family for a potential evacuation and further down the page links for planning with toddlers, those with special needs and also a link to a Red Cross article on prepping for Seniors.

I am forwarding the CalFire web page to the people who asked me questions and by posting this, I hope others who did not ask can gain some valuable information.

Nothing was purchased, some new prepping friends were made and good information was shared.

It was a good week.

*I do shop through the BCP Amazon link.

Just a reminder: if you plan on buying anything through Amazon, please consider using our referral link. When you do, a portion of the sale comes back here to help keep this site running! 

If you have comments, suggestions or corrections, please post them so we all can learn. And remember, Some Is Always Better Than None!

NOTE: All items tested were purchased by me. No products have been loaned in exchange for a favorable review. Any items sent to me for T&E will be listed as such. Suck it Feds.

Winter Is Coming

While the calendar tells us that fall just started, cold weather is already arriving, especially here in the high country. It's not bad enough to keep folks out of the hills, but it is definitely bad enough to punish improper choices. With the cold weather comes cold weather injuries. While a bit of forethought can prevent the vast majority of these, things sometimes go wrong. When that happens, you need to be able to recognize and treat the resulting injuries.

The two major cold weather injuries are frostbite and hypothermia. Frostbite results from flesh being exposed to extreme or prolonged cold, while hypothermia is a lowering of the body's core temperature to a dangerous level. They often run hand in hand, and can cripple or kill a victim.

Frostbite: Frostbite is a progression of injury caused by the exposure of skin to extreme cold, or prolonged exposure to more moderate cold. Early stages start by the skin becoming red, cold, and swollen. This progresses to numbness, and the skin becoming hard to the touch in the more severe stages. The redness progresses to a bluish or gray tone as well. There may be a tingling sensation as well as pain associated with swelling.

Treatment involves warming the affected area gradually. Soaking affected areas in warm water is ideal. A loose wrap with warm towels or blankets can help, as well as sheltering in a warm building or car. Do not rub frostbitten skin. While it does provide heat, vigorous rubbing can damage tissues already weakened by frostbite. Severe cases require medical attention. These cases are ones involving gray or hardened skin, as well as persistent numbness and swelling.

Hypothermia: Hypothermia is a very dangerous condition where the body's core temperature drops to a dangerous level, usually defined as 95 degrees Fahrenheit. This frequently occurs from exposure to winter conditions or immersion in cold waters. When the body temperature falls to these levels, the brain and organs begin to malfunction and shut down, and can lead to permanent damage or death.

Early-stage hypothermia patents will be shivering, and possibly dizzy and confused, and show a lack of coordination. They may be both hungry and nauseated, as well as fatigued. As their condition worsens, shivering stops, and fatigue progresses to drowsiness and unconsciousness.

The first step in treatment is moving the patient out of the cold, and removing any wet clothing they're wearing. Wrap them in warm, dry blankets if they're available. If necessary, wrap a healthy person in the blankets with the patient to share body heat. As with frostbite, gradual warming is safer and better than severe, sudden heating. Be gentle when moving all cold-injury patients, both due to their possible confusion and sluggishness, and to prevent injury to weakened tissues. Severe hypothermia cases need professional care, where advanced techniques can be used to warm the patient inside and out.

Prevention of cold injury is the best course of action. Unfortunately, no plan survives first contact with reality. Know how to recognize cold-related injuries before they become severe, and how to treat them when they occur.

Lokidude

Monday, September 26, 2016

Firearms Cleaning, Part the Fourth: Revolvers

Revolvers  aren't as common for carry pistols as they used to be, but there are still a lot around.  And that's not counting those used for hunting and targets.  They're reliable, versatile,  and generally handy.  Cleaning them is different from cleaning a semi-auto.

For this I'm using a Smith & Wesson .38 Special.

First thing, open the cylinder and make sure there's nothing hiding in any chamber.
For general cleaning, you don't have to remove the cylinder, but I'll cover how to later on for serious scrubbing-out.

For the barrel, wet a patch with your favorite CLP or whatever, and push it through the bore.

Let it soak while you attend to the cylinder.  Use a bigger patch, because the chambers are larger in diameter than the bullet.  Hold the pistol so you're supporting it, pick a chamber, and push the patch through that chamber. 

It'll be pretty tight right at the front, because there the chamber narrows from cartridge diameter to bullet diameter.

Remove the rod, take the patch and put it back on the jag, and do the next chamber.  If it's really dirty, and the patch looks nasty, use a fresh one as needed.

Once all chambers have been patched, take a cloth, wet with your cleaner, and wipe the front and back of the cylinder.

Now take a cloth, and clean out the inside of the frame.

You might need to use a craft stick or something to push it tight around the barrel,

otherwise a finger works.

Back to the barrel, push a dry patch through, then take a look.  Helps to hold the piece so light reflects off the back of the action, or use a flashlight.  Unless you had some really dirty ammo, or it's had a LOT fired through it, chances are that's all the cleaning it'll need.

Go to the cylinder, push a dry patch through each chamber, and inspect.  If any that need more attention, you can hit them again, or use a brass or bronze brush to help get any stubborn fouling out.  If you have to do this, it helps to have a rod with no swivel action, as you can rotate the brush to better scrub the chambers out.  Can even go to a little larger diameter brush if need be. 

Then wipe off the front and back of the cylinder.

Now dry cloth, and wipe out the inside of the frame.

Wipe down the outside of the barrel and frame, the ejector rod, anywhere that looks like it needs it.

You're done.

A lot of people do prefer to remove the cylinder for cleaning.  On the S&W, that's simple.  See that front screw on the sideplate on the right?
Use a proper-fitting screwdriver, and remove that screw.

Open the cylinder, and line one of the flutes on it up with this spot on the frame(shown with the cylinder removed).
You should be able to slide the cylinder and crane forward
and out.

On models that have a ejector rod that's the same diameter all the way, you can slide the crane forward and off the ejector rod.  Older models often have a larger-diameter head on the rod, which means you'd have to remove the ejector rod to take the crane completely off.  We're not doing that today.


More advanced: say you picked up an old revolver, or inherited one, and the action is stiff, the cylinder won't spin freely, it really needs to be detail-stripped, cleaned and lubed.  There are books and web pages that cover this, or go to a friend who knows how(actually knows, not "Sure, I can figure that out") for help.  There are a number of pieces inside, including springs
that just love to take off and disappear, and there's a sequence everything should be removed and replaced in.  That's important.

Note: if you have a Taurus revolver, you can remove the cylinder from the frame the same way, BUT in the end of the crane that fits into the frame, there is a plunger and spring.  If you don't put them back in before you reassemble, the cylinder will not lock up.  And they're easy to lose.

Sunday, September 25, 2016

Gun Blog Variety Podcast #110 - Radioactive Riots Forever

It's like Strawberry Fields, only with more rioting and radiation.
  • Beth is "On Assignment" and will return next week. We explain why in the podcast.
  • Who pulls a knife on someone for "stealing" his begging spot? Who is that beggar you're giving money to? Sean looks a little deeper while throwing Erin under the bus for an errant slip of the tongue.
  • Barron reminds us of something that Hillary's Information Technology consultant is learning the hard way: The Internet is Forever. FOREVER.
  • In the Main Topic, Sean and Erin discuss the #NCRiots in Charlotte.
  • In the wake of all the awfulness going around, we need some good news. Tiffany tells us of the story of a good Samaritan with a gun in a Kansas City parking lot.
  • Did you hear about all the radioactive water that leaked into Florida's aquifer? Erin tells us why we're all going to die. Or, you know, not.
  • It takes a scientist to take on a scientist. It's Weer'd vs. Science in this Audio Fisk™ of two Science Vs. podcasts.
  • Our plug of the week is for the Grass Roots North Carolina.
Thank you for downloading, listening, and subscribing. You are subscribed, right? We are available on iTunes, Stitcher Radio, and now on Google Play Music!
Listen to the podcast here.
Read the show notes here
Thanks also to Firearms Policy Coalition for their support.

Thursday, September 22, 2016

Gun Cleaning, Part 3: How to Clean a Rifle

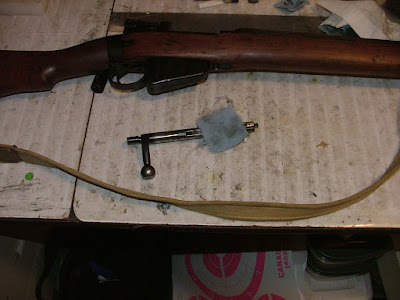
This procedure is basically the same as cleaning a pistol, just using a longer rod. There are X-hundred pages out there on "How to clean an AR -15", so for this I'm using one of the more common military surplus rifles out there: a Lee Enfield #4 MkI.


This is a bolt-action (a turnbolt if you want to be picky, since you rotate the bolt via the handle to lock and unlock it) rifle, chambered in .303 British, with a ten-round magazine.

MAKE SURE IT IS UNLOADED
Yes, I keep saying this. I once met a Oklahoma Highway Patrolman named Dan Combs, who was an incredible shooter, both in speed and accuracy. One of his sayings was "Nobody ever got shot with an unloaded gun; but a LOT of people have been shot with one they thought was unloaded." Words to remember!
Editor's Note: Firehand likes to use the word "bore" a lot. In firearms terminology, the bore is "The hollow part inside a gun barrel or other tube." However, he also uses the word "bore" to describe the chamber of the firearm, which is the portion of the barrel where the cartridge is places prior to firing. 
To prevent confusion, Your Editor has decided that for the purposes of this article, "bore" is going to be a general term that means "hole". If we mean the barrel, we will say barrel; if we mean chamber, we will say chamber. Only if we are discussing general hole-cleaning procedure will we use the imprecise term of "bore". 
Barrel

Remove the bolt. Check your manual or other information;
how to do this varies by brand and by model.

Cleaning the barrel is same as with the pistol for both patches and brush, with the only difference being size; you really need a table to lay the rifle on, or some other way to hold it while you run the rod through.


Exception: with a revolver, a lever-action rifle, or some semi-autos like the M1 Carbine (above), you cannot clean the bore from the rear and must do it from the muzzle end.
http://amzn.to/2ciSHA2

This is where that muzzle guard shown in Part 1 comes in: you fit it over the rod, then put on the jag or brush. Fit the patch and jag, or brush, just far enough into the barrel to allow you to get the guide into place, then push it through. Make sure the guide stays in place while you're pulling the rod back out, and repeat as necessary.

Bolt
Instead of cleaning a slide, with a bolt-action rifle you clean the bolt.
Generally the bolt will only need wiping down with whatever cleaner you use...
... including the bolt face. 

Wipe off the fouling, then apply a light (emphasis on 'light') coat of oil or CLP.

Different bolts
The bolt for a rifle always has some kind of locking lugs to hold everything closed when firing.

On an Enfield, they're at the back of the bolt.

Most rifles have the locking lugs at the front.

Here's a Mosin Nagant, a very common rifle, with the bolt removed. 

The red arrow points to the front of the receiver where the bolt lug recesses are. You will need to wipe all around the lugs when you're cleaning the bolt, and lightly lube them.

If the rifle is really dirty, you may also need to clean the recesses in the action where the locking lugs fit. I can't show you a picture of them, so think of them this way:

  • Hold the bolt with the handle in the position it would assume if it were in the rifle but all the way back. Note the position of the lugs.
  • When the bolt is all the way forward, the lugs go into the recesses, and when you turn the bolt to lock it, they cam into place.

If the action has gotten muddy, or really dusty, or you've fired corrosive-primed ammo, you'll need to clean them out. There are tools made for the purpose, and they work, but if you can put a patch over the end of a finger and get into them, that'll generally take care of it.

Then check the inside of the receiver, where the bolt slides back & forth.

Take a cloth or big patch with a touch of oil on it and wipe it out;
there'll generally be very little fouling here, but it's still a good idea to make sure.

Chamber
The biggest difference between cleaning a pistol and a rifle such as this is the chamber. The body of the cartridge is generally bigger (sometimes much bigger) in diameter than the bullet, so a jag and patch that fits the barrel nicely won't work at all to clean the chamber. 

I like to take a bore brush and wrap a big patch or a strip of cloth around it a couple of times (how many times depends on chamber size), put a little cleaner or CLP on it, push it into the chamber and rotate it a few times, then back it out.

Warning!
Unless you're cleaning before a long period of storage, do not leave a heavy coat of oil or grease in the chamber, and if you are storing it, be damned sure to clean it out before you use it. Firing a rifle with a heavily-oiled chamber can generate very high pressure in some cases, and that's something you want to avoid.


That's the basics for a bolt-action rifle. Part 4 is going to be on cleaning revolvers.

Wednesday, September 21, 2016

Prudent Prepping: More First Aid

The dust has settled and the First 72 Hours have passed. Follow along as I build a long term plan via Prudent Prepping.

First aid is a part of my plan that has been lagging behind food and shelter, mainly due to financial reasons. That particular limitation has eased somewhat in recent months, so a few items are going to be added, piecemeal to my EDC kit, GHB and my more permanent home/camping kit.

Several of our authors have written about first aid (like Lokidude's post yesterday!), or describing their kits here and here,  As I am just starting to build a selection of supplies, I've read and followed the advice of many different people, like Jonathan Sullivan.

Jonathan is someone I've been following for several years, even before he joined our Facebook page. He made this post not long ago, detailing his reasons for building a compact trauma kit and the items he purchased. I don't have anything to add to kit he built, but I am duplicating the belt kit and adding some of his recommended pieces to a First Aid kit I already mentioned here.

Items I'm Ordering

I don't need to order Nitrile gloves or look for duct tape; these are things I've had in my bags almost forever. 

Just like the disclaimers in Jonathan's post, I too am not qualified to speak from a position of authority on any medical topic. When I receive these items I'll put up a post showing how they all fit into my existing bag, since it's obvious they will fit into the pouch Jonathan is using.

The Takeaway
  • Here is another case of suggested improvements coming from friends with experience that I lack.  
  • This is Blue Collar Prepping, where most people have to budget. There is nothing wrong with slowly building towards your goal. 

The Recap

Just a reminder: if you plan on buying anything through Amazon, please consider using our referral link. When you do, a portion of the sale comes back here to help keep this site running! 

If you have comments, suggestions or corrections, please post them so we all can learn. And remember, Some Is Always Better Than None!

NOTE: All items tested were purchased by me. No products have been loaned in exchange for a favorable review. Any items sent to me for T&E will be listed as such. Suck it Feds.

Tuesday, September 20, 2016

Cuts and Closures

Cuts and scrapes are a part of life, as any mother of boys can tell you (just ask my mom; she treated plenty of  them, between my brother and me). However, there are multiple types of cuts, and they all need to be treated a bit differently.

This isn't a comprehensive breakdown by any means, as that can occupy entire chapters of medical textbooks. Instead, it's more of a crash course, if you'll pardon the unintentional pun. So, without further ado, lets close some cuts.

(Author's note: The pictures for this article are hidden behind links, for the benefit of those with softer stomachs. They are quite graphic. Be advised.)

Abrasions
Abrasions are one of the most common types of cuts, and are caused by rough materials rubbing the skin away. Colloquially called "road rash," abrasions can be caused by tools, falls, recreational accidents, or any other incident where moving skin hits a stationary surface (or vice versa).

These wounds look ugly, but usually don't bleed much and are fairly shallow. They do need particular attention when being cleaned, however, as debris often ends up in the wound.

Some abrasions can be quite severe, though. If large areas of skin are removed, or the wound bleeds heavily, professional medical attention is required. In addition, due to the amount of skin removed, abrasions need to be kept clean to prevent infections and speed healing.

Bandaging abrasions is usually quite simple, requiring only adhesive bandages or gauze pads. 
  1. Rinse the wound with clean water
  2. Dry it gently
  3. Apply the needed bandage. 
Lacerations
A laceration is what most people think of when they think of a cutting injury, and occur when a sharp object breaks the skin. They may bleed very little, or they may bleed heavily, depending on the depth of the wound and the location. Lacerations that bleed heavily, or won't stop bleeding with direct pressure, should be seen by a doctor. In addition, a wound deep enough or wide enough that you can see into it needs professional attention, typically sutures. Some folks are bold enough to do that at home, but I lack formal training in the subject, and so would rather leave that job to the professionals.

Bandaging a minor laceration is so basic that most folks do it without thinking.
  1. Flush the wound with clean water
  2. Dry it
  3. Apply an adhesive bandage, or something larger if needed. 
  4. Antiseptic ointment can also be used, if desired.
Temporary bandaging can also be used while transporting to, or waiting for, professional medical treatment. Wounds too large to bandage at home often benefit from a compression bandage until better treatment can be applied.

Punctures
Puncture wounds are deep, narrow, and generally difficult for a layman to treat. If possible, do not remove whatever caused the puncture, as it often helps "plug the hole" and removing it can make things dramatically worse.
  1. Bandage any areas that are bleeding
  2. Immobilize or otherwise support the object to keep it from moving
  3. Summon professional help.

Illustration: Laceration vs Puncture

Avulsions
Avulsions are ugly, nasty wounds. The definition of an avulsion is when something is "torn away" from its natural place. These injuries are often caused in a manner similar to abrasions, but they are far more severe. In short, if things are only partially attached, it's an avulsion. 

Much like a puncture, there isn't anything that can be done in the field beyond keeping the patient still and calm, controlling bleeding, and calling the professionals.

Blood makes folks understandably upset. With a bit of forethought and awareness, you can help calm that storm and lead the way to the E.R. and, hopefully, a shorter recuperation period.

Lokidude

Monday, September 19, 2016

Fuel Storage

With the recent Colonial Pipeline spill causing problems with fuel supply in several states, a member of our Facebook page asked about storing fuel. To our surprise, this is a topic that we hadn't covered yet.

Most of the “experts” recommend storing enough fuel for your vehicles to make it to your BOL plus 50%, and enough for your generators to run for at least 24 hours. I rarely ever let my vehicles get below a half tank of fuel (that's three round trips to the BOL), and what I have on hand will run my generator a lot longer than 24 hours. Use your own judgment on how much you need to store.

Storing fuel for your vehicles and generators breaks down into two parts: safety and treatment.

Safety
  • Never store gasoline inside an inhabited building! Gasoline is more volatile than diesel, and the vapors are heavier than air so they can travel along a floor to an ignition source. A fan motor starting, a pilot light on a water heater, or a light switch being flipped can cause a huge explosion.
  • Keeping air away from the fuel is the first step to storage. Containers must be airtight, preferably without a separate vent hole to reduce the chances of air getting inside and vapors getting out.
  • Fuel containers are color-coded: Red for gasoline, yellow for diesel, blue for kerosene. Don't mix them up unless you want to destroy an engine or two.
  • Metal containers are better than plastic. Metal seals better and is more durable than plastic, but it costs more.
  • Have fire extinguishers close to anywhere you are storing fuel. You're not likely to be able to put out a fuel fire, but you might be able to prevent a small fire from reaching your supply.
  • Keeping the fuel cool and at a constant temperature is the best way to store it. You're not going to be able to store gasoline below its vapor (or flash) point (-77° F), but you'll reduce the condensation inside the containers. Diesel,with a flash point around 105° F, is a lot easier to store. 
  • Minimizing vapors means less of a chance of accidental fires and explosions.
  • Large containers (over 5 gallons) are easier to deal with safely than small ones. Having a 55 gallon drum or 100 gallon transfer tank leads to fewer vents and spills. It is also easier to keep track of when it is time to rotate your fuel when it is all in one place.
  • Transfer tanks and pumps are designed to be carried in the back of a pickup and have stringent DOT and other government regulations. Be careful if the rule of law is still operating, and do your research; I have a CDL with a Haz-Mat endorsement so I can get away with a bit more than most people, but it comes at a cost.

Treatment
There are several products on the market for treating fuel for storage, and even more anecdotal evidence about which of them is the best. Improving the thermal stability of the fuel seems to be the main goal, meaning that the treatments are trying to keep the fuel from breaking down when warm. Avoiding ethanol blends seems to be a common starting point, due to the alcohol's affinity for water. I have researched a few and come to these conclusions.
  • Sta-Bil is the most common, and will work for a gasoline stored for up to a year. Re-treating every year seems to maintain the stability of the fuel for several (up to an indeterminate number of) years. I've used Sta-Bil in my lawnmower gas for years and have never had it go bad over a winter, so I can testify to at least 8 months of effectiveness.
  • Sea-Foam is more of a cleaner than a stabilizer, but it will help refresh old gasoline that wasn't treated and provides some protection for stored gasoline. The marine grade gets better reviews than the standard grade.
  • Several 2-stroke oils have stabilizers added. From what I've found, they seem to work as well as Sta-Bil.
  • PRI makes PRI-D for diesel and PRI-G for gasoline. They are industrial suppliers that specialize in fuel treatment for marine and heavy industrial customers, so their retail footprint is small. Their products are in use in large ocean-going vessels and fuel tanks for back-up generators at nuclear power plants, something I consider a good endorsement of their efficiency. The bottles are more expensive but treat a lot more fuel, so compare unit prices before buying.
  • There are several “enzyme” treatments that claim to be able to revitalize stale gasoline, but the jury is still out on how effective they are. Anecdotal evidence becomes “He said, she said” before the truth is ever known. Several of these products haven't been on the market long enough to back the claims they make, which tends to raise the reading on my BS meter.

Long-Term Storage
Gasoline and diesel are not designed to be stored long-term.

Freshness
  • As sold at the pump, gas is going to stay “fresh” for about six months and diesel for about a year. 
  • Both will slowly oxidize from contact with the air and lose their combustibility. 
  • Both will absorb moisture from the air if they are exposed to it. Ethanol-blend gasoline is worse in this regard.
Moisture
  • Water is denser than diesel or gasoline and will settle to the bottom of any container. 
  • Water in diesel leads to biological growth of bacteria that will foul filters and block lines.
Fouling
  • Diesel tends to form gummy deposits that will plug filters and injectors.
  • Gasoline will also form gums and varnish that will plug a carburetor and injectors after storage.
  • Both will cause carbon (soot) build-up inside an engine after sitting for a long time, which reduces an engine's power and makes it run rough.

My Setup
I heat my house with an oil-burning furnace. Fuel oil is nothing more than low-grade diesel fuel, so I have dealt with storing up to 500 gallons of it at a time for the last 20 years. My tank gets refilled at least once a year, so I have had no reason to add a stabilizer to it, although I have started adding an antibacterial treatment to keep the sludge growth down, as filters are a mess to change and I hate having to prime the fuel pump on the furnace to get the air out of the line. 

Since the engine in my M35A2 truck is a multi-fuel diesel, it will burn fuel oil just fine. The diesel tractor runs on #2 diesel already, so using fuel oil won't be a problem with it. My furnace fuel tank is my back-up truck fuel tank, although the DOT will get pissy if they catch me using dyed fuel in a vehicle on the road. (The dye is added to indicate that no road taxes were charged when the fuel was sold.)

I keep a few 5 gallon cans of gas on hand for emergencies and rotate them through the lawnmower and chainsaws. I have used Sta-Bil for years and never had a problem, but it rarely sits for more than a year. It seems like I'm always running into someone who has run out of gas, or some other need pops up, and the stored gasoline gets used and replaced before the year is up.


Use common sense and the best information you can find when trying to store fuel for an emergency, and you should be fine. Never forget that you're working with something that is designed to burn or explode, and give it the respect that it is due.

Sunday, September 18, 2016

Gun Blog Variety Podcast #109 - One Aux Port Closes, Another Port Opens

Shh. It's okay. Just try to relax and enjoy this episode of the GunBlog VarietyCast. You'll only feel a little pinch...
  • Beth went to frickin' Crimson Trace where they put frickin' lasers on frickin' guns. She's back to tell all us about it.
  • What kind of father takes a .44 Magnum and shoots at his son? What kind of son makes it necessary? Sean takes a closer look.
  • The iPhone 7 loses an aux port and the Galaxy Note 7 loses its cool. Barron tells us which is important and which is just not worth worrying about.
  • Tiffany invites police officer and tactical trainer Chuck Haggard to discuss the very timely issue of police/community relations.
  • You hoped she'd never go there, but she does. What do you do when you need to rehydrate someone but they can't drink? Yes, the old urban legends are true, and Erin tells you how it works.
  • He's the anti-gunner's favorite "gun guy", but he's really just a sheep in wolf's clothing. His interview with Boston Public Radio gets its very own Patented Weer'd Audio Fisk™.
  • Our plug of the week is for the Gun Rights Policy Conference Livestream at www.PoliticsAndGuns.com/Live.
Thank you for downloading, listening, and subscribing. You are subscribed, right? We are available on iTunes, Stitcher Radio, and now on Google Play Music!
Listen to the podcast here.
Read the show notes here
Thanks also to Firearms Policy Coalition for their support.

And a special thanks to our sponsors for this episode, Remington Ammunition and Lucky Gunner.com.

Friday, September 16, 2016

Gun Cleaning, Part 2: How to Clean a Pistol


You have a dirty firearm that needs attention. You've got your cleaning materials assembled, and you've got a clear space on a table to do it, with something to catch drips, splashes, and dirty patches. Now it's time to actually clean your gun.

I shall use my S&W pistol to demonstrate how I would clean a firearm.


NOTICE
I have no control over what you're doing, how you're doing it, or how careful you are. This is the process I use, and it works for me, but this is not the only way to do it. Be careful, pay attention to what you're doing, and observe proper gun safety.

First, make sure the gun is unloaded. In the case of a semi-auto pistol like this, that means the magazine is out, and the chamber is empty. CHECK BOTH OF THEM. And it won't hurt to check them again, just to be sure, before you do anything else.

The pistol field-stripped for cleaning, with the parts labeled. 

Put the proper jag on the rod.
Wet a patch with whatever cleaner you're using
and place it over the jag.

Insert jag and patch into the chamber end of the barrel...

... and push through.*
That first patch both wets the bore, and pushes a lot of the loose fouling out. I like to let it sit a few minutes while the cleaner soaks the fouling, then push another wet patch through, then a dry patch. Depending on how smooth the bore is, and just how dirty it was, that may be all it takes. If you have stubborn fouling in the rifling, it's time for a brush.


A new brush can be dipped into the bottle, but don't do it again after that first pass; you'll contaminate the cleaner with what the brush cleans out. Either carefully drip some on the brush, or use a eyedropper or pipette to do it. 

 Push the brush all the way through, then pull it back; do NOT try to push it partway through and then pull it back, the thing can actually get stuck when that kinks the bristles. Do that several times, and if you're not in a hurry, let it sit and soak a few.

While it's soaking, get a piece of cloth or a large patch,
wet it with cleaner and wipe the outside of the barrel off, 
then let it sit.
Take your cloth, and wipe out the inside of the slide,
including the breech face.

I like to take a craft stick (popsicle stick if you prefer),
cut one end at an angle, fold the patch over that,
and use it to clean out the slide rails.


If it's pretty cruddy inside, let the cleaner work a few minutes and take care of the frame while you wait. The frame is generally fast & simple: take the cloth (or a clean one if needed) and wipe the rails off, top and bottom, and any other place that looks like it needs it. If you've got a lot of loose fouling in there, you might take it outside, or over a trash can, and use a soft toothbrush to get all the loose stuff off before you start wiping.

When the frame is done, go back to the slide with a clean patch and wipe everything out. If you find an area that needs it, give a little extra scrubbing. Then use a dry cloth to wipe out all the cleaner and fouling you can.

Look the recoil spring assembly over. If it's cruddy,
use the toothbrush first, wipe out as well as you can,
then add a drop of oil onto the rod itself.

When done, go back to the barrel. Put the jag back on the rod and push a dry patch through and then take a look through. Chances are it will need maybe one more dry patch. Then wipe the outside clean.

If you live in a humid area, you might want to take a clean patch, put a light amount of your favorite lube/protectant on, and wipe it through the bore.

If you haven't already, check the manual for where it recommends you lubricate the barrel and slide, and do that. Remember, you don't need much, just a bit in the proper places.

Then you can put the barrel, slide, and recoil assembly back together.

Time for the frame. Lube where the manual says,
then put the slide assembly into place.

That's it. Barring a really dirty pistol (lots of dust, steel-case ammo residue, dirt or mud from being dropped), that'll take care of it, and it's ready to be function-tested and then put back into service.

Next time, I'll demonstrate with a rifle.

Footnote
*Whenever possible, clean any firearm, from the breech end; there is much less chance of damaging the rifling at the crown (where it ends, at the muzzle) that way. 

Thursday, September 15, 2016

Sporks, Not Foons

When loading a pack for an adventure or assembling a BOB to keep handy, weight becomes a major issue. There are two main methods of reducing the weight of your bag: reduce the number of things in it, or reduce the weight of the individual items.

A few years ago, I ran across a handy item while looking for a birthday present for a friend who is an ultralight cyclist, a hobby where every gram of weight matters. This one item replaced three that he normally carried, and weighed less than any of the three it replaced. It did the job as well or better than what he was using, and was a lot more durable.

I found him a titanium spork.

http://amzn.to/2csa5Gt
We've likely all seen the disposable plastic sporks (spoon and fork in one tool) at fast-food joints. Handy for the restaurant (since they only have to stock one eating utensil to hand out to customers), they are usually a poor compromise between a spoon and a fork. They are also common in prisons, military meals, and schools and are generally weak and frustrating to use. Trying to get a spoon to do the job of a fork means compromising both functions and they just don't work well as either one.

I'm not normally a huge fan of multi-purpose tools, since they inevitably result in trade-offs that weaken the tool to the point of premature breakage, and I have a collection of broken Leatherman and Gerber multi-tools that reinforce this belief. I won't buy the cheap multi-tools because even the well-made ones don't hold up for long. I've broken pliers jaws, screwdrivers, knife blades, and worn out hinges during normal daily use. I don't abuse my tools, but I expect them to do the job they are designed for.

http://amzn.to/2cAYKl5

The titanium spork I found for my friend is “Light My Fire” (LMF), and it has a spoon on one end of the handle and a fork on the other. This eliminates the compromise of putting fork tines on a spoon and makes it actually useful. They also make plastic versions of the same design, but titanium has several advantages:
  • Titanium (Chemical symbol Ti) is as strong as mild steel, but only weighs half as much. I tested my spork by digging into a tub of frozen ice cream. Steel spoons bend and plastic ones break, but the Ti spork didn't even flex
  • Ti has a physical memory: if it does get bent, it tends to go back to its original shape.
  • Ti is resistant to most chemicals at room temperature and will not rust like steel. I have a few Ti-framed pistols and they are much easier to clean than their steel cousins.
  • Ti is a fairly poor conductor of heat, so you won't burn your fingers while stirring a pot on the fire. This also means that pots and pans made of Ti are known for uneven heating.
  • Ti does oxidize, but the oxidized coating protects the underlying metal (a process known as passivation). The process can take up to four years to complete under normal conditions, but then protects it indefinately.
  • Ti melts at about 3000°F, so it isn't going to be damaged by any common fire.
  • Ti is bio-safe, meaning it doesn't react with the human body. I have a Ti plate and screws holding a couple of vertebrae together, and due to this property it is used for making replacement joints. You don't have to worry about it adding anything to your food.

Ti also has a few disadvantages, though:
  • Even though it is the ninth most abundant element in the Earth's crust, it's also hard to extract and purify, which makes it expensive. The extraction process is inefficient and difficult when compared to steel of any type.
  • Most of the Ti-bearing ores are found in Australia, Canada, South Africa, and India. There's not much local ore in the USA, which means shipping and handling fees.
  • Ti “work-hardens”, which means that if you use a cutting tool on it, it gets harder to cut as you go. Machining Ti is a pain,  which is why most of the products you see are simple stampings and forgings.
  • Ti will burn when hot enough, so welding it is a challenge. Oddly, it will burn in pure nitrogen at the right (high) temperature,  so Argon and Helium shielding gasses are used.

The version I bought came in a three-pack, so the second went to another friend and the last one I kept for myself to play with. I've taken mine on numerous camping trips, and it now rides in my lunch bag for daily use.

I was recently given a different brand of Ti spork as a gift, and I am still testing it. The new one is made by HeavyCover and has a built-in bottle opener and some small wrench-like holes in the handle. I may write up a review on it later.


All told, I am impressed by the utility and light weight of my Ti spork. It works well, and it takes up very little space in a bag while replacing a steel utensil set. Every ounce counts when you're carrying it on your back for any distance, so keep looking for ways to reduce the burden.

Wednesday, September 14, 2016

Prudent Prepping: Making My Own Knife

The dust has settled and the First 72 Hours have passed. Follow along as I build a long term plan via Prudent Prepping.

I have met quite a few interesting characters in my 20+ years as a sales rep calling on the country's largest home improvement chain, from the multi-millionaire real estate developer who drives a 20 year old pickup, to the medically-retired DEA agent who brings his working dog along with him and who 'alerts' on about 20% of the customers(!!), to the ex-corporate lawyer who is now a cabinet maker and part-time blacksmith.

The last guy, Rob, has turned out to be not just a customer in the store or the target of a sales pitch, but also a friend. When he gets finished with a cabinet commission (his stuff is that cool), he sometimes fires up his forge and cranks out pieces he gives as gifts to clients and friends. I have seen pictures of candlesticks and full-on candelabra to fun things like wrought-iron bottle openers and napkin rings.

This is a longish lead-up to the main topic of this post. Everyone has favorite knives, and their reasons for those choices are quite personal. I decided to get with the program and see what the big deal is with Mora knives, and why they had such a passionate following, by building my own knife! It is a Mora style blade, specifically a Lauri pattern. I don't know enough about the difference to speak on why one is a Mora and one is not, but I'm betting there are folks reading this who can educate me.

Rob gave me this knife blank:

Lauri Knife, Blade 3.7" Long Model #105H


From the website:
  • NEW LAURI HIGH CARBON 105H BLADE
  • 3.7" X 3/4" WIDE BLADE.
  • 8 1/4" OVERALL WITH A 3MM THICK BLADE.
  • HARDENED TO 59 ON THE ROCKWELL SCALE.
  • UNPOLISHED BLADE WITH SCANDINAVIAN GRIND.THIS IS A NICE SIZE ALL PURPOSE BLADE.
  • RAZOR SHARP MADE IN FINLAND.

Before
After
When they say razor sharp, it's no joke. This blade is sharp right from the factory!

This shaving was done dry on the top of my wrist, with the knife right out of the package.


Ben's Backwoods has a large selection of knives, camping equipment and survival gear that my friend Rob says has never disappointed him in quality or their customer service. I am adding this supplier to my List of Interesting Places that may get some of my money in the future.

A bit bothersome is the lack of handle kits for their knife blanks. I've looked through the site and there are no offerings; I've even searched other places that sell kits, but there are no solid handle options, just a good selection of 'slab' or two-sided kits. This is going to be a more complicated job than expected, since I will have to buy a block of wood of the proper size, drill a hole lengthwise, shape it to a comfortable fit, and then figure out a durable finish.

There will be more updates as I get involved in this project, so stay tuned!


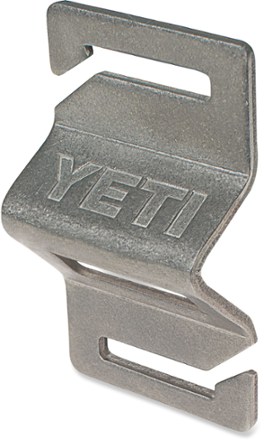
The other thing that I just picked up is a fun and fairly frivolous item, a MOLLE mountable bottle opener, specifically this:

Stainless Steel
http://amzn.to/2cf6MPY
Yeti Molle Bottle Opener

Product Description:
  • Yeti's lightweight MOLLE bottle opener attaches directly to your YETI Hopper, meaning you'll never again be without a way to crack into those frosty brews.
  • It's low profile to prevent snagging, attaches snugly for maximum leverage and is made from corrosion-resistant stainless steel that can take a major beating.
  • As an added bonus, you can attach it to your pack or any other MOLLE rigging.

Mounted on my
5.11 Rush Moab 6
I don't plan on opening too many bottles, but I feel that I am well prepared for any such situation now.


The Takeaway
  • Adding a knife to my gear and dusting off my woodworking skills all at once is a treat! 
  • Every purchase doesn't have to be 100% practical. Fun can be in the mix as well.

The Recap
  • Lauri knife blade: $11.98 from Ben's Backwoods
  • YETI bottle opener: $10 from REI, or $15.95 from Amazon with Prime.
Just a reminder: if you plan on buying anything through Amazon, please consider using our referral link. When you do, a portion of the sale comes back here to help keep this site running! 

If you have comments, suggestions or corrections, please post them so we all can learn. And remember, Some Is Always Better Than None!

NOTE: All items tested were purchased by me. No products have been loaned in exchange for a favorable review. Any items sent to me for T&E will be listed as such. Suck it Feds.

The Fine Print


This work is licensed under a Creative Commons Attribution- Noncommercial- No Derivative Works 3.0 License.

Creative Commons License


Erin Palette is a participant in the Amazon Services LLC Associates Program, an affiliate advertising program designed to provide a means for sites to earn advertising fees by advertising and linking to amazon.com.