Showing posts sorted by relevance for query soap. Sort by date Show all posts

Friday, March 3, 2023

Homemade Soap

Keeping clean is an essential part of maintaining both physical and mental health. I've taken enough bloodborne pathogen and hazmat classes that not being able to wash my hands regularly makes me actively uncomfortable. Any of our readers who have been on an extended camping trip (whether personal or under government contract) know the challenges involved in maintaining an acceptable level of personal hygiene.

There are a number of potential issues in keeping ourselves clean, such as access to a water source, ambient temperature, and privacy. While there's not much we can do about those issues, the one we can address is soap. While readily available in stores and online, making soap at home doesn't have to be complicated or expensive, and is another self-sufficiency skill to be considered.

WARNING!
Soap making uses lye, a caustic chemical that can cause severe burns. Use all appropriate personal protective equipment,  including but not limited to eye protection, long sleeves, and gloves.

Equipment
Just over a year ago I posted an article on candle making, and some of that same equipment can be repurposed for making soap, specifically a double boiler or crock pot to melt the ingredients safely and a mold to form the soap.

A friend of mine who makes soap uses Pringles cans as one-use molds, with the resulting tube of soap then cut into disks. Any of the variety of silicone baking molds available on the market can be used as well.

A variety of home-made soaps from the author's collection

Make sure that any equipment and utensils used in the soap-making process are never again used for food preparation! Some of the chemical residue isn't good to imbibe, and it will give your food a nasty taste. 

Secondhand stores and yard sales are a very economical source for the necessary equipment.

Ingredients
A basic soap can be made with just three ingredients:

  1. Oil or another fat (olive oil, coconut oil, etc.)
  2. Lye (sodium hydroxide for bar soap, potassium hydroxide for liquid soap)
  3. Water (preferably distilled) or other liquids, such as goat's milk

Optional ingredients include essential oils, colorants, and dried herbs or flowers. 

The type and quantity of oil will affect the amount of lye needed for a recipe. This is a link to a handy lye calculator.

WARNING!
Never use aluminum containers or utensils when working with lye, it can cause a dangerous chemical reaction.

Process
This is the traditional hot process method for making soap. There is also a cold process method that takes longer, but doesn't require constant heat.

  1. Set the mixing vessel to low heat.
  2. Add the oil and cover.
  3. In a separate container, slowly add the lye to the water
    (don't add water to lye, it can splatter).
  4. Gently stir the solution while adding the lye.
  5. Put aside and let the lye solution cool for 15 to 20 minutes.
  6. Check the temperature of the oil(s) using a candy thermometer.
  7. Once they reach 120 to 130F gently pour in the lye to avoid splashing.
  8. Stir slowly (a stick blender on low can also be used).
  9. Continue blending and stirring for 10 to 15 minutes, or until the soap has thickened and looks like pudding.
  10. Cover and cook on low heat for 50 minutes, stirring gently if bubbles form.
  11. Let cool until the mixture drops below 180° F.
  12. If desired, add essential oils and/or colorants and mix well.
  13. Pour the mixture into a mold.
  14. Gently tap the mold to eliminate air bubbles.
  15. If using an open mold, smooth the top with a spatula.
  16. Let sit for at least 24 hours at room temperature.
  17. After cutting, allow the soap to dry for another week.

Soap making, if done responsibly, can be safe and isn't very complicated. It's also good clean fun.

Links


Tuesday, October 7, 2014

Guest Post: Chemistry of Soapmaking

-- by Renee Williams

(Editor's Note: This article was submitted for our writing contest.)

Renee's preferred avatar. 
In the first installment of this series, we talked about necessary equipment. Today’s installment will go over  basic chemical processes of soap making, and some of the most commonly used ingredients to achieve the best results.


For Science!

Soap, according to the FDA (federal Food and Drug Administration) and taken straight from their website (as of 10/3/2014), is as follows:

[...] the Food and Drug Administration interprets the term “soap” to apply only to articles that meet the following conditions:
(1) The bulk of the nonvolatile matter in the product consists of an alkali salt of fatty acids and the detergent properties of the article are due to the alkali-fatty acid compounds; and
(2) The product is labeled, sold, and represented only as soap.
What this means for us – as consumers, DIYers, hobbyists, and preppers/off-grid folks – is that soap is the solid formed when a fatty acid (lard, coconut oil, olive oil, Crisco, butter, etc.) is mixed with an alkali (Sodium Hydroxide or Potassium Hydroxide) to create a chemical reaction.


Chemistry

When lye and fats meet in the pot, the lye breaks the chemical bond between the glycerin and the acid chains. The sodium in the lye replaces the glyceride, leaving you with two compounds, bound together in a matrix: Soap (that salt precipitate the FDA mentioned) and Glycerin (and of course excess water which eventually evaporates out).

Soap is a chemical by-product. It is formed when an acid – in our case, the acid chains that are part of any fat – meet and react with a strong alkali, such as sodium hydroxide (NaOH.) Many of you will be familiar with sodium hydroxide in its most commonly used form: drain cleaner.


Alkalis

For years, you could walk into any grocery or hardware store and buy a bottle of Red Devil Lye. These days, all of the commonly sold drain cleaners are not straight lye. Finding pure NaOH can be tricky a lot of the time now. There are websites where you can order it, or if you happen to run a business you can frequently locate chemical supply houses that will sell it to you once you show them your tax ID and/or any state licensing that your area requires. Later on, I’ll do a follow-up to this article on how to process your own lye solution from wood ash and rainwater; but for now, do yourself the favor of starting out with a pure ingredient. Using the pure ingredients we have available to us currently – and having a good grounding in how those ingredients react and set up – will give you a good understanding of how the ingredients are supposed to react, and will save you a lot of confusion and head scratching in a SHTF situation where ingredient purity can’t be guaranteed and you're having to improvise


Fats

Fats – both solid fats like butter, lard, and cocoa butter, and liquid fats like olive oil, corn oil, soybean oil, or sunflower oil – are composed of two basic parts. The first part is a Glyceride molecule, or glycerin. This is what will give the soap its “slippery” feel when it’s finished.

The second part is an acid chain. Each glycerin molecule has room for up to 3 acid chains to be attached. Some fats use all three slots for acid chains; others do not, which gives us Tri-Glycerides versus Mono- or Di- Glycerides. It’s simply telling you how many acid chains are present. Each acid chain within a fatty acid compound might be the same acid... or it might not.

Each type of acid chain present lends a different quality to the finished soap. It can take years of study – or simply a single-mindedness about doing so – to find out which acid chain lends what qualities, and which fats they’re generally available in. Fortunately, you do not have to know which acid is in which fat at what proportions in order to get a good soap! There are a lot of sources already out there in the world which will tell you what fats are going to be most helpful.


Balancing the Recipe

Just like any other chemical formula, a soap formula has to be balanced in order to work right, and not have undesirable elements left over after the reaction finishes taking place. The way to balance a soap formula is to know which oils (fats) you’re going to use, and what their SAP values are. The SAP value of a fat is its Saponification Value – that point where it turns properly into soap, with no lye left over to cause a problem.

There are several programs available online which are used by modern Soapers – SAP calculators like SoapMaker are probably the most commonly used. It’s a great little program, and in any situation short of TEOTWAWKI, comes in very handy for those who don’t want to have to deal with working out the calculations. There are also places where you can find rather detailed lists of commonly-used fats and their respective SAP values, along with the actual mathematical equation needed to make a balanced soap recipe.

One of the reasons that I like – and still use – SoapMaker as a program is that it will automatically make all of your recipe adjustments for you based on various criteria ranging from the size of your mold, what percentage of a specific oil you want to use, to how strong you desire your lye solution to be. It will even graph out for you what several commonly looked-for qualities in your finished soap are going to be like, including hardness (how durable the soap is going to be when left in water) and moisturizing ability (how well it will lather, and how stable or fluffy that lather will be)

The most commonly-used fat in soap making has traditionally been olive oil. It was used by the ancient Greeks, Romans, and Egyptians, and there is evidence that it was in use as a soap making oil by the Etruscans and Phoenicians as well. Olive oil, when used by itself – traditionally called Castille soap (named for the Castille region of Spain) – is very moisturizing, and very easy on even sensitive skin, but the lather isn't very stable at the best of times, and it tends to dissolve rapidly if it’s not placed where it will drain completely and dry out between uses.

Olive oil, along with lard (melted, cleaned fat from pigs and wild boar) and tallow (fat from cows, goats, sheep, and various types of deer or buffalo) has been in use the longest. Lard and tallow both make for soaps that are very hard bars which survive well even when left in water, but they don’t always cooperate in making a good lather in cold or hard water.

Coconut oil has been in use in some areas for as long as it’s been pressed, much like olive oil in the Mediterranean region. Coconut oil makes a much harder bar than olive oil by itself, with a much more stable lather, but like lard and tallow it tends to have a drying effect on many skin types.

A great compromise these days is vegetable shortening – Crisco and its generic store brand offspring – which is made from hydrogenated soybean, cotton seed, and corn oils. It’s extremely shelf stable, cheap and easy to acquire, and tends to produce a soap that is hard enough to last a while, without being excessively drying, and with a decent lather even in cool water.


Next Installment

I’ll go over the actual process of creating soap from the raw ingredients of fats, water, and lye. I’ll also provide a couple of tested recipes, along with conversion rates to list the recipe in ounces, grams, and cups for ease of use.

Monday, October 13, 2014

Guest Post: Soapmaking 101, part 3 - Getting Down to Business

-- by Renee Williams

(Editor's Note: Renee submitted this series for our writing contest, which she won. Due to the strength of her writing, we at BCP have invited her to become a regular here. This is her final entry as a guest author.)

Renee's preferred avatar. 
In part 1 of this series, we discussed basic equipment lists. In part 2, we covered the essential chemistry of what makes a soap Soap. Here in part 3, we're going to finally get down to the nitty gritty, and actually get to business making a batch of soap.

In all our endeavors, we have to go through certain steps to get to the end result. Below is my personal soaping routine, developed and refined over the course of several years. If something in this doesn't suit you personally, adapt it to your own needs, keeping safety in mind when you do so.

Setting Up

  1. Get out your recipe, and start going through your ingredients list.  
  2. Make sure you have everything on hand, and that you have sufficient quantities of those ingredients to make the batch size that you desire.  
  3. Once you're sure that you have all your ingredients, start setting up your equipment.  
  4. Make sure everything is clean and ready for use.  
  5. Set up your work station in an area where pets and small children are not going to be able to tamper with, or potentially spill, your ingredients or the soap as it processes.  
  6. Make sure you have your protective gear handy.


Mixing Your Lye Solution


Ingredients:

  • wide mouthed glass or heavy plastic container, preferably labeled "Lye Solution - Do Not Touch!"
  • long handled plastic or wooden spoon
  • scale with a tare (zeroing) function
  • small scoop
  • well-ventilated space
  • micro-bead or flake NaOH  (available here or here for reasonable prices and good quality)
  • distilled or otherwise purified water
  • goggles, gloves, apron (mask  if available)
  • a 50/50 solution of white distilled vinegar and water, set aside for neutralizing any spills


Process:

  1. Place your mixing container on your scale and tare (zero out) the weight.  
  2. Making certain that your safety gear is in place, carefully begin adding water to your mixing container until you reach the amount specified in your recipe.  
  3. Always measure your water into your mixing container FIRST.*  Then, and only then, do you add your lye to your measured water.  
  4. Once your water is measured, begin adding your lye in small amounts, using the clean scoop.  
  5. Take care to keep from splashing the water onto the scoop, and to keep from adding more lye than your recipe calls for.  
  6. Stir the mixture gently to dissolve all the lye into the solution, then set aside in a location that is not easily accessed.  
  7. Allow it to sit undisturbed for a couple of hours, occasionally monitoring the temperature, until it has cooled down to no more than 110 degrees F.
* Mixing water and lye in the incorrect order creates an Extremely Violent reaction that can easily have the appearance (and danger levels) of an active volcano. I cannot stress enough just how important this point is - it is THE single most dangerous action in making soap or working with lye for any other purpose.  It won't be a problem, or be more dangerous than necessary, as long as you do things in the Correct Order.

While your lye solution is cooling down to a useable temperature, now is a good time to start your prep work for the rest of the process.   First we'll go over how to prep the mold you're going to eventually pour your soap into, so it can set up.


Prepping Your Mold

For today's purposes, I'm going to use the example of my 3 lb loaf mold - a simple rectangular box with interior dimensions of 10.5 inches long by 3 inches wide by 3 1/4 inches deep. To give you a scale, the loaf mold pictured was photographed sitting in a standard size living room chair.

Rhi's 3 pound Loaf Mold for Test Batches

  1. Get out that Saran Wrap or plastic sheeting that I listed in equipment at this point, because now is when you'll need it.  
  2. Line the INSIDE of your mold with a single sheet of plastic wrap large enough to drape over the sides and hang down some.  
  3. Make sure you've used enough that the plastic wrap is tucked smoothly into the corners, and still has some left over.  
  4. Later on, this hanging portion will be folded over the top of the filled mold.

Prepping Your Fats and Oils

So you've got your lye water cooling, and your mold is ready and sitting to one side to wait, now we're going to start getting our fats and oils ready for the mixing process.

Ingredients:

  • Large stainless steel pot
  • large non reactive spoon designated for oils
  • scale
  • heat source large enough to safely and comfortably heat the pot of oils
  • candy or digital read thermometer (separate from the one used to monitor your lye!)

Process:

  1. Set your large pot on your scale, and once again tare out the weight.  
  2. Carefully begin adding one fat or oil at a time, starting with any which are solid at room temperature.  (Coconut oil is a good example of this, as are beef tallow and lard.)  
  3. Each oil should be added separately, and the scale should be zeroed out again before the next oil or fat is added to the pot.  
  4. Once all fats have been added, transfer the pot to your heat source -- but only if one or more of your fats is in a solid form at room temp.  If all oils are liquid at room temp, you can dispense with heating them, since this step is only to get them all into the same liquid state.  
  5. If your local weather is particularly cold on the day that you plan to do your soaping, you will probably also want to heat your oils up very gently to bring them to approximately 95 to 100 degrees F before the actual mixing process begins, as it will greatly speed up the process.

Mixing the Soap - now is when the fun begins

Once your lye solution and oils are within 15 or 20 degrees of each other, it's time for the next step: turning the two separate substances into soap.
  1. Put those safety goggles and gloves back on, and get your long handled spoon or stick blender handy. 
  2. Carefully pour your cooled lye solution into your melted, cooled down fats. 
  3. Once all of your lye water has been added, begin stirring the two together.  This is when that stick blender really comes in handy, because without it, you'll probably be stirring for the next 3 to 5 hours, waiting for your mixture to hit the right consistency for pouring into the mold.
  4. As you stir, your mixture will slowly begin to thicken up a little bit at a time -- within 12 to 15 minutes, using a stick blender, or probably 3 hours of constant stirring if you're doing this completely by hand.  
  5. You'll know it's well on it's way to turning into soap when it thickens to the point called Trace.  This is about the consistency of pudding.  You can tell you've reached Trace when you can dribble a bit of the mixture back into the pot, and still see where the drops fell for several seconds afterwards.
  6. Once Trace has been reached, it's time to pour that thickening mixture into your prepared molds.  Now is not the time for hesitation, especially if you're using a stick blender, as it will begin to stiffen up into a solid very rapidly after this point! So you will want your mold or molds prepared well ahead of time.  
  7. Fill your mold (or molds, if they're small) with your prepared soap mixture, then fold those hanging remains of plastic wrap over the top to keep dust, bugs, etc from getting in your soap - and to keep out pests while it's processing.
  8. After your mold is filled, set it aside for 24 to 36 hours to do it's thing.  This is when Chemistry takes over, and turns the liquid mass of goo into solid soap.  
  9. At the end of the processing time, your soap should be a solid chunk in the mold, cool to the touch, and without any strong odor other than a clean "soapy" smell.
  10. Lift your finished soap out of the mold using the plastic.  
  11. Unwrap the plastic, cut your soap into bars or small chunks (depending on the size of your original mold) and set those aside to dry out for 3 to 4 days. This will help evaporate out unnecessary water content that's still in the soap - making the bars harder and much longer lasting.  The longer they sit before use, the more excess water will evaporate, and the milder your soap will become!


Happy Soaping, y'all!

Monday, October 6, 2014

Guest Post: Making Soap

-- by Renee Williams

(Editor's Note: This article was submitted for our writing contest.)

Renee's preferred avatar. 
Over the course of 30 years of being a medievalist, one of the things I learned -- and based a home business on -- was soap making. It's cheap; it's easy; and some incredibly fine soaps, formulated for your skin type and the qualities desired out of the finished product, are readily within your reach. If you have a properly formulated recipe, you can use the finished product within a couple of days, rather than having to let them set for months on end to mellow, dry out and finish reacting.

This series is going to focus on teaching you in easy steps how to make your own soap at home for a minimum of cost or equipment investment. I will only be covering the Cold Process Method of soap making. It is much more commonly used, much easier to learn with a significantly lower learning curve, and is actually the safer method of soaping.


First up

Most of what you'll need for soapmaking you probably already have on hand in your kitchen, garage, or workshop. What you don't have can be easily aquired for little to no investment, often from thrift or second-hand stores. There are a few items on this list for which I will name alternatives, since they're on the high-tech side and may not be as easily available (or practical to use) in a SHTF scenario.

 Outside of SHTF scenarios, all of my soaping equipment is dedicated duty. Soaping is all it does. Since that isn't always an option in life and death situations, choosing equipment which is easily cleaned and doesn't readily hold on to bacteria (in this case stainless steel, glass, and heavy duty plastics) are given a high preference over wood as long as they're available. Aluminum, while cheap and readily available, is not an option! 

No Matter What The Circumstances, Never Ever Use Aluminum For Soap Making - it is Highly Reactive, and Will Contaminate Your Soap, Making It Unsafe For Use. 
The actual hows and whys of this will be further explained in the forthcoming "Chemistry of Soap" article, but the short version is that aluminum, as a metal, reacts very rapidly with strong base solutions and therefore it leaches rapidly out of the alloy, leaving little bits of Sodium Aluminates floating in your soap and destroying your pan. The creation of the aluminates will consume some of your strong base (lye) and throw off the delicate balance of fats and lye.

Necessary Equipment


Scale

These days, battery-operated digital scales that have a Tare function and read to 1/100th of a gram are readily available both online and in various stores such as office supply houses. (A tare function allows you to weigh something, leave it on the scale, and zero out the weight before you add more to it.) Having a scale with a Tare function means not having to weigh your pot, and your measuring cups, and keep that information written down so that you can do the math yourself while measuring out ingredients.

While a simple non-electric ounce/gram kitchen scale will do the trick, the more accurate your scale, the more accurate your recipe, and therefore the more accommodating your finished soap. As an alternative, recipes can be converted from ounces or grams into cup measurements, and a simple set of plastic kitchen measuring cups can be used instead. This won't lend you the sort of accuracy even a cheap scale can provide; however, you never have to worry about replacing batteries or the technology failing!

Please don't ever rely on a "best guess" or "eyeball" measurement of ingredients. Doing so pretty much guarantees one of two unpleasant scenarios: first, if you underestimate your fat (acid) to lye (base) ratio, then you will not have a complete acid/base reaction, and your soap will be harsh, lye-heavy, and not safe for use. Alternatively, If you overestimate your acid (fat) to base (lye) ratio, what you'll end up with is a greasy mess that oozes excess fats, and rapidly succumbs to rancidity and spoilage. Yes, those really are the only two likely outcomes when you "guesstimate" your measurements while Soaping! 

Large Pot
Stainless steel or ceramic pots work best. Yes, they're expensive, but you get what you pay for. You want something that's going to be easy to maintain, easy to clean, non-reactive, and easy to locate. Stainless steel, while costing you on the initial expense, can pull double duty in the kitchen and will last practically forever as long as it's well taken care of. Enamel-glazed cast iron pots are much cheaper (especially if you frequent thrift stores!) and are often easier to come by than stainless. They will work as long as you're absolutely, positively, 150% certain there are no scratches in the enamel coating deep enough to expose the cast iron. (While nowhere near as reactive -- in a bad or contaminating way -- as aluminum, cast iron or hammered high carbon steel still reacts with the lye. It will corrode away and have to be replaced much more rapidly than stainless or ceramics.) 

When it comes to what size you should get, there is no standard other than "something large enough to hold your melted oils, plus hold your lye water, and leave a bit of room to guard against splashes". I use a 16 quart pot because I generally do 15 to 25 lb batches at a time.

Large Long-Handled Spoon
The choice of a spoon really comes down to two criteria:
  1. Is it long enough to comfortably reach the bottom of the pot, while still leaving enough to grasp comfortably (without your hand being in the processing mixture)? 
  2.  Is it non-reactive? 
Non-reactive is critical, so go with either wood or sturdy plastic. If you choose wood, be prepared to replace your spoon on a semi-regular basis, as the wood eventually wears out from contact with a strong lye solution. You will need to have several on hand; one is for mixing the lye solution, another is for dealing with your oils as you heat them to bring to temperature (and melt any solids) etc. It is always better to have more than fewer -- better to have to wash up several at the end of the day than to have to be running back and forth to your water source several times at what could be a critical point in processing.

Be comfortable with your spoon. You'll be seeing a LOT of it. You'll be spending hours with it, once you mix your lye and oils, so by the time you're done, you'll know that spoon intimately!

Alternatively, you could have several long-handled spoons on hand in order to mix your lye solution, and keep your oils well mixed while coming up to temperature, and use what most Artisinal Soapers use for the actual processing; an immersion blender! While unusable if you're dealing with a SHTF scenario that lacks electricity, it can be a huge time saver at any other point. An immersion blender (or stick blender as they're sometimes called) can turn a five-hour stirring chore into a 15-minute stirring chore. Most stick blenders are plug-in, but there are a few out there nowadays that take batteries. If you're going to invest in one for a SHTF soaping use, definitely go with the more expensive battery operated type. A regular blender can be used, but it becomes a tedious process of filling the blender container, pulsing it for several minutes until it reaches the correct point, and emptying it into your mold, only to refill and repeat. Unless you're making a particularly small batch of soap, it's not really practical in terms of time/mess vs end results.
You will need one to monitor the temperature of your lye solution. The second will be to moniter the temperature of your oils as you melt any solids.

Safety Glasses/Goggles
These are not optional. Lye is a strong corrosive substance. You will be stirring it, which introduces a splash risk. Getting it into your eyes, even at the low ratio solutions typically used by home soapers, WILL PERMANENTLY BLIND YOU. Like most of life, working with potentially dangerous chemicals carries some risk. Be Smart -- Minimize The Risk.

Glass Pitcher or Long-Necked Jar
This is for mixing your lye solution. Heavy-duty plastic can be substituted in place of glass. Make sure the neck of your pitcher is wide enough for a plastic or wooden spoon to fit comfortably into it to stir your lye solution.

Saran Wrap/Plastic Wrap/Plastic Sheeting
This is to line your mold if you intend to use the same mold more than once. It can be ignored if you're using something disposable.

Heat Source
This will be used only long enough to bring your oils and fats up to temperature, melting any solid fats you happen to be using with your recipe.

Long Rubber Gloves
Much like the safety goggles, these are Not Optional. Splashing lye solution onto your hands hurts. Spilling sufficient quantities of it can cause some nasty chemical burns.

Long-Sleeved Shirt, Long Pants, Close-Toed Shoes, Apron
While these are, technically, optional, you're taking an unnecessary risk if you wear shorts, a tank top, and sandals while soaping. Remember that splash risk I mentioned? Getting lye solution on your clothing -- which creates at least a temporary barrier between you and the lye -- is preferable to having tiny scars all over your arms and legs from splashing lye solution on your skin and getting a multitude of tiny chemical burns. Take this advice from my personal experience and learn from it. That being said -- this is frequently a rather messy process, so an apron can save you a lot of time in the long run on laundry!

Molds
Soap molds can be almost anything. I've used everything from emptied plastic butter tubs to lengths of PVC pipe to waxed cardboard milk containers for quick and easy disposable molds. For something more permanent, use a stout wooden box (preferably with a lid that fits easily) or specialty fancy plastic soap/candy molds. For practical reasons, I prefer my wooden box molds for durability, cleanability, and reusability. As an artisan soaper, I've got a wide variety of box molds that hold anywhere from 3 pounds all the way up to production molds that have a 25 pound capacity.

Next:  Basic Chemistry and Ingredients

Wednesday, April 1, 2020

Prudent Prepping: Take-Out Post

The dust has settled and the First 72 Hours have passed. Follow along as I build a long term plan via Prudent Prepping.

With Shelter-In-Place orders coming out or changing seemingly by the hour, many places are only doing pick-up orders or delivery. There isn't a Buffet anywhere that's open, so no posts like that from me. What's left is maybe a 2 Item to Go post.

Dr. Bronner's Soap
If you're a certain age, have done extended backpacking, or shop at natural food stores you have more than likely seen Dr. Bronner's soap. Besides making very nice, natural soaps, the good Dr. is (in)famous for the Wall o' Text labels on all of his products. While it is true that nature abhors a vacuum, it is also apparent Dr. Bronner hates blank space on his labels. No joke, this is an actual label!

Actual Label!

Here is a link to the actual text, if you think it's possible to get through it. I've heard it said that Vogon poetry is more easily understood than this label's message.

I first started using this soap years ago when camping, because it is very concentrated and a very small amount lasts a long time. I would take a 3 oz. bottle and it would last almost forever! I recently bought more soap in a larger size due to reports that soap is even more effective in breaking down the virus than detergent. The type I bought is unscented, so it is adapted to both personal use as well as cleaning dishes and surfaces that may be close to people who are sensitive to fragrances.

Weatherproof Match Comparison
In this post from March 11 I mentioned wanting to compare the on-sale matches to the UCO ones I have in my stored gear. I have the two items side by side now.
Take a look.

(L) UCO  (R) Diamond Weatherproof
It appears they have a very similar design, but I don't know if both are made in the same factory or not. Both are made with a tip that needs an abrasive strip to ignite and have a body that has a long-burning portion.

As a way to explain what these matches are and do, here is information from the UCO Amazon ad.
  • Includes 25 windproof and waterproof matches, 3 strikers and match case that can hold up to 40 matches
  • Matches are easy to light, will burn up to 15 seconds each and will relight after being submerged in water
  • Waterproof, durable ABS plastic case floats and keeps contents dry and protected; external, integrated, and replaceable striker for easy lighting
  • Extended length of match allows for added safety to keep from burning fingertips
  • Length of matches: 2.75 inches (7 cm); Kit weight: 1.7 oz. (48 g)
Now the Diamond matches are fractionally longer than what comes in the UCO case, so if I wanted to replace the originals, I would have to trim approximately 1/4" of to make them fit. Either way, I have more waterproof matches at an even better price!

Recap And Takeaway
  • I bought two 16 oz bottles of Dr. Bronner's 18 in 1 Hemp Baby Unscented soap through Amazon for $27.75 with Prime. Unfortunately, this is Out of Stock from this Seller. Check around if you are interested.
  • Waterproof matches are just one of the ways I have to start a fire and what I reach for first. If you want the UCO container, here is the Amazon link. The Diamond matches may still be on your local Home Depot's shelf, near the BBQ accessories.
***

Just a reminder: if you plan on buying anything through Amazon, please consider using our referral link. When you do, a portion of the sale comes back here to help keep this site running!

If you have comments, suggestions or corrections, please post them so we all can learn. And remember, Some Is Always Better Than None!

NOTE: All items tested were purchased by me. No products have been loaned in exchange for a favorable review. Any items sent to me for T&E will be listed as such. Suck it Feds.

Tuesday, April 4, 2017

Cleaning Common Automotive Spills

When you first start doing your own automotive maintenance and repair work, you'll find yourself making some pretty impressive messes. Even as an auto repair veteran, I still find myself making a few good ones. Since spills are a pretty common occurrence with mechanical work, knowing how to clean them up should be part of your knowledge base.

Most automotive spills and messes are petroleum related, and that's because most of the chemicals used in your car (gasoline, motor oil, and various other lubricants) are petroleum based. The other common spill is ethylene gycol, otherwise known as antifreeze.

Gasoline Spills
My most recent spill was about a gallon of gasoline from the motorcycle I have been working on. In addition to smelling foul, a gasoline spill will stain concrete, soak into anything the the garage it can reach, and is flammable until it is dry. Luckily, gasoline is also fairly easy to clean up.
  1. Soak up any pooled gasoline. There are commercially available products for this, and they work quite well. However, we have three cats so we have kitty litter on hand, and it works as well as the purpose-made products and they're frequently made of the exact same material. 
  2. Cover the standing gas with the litter and work it around with a stiff broom until it is all absorbed. 
  3. Sweep the contaminated material into a plastic or metal container and place it outside to dry. This keeps gas fumes from building up in your house or garage. 
  4. Call your local landfill or trash disposal company for instructions on how to dispose of this material safely, as laws and capabilities vary by jurisdiction.
  5. Scrub the spill area with a strong mixture of liquid dish soap and hot water and the same stiff broom that you used before. This will clean up the gas that has soaked into the concrete
  6. Rinse the area and repeat as needed until the smell and stain go away. The strong soap mixture breaks down and dilutes the gasoline, making it safe to hose down.
Motor oil and other petroleum-based chemicals are cleaned with the exact same process as gasoline. If they feel oily on your fingers, that's a great indicator that this process will work.

Old or especially stubborn stains can be cleaned, but they require harsh, dangerous chemicals such as Trisodium Phosphate and yield less return for the effort and risk. In almost all situations, once the smell is gone and the dish soap isn't removing any more stain, you're safe to stop the process.

Antifreeze Spills
Antifreeze cleans up a bit differently.
  1. Soak up any standing puddles, just like with gasoline. The big difference is what happens afterward.
  2. Hose the entire area down with water. Antifreeze is water soluble, and this helps dilute it somewhat. 
  3. Cover the stained area with powdered laundry detergent. Cover this powder with soaked newspapers and let it sit and soak for a few hours. Wet rags also work, but they're not as easy to clean up.
  4. Remove and discard the newspapers after the soap has had a couple hours to soak in, then use your stiff broom to scrub the laundry detergent until suds form. 
  5. Rinse the concrete with water and allow to dry. 
  6. Repeat as needed if stains remain.

Spills happen. Cleaning them up properly makes for a safer, healthier, and better work space.

Lokidude

Thursday, February 2, 2017

Ashes


One of the side-effects of burning wood for heat is the production of lots of ashes -- about 20 pounds of ash per cord of wood burned. Wood ash is treated as a waste product by a lot of people, but it has a few uses around a homestead.

Warning:
  • Please use common sense and only work with cold ashes. 
  • When cleaning out the wood stove, place the hot ashes in a metal container. The metal container should then be taken outside and placed on a surface that will not burn. 
  • Keep children and pets away from the ash bucket, since there is likely a hot ember or two in it that will stay hot for many hours.

Food Storage
If you don't have a local source of salt to preserve meat (such as salt pork and corned beef), you can use clean ashes instead.
  1. Lay down a thick bed of ashes in a container, then place a single layer of meat on top.
  2. Cover the meat with more ash at least an inch deep, then place another layer of meat. 
  3. Repeat until you run out of container, meat, or ashes. 
  4. You'll need to rinse the meat before preparing a meal with it, just as you would if you were using salt. 
The ashes or salt preserve the meat by absorbing moisture, dropping the water content of the meat below what is needed for bacteria and fungi to grow. Common recipes from a century or two ago included boiled salt pork and "Bully beef".

Melting Ice
While not as good as salt, ashes tend to be dark in color and will absorb sunlight (and thus get warm) better than salt will. Ashes also tend to have insoluble parts that provide a bit of traction on ice. Being basic on the pH scale, ashes and the lye they create are also easier on concrete (which is basic as well) than salt is.

Soap-Making
One of the main ingredients needed to make soap is lye (potassium hydroxide), which is easily made by running water through wood ashes. I'll leave the art of soap-making to one of the experts, but knowing that you don't have to buy lye is a good thing.

Cleaning Agent
Lye is a strong base and will react with anything acidic, so it makes a good cleaning aid for oils (slightly acidic by nature). Diluted mixtures of lye were once used for washing floors, linens, and clothes. Dry ashes applied to oil spills on concrete will break down the oil and absorb it, making it easy to sweep up.

Wood ashes mixed with a bit of water to form a paste combine the action of the lye with the mild abrasive nature of the ashes, and make a good metal and glass polish.

Gardening
Since ashes are what is left over after all of the carbon has been burned out of the fuel, wood ashes are rich in minerals and trace elements that plants need. Be careful that you don't add so much that the ash raises the pH of the soil, though.

Ashes also repel slugs and snails by irritating their skin. A light dusting of fine ash on and around your plants will last until it gets washed off by rain or watering.


Recycling is not a new concept; our ancestors used everything they had until it wasn't useful any more. Re-purposing the cleanings from a wood stove just makes sense.

Monday, September 17, 2018

Prepping for Asthma

As any prepper knows, preparedness is key.

And as anyone with chronic health conditions knows, emergency preparedness for those conditions can be nearly impossible at times.

I have lived with chronic, severe allergies for the last 20 years plus, but they have only notably impacted my life over the last 10. The most significant day to day impact of this has been asthma, specifically allergy-induced asthma that has made interacting with the general public difficult... such as when I have an allergic reaction to most kinds of soap. In addition to soap, I am badly allergic to mold, such as orange mold, various plants, and dust mites.

(I am aware that there will are those of you who claim that it is impossible to be allergic to soap. Feel free to convince my allergist, and my body, of that. When the in double-blind testing I have the same reaction, I promise you that it is not “attention seeking”).

Non-Medicinal Preps
In an emergency, I don't expect frequent access to allergy medication so I can restock what I typically keep on hand. This means that for whatever emergency I am planning against, I have to keep enough on hand to last me for quite some time. To that end, I specifically look for things that will last for a long time.
  • Instead of just getting medication, I try to control the environment. Medication tends to expire much more quickly then filters for your furnace or a facemask.
  • When I do get medication, I try to keep a stock of individually foil packed pills, so that if there is an emergency, I don’t have to open an entire container of them and risk contamination or expiration.
  • When I do stock up on medication, it's easier to do it in stages. The rule that I have is one – two – five. I try to get a one month supply, and then a two month supply, and then a five month supply, and then a year's supply, and so on. If I cannot afford a month's supply at a time of whatever it may be, I start with a day or week.

Over the Counter Preps
As to the specifics of what preps I keep on hand:
  • I keep a year's supply in bottles of three different over-the-counter allergy medications. I buy mine from Costco, but it does not especially matter where you purchase yours from as long as they work and have a basic minimum level quality packaging. I use, sometimes more than one at once, generic/store brand versions of Allegra, Claritin, and Zyrtec
  • I also keep a two-week supply of each of these in foil-wrapped packets. I actually buy name brand for these, because in my experience the packaging tends to be more waterproof. The Claritin and Zyrtec are even available as a dissolving tablet, which means you don't need water to take them. 
  • I keep a two week supply of Mucinex on hand. I'm still working up to a full year's supply, but the supply that I do have is all foil wrapped.
  • I keep chlorpheniramine (an alternative to benadryl) on hand. I buy this in bulk, since it is cheap, and I know people who are allergic to Benadryl.
  • As far as controlling the environment, I use a good spray sanitizer when I clean, and then I use a power fan style HEPA filter.
  • To supplement that, I use a box fan with a 20” x 20”  filter on it.
  • I even use a face-mask respirator on occasion. It has excellent filtration, and on days like today (where the air smells like barbecue) it ends up being a practical method to be able to breathe outside. I tried to keep between four and six filter replacements for it on hand, because I occasionally use the respirator for work reasons.

Prescription Preps
Everything I have mentioned so far is not a controlled substance, requires no prescription, and can be purchased over-the-counter at any drugstore with no problem. Everything else on my list is still legal, but may be more difficult to obtain in case of power outages or loss of infrastructure.
  • Sudafed and other decongestant medications require identification (such as a driver's license) to purchase in the USA. Pharmacies scan your ID, and to enssure that you’re not making methamphetamine with it they monitor and restrict how much you're allowed to purchase in a given month. I try to keep a one-month supply on hand, which is thankfully not very much. I do not use it often, but when I need it, I have to have some on hand.
  • I try to keep an inhaler on hand in my backpack, in my desk, and on my person. When I am in public a lot I end up going through an inhaler every 3 to 4 months, averaged over the several that I keep on hand. I also try to keep a foil-wrapped inhaler in my bug out bag, my roadside emergency kit, my primary toolbox, and one to three in the long term food storage. I know that sounds like a lot, but inhalers are inexpensive, (less than $10 each at Walmart without insurance), will be very difficult to get a hold of in a real emergency, and are something I will quite literally die without. I feel that overkill is a far smarter way to go then underkill.
  • Finally there is the EpiPen. I've never had to use one, and I hope I never do, but if I have to it will be there. I keep one in my backpack and my first aid kit. I would like to keep one in several other places, but they are quite expensive. I hope to remedy this with an EpiPencil.

It's possible to prep for asthma. I did it, so you can do it too. I know it sounds like a lot, and in some ways it is, but it's entirely doable.

Good luck, and don’t forget to practice.

Sunday, January 22, 2017

Gun Blog Variety Podcast #127 - Nice SHOT, Man

That's why I say man, nice SHOT
What a good SHOT, man
  • The SHOT Show is over and Beth has some thoughts about the Good, the Bad, and possibly the Ugly aspects of it.
  • Who steals a golf cart and punches a cop? Sean takes a closer look.
  • Barron is on assignment and will return soon.
  • In the Main Topic, Sean and Erin talk about the recent gun rights court victory, Ezell II.
  • Tiffany also spent the week at SHOT Show. She asks "Why are we so divided?"
  • Do you like wool clothes? They're great for the cold and wet that preppers might have to face. But how do you clean them when you don't have all your modern conveniences? Erin tells you how.
  • Josh Horwitz, the Oompa Loompa of Gun Control, was on the Tucker Carlson show. And you just KNOW that Weer'd is going to take a crack at him.
  • And our plug of the week is Bondic, the Liquid Plastic Welder. If you need to fix it, Bondic might just be the ticket.
Thank you for downloading, listening, and subscribing. You are subscribed, right? We are available on iTunes, Stitcher Radio, and now on Google Play Music!

Listen to the podcast here.
Read the show notes here.

Thanks to LuckyGunner and Remington for their sponsorship, and a special thanks to Firearms Policy Coalition for their support.

Blue Collar Prepping Transcript:
Cleaning your Winter Wool
It’s wintertime for most of the country -- I say “most” because here in Florida, it’s still 73 degrees outside -- and when preppers put on their winter clothes, they’re usually made of wool.

Wool is favored by preppers because it retains its insulating properties even when wet. This makes it a great material for clothes that could get immersed -- like socks -- or become damp from sweat.

But the problem with wool is that it doesn’t clean easily. While this isn’t much of a problem for your favorite sweater that you take to the dry cleaners once a year, stinky clothes -- especially socks -- can be a hygiene and morale problem.

So how do you clean your woolies? First of all, don’t wash them like regular clothes. There’s a link in the show notes to a video explaining why, but the short version is that wool, unlike cotton or synthetic fibers, is made out of protein -- which is exactly what most stains are made of, and most cleaning agents are optimized to destroy protein stains. So putting your wool clothes in with regular soap is about as effective as washing them in acid.

In a non-emergency, the best way to clean your wool unmentionables is to use cold water and a soap that is listed as being wool-safe in the gentle (non-agitating) cycle, and then dry them without heat.

But what do you do if you don’t have access to cold water and soap? Fortunately, there are other cleaning methods available to the intrepid prepper.

The easiest method is to use snow. It’s free and it requires very little effort, but you need need snow -- not the easiest thing to find in places like Florida -- and it should be fresh, dry, powdery snow. Using wet snow will make your clothes soggy and you’ll have to carefully let it dry without heat, which is difficult to do in the winter. Assuming you can find this kind of snow, here is what you do:
  1. Shake your clothing out to get rid of any loose dirt or dust.
  2. Hang your clothes outside for at least 30 minutes to allow them to reach air temperature.
  3. Using a clean broom if available -- and if not, use your hands -- sweep enough snow across the clothes to cover them but not bury them.
  4. Compress the snow onto the material using your palms or the flat of the broom.
  5. Let the snow sit for 15-20 minutes. Snow contains trace amounts of ammonia, and it will react with the cold air to cause stains to solidify and be expelled from the material.
  6. When time is up, flip the clothing over and repeat the above process. For garments like socks and underwear, you may need to turn them inside out and repeat the process again.
  7. After you’ve done this to all the soiled sides, shake as much snow off the item and then hang it up to dry in the sunlight. If you’ve done it properly, the snow will evaporate without even getting your garment wet.
If you don’t have access to snow, there’s still another option open to you, but it’s riskier. According to BCP author OkieRhio, who is a fiber arts enthusiast, you can clean soiled wool with plain white vinegar, so long as it’s no more than half cooking strength, and provided you don't have a delicate nose which is overly sensitive to the smell of vinegar on your clothes.

However, there is a problem with cleaning clothes with vinegar, because you have to make VERY certain that you get the material rinsed out EXTREMELY well, so that there is no trace of the vinegar remaining! This is because vinegar is something called a mordanting agent - a chemical used to make fibers more porous and prone to accepting color. What this means is that if you have this great wool sweater that you really like and you rinse it in cold vinegar water but don’t rinse all of the vinegar water out -- the next time you spill anything colored on your sweater, such as tea, your sweater will now be almost permanently stained by the tea.

So here’s the takeaway from all this: Wool clothes are great to have for preps, but odds are good that if you need to clean them in an emergency, they are likely going to end up with odd colors or smells. That’s fine if they’re socks, gloves, or underwear -- function over form -- but keep in mind the drawbacks of cleaning your nicer wool clothes this way.

Monday, October 18, 2021

Leather Care

A friend’s shoulder harness failed after more than a decade of loyal service. According to him, all he did was wear the shoulder holster harness and gave it no additional care. This is a shame, because leather can last indefinitely with proper care. I have some World War II vintage holsters and pack straps in my collection that are nearly as supple as when they were made, and I know people who have leather goods that are even older.

Do's and Don'ts
Two of the biggest enemies of leather are getting too dry and getting too wet. Leather contains certain oils and fats that are necessary to maintain flexibility and strength. When leather gets wet, those elements can be flushed out or diluted, leaving the leather stiff and inflexible when it dries. This can lead to cracking, which is fatal. Once leather develops cracks, there’s not much that can be done to preserve it for further use.

Do
  • Blot wet leather dry as soon as possible.
  • Allow it to air dry naturally.
  • Apply a leather conditioner once dry.
Don't
  • Use an artificial heat source, such as a hair dryer or radiator, to dry leather! At best this will cause shrinking, and cracking at worst.
  • Immerse leather items in water.
  • Run them through the washing machine or dryer
  • Use an iron on leather items.

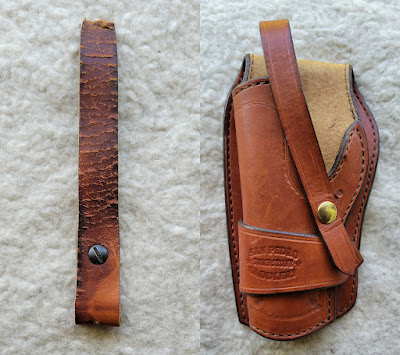
Left: leather that has cracked through lack of care
Right: leather that has been properly cared for

So what’s involved in maintaining leather and what supplies are needed? The answers are Not a lot and Nothing too complicated.

Cleaning
When leather gets dirty, one of the first things to do is wipe it down with a soft brush or a dry cloth to remove any loose dirt  (pay special attention to seams, where dirt and debris can hide), then use a proper leather cleaner to remove any deeper soil or stains.

Murphy’s Oil Soap, when used correctly, is a good choice, but in a pinch you can use a bar of moisturizing soap to clean leather. Rub the bar on a washcloth dampened (not wet just damp) with warm water and gently wipe it along the leather to remove any dirt. Make sure to wipe off all the soap residue as soon as possible.

A reasonably good home-made surface cleaner can be made from a mixture of equal parts olive oil and white vinegar. Shake them together in a spray bottle, lightly mist the leather, and wipe clean with a dry cloth.

With something like a holster or belt that gets exposed to sweat and body oils, an additional option is using a steam cleaner to help disinfect and remove buildup and salt stains from the leather.
 
Conditioning
The next part of leather maintenance is conditioning, the purpose of which is to help leather maintain its supple and flexible nature without saturating it with oil. After leather gets wet or is cleaned, and on a regular schedule of every three to six months regardless, use a leather conditioner to help replenish the leather’s natural oils.

Store-Bought Conditioners
Depending on the type or leather product and its exposure to the elements, a variety of preservatives and conditioners can be used.
either as-is or mixed with other ingredients. This list includes items as varied as: 
Olive oil, specifically extra virgin olive oil, is preferred over other vegetable oils due to its lower acidity, the specific fats present, and its longer store time before going rancid.

The Pecard company has offered a wide variety of leather care products for over a hundred years. Their Classic Leather Dressing is particularly well regarded so they must be doing something right. 

Home-Made Conditioners
There are also many different leather treatments you can make. One such is a mixture of one part white vinegar to two parts linseed oil. Apply a light coating with a soft cloth, let the item rest for 12 hours, then buff the leather.

Another option is one part beeswax, one part cocoa butter, and two parts almond oil. Blend them together on medium heat until the oils are melted. After it cools, massage it into the leather with your fingers before polishing with a dry cloth. 

Waterproofing
Leather is a natural material and is very porous. It can never be completely waterproof, but there are a number of surface treatments to help defend leather from moisture. These include a variety of commercial products, such as Sno-Seal, that can help protect leather if it gets exposed to water. 

An option that can be made at home is a beeswax-based cream. Beeswax is a natural waterproofing solution and can be fairly effective at waterproofing leather.

Beeswax Waterproofing Recipe   

  • 1 cup extra virgin olive oil
  • 2 ounces beeswax
  • Glass Jar
  • Medium pan of cold water
  • Clean, soft buffing cloth

  1. Pour the extra virgin olive oil into the glass jar.
  2. Break the beeswax into pieces and add to jar.
  3. Place the jar in a pan of cold water.
  4. Carefully warm the pan on a stove.
  5. Stir the mixture until the beeswax has completely melted and blended with the olive oil.
  6. Remove the pan from heat. Carefully remove the hot jar from the pan.
  7. Continue to stir the wax/oil mixture until it cools and stiffens. This can take up to 20 minutes.

After the mixture has cooled and stiffened, spot test the cream on an inconspicuous area of the leather. Making sure to begin with clean leather, apply the cream with your fingers, gently buffing the leather surface as you go. This treatment will need to be repeated to build up a protective coating.

When applying any waterproofing, make sure to pay particular attention to seams; with shoes pay special attention to where the upper meet the sole.


If we take care of our leather products, they will take care of us and the following generations. And remember, in the Dungeons & Dragons role-playing game, rogues and rangers prefer leather armor because it’s made of hide.

Wednesday, October 7, 2015

Prudent Prepping: Cleaning Up

The dust has settled and the First 72 Hours have passed. Now we concentrate  on what to do in, and how to plan for, the long term via Prudent Prepping.

It's nice to have friends who look out for you, because now I have another addition to my camping/BOB gear from my friendly neighborhood Gear Nut. I will pay him back for these items (somehow) in the near future with more manual labor than two people should attempt, but will carry on anyway. Such is the way of Bro Debts.

As I've said before, a generous friend who has more money than two people should have is both a curse and a blessing.
The good thing is: You get stuff.
The bad thing is: You get stuff.
I'm talking about useful, necessary, and in my situation things that I needed, almost to the point of life-saving. Since his family is in good financial shape, he can do things for others without looking for a return. I have been given more than camping gear, but that is what fits into the group's purpose so those items are the only things discussed here.

This is what I was gifted: 

GSI Outdoors Crossover Kitchen Kit
GSI kit in the storage bag


From the GSI website:

Crossover Kitchen Kit
Everything you need to cook, clean, spice + stow
Item# 90102
  • Pivoting high temperature Nylon 66 Spatula and Spoon with graduations 
  • Tools rotate from stored to working position.
  • Waterproof Ultralight Salt + Pepper shaker modules screw together to keep spices dry and flavorful.
  • Includes cutting board, camp towel, compact scrapper, liquid soap dispenser and scrubbing pad for quick clean-ups.


Interior of the bag, with utensils folded


Everything fits neatly into the bag.
Handles extended


With the handles extended, all of the utensils approach normal kitchen tool length. Not visible in the picture or mentioned in the website blurb are measuring graduations in the spoon. The spatula also has an extra feature not mentioned: serrations on one edge. Not quite a knife, but possibly enough to do light cutting.


Included is a (very) small cutting board, salt and pepper shaker, scraping tool, soap container, and what has been called an oil container.

I personally would include a bit more oil that what the small, clear bottle holds for anything longer than a weekend trip. For comparison, the container is smaller than many contact lens wetting solution bottles.

In the top or lid of the storage bag is a Velcro pouch holding the scrubbing pad and a micro fiber towel. Not quite visible is a mesh panel at the end of the pouch to aid in letting any moisture out from a damp towel or scrub pad.

Product Specifications
Major Dimension: 12 piece
Weight: 9.6 oz.
Dimensions: 7.30'' x 3.70'' x 4.30''
Material: Copolyester, Nylon 6-6 and Polyethylene
Product Use: Car Camping, Gourmet Backpacking
Includes: Compact Scraper, Scrubby Pad, Cutting Board, Pivot Tongs, Pivot Spoon, Pivot Spatula, Spicer, Soap Bottle, Oil Bottle, Camp Towel, Tote

The Takeaway
I think this kit is a fantastic addition to my gear, with the minor point of the 'oil container' appearing to be too small for me.

I have to rate this at 4.5 of 5 stars, and would definitely recommend it to my friends.

Recap
Compact, self-contained kitchen utensils and and cleaning items. What's not to like?
  • GSI Crossover Kitchen Kit, in storage bag. $30.24 from Amazon.
As a reminder, any purchases made from Amazon through the links in this blog help pay for this site and do not increase your cost one penny! 

If you have comments, suggestions or corrections, please post them so we all can learn. And remember, Some Is Always Better Than None!

NOTE: All items tested were purchased be me. No products have been loaned in exchange for a favorable review. Any items sent to me for T&E will be listed as such. Suck it Feds.

Sunday, January 15, 2017

Gun Blog Variety Podcast #126 - Panthers, Po-Po, and the Pew-Pew Life


It's the pew-pew life for us!
Guns are civil rights for us!
Steada resting, we fight back!
Nearly all our guns are black!
It's the pew-pew life!
  • Beth is going to the SHOT Show. Since she started attending in 2000, some things have changed... and some have not.
  • We all love a story with a happy ending, and this one will not disappoint you. But what sort of person ties up a woman in her own bedroom during a home invasion? Sean tells you what he's found.
  • Barron is on assignment and will return soon.
  • In the Main Topic, Sean and Erin read and explain the newly introduced National Concealed Carry Reciprocity bill.
  • What are the dark, secret parts of Gun Control? Tiffany gets her Black Panther Party on and tells us what she's found.
  • Does the idea of flushing the toilet during an emergency by pouring good clean drinking water into it feel like sacrificing your baby? Erin tells us how the Blue-Grey-Black water cycle can help.
  • There's a new "threat" to our gun rights. Are they dangerous, or just a paper tiger? Weer'd takes a recent NPR interview with their spokesman and puts it all in context.
  • And our plug of the week is for "Miss Fisher's Murder Mysteries" on Netflix. It's got guns, action, and adventure for the guys, and costumes, relationships, and not a small amount of wish fulfillment for the ladies. It's a date night TV show for everyone.
Thank you for downloading, listening, and subscribing. You are subscribed, right? We are available on iTunesStitcher Radio, and now on Google Play Music!

Listen to the podcast here.
Read the show notes here.

Thanks to LuckyGunner and Remington for their sponsorship, and a special thanks to Firearms Policy Coalition for their support.

Blue Collar Prepping Transcript:
the Blue - Gray - Black Water Cycle
Last week, Sean and I talked about the preparations he’d made for the Snowpocalypse that was slated to hit North Carolina, and later on Facebook he posted a picture of his bathtub full of water jugs.  He captioned it it “This is about 40 gallons, or three flushes of the toilet” and then in the comments explained “During the power outage from the hurricane I had to pour water into the toilet to make it flush the poo. The Wife insisted. Each flush was 2.5 gallons. It was like sacrificing a baby watching all that water I'd driven to Walmart to get going down the toilet.”

And I agree, using 2 and a half gallons of fresh drinking water to flush the toilet is wasteful. So let’s talk about making the most out of our drinking water by utilizing the Blue - Gray - Black Water Cycle.
  • Blue water -- also sometimes called white water, but that makes me think of rapids -- is water fit for human consumption. The technical term for this is “potable”, and it’s what you drink and cook with and bathe in and usually what you wash your clothes in. 
  • Gray water is what goes down the drain. It’s not drinkable, because it’s soiled with things like dirt, soap, bits of food, hair, shampoo, skin cells, and so forth, but it’s not harmful to a human being. You could bathe in gray water without ill effects. 
  • Black water is what leaves your toilet, and it’s decidedly NOT safe to be exposed to, because it’s full of pathogens that are just waiting to infect you if they get past your skin. 
So the general thought behind this cycle is that you can use water more than once, going from levels of highest potability to lowest, if you are in a situation like Sean where your water resources are limited.

Here’s an example of how that would work in a limited-water emergency:
  1. When preparing food or washing yourself or your clothes, do not pour the water down the sink. Instead, catch it in a container of some kind. The blue water has become gray. 
    • If you REALLY want to ration water, wash your clothes and your dirty dishes in the gray water. I would caution you that the grease and other food elements might not be the best for your clothes, but it’s possible. Washing dishes and utensils in gray water isn’t as bad, since metals and ceramic aren’t going to absorb odors, but make sure that 1) you use lots of soap and 2) you rinse them with blue water before putting them away for reuse.
    • Depending on the soap and other elements in the gray water, you might be able to use it for watering plants. In fact, gray water irrigation is a rabbit hole that is outside the scope of this article, so I’m going to suggest that anyone who is interested should check out the article titled “How Gray Water Reclamation Works” in the show notes. 
    • For our example here, though, we’re just going to assume that you aren’t going to do that. Instead, you save that gray water for flushing the toilet.
  2. Now it must said that when it comes to conserving water, the “If it’s yellow, let it mellow” rule must be in effect. Otherwise, you’re going to be flushing a lot more often, which is exactly what we want to avoid.
  3. When it comes time to “flush it down, because it’s brown”, you take your bucket or tub or whatever container of gray water you have and you pour about a gallon of it, quickly, from about two feet. You don’t want it so high that you get splashed, but you want it high enough that the water gets a gravity assist.
  4. Past a certain point, the pressure of water in the bowl will be greater than the air pressure in the pipes beyond, and the force will induce a flush. There’s a YouTube video in the show notes if you need a demonstration.
  5. After you pour the gray water into the toilet, it becomes black water -- and because you’ve caused it to flush, that black water is no longer your concern.
Now before you decide to start saving your gray water for flushing, you need to know that gray water becomes black water within about 24 hours due to the bacteria in the water eating the food and giving off their own waste. So don’t let it become a health hazard and flush it away.

But with that in mind, Sean and everyone else can be a lot happier if the water goes out during a winter storm, because 1 gallon of gray water is a lot less heart-wrenching to flush than 2.5 gallons of blue water.

And if you’d like to read more about getting by on limited water, check out the linked article of the same name on Blue Collar prepping, linked in the show notes.

The Fine Print


This work is licensed under a Creative Commons Attribution- Noncommercial- No Derivative Works 3.0 License.

Creative Commons License


Erin Palette is a participant in the Amazon Services LLC Associates Program, an affiliate advertising program designed to provide a means for sites to earn advertising fees by advertising and linking to amazon.com.