Friday, May 29, 2015

Product Review: Etón FRX2

& is used with permission.
Last month my Facebook friend Lawrence asked me the following question:
I'm looking for a portable radio that can be hand-cranked or use solar power to keep in juice. Listen-only radio, not transmit. Price range $100 or less. Any ideas?
Easily done, I said, and I linked him to one of my perennial favorites: an AM/FM/Weather Band flashlight by Etón that uses both a dynamo crank and a solar panel to charge itself. The current version is the FRX2; the model I own is the FR150 (reviewed here) which has since been surpassed by the FR1650, FR170, FRX1, and the current model.

Here is Lawrence's review after buying the FRX2 on my recommendation:
OK, I'm not big on writing reviews but Erin asked me to, so I will. Last week I took a quick two-day camping trip and tested my bug out bag at the same time. In fact, much of my camping gear is part of the bug out kit -- easier that way, and I don't double my efforts. I just have to restock supplies when I got home.

The new tool in my kit, the Eton FRX2 Hand Turbine AM/FM Weather Radio with Smartphone Charger, came when I asked Erin a few weeks back on a recommendation. And I have to say I liked it. 

  • I charged it up using my laptop as soon as I got it, and the instruction manual said it would run for three hours... it ran for five hours with the speakers at full strength. 
  • Hand cranking it takes about ten minutes for an hour of power as well. 
  • Can't gauge solar cells as it sat in the sun a lot. 
  • Radio reception was clear, and since I was in Cape Henelopen in Delaware for this trip, I took it out to the beach at night to see how far the range was extended (a little trick I learned when I was younger). I got radio stations as far out as Canada and North Carolina. 
  • My only issue was the the USB cable that came with it wasn't the same type as my cell phone charger, so I had to find my spare for the trip. I left the phone hooked up to the radio while it sat in the sun for two hours and came back to find the phone fully charged and the radio still had plenty of juice to play for another hour before I had to turn it off and let the sun do its job.
It's always a pleasure (and a bit of a relief) to hear that something I recommended performed as advertised and my advisee is happy with the results.

Since my main complaint about the FR150 (its inability to charge a smart phone) was apparently solved in later generations, I decided to follow my own advice and purchase an FRX2 for myself. Two is one and one is none, after all, and this way I could see what improvements have been made to the line. Here's the head to head comparison between the two:

  • Purchase price is similar, given half a decade's inflation. I recall I bought my FR150 for about $24.99 back in 2009ish; the FRX2 can be bought on Amazon for $31 in 2015.
  • The 150 is covered in a rubberized coating that not only makes it easier to grip, it also provides basic rain resistance. The X2 is just slick plastic and the instruction manual says "Do not expose this appliance to rain or moisture." This is actually a very serious shortcoming on the part of the X2 in my opinion. 
  • The X2 is larger than the 150 in every dimension. Although not massively larger, it is noticeable to me and my small hands. The 150 is sized well for me to hold it comfortably as a flashlight; the X2 is too large for my tastes. The X2 is also "boxier", with more pronounced edges, again making it uncomfortable to hold as a flashlight. The 150 has a more organic shape with comfortable curves and rounded edges, which feels pleasing to my hand. This might not be an issue for folks with larger hands, but it was for me. 
  • However, this boxiness means that the X2 can stand on its tail to light a room by aiming the flashlight at the ceiling; the 150's curved edge is not as stable and has a tendency to rock and wobble unsteadily. 
  • Speaking of flashlights, while the X2 has a larger aperture and therefore a larger beam, I believe the lamps are still throwing out the same amount of lumens, as the 150's beam seemed slightly brighter. 
  • Both had excellent radio reception and clarity of speaker. The X2 seems slightly louder, likely due to it having a larger speaker, but overall the difference is is "not much". 
  • The biggest difference, however, is with the charger:
    •  The FR150 will a) not charge a smartphone, and 2) requires turning the crank to charge an electronic device -- the solar cell is only for radio/flashlight operation.
    • The FRX2, however, not only charges my iPhone and my Kindle, it does so from the battery -- meaning that I can leave the charger in the sunlight and it will charge independently. 
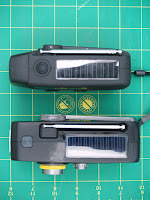
Aesthetics/ergonomics aside, the FRX2 is a fantastic purchase and I wholly recommend it to everyone. My only concern is its apparent inability to tolerate moisture, so if you're planning to use it in a get home or bug out bag, put it in a waterproof container (like a ziploc baggie) to keep it dry. 

Other than this serious shortcoming (which I truly hope Etón corrects in later models), I recommend this product to everyone for use.

Etón FRX2: $31.00 + free shipping (Amazon). Highly Recommended. 

Have a safe weekend, everyone, and see you next week.


Obligatory FTC Disclaimer: I bought this with my own money. (So did Lawrence.) Go away. 

Thursday, May 28, 2015

Possessions

In the prepper-sphere there exists a balancing act between skills and stuff. Some preppers rely on skills more than stuff, and if that works for them, that's fine. For those that prefer to collect stuff, there can be issues with ownership. Stated briefly:
  • You can only own that which you can protect.
  • You can only protect that which you can control.
  • You can only control that which you can hold.
  • You can only hold that which exists.
In more detail, with a few examples:

What can you protect?
If something is too big for you to be able to see in its entirety, I doubt you can protect it. Owning a 1000 acre retreat in the mountains sounds great, but unless you have a big enough tribe to patrol it, you can't protect it. Squatters could set up in a corner and you may not find them until after they've taken over part of “your” land. In a TEOTWAWKI/WROL situation, you will either have to get used to your new neighbors or figure out how to remove them.

Governments, to a large extent, are created to help us protect our property and rights. They rarely do a good job of it, but the legal system and other functions of government are there, in part, to mediate disputes over ownership. This is where having government issued ID and titles for real property come in handy: If you can prove that something is yours in a court of law, that's a form of protecting it.

What can you control?
A classic version of the problem with control is the “tragedy of the commons”. Follow the link for a complete description, but a simple real-world example is a river that flows through or past your property: You may own the land right up to the water, but there are other people up- and down-stream of you whose claim to the water is as valid as yours. With no method of controlling what is done with the water in the river, human nature will eventually cause someone to abuse it (pollution, over-fishing, drawing too much water, etc.). Without some form of control, greed will cause people to overuse common resources since they will share the damages but not the benefits of that overuse.

Caches are a good example of this: by artfully hiding your supplies, you are protecting them from confiscation and other forms of theft. The downside of a cache is that it is not normally close to where you live, so there is a risk of it being discovered and cleaned out. Since it is out of your sight, you can't control it and run a risk of losing it.

What can you hold?
You can hold your breath, but that's about the only volume of air that you can actually own. The atmosphere is another example of the “commons” that we all share.

Say you're out hunting. That deer/rabbit/moose/whatever doesn't belong to you until you've killed it and have your hands on it. It doesn't matter if you're on your own land or public land, wildlife has no owner until it's dead and on its way to the table. On the other hand, livestock is an example of animals that you can hold and control.

Physical possession of a thing is not always ownership, but it comes close. “Owning” a house is pretty much an oxymoron when you consider that even if the mortgage is paid off, there are still payments in the form of taxes that you have to make or someone will come and take it away from you.

Holding on to possessions while bugging out will require some decisions concerning what to take and what to leave. It would be best to make those decisions before an actual emergency, just to make your life a bit easier in a stressful time.

What exists?
This is a problem I have noticed with financial preps: buying gold/silver may be a good idea, since it holds its value, but unless you have physical control of it, it may not exist. A lot of gold dealers are selling “paper gold”, which is actually a form of futures trading. The gold isn't sitting in a vault anywhere; they are just selling the rights to trade a certain quantity of gold. Be careful what you invest in; a piece of paper that says you have X amount of gold in a vault somewhere is worth just as much as a blank piece of paper in an emergency.

Ideas and other intangibles are also hard to claim ownership of. You can own a patent or copyright (methods of controlling and protecting created by governments), but the ideas themselves are only yours until you share them.


Look around yourself and see what you actually own. Think about how you have prepared to protect, control, and hold on to the things that are real. Stuff is important, too.

Wednesday, May 27, 2015

Prudent Prepping: Gloves

The dust has settled and the First 72 Hours have passed. Now we concentrate  on what to do in, and how to plan for, the long term via Prudent Prepping.


Keeping the "Eww" 
Off of You

Erin interviewed me on this episode of the Gun Blog Variety Podcast about gloves, and then she suggested a follow-up article with a bit more information than could be squeezed into a few minutes of radio.

Hand Protection
In a Shop class many years ago, I heard something that has stuck with me and I have used in power tool training classes ever since. The teacher always finished his instructions for the day with this: "Okay inventory time! Look at your hands, count your fingers and finish with what you started!" Which, at the time, seemed pretty funny coming from a guy missing parts of two fingers on his left hand. This doesn't lead directly into gloves and their uses, but it does remind me to pay attention to what I'm doing and where I'm putting my hands.

Most of my construction experience is in interior finishing: hanging and finishing drywall, painting and trim work. But since those jobs come at the tail end of the building cycle, I had to be familiar with foundation forming, framing, rough electrical work and any other trade that needed a "helper" on the job site. This meant that I spent a lot of time on the 'dumb' end of jobs catching, pulling, drilling or carrying things with hands that were less-callused than those of the skilled people. I wore a lot of gloves, and I wore them out. I have definite preferences, since some brands don't fit my short fingers well, so I am mentioning the brands that fit me (and my budget) best.

Leather
I wear leather gloves for most jobs not involving water, solvents or precise handling of parts. Leather gloves have prevented many injuries to me and possibly the loss of a finger or two.

Years ago I needed to pour some concrete and the recommended reinforcement was welded wire, otherwise known as 'hog wire'. This is heavy diameter wire welded in a 4"x 6"pattern and sold in 6'x50' rolls. These rolls are wound pretty tightly and secured in four places by wires running around the coil. Since it was summer and due to get very hot, I had to get the wire down before the truck came at 8 a.m. As I cut the last tie wire, my off-hand was sucked into the rapidly unwinding wire, all the way up past my knuckles. Luckily I was wearing gloves, and using my linesman pliers as leverage, I was able to work my hand out of the glove after about 5 minutes. There aren't too many people out to ask for help at 6 a.m. on a Saturday.

I find these Wells Lamont gloves work well for me and last a long time. If I know that the job is going to be moving blocks, bricks or demolition, I will use these cheaper gloves since a precise fit is not required for grunt work.


Nitrile
Spring is here and many garden chemicals are easily absorbed through the skin, meaning gloves should be worn here as well. When working with pesticides or other chemicals like bleach, stains, solvents or non-latex paints, I use nitrile gloves such as these. They are priced cheap enough to replace frequently during to job so the risk of puncture is much less.

Nitrile is also a very good choice for protection from automotive chemicals or cleaners such as carburetor cleaners, antifreeze, brake fluid and motor oil. If I am working with something really corrosive like acids, or I'm mixing concrete for long periods, I will switch to something like this chemical resistant style. 

I keep nitrile gloves in my first aid kit and as extras in my BOB and GHB because they will prevent contamination from someone else's bodily fluids or other hazards (biological or chemical) that you might find at an accident scene or other emergency situation. I recommend nitrile over latex because nitrile will not aggravate anyone with a latex allergy, whether it is the person wearing them or the person being treated. 

I suggest buying them in 100 count boxes and dividing gloves between friends -- unless you have cars that need regular maintenance and are using gloves like kleenex as I do. In that case, keep the whole box for yourself!


Cut Resistant
These gloves are made from kevlar or similar fibers like those in bullet proof vests and will prevent (most) cuts from knives, glass, sheet metal or plastics such as laminate countertops. Cut resistant means what it says, though: it resists cuts, but it isn't proof against them. If the item is sharp enough and you try long enough, you can cut through the gloves. 

I have a pair of gloves like these in my BOB. I used them for handling metal duct work under a house when installing new floor registers. Due to the odd places this piping had to run, creative trimming was needed and new, even sharper edges were exposed. The kevlar gloves realy saved my hands.


Recap
  • Be prepared! Have several types of gloves in your supplies. 
  • Buy bulk or multiples, so you can share. 
  • Wear gloves when performing tasks that require them; your hands are precious.
    As always, if you have comments, suggestions or corrections, please post them so we all can learn. And remember, Some Is Always Better Than None!

    NOTE: All items tested were purchased by me. No products have been loaned in exchange for a favorable review. Any items sent to me for T&E will be listed as such. Suck it Feds.
     

    Tuesday, May 26, 2015

    Food Storage: Freezing and Drying

    But not freeze-drying, which is an entirely different matter.

    I come from a place and a people where emergency preparedness, and particularly food storage, are nigh unto doctrinal teachings. A long-running joke among the "Doomsday Prepper" types is "Find a Mormon and take their stuff." While we can debate the wisdom of actually following this course of action, there is a bit of twisted logic to it: we Mormons are experts at buying it cheap and stacking it deep, and here are a few insights into how we keep it from going bad.

    Freezing
    The most basic and common way to store food is simply to freeze it:
    • Everybody has at least some freezer capacity in their home, and deep-freeze units can be purchased fairly inexpensively if additional storage is needed.
    • Foods can be purchased in larger quantities during sales, broken down into convenient packaging sizes, and simply put on ice until needed. 
    • No other special equipment is required.
    • There is minimal overhead cost involved.
    • As long as the electricity stays on, everything is happy. 
    • Even if the power goes out briefly, a good freezer will keep food safely cold for a decent period of time (assuming the door is left shut to keep the cold in). 

    (Protip: Keep a cup of ice cubes in your freezer, and replace them as they evaporate away. If for some reason the temperature in your freezer increases to an unsafe level, the ice will melt. If power is restored without you noticing, the water will re-freeze, but will no longer be in cube form. It's a handy, free way to monitor the system.)

    Foodsafety.gov has a handy chart that lists best-quality time frames for foods that are frozen. They also note that frozen foods are safe to eat virtually indefinitely. The key to ensuring quality in frozen foods is keeping out air and moisture:
    • Commercial bags and heat sealing units are available for a modest price and will make freezing foods far easier and more effective. 
    • For shorter-term storage, or if heat-sealing is currently outside your budget, a quality zipper freezer bag will suffice. 
    • In the worst case, freezer burned food can usually still be used in soups, stews, and slow-cooker recipes. (If any readers have a recipe like this to share, by all means leave it in the comments section.)

    Drying
    Dehydrated foods store incredibly well. 
    • They require no refrigeration or freezing, so they have no maintenance cost, save for the shelf space they're kept on. 
    • Kept in cool, dark areas and sealed in a similar manner to the ones discussed for freezing, dried grains, vegetables, and other non-proteins will keep for 8 years or more. 
    • Dried fruits store for five years or better.
    • Dried meats have a fairly short shelf life, so meat often does better in the freezer. 
    • Dried foods also have the advantage of being far easier to transport, as they weigh a fraction of their original weight, and require no cooling considerations for short term use. 
    • David covered how to store food in buckets, and his advice in using buckets to store dehydrated foods, in addition to store bought, holds true.

    Drying your own food 
    It's a fairly simple process, accomplished several ways. The easiest is through a dedicated dehydrator. These consist of a low-temperature heating element and a fan which moves air across slotted or vented trays. The linked unit is the modern variant of the ones mom and grandma used for years when I was a kid. 
    1. Foods are prepped by being sliced thinly and cut into manageable sizes if necessary. 
    2. Slice as thinly as practical, since thinner slices dry more quickly and completely. 
    3. The slices are then placed on the trays in a single layer with no overlap, and the machine is turned on and let run until the food is as dry as desired.
    4. Remove the dried food from the machine, package it for storage, and you're done.
    Foods can also be dried in an oven, but it is a far more involved process, and far less energy efficient. It is an effective method, but won't work in all ovens, and the energy costs involved will go a long way towards purchasing a dehydrator that will do the job far better. If you do choose this technique, elevating your food on a stainless steel cooling rack will help the process along.

    Dehydrated foods can be used dry (raisins, dried apples, etc.), or can be re-hydrated to use as if they were fresh. Simmer or boil the dry product for 20-30 minutes, then use it as you would fresh food. They can also be thrown dry into soups and stews, and they'll reconstitute as they cook.


    Food storage doesn't have to break your budget, taste like cardboard, or be entirely alien to your diet. Freezing and drying allows you to put up foods that you like and know, and are confident that you and your family can and will eat.

    Lokidude

    Monday, May 25, 2015

    Repost: Memorial Day

    Editor's Note: In honor of the day I am reposting last year's post my Chaplain Tim, the only member of BCP who has served in the armed forces. While I hesitate to wish anyone a "good day" when we are commemorating the dead, I will say that I hope your day is well-spent in connecting with loved ones and remembering those no longer with us. 

    I'm not celebrating Memorial Day with a cook-out and beer. I haven't in a long time. To me, this day is reserved for remembering those who died fighting for their country, whichever country that may have been.

    I am a Cold War veteran. I was a REMF  (ask a vet what that means if you want the exact translation) and never saw combat. I maintained nuclear weapons in West Germany in the early 1980's when they were one of the main things keeping the Soviet Army from spreading Communism throughout Europe. Even though I never saw combat, a normal day at work involved large quantities of high explosives, highly radioactive materials, and chemicals that would peel the meat off of your bones. We had to trust each other not to screw up or one of us was going to get hurt or die. In the days before the invention of precision-guided munitions, tactical nuclear weapons were our answer to the roughly 3-to-1 numerical advantage that the USSR had over NATO troops and tanks. It worked: we won the Cold War, and Soviet tanks never poured through the Fulda Gap into western Europe.

    My job in the US Army was mostly Monday through Friday, 0700 to 1700. I had free time to travel and since my room and board were paid for, I had money and a car as well. I wandered around a foreign country that was “First World”, so I didn't have to worry about much. The police weren't corrupt, the roads were well maintained, the people were friendly, the beer was cheap, the food was good (and safe to eat for the most part, although I won't touch Argentine beef ever again), and there was a lot to see in what I consider a small area. West Germany was about the size of Iowa and Missouri combined, so everything was closer than you'll find in the USA. Most of it is also much older than than the USA.

    I was stationed in a very small NATO base in the northern part of Germany with very limited support, so I learned quite a bit of German just to get by. If I wanted fresh groceries, I had to go to town and know how to ask for them in German. This came in handy during my wandering, because it allowed me to read the plaques and memorials that seemed to be everywhere, if you took the time to look for them.

    The picture to the left is of a war cemetery in Germany. I don't know which one exactly; there are over 400 of them in Germany alone. The last new WW2 cemetery for German soldiers opened in 2013 in Russia. Think about that for a minute. Nearly 70 years after the Normandy Invasion, and they're still burying their dead from that war.


    The small picture to the right is the War memorial that was about 5 miles from where I was stationed. I was also about 10 miles from Wewelsburg, a castle used by the SS as a training center with a small labor camp at the base of the hill. Walking though cemeteries like these brought home to me the sheer scale of human loss that war brings, but having seen East Germany first-hand (we actually drove through it to get to Berlin) showed me that war is not the worst that can happen.

    I am in no way condoning the actions or motives of the German government during the 1930's and 40's - they were inhuman and should serve as a reminder of how not to act - but the individual soldiers served their country and did what they were taught and told to do as best they could.

    This picture is of Graves Registration during the Vietnam War. With the invention of computers and rapid transport, most of the casualties of war were shipped back home for burial by family instead of being interred in graveyards close to the scene of battle. The large battle cemeteries have become a thing of the past. 

    I have family members who served in that war, and several friends who lost family over there. I also had uncles that served in and survived WW2 and Korea. I have talked with many troops that made it back from Grenada, Panama, Iraq, Kuwait, Afghanistan, and a few places that are not mentioned in the nightly news. They've all lost friends and comrades. The term “brothers in arms” has a special meaning to those of us who have served in the military and experienced that unique bond of trusting another person with your very life. 

    Please enjoy your family and friends this holiday weekend, but I ask that you raise a glass or two to the men who died in order to ensure that you have the freedom to do so.

    Sunday, May 24, 2015

    Gun Blog Variety Podcast #40

    Another week, another exciting episode of The GunBlog VarietyCast!

    Adam and Sean talk about some really interesting stuff, including that "viral" photo where the man is walking on the "wrong" side. We also talk about people driving gasoline powered cars filling up at the only pump that has diesel, and that Waco biker shootout.
    • Erin Palette discusses the OODA Loop.
    • Nicki Kenyon thinks that eventually the war in Ukraine will become a "Frozen Conflict."
    • Special Guest Bob Owens discusses his recent LA Times article "Why cops shouldn't carry Glocks."
    • Barron B. talks surge protection.
    • And Weer'd does another of his patented Audio Fisks, this time of the two Moms Demand Illegal Mayors for Everytown (A wholly owned subsidiary of Michael Bloomberg, Inc) anti-gun ads from North Carolina and Texas.
    Thanks for downloading, listening, and subscribing. And don't forget to tell a friend! (Have you "liked" The GunBlog VarietyCast on Facebook?)
    Listen to the podcast here.
    Show notes may be found here.

    Friday, May 22, 2015

    A Prepper Library of PDFs

    & is used with permission.
    This is a list of PDFs that I feel would be of interest to preppers.

    It is my belief that these are all freely reproducible documents. Many (such as those from the Hesperian Foundation) are explicitly free for distribution; others are pamphlets produced by the American Red Cross or the US Army. 

    No copyright challenge is intended; if I have accidentally included something protected by copyright, let me know and I will take it down immediately. 

    Similarly, if a reader has a freely-distributable PDF of interest to preppers that I do not have here, please send a copy to me so that I can upload it. 

    Contents as of 5/23/2015:

    Disaster Preparedness/Response
    First Aid/Medical
    Food/Water/Shelter
    Environmental/Community/Sanitation
    Combination/Collections

    Download these books to your laptops, tablets and e-readers so you have access to them at all times. 

    Thursday, May 21, 2015

    Emergency Services in a Disaster

    Most of us have been taught to look to the police, firefighters, and hospital staff in our area for help during and after an emergency. While this may work for small, localized emergencies, the system has been known to fail when the damage and destruction gets beyond a certain point. History shows that the larger the disaster and the higher up the food chain the government response comes from, the more likely it is that the response will become less helpful and possibly even become a continuation of the problems.

    In a true WROL situation, abandoned emergency vehicles would likely contain supplies of useful items for surviving. Salvage is not the same as looting, but that's a topic for another day.

    The following is not an indictment of any Law Enforcement (LE) agency or other emergency responders. I'm not a cop-hater, I recognize that they are human and just as prone to making errors as anyone else. Angels and assholes exist in every job, and no job is filled with just one or the other. They're not all heroes, nor are they all monsters.


    Law Enforcement
    LE has resources like communications and information that maybe helpful in times of trouble. Since they are usually the first to respond to any emergency, they may (or may not) know more about what's going on than you do, but they generally have the ability to get more information than you can. Knowing things like which evacuation routes are still open, which direction the forest fire is moving, or how widespread a disaster actually is can have bearing on your plans. Research police scanners for your area to see if one will work as a source of information (many departments use channel-hopping radios that a scanner can't follow). A scanner and a large map can help you find the boundaries of a situation without having to travel.

    City
    The most likely to have someone you may know and have contact with. Most small to medium towns and cities employ residents as police, so they're more likely to be approachable. Networks of friends and relatives make it easier to find a point of commonality with a city policeman, which can help ease communications.

    County
    This still has a good chance that you may know people in common, but it covers a lot more area. County Sheriffs and Deputies will know more about the local roads and bridges than any other level of LE, because they travel them more often. 

    State
    The last level of LE that I consider trustworthy. Directed by the governor or his appointee, they should at least consider the people of their home state as people. State police will have better communications gear and access to information covering a broader area. 

    Federal
    FBI/ATF/DEA and all other alphabet agencies. Trust them at your own discretion. Coming from outside your area (generally after the fires have stopped burning) they will likely not care about the same things you do. Their job is to restore the political processes and find someone to blame. People tend to be treated as statistics at this level of government, not individuals.

    Other 
    LE shipped in from areas outside the disaster do not have a history of being helpful to individuals. The abuses during the response to hurricane Katrina actually spurred the passage of laws in many states to ensure that residents of a disaster-struck area maintained their rights. If martial law is declared, all bets are off and the normal rules of law don't apply.


    Firefighter/Rescue Crews
    These are the folks who will be there to pull your fat out of the fire immediately following a disaster. If you don't need their services (because you were prepared), leave them alone so they can do their best to thwart the Darwin Award nominees. If you have the training and resources, many of them will appreciate you helping them in their work.

    Volunteer
    Volunteer and small town firefighters are local people who choose to help other local people. Their access to information may be limited, but they are usually tied into some form of emergency communications network. Training varies widely from one department to another, but they should all know basic first aid and how to use the tools on their trucks.

    Specialists
    Ski Patrols, Fire Jumpers, and other specialists are trained for very specific rescue missions. If you see these rescue units working, leave them to their jobs. If you need one of these specialists you wouldn't want them delayed, and their information is going to be specific to the mission of the moment. They will have a fairly broad knowledge of survival techniques if you can catch them off duty and talk to them. 

    Paid/Unionized
    Once a city gets to the point of needing more than one fire station, they tend to start paying their firefighters. Politicians and unions tend to infect the fire departments in direct relation to the size of the force, reducing the efficiency and morale as they feed at the public-money trough. Training and equipment is usually a notch above volunteer units because of the larger tax base. 

    National Guard
    When the SHTF in a big way, the Governors of the states have the ability to call out the National Guard to aid in the rescue/recovery operations. Being somewhat local, they fall into the same category of trust as State Police above. Having access to helicopters, heavy equipment, and lots of workers comes in handy for a variety of emergencies. Individuals may not have much information, but they probably came from another area and will know how things are outside your location.


    Medical
    Medical personnel have extensive training and may have access to supplies that you don't. Communications in a disaster tend to break down due to the high number of patients, but most of them will do their best to treat everything they can. Look up the word “Triage” for an educational glimpse into how they are trained to deal with too many patients.

    EMT/Paramedics The first responders whose job it is to pick up broken people and get them to a place where they have a chance of being fixed. There are national standards for the different levels of first responders, so they all have to meet a minimum level of competence. Training is good for their job; supplies available vary by jurisdiction and level of training. 

    Clinic
    Usually an outpost of a larger hospital or specialized for a specific field, staff and supplies will be limited. Normally having only a few actual doctors, most of the staff will be nurses of one variation or another (CNA, LPN, RN, NP, PA). Easily overwhelmed in an emergency due to their limited staff, but still a good place to get to know people because they tend to live close to the clinics. Supplies will run out fast. 

    Hospital
    Many hospitals have found it more profitable to specialize (Spine Center, Sports Medicine, Cancer Research, etc.), but they will all have the same basic facilities; emergency room, treatment rooms, surgical rooms, recovery rooms,etc. Most hospitals have their own pharmacy, but they are stocked (like everything else in the US) using a Just-In-Time inventory system. Without resupply, they'll start to experience shortages within 24 hours

    DHHS/CDC
    Once the federal government gets involved, the level of care and communications degrades. The CDC may have some of the best labs in the world, but they are controlled by politicians, which means people are treated as statistics at the national level. The only advantage I can find in getting a federal response to a medical crisis is their ability to bring in supplies and people from unaffected areas, quickly.


    Knowing some of your local emergency services people should be part of any preparations that don't include leaving the area. If you're bugging in, or your bug out location is fairly close to home, it's only sensible to make contacts with the people who can help during an emergency. Remember that OPSEC rules apply, so don't be a source of information for them.

    Wednesday, May 20, 2015

    Prudent Prepping: Gear Check part 2

    The dust has settled and the First 72 Hours have passed. Now we concentrate  on what to do in, and how to plan for, the long term via Prudent Prepping.


    Gear Check pt. 2:
    Fixing what was wrong

    As was mentioned in this post, my stored Whisperlite stove didn't work when I took it out of mothballs. Lucky for me, my local Gear Nut buddy had parts on hand to get it up and running quickly and cheaply.

    Very cheaply, as in "free", since I am unemployed at the moment.

    To keep from showing some very poorly done pictures, here is a video of the process.


    Most of the items shown in the video needed cleaning or repair . I am going to attempt to soak the old jet and needle in carburetor cleaner and then vinegar (or CLR if the vinegar is not acidic enough) to see if I can clean it up to the point of being a 'last resort' spare.

    What I did have to purchase was a new fuel bottle. You might ask, "Why is this necessary?" Well, the bottle is made from aluminum, and due to how long it has been stored, there is oxidation inside the bottle. What seems to have happened is condensation settled in the bottom and side of the bottle and left a deposit of aluminum 'rust'. This doesn't appear to affect the structure of the bottle but might continue to oxidize and put particles into the fuel, leading to the clogging mentioned in last wek's post.

    Due to the small difference in cost between the medium and large bottles, I did buy the biggest of the three, a 30 oz one. Sorry, no Amazon purchase link, since REI * has them beat by half!

    I will be ordering spare parts to have on-hand, and to replace my friend's parts used in fixing my stove... just not this month.

    * REI is having a 30% off sale until the 25th! Check out their site for more information.

    Recap
    • Whisperlite stove rebuild to fix clogged jet, fuel line and bad needle: $0 (Favors owed: plenty).

    Purchases
    • 30 oz. MSR fuel bottle, $21.95 from REI.

    As always, if you have comments, suggestions or corrections, please post them so we all can learn. And remember, Some Is Always Better Than None!

    NOTE: All items tested were purchased by me. No products have been loaned in exchange for a favorable review. Any items sent to me for T&E will be listed as such. Suck it Feds.

    Tuesday, May 19, 2015

    Guest Post: Hollywood Tactics...

    by American Mercenary

    American Mercenary is an Airborne Ranger and an officer. He has spent one tour in Iraq and two tours in Afghanistan. His blog may be found here


    (Editor's Note: This article represents a tonal shift from most of the posts here at Blue Collar Prepping, as we don't usually write about tactical things. However, many of the BCP regulars own firearms, and posts about guns and reloading have proven popular here. 


    Therefore, this article is posted under the "Doing It Wrong" tag -- not as instruction on how to shoot, as there are far better sources of instruction for that -- but rather as a caution against doing what might get you killed in the real world.)

    ... an example of what NOT to do
    Steven Seagal has gotten old and fat, and his hair looks like a really bad toupee.

    Being in Afghanistan where we recycle movies in the spirit of "share and share alike", one of the direct-to-video movies* starring, produced, and directed by Steven Seagal was Violence of Action. As it turns out, about the only thing I liked about the movie was the title.  

    You see, I believe in violence of action. So did Col. Jeff Cooper. Even if you disagree with Col. Cooper, he came about his opinions the honest way: through experience.

    Unfortunately, having a great title won't save a horribly crappy movie. (It was still better than Twilight, though.**)

    The Fatal Derp
    In Violence of Action we see wise, tactical guru Steven Seagal working on shooting through the "fatal funnel" to take a "turkey peek" before moving, and then telling another shooter that he changes hands after shooting and moving from one side of the doorway to the other. 


    I gigglesnorted a couple times watching this scene because it was so horribly wrong. Don't "peek" because, if you train yourself to "peek then move" every time, all you are doing is telegraphing your next move. 

    If you find yourself at a door and wish to be sensible,  you have a few options:
    1. Go through it and shoot as fast and accurately as you can. This is what Infantrymen and SWAT train to do. This is "violence of action." 
    2. Freeze in the doorway and unload. This is what SWAT actually did to Jose Guerena. This is what happens when you don't rise to the occasion but instead sink to your lowest level of training. Hesitating in the fatal funnel is a tactical “no-no".
    3. Use the side of the door as a barrier for shooting from cover. This is what Infantrymen pulling security are trained to do, and USPSA/IPSC/3-Gun types are all familiar with this. This is what you do when you have to secure a room or hallway before your buddies can get to you to help you clear it. By the way, this is what Jose Guerena did, and it didn't work out so well for him.
    Notice that none of these tactically good options include flitting from one side of the doorway to the other while swapping firing hands on the pistol (or carbine or shotgun, etc). And none of them are really good options for someone alone with only their handgun. But suppose a storm brought down power and communication and you had to clear your house by yourself because you just got home and the door was obviously kicked in?

    You can go slow and deliberately, as quiet as you can, slicing the pie at each corner. But every doorway is a fatal funnel and you need to get out of the fatal funnel as quickly as you can. Often times we will clear as much of the room by working the angles through an open door before we enter and clear with violence of action. On a closed door it is always hilarious when a fire team slams themselves into what turns out to be a linen closet. (Seriously funny in training, anyway).

    Never go faster than smooth. The saying "slow is smooth, smooth is fast" is true: don't rush yourself, and you'll go faster than you think you can.


    Swip-Swap-Drop
    So, now that I've addressed why you don't want to hang out in the door, silhouetting yourself in the obvious line of attack for a defender, lets deal with why you shouldn't swap hands:
    • A handgun is supposed to be a “hand gun” in that you can operate it with one hand. Double action revolvers are great for this because if you have a misfire, you just pull the trigger again. But, if you have a failure with a pistol, it becomes a “hands gun.”
    • Every time you unnecessarily manipulate your weapon you are setting yourself up for an accident. Palms slippery from sweat and arms jittery from adrenaline work against you. 
    • Manipulating your weapon with a second hand doubles this risk. 
    • Swapping your gun to your weak hand (unless you absolutely must, likely due to injury) is worse than all of these, because not only could you accidentally fire or otherwise mis-operate your weapon, you now run the risk of dropping it. 
    Remember, what looks cool on film doesn't translate well to the real world. Instead, remember the fundamentals. Mine are draw, rack***, push, front sight on target, squeeze trigger. Even if some tactical genius gun guru could shave fractions of a second off my routine by changing it, I won't change it;  I've shot this way for years and it's what my muscle memory knows. In my opinion, it's better to be consistent than risk an accident by trying something new and fighting an old habit.

    To Reiterate:
    1. Be consistent.
    2. Keep your gun in the same hand unless you are forced to change it.
    3. Don't stand in the doorway, and don't freeze. 
    4. If you have to be violent, be violent and get it over quickly by being deliberate and smooth.
    5. If you are moving, you need to have your gun up and ready to engage targets. 
    6. If you are stationary, you need to be reloading or waiting for your buddies to catch up so you can move again.


    * It turns out that this was originally a TV series called True Justice which had episodes turned into 2-hour DVD "movies" that were sold in the UK. I think this was just a last ditch attempt to regain lost capital from a TV show that had poor writing, bad action, and dull characters.

    ** If anyone asks why I watched such crap, remember that you'll watch just about anything on a deployment.

    *** When I carry a pistol, I carry with an empty chamber. This generally turns a “hand gun” into a “hands gun.” But I am 6 foot 200 lbs of man, I am comfortable with my hand-to-hand combat skill level (not as good as someone who trains more regularly, but better than most) so I feel that the half second it takes for me to rack the slide is a good trade-off. You may feel differently, and that is your choice.

    Monday, May 18, 2015

    Guest Post: Cutting Threads with Taps & Dies

    by Firehand
    (Editor's note: Firehand is a blogger and a part-time blacksmith. He is a frequent contributor to this blog and his previous articles may be found here.)

    Have a machine screw/ bolt/ threaded fitting whose threads have gotten dinged-up? You can use a tap or die to clean up (the technical term is "chase") the damaged threads. In fact, being able to modify (or, if need be, make) a bolt, nut or threaded fitting can be a pretty handy skill to have.

    Modifying a sling swivel stud for a rifle is good skill practice, and it makes something useful when finished.


    Note: I'm no machinist, so this isn't expert advice. This is "stuff picked up while making knives, working on guns, and generally fixing or modifying crap and the experience directly related to that."*. It's possible an actual machinist might read something here, grab their hair and scream "NO!"

    Well, I'm writing this, so deal with it.

    Tools
    Left: tap. Right: die.
    Depending on what you're cutting, you'll need either a tap or a die, and a wrench to make use of them.

    A tap is designed to cut threads into a hole (internal, or "female" threads). A die is designed to cut threads into a shaft or rod (external, or "male" threads).

    Both are made of tool steel that can be hardened: the threads are cut into a blank, flutes (taps) or holes (dies) are machined in, and then the piece is heat-treated.

    The sharp remainder of the threads are the cutters: you rotate the tool on/in the piece and they do the cutting. The flutes or holes serve the purpose of giving the chips cut out of the metal somewhere to go; otherwise they either clog up the works and get in the way, or cause the tool to jam (this is absolutely something to be avoided, as a jam can easily result in a broken tap or work piece, thus ruining the project).
    Left: tap wrench. Right: die wrench.
    There are different styles of tap and die wrenches; these are the ones I have. 
    Not shown, but something you'll definitely need: cutting oil. In some places it may be difficult to find the specialized stuff, but be reassured that a small bottle will work for a lot of cutting. If you can't find it, or don't have the cash, remember that it's same as a gun: any lube is better than none.

    Cutting oil serves two purposes:
    1. It lubricates the cutting teeth, making the job easier and helping them stay sharp longer.
    2. In the case of threading a deep hole, or a long piece of rod, it helps carry heat away. This is rarely a real with done-by-hand jobs, but is something to remember.

    The Project
    I've been working on a AR-10 rifle. It's almost finished, but it  needs a sling stud on the handguard. The handguard company makes one for the quick-detach sling swivels; however, the buttstock is an A2, which has a standard sling loop. so I wanted a standard swivel stud that I could hook a regular detachable sling loop onto.

    So off to the boxes of parts and "I might need this sometime" stuff, and lo! An old set of Uncle Mike's swivels and studs was located, the stud for the front having machine-screw threads, and the threads are the same as the holes in the handguard: 10-32, which means "Size 10 screw body, cut with 32 threads per inch".
    Yes, I started this before I thought "I should take pictures!"
    So imagine the last 1/8" or so of the screw being unthreaded.
    Two problems, though:
    1. The threaded portion is way too long (easy to fix, though)
    2. The threads don't run all the way down to the stud part(or head, or whatever), which would mean it wouldn't fit flush against the handguard. This is where "cutting the threads" comes in.
    Cutting the Threads

    1) First get a 10-32 die**.

    2) Fold some paper a few times to protect the stud from the vise jaws and clamp it in the vise.

    3) Put a couple of drops of oil on the threads, then run the tap onto the screw. When it reaches the unthreaded area, start cutting.

    Important point: one side of a die is designed to be started onto the piece, the opening is funnel-shaped to make it easy to start.

    4) The usual method is to turn the tool 1/3 to 1/2 turn, then back off 1/4 turn; this helps move chips into the flutes to clear them from the cutting teeth.

    5) Continue until the die bottoms out on the stud and can't turn further.

    6) Spin it all the way back off.

    7) You'll find that this leaves a short distance of the screw still unthreaded, or only partially threaded (how much depends upon the die). However, I need them to run all the way.

    Remember that 'start from this side' important point? Now you turn the tap over in the wrench, clean any chips off the piece and out of the die, add a drop or two of oil, and start cutting again. The cutters on that side of the die are (depending on the die) for the final diameter or may have a slight flare, so you can use it to cut the threads into the last portion of the screw.

    8) Stop when the tap bottoms out; do NOT try to force it further. Back it all the way off and inspect the workpiece. You should now have nice, clean threads all the way. Wipe or spray them clean (I used brake cleaner) to get rid of the cutting oil and any chips.

    Cutting It to Length


    First, figure out just how long it has to be. You can measure, but I use a counting method: Starting by running the screw into the hole until it touches the barrel, I then back it out, counting how many turns it takes to go from touching the barrel to out (seven, in this case). Then I do it again just to be sure.


    My method to mark where to cut: I take a 10-32 nut and run it all the way down, then I back the stud out the proper number of turns. The inside edge of the nut marks the max length.

    Do that twice, too.


    Now you can use a hacksaw or whatever else to cut the screw, I'm using a jeweler's saw, which is basically a hacksaw that uses very fine blades. Pick the right one and it will cut steel.


     Clamp the exposed end of the screw into a vise, and start the saw cutting right against the nut. You can back the nut off a further one-half or one turn if you want a bit of fiddle space, which is what I did. Cut slowly and don't put pressure on the saw blade(see 'fine' above, which translates to 'a big delicate'). Just let the weight of the saw do the pushing, and do use a drop or two of oil.


    That'll give you a clean end.


    Clamp the stud in the vise (remember the padding!) and use a fine file to square the end, and then use it at an angle to give a slight taper( chamfer, to be technical) at the very end.


    Clean it all up and try it. If you need you can always file a bit more off the end.


    You now have the stud you needed. Pick your hole, set it in place with a bit of threadlocker, and it's done.

    I'd suggest flushing the cutting oil and chips off the die, then put on a little regular oil to protect from rust.


    Bonus How-To!
    You just might want a washer of some kind to fit between the stud and handguard (I did). If you've got some leather punches, that's easy: find something suitable (I used a piece of innertube) and start punching.

    You say you don't have leather punches? Do you have some fired cartridge cases and a deburring tool?


    Use the deburring tool (you could also sand or file) to get an edge on the case mouth.


     Put the material on a wood block or something else suitable and rap it with a hammer or mallet.


    Take the cut piece, center the smaller case on it, and rap.


    Washer!


    *I read somewhere the definition of 'experience' is "What you learned when you were expecting something else."
    ** I USED to have one, but it's disappeared so one had to be bought; about $7.

    Sunday, May 17, 2015

    Gun Blog Variety Podcast #39

    Adam and Sean meet once again to talk about all sorts of things from Felons Behaving Badly to traffic circles to people who think that death is an appropriate punishment for leaving your dog in the car.
    • Erin Palette asks fellow Blue Collar Prepper David Blackard about protective gloves.
    • Nicki Kenyon tells us how the recent UK General Election might affect the EU.
    • Special Guest Gene Hoffman, entrepreneur and activist,  tells us about this one time he was investigated for arms exporting.
    • Barron B. tells us that crypto isn't for amateurs, and gives us examples.
    • And the Anti-Gunners are trying to pretend that they're really interested in "Gun Safety," which Weer'd thinks is just plain silly.
    Thanks for downloading, listening, and subscribing. And don't forget to share this with a friend!
    Listen to the podcast here.
    Show notes may be found here.

    The Fine Print


    This work is licensed under a Creative Commons Attribution- Noncommercial- No Derivative Works 3.0 License.

    Creative Commons License


    Erin Palette is a participant in the Amazon Services LLC Associates Program, an affiliate advertising program designed to provide a means for sites to earn advertising fees by advertising and linking to amazon.com.