Thursday, October 21, 2021

Fire Safety

The dust has settled and the First 72 Hours have passed. Follow along as I build a long term plan via Prudent Prepping.

I need to re-post links for two articles I've written about fire and fire safety.

FIRE!!!
While CA just received its first measurable rain, that doesn't mean things can't burn. Tuesday, October 11, was the 30th anniversary of the Berkeley/Oakland Hills Fire, one of the most destructive urban fires in California history: 3,500 structures destroyed, 1,600 acres burned and 25 deaths, and it took 12 days to bring it under control.

Twelve days. Even with roads and reasonable access to what was burning, still it took 12 days. I wrote this blog post about getting out in the face of a fire, followed with even more as I refined my plans.

All of us have written on Bugging Out and I wrote this post about being stuck in a burning building. In the middle of the night. Hungover and tired. In the dark, with no lights.

That post started to be an EDC (Every Day Carry) write-up, but it can just as easily be about "How Not to Act in a Fire". People die every year, from fire and smoke by not having a plan everyone knows about.

Please take the time to read the posts if you haven't read them before, especially the Berkeley/Oakland Fire posts links to other articles. 

Recap and Takeaway

  • Have a plan in place for getting out safely where you live and visit. Make certain everyone is aware of what to do.
  • Make where you live as safe as possible. Trim trees and bushes away from houses and fences, and if it isn't your house, have the Landlord or Property Management do it -- or at least make them aware that you think there may be a hazard.
  • Due to work overload, this is a much shorter than normal post from me. Read the links, please.
* * *

Just a reminder: if you plan on buying anything through Amazon, please consider using our referral link. When you do, a portion of the sale comes back here to help keep this site running!

If you have comments, suggestions or corrections, please post them so we all can learn. And remember, Some Is Always Better Than None!

NOTE: All items tested were purchased by me. No products have been loaned in exchange for a favorable review. Any items sent to me for T&E will be listed as such. Suck it Feds.

Tuesday, October 19, 2021

Erin's New GHB, part 7: New Additions plus Food

Not actually Erin.
& is used with permission.
The main reason I do "bag dump" posts like these isn't to show you how to assemble a Bug Out or Get Home Bag, or even to show off all the cool stuff I have. No, it's because in the process of laying everything out, photographing it, and then explaining my reasoning behind it, I'm able to notice previously missed holes in my preps or flaws in my reasoning. 

For example, by laying out the contents of my medical pouch, I realized that I didn't have any effective way to splint an injured arm or leg. Sure, I could probably craft one out of sticks, but the premise behind my GHB is that I may have to walk home for several days, and if I have a broken arm or a sprained ankle I'd rather have gear that is quality and, let's be frank, more comfortable that something improvised with sticks. 

To that end, I bought some SAM Splints for my GHB so I wouldn't have to rob my BOB, and now I have both a 24" SAM and a 36" SAM in my medical supplies. I also added some titanium bandage shears, both to cut clothing, splints, etc for first aid and also just as a general cutting tool. 

https://amzn.to/3n6uHnP

I also acquired a CRKT Eat'N Tool XL for my Snack Pouch because I also added a pouch of Bumble Bee Salmon. I love this stuff, but it's difficult to eat with my bare hands. I typically use a long-handled iced tea spoon when at home, but I thought the added utility of the XL would be welcome. 

(Yes, I'm aware that pouched fish spoils easily, so if I plan to keep my GHB in my car during the warmer months I'll take the salmon out.)

https://amzn.to/3vFpnMd


Speaking of food, the reason I've been stalling on entries for this series is because during the course of the layout I realized that while I had snacks, soups and teas, what I was missing was bulk calories for energy. I had to try different kinds of survival foods in different pack configurations before I found something that worked. It required a drastic rearrangement of gear, but I made it work. 

I wanted something that was compact, as light as possible, would last for a long time, and would provide a decent amount of calories. I ended up buying two of these SOS Emergency Food Rations

https://amzn.to/3FWkx1L

Chaplain Tim reviewed these rations in 2017, and he gave them his top rating. I agree with his assessments and am largely happy to have these in my pack... although the weight (1.6 lbs each) is more than I'd like, it pales in comparison to the 6.6 lbs of water I'm also hauling. 


I bought two for the simple reason that each brick has 3600 Calories, and the average person needs roughly 2000 Calories each day. Each brick is supposed to be a three-day supply, but that works out to 1200 per day; this is fine for sitting in a life raft waiting for rescue, but not enough to get home after a disaster. However, two bricks is 72000, which works out to 2400 Calories over three days. Between that, my snacks, and my supplemental foods, it ought to be enough either to get me home or get me to a place where I can restock. 

I'm going to take some test walks with this setup once the temperature cools off a bit. If I can haul this without a problem, I'll see if I can fit two more bricks into my bag and carry it. If so, then I'll have seven days of meals, and that will make me a very happy prepper. 

Finally, I decided to add a multivitamin to my rations. Bulk calories are important, but just as important is proper nutrition and vitamin supplements can help with that. I bought a bottle of Vitamin Shoppe-brand VThrive Bioactive Multivitamin that was appropriate for my age group and placed a week's worth in my GHB. 


Next week ought to be the final post in this series, where I show you the miscellaneous stuff I have inside along with the configuration changes I've made. 

Monday, October 18, 2021

Leather Care

A friend’s shoulder harness failed after more than a decade of loyal service. According to him, all he did was wear the shoulder holster harness and gave it no additional care. This is a shame, because leather can last indefinitely with proper care. I have some World War II vintage holsters and pack straps in my collection that are nearly as supple as when they were made, and I know people who have leather goods that are even older.

Do's and Don'ts
Two of the biggest enemies of leather are getting too dry and getting too wet. Leather contains certain oils and fats that are necessary to maintain flexibility and strength. When leather gets wet, those elements can be flushed out or diluted, leaving the leather stiff and inflexible when it dries. This can lead to cracking, which is fatal. Once leather develops cracks, there’s not much that can be done to preserve it for further use.

Do
  • Blot wet leather dry as soon as possible.
  • Allow it to air dry naturally.
  • Apply a leather conditioner once dry.
Don't
  • Use an artificial heat source, such as a hair dryer or radiator, to dry leather! At best this will cause shrinking, and cracking at worst.
  • Immerse leather items in water.
  • Run them through the washing machine or dryer
  • Use an iron on leather items.

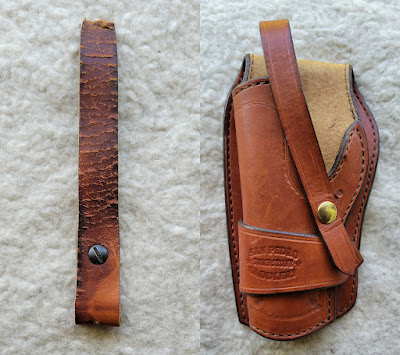
Left: leather that has cracked through lack of care
Right: leather that has been properly cared for

So what’s involved in maintaining leather and what supplies are needed? The answers are Not a lot and Nothing too complicated.

Cleaning
When leather gets dirty, one of the first things to do is wipe it down with a soft brush or a dry cloth to remove any loose dirt  (pay special attention to seams, where dirt and debris can hide), then use a proper leather cleaner to remove any deeper soil or stains.

Murphy’s Oil Soap, when used correctly, is a good choice, but in a pinch you can use a bar of moisturizing soap to clean leather. Rub the bar on a washcloth dampened (not wet just damp) with warm water and gently wipe it along the leather to remove any dirt. Make sure to wipe off all the soap residue as soon as possible.

A reasonably good home-made surface cleaner can be made from a mixture of equal parts olive oil and white vinegar. Shake them together in a spray bottle, lightly mist the leather, and wipe clean with a dry cloth.

With something like a holster or belt that gets exposed to sweat and body oils, an additional option is using a steam cleaner to help disinfect and remove buildup and salt stains from the leather.
 
Conditioning
The next part of leather maintenance is conditioning, the purpose of which is to help leather maintain its supple and flexible nature without saturating it with oil. After leather gets wet or is cleaned, and on a regular schedule of every three to six months regardless, use a leather conditioner to help replenish the leather’s natural oils.

Store-Bought Conditioners
Depending on the type or leather product and its exposure to the elements, a variety of preservatives and conditioners can be used.
either as-is or mixed with other ingredients. This list includes items as varied as: 
Olive oil, specifically extra virgin olive oil, is preferred over other vegetable oils due to its lower acidity, the specific fats present, and its longer store time before going rancid.

The Pecard company has offered a wide variety of leather care products for over a hundred years. Their Classic Leather Dressing is particularly well regarded so they must be doing something right. 

Home-Made Conditioners
There are also many different leather treatments you can make. One such is a mixture of one part white vinegar to two parts linseed oil. Apply a light coating with a soft cloth, let the item rest for 12 hours, then buff the leather.

Another option is one part beeswax, one part cocoa butter, and two parts almond oil. Blend them together on medium heat until the oils are melted. After it cools, massage it into the leather with your fingers before polishing with a dry cloth. 

Waterproofing
Leather is a natural material and is very porous. It can never be completely waterproof, but there are a number of surface treatments to help defend leather from moisture. These include a variety of commercial products, such as Sno-Seal, that can help protect leather if it gets exposed to water. 

An option that can be made at home is a beeswax-based cream. Beeswax is a natural waterproofing solution and can be fairly effective at waterproofing leather.

Beeswax Waterproofing Recipe   

  • 1 cup extra virgin olive oil
  • 2 ounces beeswax
  • Glass Jar
  • Medium pan of cold water
  • Clean, soft buffing cloth

  1. Pour the extra virgin olive oil into the glass jar.
  2. Break the beeswax into pieces and add to jar.
  3. Place the jar in a pan of cold water.
  4. Carefully warm the pan on a stove.
  5. Stir the mixture until the beeswax has completely melted and blended with the olive oil.
  6. Remove the pan from heat. Carefully remove the hot jar from the pan.
  7. Continue to stir the wax/oil mixture until it cools and stiffens. This can take up to 20 minutes.

After the mixture has cooled and stiffened, spot test the cream on an inconspicuous area of the leather. Making sure to begin with clean leather, apply the cream with your fingers, gently buffing the leather surface as you go. This treatment will need to be repeated to build up a protective coating.

When applying any waterproofing, make sure to pay particular attention to seams; with shoes pay special attention to where the upper meet the sole.


If we take care of our leather products, they will take care of us and the following generations. And remember, in the Dungeons & Dragons role-playing game, rogues and rangers prefer leather armor because it’s made of hide.

Thursday, October 14, 2021

Getting Started: Food

The dust has settled and the First 72 Hours have passed. Follow along as I build a long term plan via
 Prudent Prepping.

The friend I gave prepping books just asked what I think are questions every beginner asks: How do I start? What do I buy? Where do find everything? 

The cliché' answer is, of course, At The Beginning. I recommended looking at our entire blog and searching (from the actual blog, not Facebook) for the topics that are important. 

The question I seem to be asked most is What food do I buy? and the answer is Buy What You Use Now. Start with buying two extra of your normal canned/jar items and put those away. Then search for 'Food Storage' in the box on the upper left of the blog page, and be prepared to scroll through many really good posts. especially those from Chaplain Tim and Erin.

The next question, especially from folks that might be a bit well-off, is How long can I expect canned goods to last? The answer is longer than you might think. Erin has a post on 100 year old cans that is quite an eye-opener! 

There are several other posts on this blog which mention shelf life, but an article appeared in my news feed recently that addresses this nicely. From the article How Long Does Canned Food Last? Here’s What You Need to Know:
"Exactly how long does canned food last, and is it safe to eat canned food beyond its printed expiration date?
Here’s the good news: Canned goods actually last indefinitely if they're kept in good condition, according to the USDA. But that doesn't necessarily mean that they’ll still taste optimal ten years from now! There are actually several factors that limit the shelf life of canned goods, but in general, foods that are more acidic will expire sooner, while low-acid canned foods will actually last for longer. If you’re wondering about specific canned foods, though, here’s how long they’ll last on your shelf, as well as in the refrigerator after you open them." 
I do recommend reading all related posts from the blog to get even more food storage ideas. 

What if I want to plan further out than 5 years? Or have a budget that allows spending more? Possibly a lot more? 

That is something I personally don't have any experience with, since I am solidly Blue Collar in my upbringing and budget. I strongly recommend diving into Jim Cobb's book that  I mentioned in this post and reading pages 68-69. Two weeks to a month's worth of food is pretty easily done, following the 'Buy Two  Extra' plan. After 3 to 6 months, depending on how much you spend each week, you will have your month supply. 

Now, if you've recently hit Powerball or Super Lotto, things are much different. There are many different long-term food storage companies, but the one I like is Mountain House. Their product tastes good to several different people I served samples, and they have a very wide assortment of to choose from. 

Mountain House 6-Month Emergency Food Supply: $3,999.00

https://mountainhouse.com/products/6-month-emergency-food-supply

From the webpage: 
Emergency food supply of breakfast, lunch, and dinner for one person for six months, or two people for three months. Kit contains 540 total pouches and provides approx. 1,724 calories per day. Just add water and have a comforting, delicious meal in minutes. No pots, pans or cooking required. With the longest, proven shelf life in the industry, have peace of mind with Mountain House.
Or, if you want to go big:

Mountain House 1 Year Emergency Food Supply: $7,829.00
https://mountainhouse.com/products/1-year-emergency-food-supply
Emergency food supply of breakfast, lunch, and dinner for one person for twelve months, or four people for three months. Kit contains 1,080 total pouches and provides approx. 1,724 calories per day. Just add water and have a comforting, delicious meal in minutes. No pots, pans or cooking required. With the longest, proven shelf life in the industry, have peace of mind with Mountain House.
Here is a link to what is in the 1 Year Emergency Supply assortment. It is pretty complete, in my opinion.

Unfortunately, both items are sold out at the moment and, from what I can tell, when they are in stock inventory disappears very quickly. Now I want to say this certainly isn't the only way to go, and I would like the other authors here to add their recommendations to this list. Google can be your friend, but the "Prepping Food Rabbit Hole" can be very wide and deep. That's not to say don't look; just have a plan for what you are searching for... and maybe a lifeline to pull you out.

I can't tell you what you need, but all of us can at least point you to resources where you can find reliable information. Happy Hunting!

Recap and Takeaway
  • I seriously doubt there are any Powerball winners hidden here, but even so, knowing what is out there can make searching easier.
  • Find out what you and those around you like. Buy that and keep it in a secure place.
  • Nothing was purchased this week, but there will soon be additions to the Purple Pack, my own GHB and house stores.
* * *

Just a reminder: if you plan on buying anything through Amazon, please consider using our referral link. When you do, a portion of the sale comes back here to help keep this site running!

If you have comments, suggestions or corrections, please post them so we all can learn. And remember, Some Is Always Better Than None!

NOTE: All items tested were purchased by me. No products have been loaned in exchange for a favorable review. Any items sent to me for T&E will be listed as such. Suck it Feds.

Wednesday, October 13, 2021

The SAM Splint

Not actually Erin.
& is used with permission.

I am quite frankly shocked that this blog hasn't talked about the SAM Splint before, because not only is it an amazing and affordable bit of medical gear but also because I've owned at least one of them since 2009. I feel like it, alongside the Mora knife, is one of the best kept secrets of prepping. 

Put simply, the SAM is a moldable, compact splint that can conform to a variety of injuries. It's made from a thin sheet of aluminum sandwiched between two pieces of foam, and you stiffen the aluminum into a supportive structure by curving it. 

I realize that's hard to envision, so here's a video demonstrating the use and versatility of the SAM Splint. 


The kit mentioned in the video seems to be a special run that's sold only by Sawyer, which is a name I've trusted for over a decade when it comes to water filtration. The package is $24.99 with Prime shipping, and if you don't already own a SAM then I heartily recommend you buy this as it's an amazing value for the price. 

https://amzn.to/3mQ085D

SAM Splints come in a variety of sizes, from 1.8" x 3.75" finger splints to the XL size 5.5" x 36". I would recommend that you have at least one regular 36" or a couple of 24" splints in your GHB and BOB, and more in your medical preps. Some of them are packed flat, but most of them come rolled... although to be honest, given their malleability if you need a roll to be more compact you can just squash it flat-ish. 

The SAM Splint family

To conclude, here are some resources on learning how to shape the SAM Splint for different injuries. 
  • Basic PDF (suitable for printing out and keeping in your bag)
  • SAM Splint User Guide. A more detailed and thorough version of the above, including alternative uses such as a canoe paddle, flexible container, and emergency sandals. 
  • Video demonstration of the more common applications. 

The SAM Splint has my highest recommendation. Get one, learn how to use it, and keep it with your first aid preps. You won't regret it. 

Monday, October 11, 2021

A Variety of Spices are the Spice of Life

Any prepper worth their salt* is going to have a good supply of long term food storage. While many preserved foods may be good at stability and nutritive value, they don’t always get high marks for flavor, and a week of eating bland but healthy meals can have a serious effect on morale and general outlook. After all, there’s a reason military MREs come with those little bottles of tabasco sauce.
* I see what you did there, David.  -- The Editrix

Many herbs and spices, if kept in a cool dark place in well-sealed containers with oxygen absorbers, can be preserved long term and still maintain good flavor. This is because the two biggest causes of loss of flavor in spices are oxygen and light.

Tips for preparing longer term spice storage:

  • Buy spices with expiration dates as far out as possible.
  • Keep the container sealed.
  • If the container is opened, use a dehydrator or the oven set on low to force out as much moisture as possible.
  • Each container should have its own fresh oxygen absorber.
  • Store the spices in a cool dark place.

If working with fresh herbs and spices:

  • Wash them carefully.
  • Pluck any wilted leaves.
  • Remove the stems.
  • Remove as much moisture as possible in a dehydrator or the oven set on low.
  • Seal in containers no larger than necessary.
  • Each container should have its own fresh oxygen absorber.
  • Store the spices in a cool dark place.

With proper care, a vacuum sealer can be used to store larger quantities of spices.

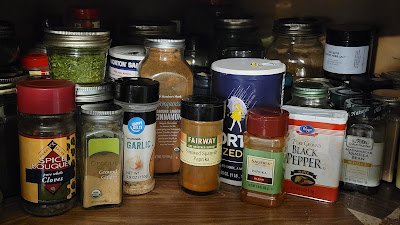
A glimpse into the author's spice cabinet

While the variety of spices is legion, certain seasonings are more frequently encountered. As everyone has different preferences, the spices chosen can vary significantly.

Salt
Probably the most common spice used throughout the world is salt, to the point it’s part of common parlance. Look back at my first sentence for one example; another is referring to something necessary but boring as “Like rice without salt.” Roman legions even received part of their pay in salt, from which the word salary is derived. 

Modern table salt is not just simple NaCl, but has anti-caking agents and iodine added for storage and health purposes respectively. (The reason we often see a few grains of rice in a salt shaker is they act as a basic moisture absorber.) Salt is fairly easy to store long term, and is unlikely to lose any flavor.

Pepper
Black pepper is almost certainly the next most common spice.  Ground pepper's flavor will deteriorate over time once unsealed: leaving peppers in kernel form increases storage life, but adds another complication in the need for a grinder.

Other Spices
Depending on individual taste, both garlic powder and ginger powder are two excellent choices as they add a good amount of flavor for their volume. Though, is there ever such a thing as enough garlic?

Chili powder, paprika, and cinnamon (either stick or ground) are other spices that offer a good bang for the buck and bulk. The first two also come in a wide variety and can be tailored to appropriate foods and cooking method.

When storing leafy spices, such as parsley, sage, rosemary, or thyme, keep in mind that they will lose flavor more quickly, and possibly develop mold, if not very thoroughly dehydrated. For home use, herbs and spices can be stored in the freezer for quite a while without loss of flavor, though some will suffer in appearance.

Remember, the plural of spice is spice, and also spices.

Friday, October 8, 2021

A Shmidgeon More About Shemaghs

Not actually Erin.
& is used with permission.
I thought I'd written more about the various uses of the shemagh on this blog, but it turns out that was in a podcast segment that wasn't transcribed. 

A shemagh (properly pronounced shuh MAAG, but most Americans shorten that to "schmog") is the Swiss Army Knife of clothing. It's a 42 x 42" square of cotton or cotton-poly blend cloth, and it can do anything that a bandana can do and more besides. The "more besides" is what I want to focus on today, because unlike a bandana a shemagh can wrap around your entire head. You can wet it to keep you cool in the heat, or filter out smog or smog. Most importantly, it protects you from the sun and airborne irritants without making you overly hot -- at only four ounces, it's very lightweight and very breathable fabric. 

The hardest part about wearing a shemagh is learning to tie one. There are various methods of tying it, along with a few tricks that I'll share with you.   

This is my favorite method:


However, this method has a lot of utility, although I could never get it to work for me:


This video shows 17 different ways of tying them. Some are more decorative than others:


You'll note that every single method involves the shemagh starting out as a triangle, which is why I stored mine the way that I did. 

Finally, this method is known as Berber style, and it comes to us courtesy of LawDog. I am not sure if this will work with a standard size shemagh or if it requires a different length.


Tips & Tricks
  • Wear a ball cap. Not only will the brim of the cap keep the sun out of your eyes more efficiently than the shemagh ever will, but the cap also helps provide a frame for the floppy fabric when you're wrapping it around your face. This is more helpful then you'd think, as shemaghs seem to like giving you tunnel vision. A cap brim keeps your field of view clear and your eyes shaded. 
  • Beware of fog. If you wear glasses, a shemagh is a great way to fog them up if you have it wrapped over your mouth. I've found that the fogging is mitigated somewhat by breathing through my mouth rather than my nose, but not entirely. Alternately, you can uncover your nose and keep only your mouth covered, although that eliminates a lot of the benefit of having something to protect against airborne irritants.  
  • Research your colors before you get one. Red, red and white, black, or black and white shemaghs are typically associated with a country or political movement, so don't be a dumb westerner and wear a thing without realizing you're making a political statement. Olive drab, foliage green and coyote tan are all good choices. Yellow is probably okay, but if you're in an area with a gang presence, blue (the color of the Crips) is probably not a good choice, as is the aforementioned red (the Bloods). 
You can buy a shemagh at Amazon with Prime shipping for the princely sum of about $10 (depending on color choice). 

Thursday, October 7, 2021

Gear Maintenance

The dust has settled and the First 72 Hours have passed. Follow along as I build a long term plan via Prudent Prepping.

This post is late. There was an earthquake! A terrible flood! Locusts! It wasn't my fault! I SWEAR TO GOD!

Yeah, yeah. The Mystery Woman, aka our long-suffering Editrix, ain't buying it either. I had a computer glitch that, if I had any sort of software knowledge, would have been an easy fix. Fortunately, things are back to business as usual. 
 
Gear Maintenance
Just the other day the Purple Pack Lady brought me her car flashlight and said, "The flashlight is blinking at me!" I  thought that possibly the strobe function of the Nitecore P12GT was on, but it wasn't. The flashlight has a battery life indicator built into the Mode Selection button on the body, which flashes as the battery runs down to show the user that it needs a new battery. If it does die, it's your own fault for ignoring the warnings.  


I really like Nitecore lights: they're reasonably compact, feel solid in my hand, and supply all the lumens I desire at a fair price.  
 
Unfortunately, this light (the Nitecore P12GT) is now discontinued, but features have been carried over to current models.

https://amzn.to/3mvF2JH

For comparison, here are the specifications for the P12GT:
  • LED: CREE XP-L HI V3
  • Battery Run-Time (Using 18650):
    • 1000 lumens - 1 hour
    • 280 lumens - 5 hours 15 minutes
    • 55 lumens - 28 hours
    • 1 lumen - 520 hours
  • Battery Run-Time (Using CR123A):
    • 1000 lumens - 45 minutes
    • 280 lumens - 3 hours 30 minutes
    • 55 lumens- 20 hours
    • 1 lumen- 300 hours
  • Beam Distance: 350 yards / 320 meters
  • Beam Intensity: 25,700cd
  • Battery type supported: 1 x 18650 or 2 x CR123A

Here is the closest new model, the Nitecore P10i 1800 Lumen USB-C Rechargeable Tactical Flashlight. The current model uses a built-in USB charger to replace the charger in the original kit, which makes the newer set potentially much more user friendly. 

https://amzn.to/3uOZGbz

Here are the newer light's specs:
  • HIGH PERFORMANCE TACTICAL LIGHT - The Nitecore P10i emits up to 1800 lumens with a max throw of 317 yards. Designed with law enforcement and military personnel in mind, this torch is easy to operate with 3 brightness levels and strobe.
  • STROBE READY - Simply press and hold the mode switch on the tail to enable the strobe mode at any time. Non-linear strobe patterns cause enhanced dizzying effects, highly effective for diffusing a tense situation.
  • USB-C RECHARGEABLE - An upgraded 21700i battery enables higher efficiency output and minimizes loss of power, for 90 minutes on high and a max runtime of 38 hours on low. Recharge the P10i via the fast charge USB-C port.
  • READY FOR DUTY - With an IP68 waterproof rating and anti-impact protection, the P10i is ready for high intensity, tactical operations. Included is a NTH10 tactical holster that is compatible with police duty belts and standard MOLLE systems.
  • P10i POWER BUNDLE - Included in this bundle are Nitecore P10i, NL2140i battery, CR123 battery magazine, NTH10 holster, USB-C charging cable, lanyard, clip, spare O-ring, and a LumenTac battery case


I'm not in the market for a new light, but I'm always looking for a good tool at a great price, and I think this fits all the points in my shopping list.

By the way, the Purple Pack Lady now has a recharged flashlight and an explanation of why she had flashlight that was blinking on the side. 

Recap And Takeaway
  • Make sure everyone is thoroughly trained with their gear and comfortable in its use. There's no telling when missing a critical indicator like a "Low Battery" warning might cause serious problems
  • Nothing was purchased this week.
* * *

Just a reminder: if you plan on buying anything through Amazon, please consider using our referral link. When you do, a portion of the sale comes back here to help keep this site running!

If you have comments, suggestions or corrections, please post them so we all can learn. And remember, Some Is Always Better Than None!

NOTE: All items tested were purchased by me. No products have been loaned in exchange for a favorable review. Any items sent to me for T&E will be listed as such. Suck it Feds.

Tuesday, October 5, 2021

Quick-Access Shemagh

Not actually Erin.
& is used with permission.

I'm stalling because I'm still not quite happy with something inside my GHB. Part of the reason I do these multi-part "This is what's in my bag" articles is that they're a bit like Rubber Duck Debugging; the act of spelling it all out causes me to see omissions and forces me to confront poor decisions. I had one of those, and while I'm experimenting with solutions to find one I like, you're going to get quickie filler articles like this. That said, I'm rather proud of the solution I detail here. 

It's no secret that I love shemaghs; they're an inexpensive and versatile piece of kit. However, the biggest problem with them is that they're rather bulky when configured as a head scarf, and if they're folded down flat then they aren't in a proper condition to be wrapped around your head. What's a prepper to do?

I don't know about you, but this prepper (me) figured out a way to mount it to the MOLLE straps on my chest rig so that I could access it quickly. 

First, I bought a set of Velcro tie-down straps from Amazon. I bought more than I needed because I didn't know what size I would end up needing and because I figured I could find a use for the others. I then installed two of the smallest ones like so:


Then I began folding the shemagh. As we all know, to make a shemagh into a scarf it must first be folded into a triangle. 


Then I rolled it up into a burrito. 


I folded it in half once...


... then twice. 


Finally, I put it on the chest rig and tied it in place. 


Now it's ready to go with just two tab pulls and it saves me important real estate in the chest rig pocket!

Monday, October 4, 2021

Organization and Record Keeping

We’ve all had that moment at the grocery store when we’re trying to remember if we have an item at home or if we need to buy more. We’ve also all experienced blanking on where we stored something, especially if we put it “in a safe place” so we could easily find it later. This can be irritating in day to day life, but the consequences get much worse in an emergency situation where we simply don’t have the time find the item or the ability to get more of some supplies.

Several of our contributors have talked about misplacing a prep item or rediscovering an item thought irrevocably lost. It happens to all of us; in fact, it happened to me recently when I was trying to find a particular item in my workshop (I had just put it down two seconds ago) and during my search I wound up finding a tool I’d thought long gone. Yes, I did eventually find the item I was originally looking for, and no, it wasn't a 10mm socket.

For another example, at my house we have a variety of storage tubs in the basement for seasonal decorations, yard and garden supplies, and the like. Each tub is labeled as to its general contents, but lacks a detailed list... which is how we wound up misplacing a pair of scissors for over six months when it was accidentally put in the wrong tub. Record keeping and organizational plans are important!

Something I put together, and my wife and I update on a somewhat irregular basis, is an inventory of our baking and spice supplies. I created a Google Docs spreadsheet with multiple tabs so we can reference the lists while at the store.

A sample of the author's spice inventory

I’m planning on doing something similar for longer-term food storage, adding "purchased on [date]" and "best used by [date]" columns. If necessary (and it would probably be a good idea), I may create another list of general preps and their locations. Having these lists on Google Docs adds to accessibility, but also increases the risk of discovery if my account is hacked. This is not a big deal with spices, but it’s a major violation of Operational Security (OpSec) for things like ammunition. Thankfully, there are a variety of software and hardcopy solutions available for record keeping.

When creating a list of this type, the Keep It Simple, Stupid (KISS) principle should apply. What information is really needed about this particular group of items? Make sure to include all pertinent data, but don’t get too granular. It should be quick and simple to enter records. Once created, any lists should be reviewed and updated on a regular basis.

Of course, this is all easier said than done, but just like building up a food supply, it doesn’t need to be completed all at once. Start small and add items and lists as time permits. Once the lists have been created, maintaining them should be easier.

Keep calm and inventory on.

Friday, October 1, 2021

Food Storage Season

For those of us who grow food, things start to get interesting after the first full week of autumn. Summer is over, the growing season is coming to an end, and we have the fruits of our labor to deal with. Most people who grow some or all of their own food try to plant a variety of foods that will mature at different times; this is to ensure a steady supply of edibles and helps avoid catastrophe in the event of a crop failure by not putting all of your eggs in one basket. Because of this mentality, we're dealing with food storage for a couple of months, with the bulk of it being harvested in the fall.

I don't preserve as much food as we did when I was growing up -- my family dynamics and living conditions have changed too much -- but I recall the annual rush to get all of the tomatoes canned and the sweet corn frozen. Fruits were either canned or turned into jellies and jams, cucumbers were pickled and put in jars (three or four different recipes) but we had moved beyond making our own sauerkraut (grandma still did that, though). Root crops (onions, garlic, etc.) went into the cellar along with the apples, peppers and a few other things that were hung from the basement ceiling to dry, and herbs were sealed up in carefully labeled jars. 

Meat cycled through the freezers with the seasons, with chickens going in during the early summer and red meat being processed and frozen in late summer. Fishing is a year-round activity (once the ice gets thick enough December-February) and small game found their way into the freezer from October to February. The only big game in my area are white-tail deer, and they're more of a pest than a food source to me; besides, the hunting regulations are so arbitrary and confusing that I have never needed to hunt the long-legged rabbits. If the system fails and we're in a crisis, I've helped process enough of them that I could make meat out of one and I have several methods of hunting them.

As  I recall, the main problem during the fall canning season was the shortage of containers and space to put them all. A few decades ago it was easy to put a smile on a housewife's face: all you had to do was bring home a few boxes of canning jars from an estate or garage sale, as there were never enough jars, lids, or rings for everything. Shelf space was the second problem. Even with a full basement and a good-sized pantry, the results of a good harvest would overflow into boxes and the surplus was often gifted to or traded with neighbors.

Preppers who choose to buy their food and store it can run into the same problems.

  • I tend to buy by the case; it saves me a little money and it's easier to transport while the cans are still in their box. I have my pantry with a storage room behind it, and once a box gets opened it gets moved to the pantry for use. The back room has sturdy shelves to hold the weight of cases of cans, and I'll be adding to the shelves as soon as I clear out some of the clutter that has found its way into the corners.
  • Rice and beans are staples of the prepper diet because  they're cheap, easy to find, and they store well, but finding a place to stack 20-50 pound bags where the rodents can't get into them can be a challenge.
  • One of my local prepper friends has standardized his purchases on the #10 cans (the large, almost 1 gallon cans that you see in commercial/institutional kitchens). A lot of the “preparedness” companies sell food in #10 cans, but you'll need to have a way to reseal the cans after you've opened them unless you're cooking for a few dozen people. It's difficult to eat a gallon of any one kind of food before it goes stale unless you can refrigerate, or at least close, the open containers.
  • Stored water takes up a lot of space and is heavy. We've covered several methods for storing water over the years; use the search box for older articles.

These are all things you need to consider as you plan your garden for next year, or find some extra money and invest it in food. Ask yourself Where is all of that food going to go until we eat it?

The Fine Print


This work is licensed under a Creative Commons Attribution- Noncommercial- No Derivative Works 3.0 License.

Creative Commons License


Erin Palette is a participant in the Amazon Services LLC Associates Program, an affiliate advertising program designed to provide a means for sites to earn advertising fees by advertising and linking to amazon.com.