Sunday, October 20, 2024

Sheepdog Response "Protector 1" Review

Last month, I attended the Sheepdog Response “Protector 1” class taught at the Government Training Institute (GTI) in Barnwell, South Carolina. The Protector 1 curriculum was delivered over three days, Friday evening through Sunday afternoon.

Friday
The initial briefing on Friday night covered a lot of the course administration, but also set expectations for the weekend of training. Concepts like situational awareness, the OODA Loop, a methodology for categorizing situational awareness zones, even Colonel Cooper's color code was covered.

Saturday
Saturday morning, on the mats at a martial arts gym in Aiken (45 minutes from GTI), we covered the basic positions of mount, side control, back mount, and guard. This all culminated in running through “Drill One,” which is escaping the mount by “arm trap and roll” into the guard, passing the guard to side control, and transitioning from side control to the mount, at which point the drill starts again. The final exercise on the mats was full resistance rolling from various positions, such as back to back, lying side by side, or even starting in the mount.

Saturday afternoon was at the shooting range. We started off with slow fire, then progressed to drawing from the holster and other basic pistol drills. There were two of us on the line with DA/SA pistols, and I identified that I was dropping the first double action shot. The instructors helped me achieve a better grip, which fixed that problem over the course of the weekend.

Sunday
Sunday morning we were back on the mats, this time working up through parts of “Drill Two” and taking the back to a rear naked choke, along with kimura from guard, guillotine from guard, and the hip bump sweep. Weapons control was introduced, and rubber pistols and knives were included in the sparring. 

Sunday afternoon we were back on the range, this time with more advanced drills including dummy round induced failure to fire drills (tap & rack drills), turning to shoot, alternate positions (squatting, kneeling, seated, urban prone), barricade shooting, vehicular barricade tactics, and the final “run, pummel, barricade shoot” stress shoot.

https://sheepdogresponse.com/collections/protector-1


Review
That is a lot to pack into the time, and it left me with a conundrum for how to review Protector 1 for Blue Collar Prepping. First, at $950 it is not a cheap course. Second, I think it is best if I explain that Protector 1 is designed as a "baselining" course to ensure that everyone who wants to continue with Sheepdog Response has a solid set of skills to build on in more advanced classes. 

My personal “gun school” resume includes various US Army Infantry school courses, Army Marksmanship Unit CQB and SDM Train the Trainer courses, Shivworks' Extreme Close Quarters Combat, and my competition history is a lot of service rifle with some two-gun mixed in. My grappling is experience is getting close to four years of Brazilian Jiu Jitsu at 2 to 5 hours of training per week, and a US Army Combatives instructor (level 2).

That being said, I learned things in Protector 1. They were little tricks that improved my pistol performance, a different way to set up a guillotine from guard,  and an alternate head placement for an arm trap and roll. You know the instructors truly know their craft when a student, for whom all of the curriculum is review, still learns something new to improve his skills. That makes it a solid course taught by good instructors.

So in the “Good/Fast/Cheap, Pick Any Two” definition, Protector 1 is “Good and Fast” but not cheap. It is quality, however, so you have to balance the monetary cost with the residual value:
  • If you attend a class like Protector 1 and then go immediately back to your previous lifestyle without incorporating new priorities into your schedule like exercise, range time, and grappling time, you wasted your money and time. 
  • If you go to a class like Protector 1 and then go, “Huh, I was completely out of breath three minutes into a live roll, I need to join a BJJ or MMA gym and train regularly, and I need to do fifteen minutes of dedicated dry fire every other day” then Protector 1 was well worth the cost. 
  • However, if more modestly priced “fundamentals” courses in your weak areas are offered, it might make more financial sense to invest in a basic pistols fundamental class, or a concealed carry class, and then just join a BJJ or MMA gym and start training. Protector 1 represented over four months of tuition for me at my BJJ school, so it was definitely a luxury purchase in my budget.

Side note: once you complete the course, you are eligible to join the Sheepdog Response forums to connect with other alumni and start finding answers to your questions as they pop up. This is an additional residual value that needs to be mentioned.

So who do I recommend go to Protector 1? People who can afford it and have nearly zero formal training on grappling or pistol shooting. Attending Shivworks' Extreme Close Quarters Concepts convinced me that I needed to develop my grappling skills more seriously, because testing myself against one or two full on attackers was an eye opener. I believe that Protector 1 provides that same “eye opener” experience of where your skills are lacking. 

https://agile-mercurial.com/2019/07/12/the-dunning-kruger-effect/

Getting off the "Peak of Mount Ignorance" on the Dunning-Kruger scale is the most important part of building real expertise. However,
if I had to choose between Protector 1 and Extreme Close Quarters Concepts, I would recommend ECQC to anyone who already has a passing familiarity with grappling (years of wrestling or BJJ) and pistol shooting (has attended at least one CCW course before).

What if Protector 1 and/or ECQC is out of your price range? Join a martial arts school that does full resistance training (BJJ, MMA, wrestling, krav maga, etc), and find training opportunities for defensive pistol training. As much as I give the NRA grief, they do offer some affordable 8 hour classes for pistol training, including intro to conceal carry and defensive pistol. 

(Erin adds: If you can at all afford it, I recommend the MAG40 class for both pistol instruction and class time on "Armed Citizens’ Rules of Engagement". See my review here for more information.)

Final Thoughts
You always pay for an education; always with time,  and often with money as well. You have to live in the body you have, so you have to train in the body you have. Don't wait to "get in shape" to start training. Start training now, and "getting in shape" will happen. 

Wednesday, October 16, 2024

The OODA Loop

Not actually Erin.
Used with permission.
This is an in-cockpit video of a pilot flying a World War 2 era TBM Avenger for 2015's Arsenal of Democracy flyover. At first, everything is fine, but suddenly there's smoke in the cockpit. The pilot scans back and forth, trying to find the source of the smoke, and you can you can almost hear him thinking, "What the heck is going on?" This goes on for about ten seconds until the rear seat passenger asks, "Are we on fire?" It's only then that the pilot starts executing pre-planned emergency procedures; he was stuck in his OODA loop until the question "Are we on fire?" shocked him out of it. 

OODA is an acronym for Observe, Orient, Decide, Act. It's also called the Boyd Loop for the man who codified it, Colonel John Boyd, an Air Force strategist in the 1960s. Col. Boyd used the OODA loop as a way of describing how people think and make decisions, specifically under stress. While this process was originally designed to help pilots react to enemy planes during dogfights, the concept of the OODA loop is so universal that it has been applied to any sort of armed conflict. 


What is an OODA Loop?
In simplest terms, an OODA loop goes like this:
  1. Observe as many details about the situation as you can, as quickly as you can. 
  2. Orient yourself within that observation, essentially asking yourself, "Where do I fit into all of this?" 
  3. Decide on which course of action to take based upon your observations and your orientation.
  4. Act decisively and then observe what happens next, repeating the loop until the situation is resolved.
Anyone who has taken any sort of self-defense class is familiar with these steps. In fact, many tactical pistol classes teach OODA as part of their training, and state that the best way to win in a combat situation is to complete your OODA first, and then interrupt your opponent's OODA loop, forcing him to mentally reset from surprise. While he's observing your new behavior and trying to orient himself to it -- essentially going "Um, what?" -- you've already decided and acted to defeat him. Imagine someone coming into a crowded area with a gun, and instead of running or hiding, you charge him or you shoot at him. 

Prepping Applications
But what does this have to do with prepping? OODA isn't specifically about conflict, but rather about making correct decisions quickly so that you don't hesitate in a situation where hesitation could get you or another hurt or killed. In the video above, the pilot could clearly observe the smoke, but couldn't orient himself in regards to where it was coming from. If his passenger hadn't snapped him out of it, he might have crashed before he figured out what to do. 

Here are the components of the OODA loop as I see them applying to preppers:
  1. Observe: Always be taking stock of the situation. Know where the fire alarms and emergency exits are when you're in a building; know what the weather is going to be like; know where your gear is and what's in it. Generally, be in a state of relaxed awareness, or Condition Yellow, to borrow from another colonel's lexicon. Throughout the day, this also means being proactive and asking yourself, "What would I do if X situation happens?" For example, if I noticed dark clouds, driving rain, and strong winds, this tells me that severe weather is here and that it could get worse. 
  2. Orient: Know how the situation relates to you and what will happen if you do nothing, and what you assume will happen if you take a specific action. This is the heart of prepping: you know that bad things will happen at some point, and you can't control when that occurs, but you can control how you will respond to it. Since I live in an area where hurricanes are common, and I have observed that bad weather is here now, I orient myself by realizing that a hurricane may be approaching and that if I do nothing, I could be injured or even die. Therefore, I must ask myself, what do I do to prevent injury and death from this severe weather? 
  3. Decide: Formulate a plan of action and execute it. I decide that I need to turn on the TV or the radio, or check a weather app to determine if I am in danger, and if so where the danger is coming from. 
  4. Act: I act on my decision by investigating the weather. 
  5. The cycle then repeats: I observe the weather; I orient myself to the situation regarding how strong it is and what direction it's headed; I decide if I should seek shelter, evacuate, or just get my poncho and rain hat because it's only a really strong thunderstorm that only looks scary; and I act on my decision, continuing to observe if the situation changes at all.

Don't Get Stuck
Getting stuck in an OODA loop can be inconvenient at the best of times and devastating during an emergency. This typically manifests in the following manner:
  1. I observe something out of my experience, or I am taken by surprise. 
  2. Whether due to an instinctive "freeze" response, or an inability to orient myself in relation to this completely new threat, I am unable to decide what to do. 
  3. If I can't decide, then I can't act. 
  4. Indecision leads to my brain resetting the OODA loop back to "observe". 
  5. Sometimes this reset allows me the opportunity to observe helpful information which allows me to orient myself, and sometimes it does not. 
  6. If not, the loop resets again, trapping me in OO-OO-OO, which sounds like gibbering and is just as useful. 
When someone gets inside your OODA loop, they have forced it to reset. As legendary boxer Mike Tyson once said, "Everybody has a plan until they get punched in the face. Then, like a rat, they stop in fear and freeze." Pain, being a priority stimulus to the brain, is a fantastic way of resetting OODA. There are other ways to reset, however; as we saw in the above video, once the pilot was made to realize that his plane was on fire, he was able to act decisively based on his training. 

As has been said by others elsewhere: "Under pressure, you don’t rise to the occasion. You default to your level of training." With proper training, you can correctly orient yourself to the situation, determine what you need to do, and act with confidence. Without training, you may very well be stuck with a brain going "OO-OO-OO."


Saturday, October 12, 2024

Post-Hurricane Milton Report

Not actually Erin.
Used with permission.
Much like George Groot and his family after Helene, my family and I are fine after Hurricane Milton hit Florida on Wednesday. Between Milton rapidly losing strength due to eyewall collapse after making landfill, 160 miles of land between landfall and where I live, and the storm passing well below us we were blessed with minimal damage and inconvenience. Sadly, other parts of Florida weren't so lucky, especially the Tampa Bay area which was still reeling from being flooded by Hurricane Helene a week prior. 

So far as I can tell, no damage was dealt to our house, although we have a lot of downed and damaged trees. 


This is the same tree as in the previous picture, just from a different angle. 

I don't know if this is from the same tree as the above picture or a different one,
but that's the same fence corner. 


That last picture completely justified me putting up the hurricane shutters Tuesday afternoon. I just know that if I hadn't done so, that tree would have broken one or both sets of bedroom windows. 


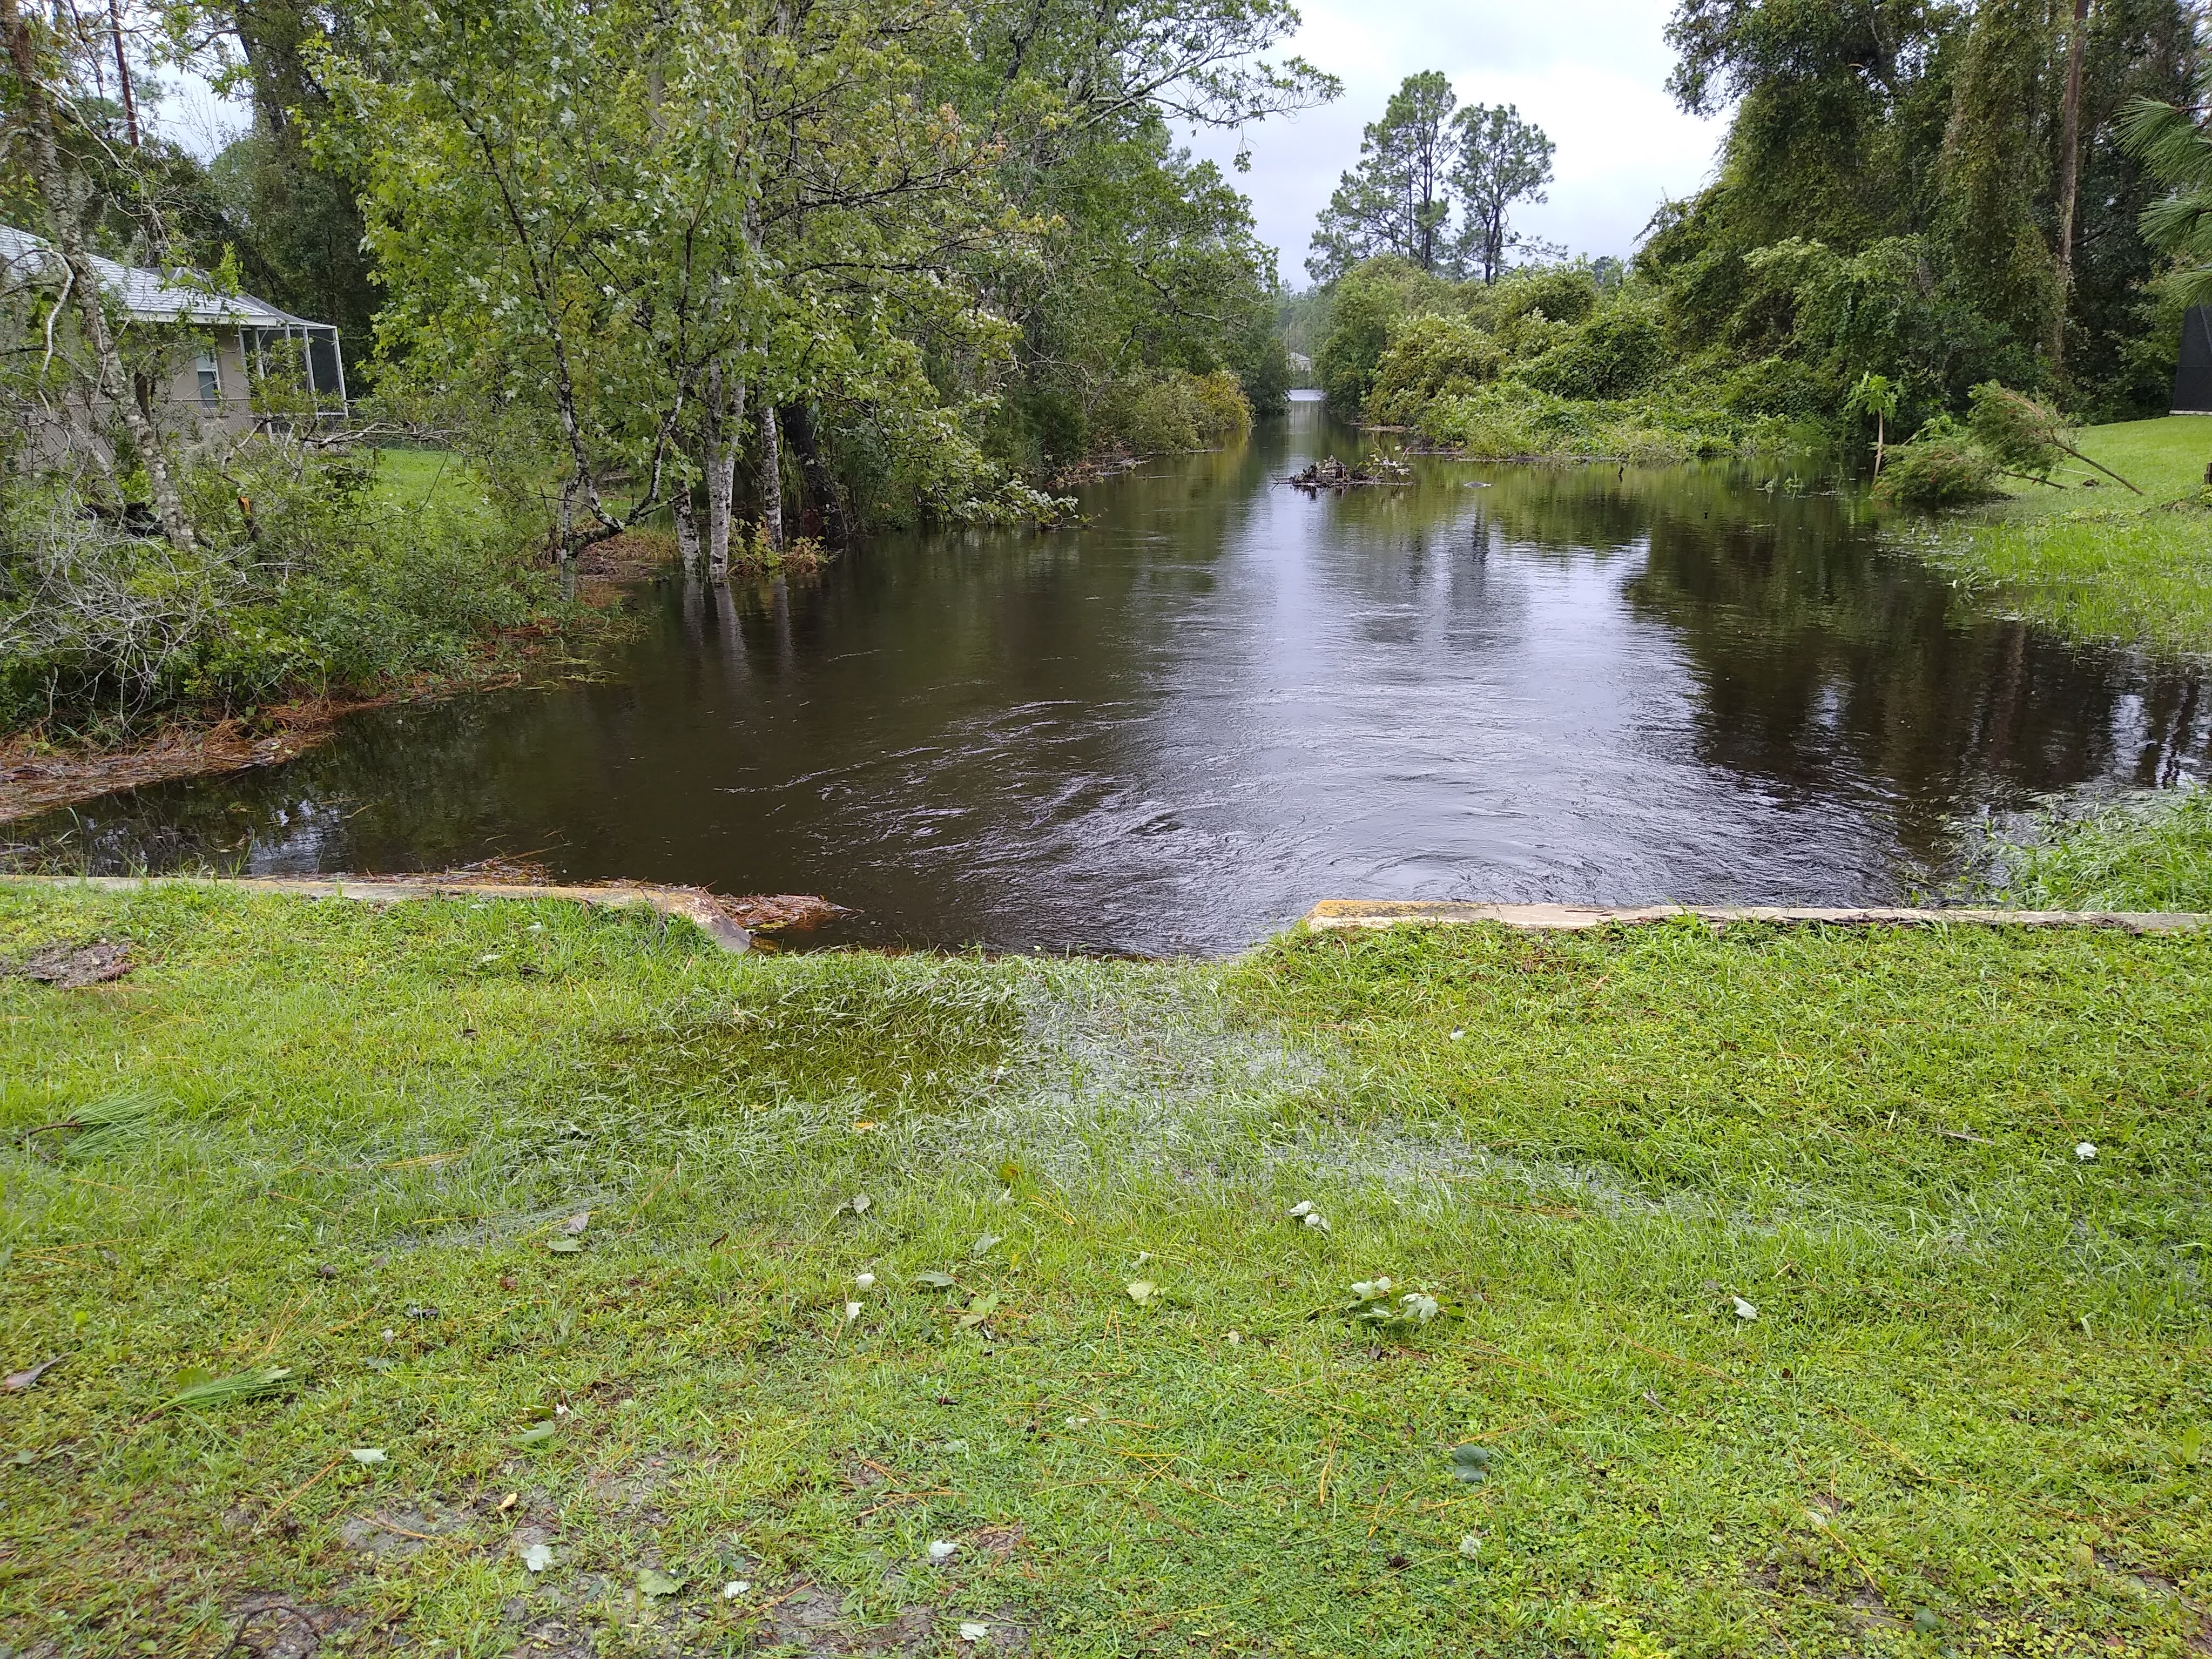
I live eight miles from the ocean, so storm surge isn't a concern for me. However, between a system known as a "tropical rainmaker" which dumped a lot of water on us last weekend and Milton coming through three days later, my neighborhood almost flooded. The following picture is of an artificial lake and canal for drainage. 


The water is supposed to be three to five feet below the concrete embankment, but it's very nearly at the top. I don't know how much water that is other than "a lot". 

Other than that, my experience was similar to what I had two years ago during Hurricane Ian, with the following changes:
  1. Because Milton happened later in the year, it wasn't quite so hot while we waited for power to be restored. 
  2. We had power back by 4:30 pm on Thursday, for an outage of about 16 hours. This was incredibly fast; post-Ian, it took about 30 hours for us to get power. I don't know what the difference was, but everyone appreciated it. 
  3. My CPAP battery backup worked extremely well. Admittedly, I had only one night without power, but for 8 hours I had my CPAP and humidifier running without an issue. 
  4. Thursday morning was too cloudy and rainy to set up solar panels, but I'm certain I could have made it another night, possibly two, before my Freeman 600 needed a recharge. 
This isn't a change from last year, but both my BioLite CampStove and my Koonie battery-powered fan did a lot of heavy lifting to make my life more comfortable. 

Once again, I am blessed that the extent of Hurricane Milton's effect on me and my family was only inconvenience and minor discomfort. Others weren't so lucky. If you'd like to make a charitable donation, I recommend the Florida Disaster Fund, which is is the State of Florida’s official private fund established to assist Florida’s communities as they respond to and recover during times of emergency or disaster. 


In partnership with the public sector, private sector and other non-governmental organizations, the Florida Disaster Fund supports response and recovery activities by distributing funds to service organizations that serve individuals within their communities with disaster response and recovery.

Donations to the Florida Disaster Fund are made to the Volunteer Florida Foundation, a 501(c)(3) charitable organization (EIN# 01-0973168), and are tax deductible. Funds given at this time will be utilized for Hurricanes Helene and/or Milton.

Visa, MasterCard, American Express and Paypal/Braintree have committed to waiving fees for those making a donation for Hurricanes Helene/Milton recovery. 100% of every donation will be used to help Floridians recover.

Thursday, October 10, 2024

Preppers Armory: Zeroing Red Dots

In previous posts I talked about the process of mounting and zeroing scopes. When used on rifles, red dots can be treated pretty much the same way as other optics. However, on handguns, especially compact pistols, there are some additional challenges when sighting red dot sights, also called RMRs for Rear Mounted Red Dots.

Sight Picture
On rifles, most red dot sights are set up to either bottom third or co-witness with the iron sights, if any. These two terms mean that the iron sights either appear below the dot, generally in the bottom third of the viewable area while the dot remains in the center, or the dot lines up precisely with the existing sights. Handgun RMRs frequently co-witness with the pistol's iron sights, which can make sighting in the red dot easier if the iron sights have been properly adjusted.


Boresighting
If using a spud-type boresight, either collimator or laser style, the bore insert may be too long to seat properly in a handgun barrel, with the end of the spud impacting the breech face before it can solidly fit the muzzle. Magnetic or laser cartridge boresights should still work as designed.

Old school boresighting, where the target is viewed through the barrel and the sight is adjusted to coincide, obviously won't work with a semi-automatic pistol. Mirrored barrel inserts have been available now and again over the years for use with revolvers; good luck finding one, though.

That leaves the most fun option: actually shooting the gun and adjusting the point of aim and point of impact. When using this technique, the most important aspect is having the pistol properly braced. A Ransom Rest or something similar is ideal, but very pricey for both the base unit and the grip adaptors. I 3D printed a rest for sighting in my firearms.

A traditional commercial rifle rest, sandbags, or even a bunch of tightly rolled or folded cloth can all work nearly as well as a fixed rest, as long as the shooter maintains consistency, grip, position, and orientation of the firearm.

Zeroing Procedure
  1. With a handgun, the rest and firearm should be positioned so the shooter's forearms are also supported. With a long gun, this applies to the elbows.
  2. Set up a target at a known range. I prefer starting handguns at five yards and rifles at ten, just in case the sighting system is way off. Having the dot contrast with the target is important for proper visibility. 
  3. Once this is done, load five rounds into the magazine or cylinder, and make ready to shoot.
I prefer using five round groups. While three rounds are traditionally used for sighting, I've found that five reduces the uncertainty considerably. For example, if I have two shots close together and one flyer off to the side, I have to wonder if the ones in close proximity are coincidental or a clear representation of the firearm's potential accuracy, and I just pulled one shot. Meanwhile, with five round groups, this issue practically vanishes, as four shots close together with one flyer is much easier to judge.

Adjustment
As with other optics, most RMRs will have some system for adjusting the emitter. A fairly common one is recessed screws turned by a small hex wrench, which is frequently supplied with the optic.

Pay close attention to those adjustment points; they should be marked with an arrow and the letter U for up or L for left. Rarely will you see D for down or R for right marked on them. If there are no markings, check the manual or manufacturer's website.

Consistency is key, so fire five rounds while maintaining the same sight picture. Hopefully they are all in close proximity, even if they aren't at the point of aim. Tune the vertical and horizontal adjustments, and repeat.

Within a few cycles of this process, the shots should be landing where the dot appears on the target. If necessary, put up a new target at the intended zero distance, and repeat for final adjustments. At this point, the red dot should be properly sighted in, and barring a problem shouldn't require any further adjustments. 

Final Thoughts
The only other thing we'll need to do is make sure the battery is changed regularly. Some of the newer red dots have auto off and shake-awake features, with battery life measured in tens of thousands of hours. There are even units with small solar panels to keep the battery topped off when exposed to light.

Whether the optic has these features or not, find out how long the battery actually lasts, and make sure to schedule replacement within this window.

Shoot often, shoot safely, shoot accurately.

Monday, October 7, 2024

Hurricane Helene After Action Review

When Hurricane Helene hit the Central Savannah River Area (CSRA) on the Georgia/South Carolina border, it retained Hurricane Category 1 wind speeds. The destruction was widespread, and many disaster preparedness plans were put into effect. This is what we learned.

Water
  • You really can’t have enough water on hand for a situation like this. Being able to restock on potable water, or boil to make safe municipal water, is essential. If you run out of water all your other preps start to matter less and less. 
  • We also keep a lot of “hydration salts” products on hand, as we do a lot of outdoor activities with our children's Trail Life troop, so we were well prepped to stay hydrated. 
  • I would say a minimum is a 36 pack of 0.5 liter bottles per person per four days of use, at least in our heat conditions, but do your own math for your own situation.
Gas
  • You’ll need a lot, and in two types: unleaded gas for vehicles and generators, and 2-cycle gas for chainsaws and pole trimmers. There's a lot of wood cutting that has to be done immediately after a storm passes in order to open roads. 
  • When we needed to refill gas cans, we emptied the ones on hand into my pickup and headed east to Columbia, SC. It took 60 miles to get to a gas station without a waiting line, two miles off the I-20. 
  • The 2-cycle gas needs to be ethanol free, or it can eat the plastic/rubber fuel lines in all the “made in China” 2-cycle engines that power tools these days. I just pay the premium to pick up a 1 or 3 liter bottle from Home Depot or Lowes when shopping. 
  • Have funnels, because modern gas cans suck (never forgive the EPA for what they did to the gas can) and you may need a funnel to properly fuel a machine without spilling too much.
Tools
  • The most commonly needed tool was a chainsaw, the second a pole saw. Get the kind that uses gasoline, as there is more work to be done than electrics will be able to handle.
  • Have extra blades, bars, and bar oil to keep them running. 
  • One friend of mine used a lot of bow saw and teenage boy labor to clear branches, but the chainsaw is going to be faster. 
  • Pro tip: you need to know more than just the chain length, as different brands will have slightly different link sizes, so know what you need in case you have to have someone else do your shopping.
Cooking
  • We cooked on a single burner propane stove, a cinder block “rocket stove”, and a campfire. Of the three, the rocket stove and propane burner got used the most. The propane burner was fastest to boiling water for coffee or soup, and the rocket stove was best for big family meals (but it does take a little longer to get going). 
  • We tried to use a Coleman white gas stove, but the pump system froze up and needs to be replaced, which is probably a project for this winter. 
  • If I had to recommend any one system, it would be the single propane camp burner and a two pack of 1 lb propane bottles. It's light, cheap, and doesn’t go bad like a white gas stove can. 

    Ozark Trail Single Burner Backpacking Propane Stove 

  • If you have room on your shelter location to set up a cinder block rocket stove, absolutely do that as well. To speed up the rocket stove starting time, I used my plumber's torch to get the central chamber area hot enough really fast, which is cheating but uses way less propane than just cooking with propane.
Medicine
  • All four of us in my family got the flu. Thankfully, this was early October not mid-August, and temperatures didn’t hit into the 90s except for a few brief bits on some afternoons. But having influenza in the south with no air conditioning is a miserable experience. 
  • We didn't need to hit up a pharmacy as we had NSAIDs to bring down fevers, and expectorants to help clear lungs. A prepper’s medicine cabinet ought to be able to keep a family of four through a 7 day disruption of electricity and potable water.
  • Those hydration salts really helped me get through the worst of the “man flu” that laid me out for most of a week.
Luxuries
  • Generators and portable air conditioning units aren't a necessity to survive, but they do make “sheltering in place” more comfortable. 
  • We didn’t use either, but we plan to get a Jackery and solar charging system for camping gear anyways, and that would have made this little “free Amish lifestyle experience” a little less spartan, and it would have allowed us to run our chest freezer enough to keep frozen proteins frozen.
  • As it was, we lost maybe a few hundred dollars in groceries that could have been prevented with a small solar generator system.
Tribe
  • We know our neighbors, they know us. When we would make the 120 mile round trip supply run to anywhere open, we made sure we had their needs and wants list. 
  • When we were eating out our thawed chest freezer we came across a turkey breast, really too big for us as a family of 4, so we let our neighbor deep fry it and they made mashed potatoes and mac & cheese; we added green beans to make a little Thanksgiving meal a tad early.
  • Build your tribe before there is a problem, because the worst place to meet for the first time is disaster response. 
Cell Phones
  • The cellular network stayed up, but bandwidth was very clogged, dropping me from 5g down to LTE on multiple occasions as cable internet (the majority of home broadband in our area) was cut just as much as the electricity. 
  • Group texts became the normal way for people to organize support for people in need, and it worked out pretty well. 
  • Internet came back up in our neighborhood two days after electricity.
Final Thoughts
  • We were incredibly blessed to be in the 50% of customers in our area who got electricity back after seven days. Other than not having a portable power solution to extend the useful food storage period of our chest freezer, we were pretty happy with the skills and resources we’ve built up as a family. We didn’t even have to open up any of our freeze-dried food stores, as our home survived the winds. 
  • For those who lost their home to the storm, they may have had a different experience, and my wife and I discussed creating “prep boxes” that could be sealed long term and placed in a shed just in case we needed to direct a neighbor to resources if we weren't there to help with disaster response. 
  • Resources can be shared, or can be destroyed in the disaster, but skills are something you keep with you. If you are new to prepping and have to choose between "stocking resources" and "building resilience skills" I'd recommend the skills building option.

Friday, October 4, 2024

Luxe Bidet 120 Follow-Up

Not actually Erin.
Used with permission.
With all the rumors about toilet paper shortages in the wake of Hurricane Helene and the dockworkers' strike, it's time to revisit the product review post I made back in 2020. Go read that first, then come back for this follow-up. 

Disclaimer: In order to write a useful post about this subject, I need to talk about things which a lot of people find distasteful and/or embarrassing. Everybody poops and everybody needs to wipe, so let's just be adults about this.

The Luxe 120 that I bought back in December 2020 still works fine, although there are a few issues I have with cleaning it. First, cleaning the part of the toilet behind the bidet nozzle is inconvenient at best (I use a Clorox Toilet Wand and it can reach most areas with a bit of work) and difficult at worst, especially when it comes to removing dried-on particles. Fortunately, Luxe has addressed that issue with their latest model which flips up for easy cleaning ($44 on Amazon as of this writing). 

The Luxe Bidet 120 Plus


The second issue that I have is related to the first: despite the self-clean feature, the nozzle itself must be periodically cleaned to prevent bacterial biofilm, aka "pink mold", from growing on it and impeding the nozzle's protraction and retraction. In my case this is easily handled by opening the protective door, pulling the nozzle down and giving the entire area a good scrub with the toilet wand at the same time I'm cleaning the bowl. I expect that the new flip-up feature would make this cleaning much easier and perhaps needed less often. 

If I should ever need to purchase another bidet, I'm definitely getting the new flip-up model, but mine is still working great and shows no signs of stopping. My toilet paper usage has been drastically diminished, and overall I just feel cleaner. The only drawback to this bidet is that I miss it terribly whenever I go out of town. I make do with flushable baby wipes, but it's not the same, especially when my lower back arthritis is acting up and making it difficult to reach behind me. 


This new version also doesn't require a full removal of the toilet seat to install,
which is a welcome change and a big help.


My Recommendation: Still A+
As I mentioned in my previous product review: 

If you're a human being who poops, buy this. It's more comfortable than dry wiping, it's probably better for the long-term function of your septic system to flush less toilet paper, and the paper you do use will last longer. It's easy to install, it's great if you have health problems (including reduced flexibility that makes wiping difficult), and if you register it comes with a 2 year warranty. 

Buy one now, before the next (real or imagined) toilet paper shortage. 


Dear FTC: I bought this product with my own money. Go away. 

Wednesday, October 2, 2024

Saving Sourdough Starter Long-Term

Let's say you've got a good sourdough starter going, but circumstances arise where you won't be able to use it for quite a while. It has to be fed regularly, or it will die. Or let's say you want to send some to someone, and shipping a container of working starter isn't really an option.

The solution is to dry your starter. 

This started as a "Will this work?" experiment, and it does. I spread some starter out on a plate and left it on the table. A couple of times a day I'd stir it around as it dried, and after a few days I had a lot of little chunks of dried starter. I put some in a baggie, squeezed out most of the air, and left it on the table for several months.

To determine if the starter was still alive, I put some of those bits into a bowl, added half a cup of unbleached flour, stirred in enough warm water to make a very soft dough, put on a loose-fitting lid, and set it out of the way. By the second day it was bubbling, showing that the yeasts had come out of hibernation and were growing, and it worked normally for baking. Success!

The next method I tried was easier. I spread out some of the starter on a sheet of no-stick aluminum foil, then set that in a safe place while it dried. By spreading it thin it can dry faster, and when dry you can flex the foil and it will flake off, giving thin, light pieces that can be crushed up easily or stored as-is.

At this time I haven't tried vacuum-packing it, which is next to on my list of things to try, but it should work nicely.

The Fine Print


This work is licensed under a Creative Commons Attribution- Noncommercial- No Derivative Works 3.0 License.

Creative Commons License


Erin Palette is a participant in the Amazon Services LLC Associates Program, an affiliate advertising program designed to provide a means for sites to earn advertising fees by advertising and linking to amazon.com.